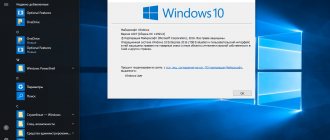
Starting with version 1909, Microsoft made it more difficult to install Windows 10 without a Microsoft account. The same applies to the released version of Windows 10 2004 May 2020 Update. This option is not available when setting up a new device in (OOBE) mode. Here's how to install Windows 10 version 2004 with a local account.
Windows 10 supports two types of accounts. One of them is a standard local account, which is not associated with any Microsoft cloud service. The other is a Microsoft account, which is connected to Microsoft services such as Office 365, OneDrive, and provides advanced features such as settings synchronization and cloud storage.
How to log in without an account
Many questions concern how to log in without a Microsoft account in Windows 11. This option is relevant even for those cases when you completed the installation by creating a Microsoft profile, and in the future you plan to log in only with a local account. The algorithm of actions is as follows:
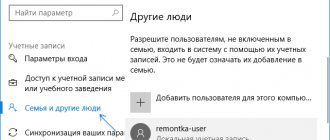
- After installing Windows 11 Home, enter settings via Win+I.
- Click "Accounts".
- Click “Family and other users” on the right.
- Click "Other Users" on the "Add Account" button.
- Select "I don't know the credentials of this...".
- Click on “Add users without a Microsoft account.”
- Enter your username and password (optional).
- Click on the arrow next to your profile and click “Account Type”.
- Select "Administrator".
- Click "OK" to save the changes.
Now it’s easy to figure out how to log into Windows 11 without a Microsoft account with regular local data. After that, go to your account settings again, go to “Family and other users”, find the Microsoft profile and delete it (if it was created). In the future, you will be able to log in using your local profile. However, it is not necessary to delete your Microsoft account.
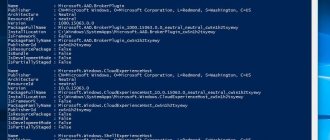
Automatic login to Windows using the Microsoft “AutoLogon” utility.
Microsoft Autologon is a small, free utility offered by Microsoft that can be used to configure Windows 10's built-in automatic logon mechanism. Similar to the netplwiz , you can save credentials for any local or MSA Microsoft account. The most important advantage of Autologon is that it encrypts the password before saving it to the registry.
Step 1: Go to docs.microsoft.com Sysinternals utilities archive . The archive contains individual troubleshooting tools, as well as the AutoLogon utility.
Step 2: Unzip the archive and run Autologon.exe or Autologon64.exe depending on the bit size of your system to install it.
Step 3: After installation, launch the application and fill in the required login and password information and click the Enable to enable the password bypass mechanism for the selected user account. A message will appear on the screen confirming that Autologon has been successfully configured.
You can also use the AutoLogon utility from the command line using the syntax below:
autologon user domain password
Step 4: Restart your PC.
Method 3.
Disable password entry when exiting their sleep/hibernation mode
Using GPO, you can disable the password prompt when your computer wakes from sleep or hibernation.
- To do this, launch the gpedit.msc console (in home versions of Windows 10, the Local Policy Editor console can be launched like this);
- Go to the policy section Computer Configuration -> Administrative Templates -> System -> Power Management -> Sleep Settings;
- Disable policies “Require password when resuming from sleep mode (on-line)" And "Require password when resuming from sleep mode (battery powered)“ (Require a password when a computer wakes (on battery) and “Require a password when a computer wakes on battery (plugged in));
- Windows will now stop prompting you for a password when exiting their sleep or hibernation mode.
How to install Windows 11 Home without Internet
Download Windows 11, write it to a USB flash drive and start the installation. After completing the first step (that is, copying the data), we move on to the second part of this installation, where we must configure the most important aspects of the operating system.
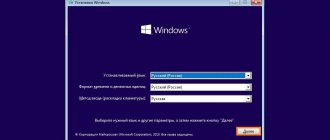
We select our Windows language, keyboard layout, and suddenly we arrive at a window like the following.
As we can see, Windows asks us yes or yes to have an active Internet connection in order to continue . And the option to continue without the Internet is not available. The fastest way to proceed is to connect your computer to the Internet via cable or Wi-Fi. What if we don’t want to or can’t?
The Internet requirement to install this operating system only affects home editions of the system. That is, if we try to install the Pro version, we will be able to continue the installation process without any problems, despite the lack of connection. Even when creating a user account, we can skip the requirement to create a Microsoft account and continue with a local, offline, or standalone account.
In any case, if we are installing Windows 11 Home and we do not have Internet, we can skip this step and continue the process in several ways.
Use Task Manager
The first trick to skip this requirement when installing Windows 11 is to force close the connection process using Task Manager. To open it, we must open a CMD window using the keyboard shortcut Shift + F10 once we are on “ Connect to the network ” and we will write the command “taskmgr” in this CMD window.
In the task manager we will click on “More details” to see an expanded list of processes and we will look for one of them called “ Network connection thread ”. Right-click on it and select the “End task” option.
After this, we will only need to return to the Windows Setup Wizard and continue as normal, being able to create, by the way, a standalone account without having to go through the Microsoft account hoop.
Force close using Alt + F4
Another faster way to continue the installation process is to force quit the installation process without searching the Windows Task Manager. To do this we must do the following: when we are on the "Let's connect to the network" screen, simply press the Alt + F4 key combination to force it to close.
Having done this, we will automatically exit the network selection window and will be able to continue installing the operating system using a local account, without connecting.
In case this trick doesn't work (since Microsoft will easily hide it sooner or later), we recommend using the above method.
Allow login to Windows without a password in the account settings
The easiest way is to disable the password prompt when logging in in the User Account Control Panel.
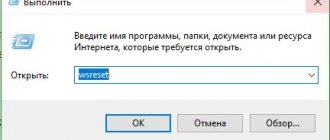
- Press the key combination Win+R ;
- In the run window, enter the command netplwiz or control userpasswords2;
- In the window that opens with a list of local Windows accounts, uncheck the "User must enter a username and password to use this computer” (Require username and password) and save changes (OK);
- The “Automatically sign in” window will appear, in which you need to specify the user account and password (twice) that you want to use for automatic login and click “OK”;
- Restart your computer and make sure Windows 10 boots straight to your desktop without entering a password.
If you are configuring passwordless login to a Windows virtual machine running on Hyper-V, do not use Enhanced Session mode to connect to the VM console. In this mode, automatic login using saved credentials does not work, because Connection to the Hyper-V console is made through the Remote Desktop service. To connect to the VM console not through Enhanced Session mode, close the Connect window by clicking the cross in the upper right corner of the window.
Is it possible to install Win 11 without an account?
There are often questions on the Internet about whether it is possible to install Windows 11 without a Microsoft account, and how to do it correctly. During the OS installation process, the system offers to create a Microsoft profile and even persistently “persuades” you to do this. But going through such a step is not necessary, and it can be easily circumvented by ignoring the request, choosing an option for personal use, or other methods.
In the future, you can use a regular local account with administrator rights and thus not have to register with Microsoft. If an account has been created, it can be easily deleted.
Why do you need Windows Internet?
If we are installing an operating system from scratch, why do we need an Internet connection? After all, the main goal is to copy the operating system files, perform the initial system setup and launch it. But Microsoft wants Windows 11 installation to go a little further.
The first reason why Windows 10 needs an Internet connection is that during installation, the system must download programs and applications so that as soon as the installation is complete, they will be available. If we do not have an Internet connection, these applications will not be available until they can be downloaded. This is usually not a problem since apps that won't install are part of Windows 11 bloatware.
Another reason why we need the Internet to complete the installation of the operating system is that, especially in the Home version, it is necessary to create a Microsoft account , that is, create an account using Outlook e-mail account and password in order our operating system could work normally and have access to all Microsoft services (such as One Drive or Office).
Finally, during installation, Windows uses the ability to search for and download some critical updates and some necessary drivers to avoid problems after the operating system installation is complete. Without the Internet, the process can still be completed without any problems, but some system features may not work as intended.
Create a local, not Microsoft account in Windows 10
As mentioned above, now when installing the system, a virtually non-alternative menu is displayed in which it is proposed to create a Microsoft account.
However, if you take into account the fact that when creating a Microsoft account, the Internet is required, then turning it off will solve all the problems.
As soon as you are prompted to create an account, simply unplug the network cable from your computer or laptop. And if Internet access is via Wi-Fi, then simply turn off the router. And after that, continue the account creation procedure.
The system will determine that there is no Internet and will then prompt you to create a local account. Great, problem solved, local account created.
Here is a simple, although not obvious, way to solve the problem of excessive intrusive behavior of the operating system in terms of imposing the creation of an account with an integral “link” to the services of the development company represented by Microsoft. And it will work for a long time, since no one is going to abolish this account format, because not everyone is covered by Internet access, and in a fairly large number of countries its use is still quite an expensive pleasure.
So there’s definitely no need to worry that Microsoft will ultimately require you to create only an account linked to its own services.
In turn, you can also help us a lot .
Just share the article on social networks and instant messengers with your friends.
By sharing the results of the author’s work, you will provide invaluable assistance to both him and the site as a whole. Thank you!
Source