Sometimes you may notice excessive traffic usage. What is the reason, because no one wants to overpay for the Internet. Perhaps it was unscrupulous neighbors who got involved, but how to check this assumption? To solve the problem, you need to gain remote access to the router. You can do this yourself via the Internet. This function will allow you not only to manage connected devices, but also to change the password, make changes to settings, and, if necessary, reboot the device.
Connecting to a TP-Link router
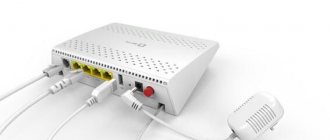
For example, let's look at obtaining remote access to a TP-Link router. It goes without saying that before connecting we will need some data about the device. As a rule, they can be found on the back of the device.
The label may look like the image below.
Connecting a home router remotely via the Internet occurs via an external IP address or, in other words, DDNS. However, not all devices can support remote access, but first things first.
Before setting up, the first thing you need to do is find out what IP address your Internet provider gives the router.
There can be two types:
- gray - dynamic;
- white - static.
Port forwarding and setting up a router for external access
A home router usually does not allow access from the external Internet to computers on the internal network. This is correct - hacker attacks are designed to target known computer vulnerabilities, so the router is an additional obstacle. However, there are times when access to the router and its local resources from the “outside world” becomes necessary. This article will tell you in what cases external access is needed and how to set it up securely.
Why open access from outside?
Access “from the outside” is needed not only in exotic cases such as opening a game server or running a website on a home computer. Much more often you have to “open a port” for a multiplayer game, and this is precisely providing an external user (game server) with access to the internal network (computer port). If you need to connect remotely and configure a computer or router, download a file or two from your home network while on a business trip, or watch video from IP cameras connected to your home network, you need to configure access.
Colors and shapes of IP addresses
Before you figure out how to open access to your resources, you should understand how connections on the Internet generally occur. As a simple analogy, you can compare an IP address to a postal address. You can send a letter to a specific address, ask a question in it, and you will receive an answer to the return address. This is how the browser works, this is how you visit certain sites.
But people communicate with words, and computers are used to numbers. Therefore, any request to the site is first processed by the DNS server, which issues the real IP address.
Let's now say that someone wants to write a letter to you. And not in response, but independently. It’s not a problem if you have a static white address - if you connect today, tomorrow, in a month or a year, it will not change. Anyone, from anywhere, knowing this address, can write you a letter and you will receive it. It's like the postal address of a family estate or family home, where you won't leave. You can obtain such an address from your provider only for a separate and regular fee. But there are fewer problems with remote access - just remember the issued IP.
Usually the provider issues a white dynamic address - one of the unoccupied ones. It's like checking into a hotel every day when you are given a room at random. There will be problems with the letter: you or another guest can receive it - there are no guarantees. In this case, DDNS - dynamic DNS - will help out.
The saddest, but very common option lately is a gray dynamic address : you live in a dormitory and share a single postal address with another hundred (or even a thousand) residents. You can still write letters yourself, and they will reach the addressee. But a letter written to your mailing address will go to the hostel commandant (provider), and, most likely, will not go further than the trash bin.
A “gray” address in itself is not a problem - after all, all devices connected to your router have a “gray” address - and this does not prevent them from using the Internet. The problem is that when you need a little more than just access to the Internet, you can change the settings of your router, but not the settings of your provider’s router. In the case of a gray dynamic address, only a VPN will save you.
Who am I, where am I, what color am I?
Now that we've sorted out the terminology, all that remains is to figure out exactly what address you have. Most providers have a fixed address that costs money, so if you are not connected, then it is probably dynamic. But whether it is a white or a gray goose - this needs to be checked. First, you need to find out the external IP address of the router in its web interface and compare it with the address under which you are “seen” on the Internet.
In the admin panel of the router, you can find your IP on the tabs “System Information”, “Statistics”, “Network Map”, “Status”, etc. You need to look for WAN IP somewhere there.
If the address begins with “10.”, or with “192.168.”, then it is definitely “gray” - most methods for opening access will not work and only VPN remains.
If the address looks different, you need to look at it “from the outside” using one of the services that shows your IP address, for example, https://myip.ru/.
If the address shown on the site matches what you saw in the web interface, then you have an honest “white” address and access from the “big world” will not cause any particular difficulties - all you have to do is set up “forwards” on the router and connect DDNS .
What are ports and why abandon them?
A port is a numbered virtual “device” designed to transmit data over a network. Each network program uses a separate port or group of ports to establish communications. For example, browsers use TCP port 80 for unencrypted traffic (http) and 443 for encrypted traffic (https).
Port forwarding is a special rule in the router that allows all calls from the outside to a specific port and forwards these calls to a specific device on the internal network.
The need to “forward” ports usually arises when you want to play some game over the network from a computer connected to the router. However, this is not the only reason - forwarding will be required whenever there is a need to gain “outside” access to any specific device on your local network.
Allowing all connections to the computer at all, that is, forwarding the entire range of ports to it, is a bad idea, it is unsafe. Therefore, routers simply ignore calls to any ports “from the outside.” And “forwards” are special exceptions, traffic routes from specific ports to specific ports of specific devices.
Game ports: what and where do we throw them?
Which port to open depends on the specific software. Some programs require forwarding several ports, while others only need one.
Different games also have different requirements - some can be played even from a “gray” address, others will lose some of their capabilities without port forwarding (for example, you won’t hear the voices of your allies in a cooperative game), others will refuse to work at all.
For example, to play Destiny 2 online, you need to forward UDP port 3074 to your curling iron, or UDP port 1200 on Xbox. But to the PC you will need to forward two UDP ports: 3074 and 3097.
The following table shows some games and the ports they use on PC:
How to find out the color of an IP address
In the router settings, you need to look at the WAN IP address and compare it with the data on the special free website “2ip.ru”. If it does not match, then the device has a white address, and vice versa - if the numbers match, it means a dynamic server.
If the device has a “white” IP address, then you can establish remote control of the router by setting up DDNS. Owners of a static WAN IP address are less fortunate - it is impossible to configure remote access on this type of router. But you can contact your provider and order a special service called “static IP address”, however, as a rule, it is always paid.
Purpose
Review and configuration of the D-Link Dir-320 modem
Remote control of the router via the Internet involves the following functions:
- reboot the router;
- IP change;
- external MAC address;
- signal blocking;
- change Password;
- traffic checking;
- work schedule;
- limiting users.
It is not always possible to quickly come home and check the router data. On vacation or on a business trip, there is a need to control the situation with the wireless network. For example, loved ones may be absent from home, but traffic shows activity.
You must log in and change your password. Another case involves an unexpected internet outage while people are at home. Remotely, it is possible to double-check the data by IP, MAC address, and make the necessary changes.
How to enter settings
To connect remotely, you need to go to settings. To do this, you need to perform the following sequence of actions:
- Connect to the router via Wi-Fi. This operation can, if necessary, be performed through a mobile phone browser, but it is most convenient to use a laptop or computer.
- Next, enter one of two addresses in the search bar: “192.168.1.1” or “192.168.0.1”. The address for entering the settings is indicated on the label on the bottom of the router.
- Next, a small sign will appear asking you to enter your username and password. In factory models, as a rule, you need to enter the word “admin” in both fields. If you have changed them before, you must indicate your own.
If everything is done correctly, the router settings menu will open.
Next, you need to decide from which IP address you need to establish a remote connection: from a permanent one or from any one. The second option is more universal, as it allows you to connect from any device at any time.
Availability, design
The most inexpensive ac routers cost from 800 hryvnia - for a device that will work 24/7 for years, this seems like a small amount.
Also, do not forget about the design of the routers themselves - it does not affect the operation in any way, but manufacturers have long stopped creating rectangular boxes that, immediately after being removed from the packaging, you want to hide in a closet. Over the past couple of years, the situation with smartphones and laptops has improved dramatically - if previously only top-end devices supported 802.11 ac, now this applies to almost all devices in the mid-price segment and even some affordable ones. If you have acquired a good laptop or smartphone in the last couple of years, then they probably know how to work with 5 GHz Wi-Fi networks - all you have to do is choose a suitable router.
What can we say in the end? A router, like any equipment, should be updated occasionally. Modern ac models have become noticeably more productive and beautiful than their old counterparts, and they are more convenient to use. Worth a try.
Connect from any IP address
Once you have entered the router settings menu, you should begin the connection itself. To do this you need to do the following:
- Find the “Security” section and click on it.
- Go to the “Network Address Translation (NAT)” section. Its contents will look something like this, as shown in the figure below.
- Next, you need to fill out the table according to this example:
- In the “Interface” section you need to select one of the proposed connection options: “ISP”, “PPPoE”, “L2TP” or “PPTP”. You can choose at your own discretion, but sometimes the required option is already specified in the agreement with the provider.
- We skip the “Packets to address” and “Mask” items; you don’t need to specify anything in them.
- Next comes the “Protocol” item. Here we select the standard “TCP/80 - Transfer of WWW pages (HTTP)”. Also note that the extension will always be "HTTP".
- We also skip “port number”.
- The penultimate item is “Redirect to address”. We write the IP address in it. Usually it is identical for all routers - “192.168.1.1”, but if it has already been changed, then we write the changed one.
- The last one is “New Destination Port Number”. We put the number 80.
- Once everything is ready, click “Save”.
- We reboot the device and try to connect from the new device. To do this, just go to the website 2ip.ru and write down the static address.
Method 1: Manually Installing a VPN on Your Router
We're using a Draytek Vigor 2862ac router and an ExpressVPN account for the demo. You do not need to install a special SmartVPN application for this router. Access to the settings is also available through the regular router interface.
To log in, type 192.168.0.1 into the address bar. Most often, a login page should open. If this does not happen, we advise you to check the instructions of your Internet provider.
One important tip: turn off automatic logout if it's enabled. You will need to fill out a large data form, so if you crash somewhere in the middle, your data will not be saved.
Let's get started:
- Login to the admin interface on your router
- Find your VPN settings. It's different for each model, but on our Draytek Vigor 2862ac the option is on the left side: VPN and Remote Access.
We are going to connect from one network to another, so we should click LAN to LAN.
Enter your provider as a new profile in the empty slot. We used slot number 1. Click on it to open the profile.
Set up your profile as follows. The Draytek page isn't entirely intuitive, but if that doesn't bother you too much, then leave it as is. If your router is different, then you just have to fill out everything approximately the same as in our example.
Basic settings:
- Profile name: Any; we used ExpressVPN
- Activate this profile: check the box here
- VPN Dial-Out Through: Select the WAN port you are using. If you are not sure, we recommend checking in the control panel first
- Call Direction: Select Dial-Out
- Tunnel Mode: Select Always On, leave the rest unchanged
- Dial-out settings
- Server type: PPTP
- VPN Host Server/IP Name: Paste the server name you copied from the ExpressVPN list here
- Username and Password: Paste the PPTP login information you got from ExpressVPN here; other data will not work here
- PPP Authentication: Make sure PAP/CHAP/MS-CHAP/MS-CHAPv2 is selected
- Dial-In settings section
- Allowed Dial-In Type: Uncheck all boxes where they appear
- Leave the remaining fields untouched
- GRE Settings
- Leave blank
- TCP/IP Network Settings
- Remote Network IP: Write the internal IP address here. Make sure the address does not match the internal address of your network or public Internet network. You can copy our example if you are not sure what to enter. Leave the rest of the fields as is. We'll explain why this is necessary in the section on DNS leaks below.
- Starting from the first subnet and through the remote network, you should: select NAT
- Change routing from regular to this VPN tunnel: Check the box here. Hint: This option only appears when NAT has been selected from the drop-down list above.
Click OK to save the profile
Once everything is saved, you will be returned to the LAN to LAN page where you started. Do not panic if you see the Offline status in the corresponding column. Wait a few seconds and then click on LAN to LAN again. The Online status should now appear in green.
On the left side of VPN and Remote Access, click Manage Connection to make sure everything is configured correctly.
Connecting from a specific IP address
This method is suitable when you know exactly from which computer, phone or tablet constant monitoring will be carried out. For example, this could be a work computer.
To connect, you need to remember the IP address of your work computer. You can find it out using the special “ipconfig” utility, which is a standard system administrator tool in Windows operating systems.
Further work is performed on your home computer:
- Find the “Security” section and click on it.
- We find ourselves in the “Firewall” subsection.
- There you can see the following table:
- The first line is “Action”. In it, select “Allow”.
- In the “source IP address” section, set the value to “one”, and then write the IP already known to us, which we took from the work computer.
- In the “Protocol” field set “TCP/80 - Transfer of WWW pages (HTTP)”.
- The work is done, all that remains is to click “Save”.
- Reboot the router and check operation by logging in through your work computer.
TeamViewer
Also, the popular TeamViewer utility is ideal for transferring data between computers via the Internet.
File transfer function
It is easier to transfer documents using this function. Therefore, you need to select this mode in TeamViewer on both PCs. Next, you will need to obtain the ID of the computer to which the information will be transferred. Enter it on another PC and click “Connect”.
After which the program will ask for a password, which must be specified to enter the main menu of the utility. Next, a window for interaction between devices will appear on the screen. It will consist of 2 blocks: the file system of the sender’s PC and the recipient’s device. You just need to drag the required document from one window to another. After which a progress bar will appear at the bottom showing the status of the data transfer.
Remote control function
You can also transfer information during remote control, and this option is beneficial when you need to quickly download a program.
The first step is to connect both PCs using the utility. Then you need to use the TeamViewer toolbar, where there is a “files and additional features” item. You need to select the “open transmission” function.
Then the window for moving documents will appear. You just need to drag them into the destination directory. Next, the process of sending information will begin.
Connecting to ASUS
Connecting to devices from this company is almost no different from others.
To establish a remote connection, you must complete the following steps:
- Go to settings.
- Select the “Internet Firewall” section.
- You will automatically go to the “Basic Config” subsection.
- Grant access in the “Enable Web Access from WAN” section and confirm by clicking “Apply”.
- View your IP. To do this, go to the “Status and Log” menu, to the “System Log” section.
- To access settings from the Internet, we use WAN.
Examination
Before you rejoice at completing the hardware settings and start setting up the CMS or client phone, I recommend checking port forwarding using an online service. Using the service, you can determine the external IP address of your computer and check whether it is static or dynamic.
Port checking service
An external IP address is required to be entered into the CMS or phone when setting up a remote connection. In the 2ip service we check ports for openness or closedness. If they are closed, you will not be able to connect remotely. Let's check all the settings again. We fix errors.
Checking the ports
In conclusion, I would like to mention that you can connect to cameras remotely not only directly. There are cloud services that can help you bypass the procedure of port forwarding and purchasing a DVR. All you need is a constant Internet connection. They have their downsides, which are a story for the next article.
Features and benefits of a VPN server
Most often, a “Virtual Private Network” is used in business, as it allows you to save and transfer important documents and files over secure channels. The function is used to provide:
- confidential access to the Internet, implying the secrecy of geolocation and personal data of the user;
- traffic encryption, which increases the level of security when surfing the Internet;
- invulnerability to malware and viruses;
- access to content or sites blocked in the Russian Federation;
- secure connection to the local network for remote employees. Not all internet routers support VPN. In the ASUS model range, the function is equipped with: RT-AC66U, RT-N18U, RT-AC53 and some other devices with software version 3.0.0.3.78 and higher. If this feature is important for further use, it is recommended that at the stage of choosing a router you check the availability in the technical specifications, with a sales consultant or on the manufacturer’s hotline.
What is a VPN server and why is it needed?
A VPN server is a physical server whose hardware and software capabilities allow you to connect to virtual private networks. The scope of application of a VPN server is quite wide. Most often this function is used for the following purposes:
- anonymous access to the Internet, allowing you to hide the user’s personal data and location;
- to increase the level of security of Internet surfing by encrypting traffic;
- additional protection against malware and viruses;
- to access blocked content;
- for connecting remote workers to the corporate network.
Several protocols are used to connect to a virtual private network: OpenVPN, PPTP, L2TP, IPSec, SSTP. If the router does not have built-in support for OpenVPN, experts recommend choosing PPTP or L2TP. The latter is characterized by high data transfer speeds, but weaker VPN connection security.