02/25/2016 iOS and MacOS | windows
This guide will show you step-by-step how to install Windows 10 on a Mac (iMac, Macbook, Mac Pro) in two main ways - as a second operating system that you can select at boot, or to run Windows programs and use the functions of this system within the OS X.
Which way is better? General recommendations will look like this. If you need to install Windows 10 on a Mac computer or laptop in order to run games and ensure maximum performance when running them, then it is better to use the first option. If your task is to use some application programs (office, accounting, etc.) that are not available for OS X, but in general you prefer to work in Apple’s OS, the second option will most likely be more convenient and quite sufficient. See also: How to remove Windows from Mac.
Which Mac computers can install Windows 10 on?
Officially, 64-bit Windows 10 Home or Pro can be installed on the following models using the Boot Camp utility:
- MacBook Pro/Air (2012 and newer)
- MacBook (2015 and newer)
- iMac/Mac mini (2012 and later)
- iMac Pro (2017)
- Mac Pro (Late 2013)
There is only one limitation: if you are using macOS Mojave, you will not be able to install Windows via Boot Camp on an iMac with a 3 TB .
This is due to the peculiarities of combining different file systems APFS and NTFS on drives of such capacity. More information about this can be found on the Apple website.
Other models support installing Windows 10 right out of the box without any problems.
Comments
Send reply
Login using:
Subscribe
Notify of
new follow-up comments new replies to my comments
Apple and technology news for the week
Receive the best materials once a week by email!
We are against spam. By clicking the “Receive” button, you automatically agree to the privacy policy and consent to the processing of personal data. Your data will not be transferred to third parties.
The last notes
How to take heart rate faster on Apple Watch Series 4
How to Add Dark Mode to Safari for iPhone
How to Send Voice Messages on Instagram
Epic Games has removed all Infinity Blade games from the App Store
How to create a Gmail alias
Popular
How to take heart rate faster on Apple Watch Series 4
How to Add Dark Mode to Safari for iPhone
How to Send Voice Messages on Instagram
Epic Games has removed all Infinity Blade games from the App Store
How to create a Gmail alias
Apple has added a page to the site for exchanging old models for iPhone XS and iPhone XR...
An iOS 12 bug has been published online, which was fixed in iOS 12.1.1
Instagram added voice messages to Direct
Apple has released the first beta versions of iOS 12.1.2, watchOS 5.1.3, tvOS 12.1.2 and macOS 10.14.3...
The ifConnected tweak adds more options for power saving mode...
What do we need
1. Free storage space. The minimum installation volume is 64 GB, and the recommended volume is 128 GB.
In practice, you can get by with a smaller volume, but there is always a possibility of not having enough space for normal operation of the system or installation of the necessary software.
2. For desktop computers, you will need a keyboard and pointing device so as not to constantly reconnect them in different operating systems. This can be either a wired solution or third-party models that have several channels for pairing with several devices.
3. USB flash drive with 16 GB or higher capacity. Owners of computers manufactured in 2015 or newer will not need such a disk.
4. Microsoft Windows installation disk image (ISO) or installation media for this operating system. You can download the image from the Microsoft website.
5. You can use Windows 10 for free for 30 days from installation. After this you will need to buy an activation key. This can be done in almost any Russian store, or on the Internet. On the official Microsoft website it costs a decent $199 or 13 thousand rubles.
The average price of a key in Russia is about 3 thousand rubles, although you come across offers that are cheaper at your own peril and risk.
Preparing and installing Bootcamp
The Bootcamp utility will help you install Windows on a MacBook; it loads the OS onto a separate partition of the hard drive. So, before installing a second OS, you need to remember that it takes up a considerable amount of space. Check the availability of free space - you will need about 30 GB.
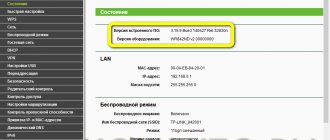
To start installing the OS, you need to check the Bootcamp program for updates, to do this you need to:
- The application has a support site, go in and see if there are any updates.
- Or you can update the utility yourself, open the Apple menu and go to the “Update...” section.
- After the update is completed, you need to make a backup copy.
How to install Windows 10 step by step
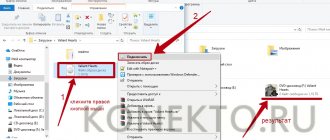
1. Launch the Boot Camp through Spotlight, Finder, or Launchpad.
2. Point the program to the path to the downloaded image and select how much space on the installed drive to allocate for installing Windows.
Think carefully at this stage, because you won’t be able to change the partition you are using without reinstalling Widows. If you plan to play games or run heavy applications, it is better to allocate more space right away.
3. Wait for the necessary drivers and data to download from the network. After downloading and restarting your computer, Windows 10 installation will begin.
4. The installation wizard will ask you to make basic settings and specify the partition on which to install Windows. It will already be called BOOTCAMP.
5. After installation is complete, you will need to make final adjustments to the system parameters.
6. Once on the Windows desktop, you will need to launch the Boot Camp utility. It will be stored on the system disk or on a removable drive that was created during the preparation stage.
7. After installing all components and restarting Windows, you need to connect to the network via Wi-Fi or cable and launch Apple Software Update from the Start panel.
8. The program should indicate all available updates. Install from and restart your computer.
Installing Parallels [Step 3]
Download the Parallels Desktop 16 virtual machine.
The program is paid, but there is a 14-day trial period. It is enough for familiarization and testing.
After downloading, install the program. This version of Parallels Desktop is not supported on Mac… during installation , it means that the developers have not yet released a final working version for Mac on the M1 chip.
No problem, there is a working version with the status of Technical Preview (link to the program). The developers also left a key there for testing .
Register and download the program. During installation it will be written that this version of the program is designed specifically for Apple Silicon processors.
After installing Parallels Desktop, the program will prompt you to install a virtual machine.
Typically, the Windows 10 image for ARM is pulled up automatically, but in case of problems, the path to it can be specified manually.
The application will prompt you to sign in to your Parallels account
and enter the activation key. If you downloaded a test version of Parallels Desktop for M1, then the key is on the page where you downloaded the program.
Next, the automatic Windows installation process will begin, which takes about 10 minutes on new MacBooks.
Drivers for external peripherals (mouse and keyboard) will be installed automatically. And everything will work without any user interaction.
How to run macOS or Windows
Now, when you start your computer, the macOS operating system will automatically start, and when you hold down the Alt/Option , you will see a menu with a selection of the partition to boot.
To quickly switch from Windows to macOS, you can use the utility in the tray (lower right corner), which allows you to restart your computer with a different OS with one click.
To go back, go to System Settings – Boot Volume, enter the settings unlock password and select the Windows partition to boot.
Summary
Boot Camp
Suitable for using resource-intensive Windows applications.
Advantages:
- High performance of the running operating system.
- Does not require installation of additional software. Boot Camp is free software that comes with Mac OS.
- Apple certified technology with technical support.
Flaws:
- Requires partitioning of the hard drive, where sufficient space must be allocated to the partition with Windows.
- You need to restart your Mac every time you want to start Windows.
- You cannot use two systems in parallel, since they are installed on different sectors of the disk.
Virtualization
This method is recommended for most iSpring users.
Advantages:
- No hard drive partitioning required.
- The virtual machine takes up exactly as much space on your hard drive as required by Windows and installed programs. The memory size for the virtual machine changes dynamically.
- There is no need to restart your computer to work with Windows; two systems can be used in parallel without rebooting.
- The Windows virtual image is easy to copy, move, and delete.
- You can install several operating systems on one computer, for example, different versions of Windows or Linux.
Flaws:
- Slower virtual system performance compared to using Boot Camp.
- You cannot boot into Windows to use all the computer's resources.
- Most virtualization software is not free (with the exception of VirtualBox).
Boot Camp + Virtualization
Allows you to boot into Windows, as well as run the same Windows system in a virtual machine in a Mac OS environment if you don’t want to reboot.
Requires a large supply of free hard disk space.
Advantages:
- Possibility to choose a loading method.
- High performance when booting the computer under Windows (Boot Camp technology).
- Windows can be used simultaneously with Mac OS without restarting the computer (virtualization technology).
Flaws:
- Requires partitioning of the hard drive, where sufficient space must be allocated to the partition with Windows.
- Using different operating system boot methods may cause Windows activation problems.
Virtualization
It involves installing a special application – a virtual machine. You can run almost any OS through it. For example, with its help you can easily play a mobile game on Android on your computer - a pointless idea, but the main thing is that there is such an opportunity.
In our case, virtualization allows us to use Windows as a separate macOS application. That is, a third-party operating system will be launched in the virtual machine window, but it will be possible to work with Apple programs.
Parallels Desktop
This is a paid application, but there is a trial version for 14 days. After installing and launching it, follow the following algorithm:
- On the initial window, click on “Install Windows...”. The program will start downloading the OS. If this does not happen (for example, Internet failures), then click on the “Find manually” button => “Image” and drag the Windows image into the current window with the mouse.
- If you have a Windows license key, you must enter it in the next window. If it is missing, then you need to uncheck the option “This version requires...”.
- Specify the primary purpose for which the third-party OS will be used. You can choose between the following templates: “Office programs”, “Games only”, “Design”, “Software development”. These are non-critical settings and can be easily changed in the future.
- Next, give the virtual machine a name. Opposite the “Location” line, indicate where Windows will be deployed on the disk. Finish the preliminary setup by clicking on “Continue”.
- In the next step, wait for the system to install. During this process, a window may appear asking you which version of the OS you want to install - for example, 10 Pro or 10 Home.
If necessary, you can change the settings of the Windows virtual machine. To do this, just click on the gear icon in the “Parallels Desktop Control Center” - there will be many parameters there. For example, you can allocate more RAM to a virtual machine.
VMware Fusion
You also need to pay for this program, but the trial version works for 30 days when registering an account. After installing the application, do the following:
- On the initial screen, select the option “Install from disc or …” => “Continue”.
- In the next window, click on “Use another disc or …”, specify the path to the Windows ISO image => “Continue”.
- Set operating parameters. To do this, click on “Customize settings” - the program will ask where to store the settings files. After this, you can start setting parameters. Specify how many processor cores are available to the virtual machine and how much permanent RAM to allocate to it. Finally, close the settings window.
- Launch the virtual machine - click on the large play icon. After this, the Windows installation procedure will begin. You will need to select a language, specify the partition to install and perform a full list of standard operations.
- The final stage is installing drivers. To do this, in macOS, in the top panel, select: “Virtual Machine” => “Install VMware Tools” => “Install”. In the virtual machine window, in Windows Explorer, go to the DVD drive. In it, click on the “setup64” application. Confirm the commands in the installer, and after installation agree to reboot the system. The result is a full-fledged Windows operating as an application in the macOS desktop environment.
Oracle VM VirtualBox
You can install Windows 10 on Mac OS on Virtualbox. The benefit is that the virtual machine is free. After installing and launching it, proceed as follows:
- In the upper left corner of the initial window, click on “Create”.
- Designate the virtual machine (remember the name you made up) and specify the OS parameters. If you have a 64-bit version of Windows 8.1, then the corresponding parameters should be specified in this window.
- Set the amount of RAM that will be used for virtualization needs. The more you specify, the more stable and faster Windows will be, but the responsiveness of macOS will decrease.
- Specify the virtual hard disk settings. To do this, check the box “Create a new virtual …” => “Next” => check the box “VDI …” => check the box next to “Fixed virtual …” => click on “Next”.
- Set up a virtual OS. To do this, the virtual machine you created earlier will appear on the start screen in the left panel (that’s why you had to remember its name). Select it, and at the top click on “Properties (Customize)”. Go to the “Media” tab and specify the path to the Wi ISO image in the corresponding line. After saving these settings, return to the initial window and click on “Run”. The OS installation will begin according to the standard procedure.
Windows on MacBook pro via Parallela Desktop
This utility allows you to boot Windows without restarting the computer.
How to use the program:
- Open the File menu in the utility, then click New.
- A window will appear, click on the “Install Windows or another OS...” shortcut.
- We indicate the source of data installation. We do it ourselves by dragging the folder to the desired location, or the application will do it on its own.
- Click “Continue”, after which we write the OS password.
- A table will appear, in it we select how to use the OS.
- Click on the folder where the program and its name will be located.
- Click “Continue”, after which the operating system will be installed. When finished, restart the laptop.