Hi all! Recently I encountered a problem with access to the Internet in a country house. I live 15 km from the city, and the usual connection between a smartphone and a modem is very poor. In general, in such remote points there are only two options for connecting to the global network:
- Satellite Internet is very expensive, both in terms of subscription fees and equipment. There is no completely unlimited tariff (at least in my area).
- 3G/4G/5G Internet is the most popular and fairly cheap option. Plus, it is possible to connect to an unlimited tariff.
I chose the second option. And then another question arose - how to strengthen the cellular signal with your own or not with your own hands at the dacha, in a country house or village. Let me remind you that we transmit data using radio waves, which attenuate when passing through an obstacle, as well as from a great distance. Looking ahead a little, I will say that I was able to effectively strengthen cellular communications using a VEGATEL cellular amplifier. For convenience, I have divided the article into steps; if you have any questions while reading, write in the comments.
Why do you need a GSM antenna?
Since the signal cannot be picked up equally well everywhere, external and internal antennas and repeaters will be needed to improve the process. The need to purchase such equipment arises from the characteristics of the telephone itself, which operates as a duplex radio station with exchange at different frequencies.
The repeater in this system acts as an intermediate link. The device processes the signal and sends it either to a base station or to a mobile device using antennas. This eliminates interference, reduces radiation levels and even extends the life of your smartphone battery.
A GSM antenna is a kind of amplifier.
Strengthening the level of reception of GPS signals by a smartphone
Craftsmen managed to improve the reception of GPS signals on smartphones using a homemade method - soldering a stranded copper wire to the GPS square contact, which was then carefully attached around the perimeter of the device.
Describes the method and installation of a passive GPS antenna with a male MMCX connector. This is quite difficult and requires some soldering skills. Yes, and you should choose a passive receiving device, since the active GPS antenna installed inside the case is not suitable for a smartphone. She needs to supply power within 3-5 V, which is unrealistic. The battery will discharge very quickly under such a load. In stores, it is the active antenna that is most often sold.
Features and types of device
There are different types of GSM antennas. Popular ones include:
- Wave channel (or Yagi). This is a traverse with reflectors located in a perpendicular position. The main advantage is considered to be a high signal amplification factor with small dimensions. One of the disadvantages is the need for installation with precise targeting to the base station.
- Parabolic system. By design, it is a set of the appropriate type of reflector and irradiator located at the focus. This device is considered effective. However, installation requires some skills and theoretical knowledge. If you make a mistake, your efficiency will decrease.
- Panel. This is a thin flat part in which the irradiator is placed inside the reflector. The signal amplification rate is low, but the advantages of the model include wide directionality, simple installation and no need for fine tuning.
- Pin. The design resembles a vertical pin. The latter simultaneously performs the function of an irradiator and a reflector. Here, precise directionality towards the base station is not needed, the main thing is that there are no shielding objects between it and the antenna.
The choice of device depends on the tasks that need to be solved.
The options mentioned above are external signal amplifiers.
There are also internal antennas. They are assembled into a single system, which consists of an external structure that picks up the base station signal, and an internal one that distributes it indoors. Additionally, the system includes a repeater (it is considered an intermediate link), a power divider, specific connectors and a coaxial cable.
Devices are divided into active and passive. The repeater is an active object, while the antennas are considered passive.
Reasons for poor internet on your phone
If a user on his phone encounters problems with Internet speed, then this may be a consequence of certain factors. Some of them depend on the location.
If the connection speed is weak, then the reasons for this may be the following:
- Exceeding the permissible mobile traffic limit, as a result of which the speed will be reduced until the end of the day or month by the operator, depending on the tariff.
- Weak cellular network signal, as a result of which it does not pick up the 4G/3G network. Currently, the 3G coverage of mobile operators is quite good, in contrast to the 4G standard, which is still being introduced.
- Uneven terrain in which the subscriber is located. Hills, mountains, ravines and forests, as well as all kinds of concrete obstacles, greatly reduce the quality of the transmitted signal.
- Any operational errors, viruses or glitches.
- Long range to the tower.
Important! An Internet antenna for your phone can help strengthen a poor signal if it is caused by long distances and uneven terrain.
How does it work
It is almost impossible to make an antenna yourself. A passive repeater for a phone - yes. It will catch the weakest signals in the corresponding frequency range, but will not be able to strengthen and stabilize the signal quality for a mobile phone. Some gain is possible by connecting multiple antennas.
Phone amplifier.
A repeater made from improvised means is often called a GSM antenna. But the device is a separate device, which consists of a power divider, connectors through which power is transmitted, and a coaxial cable (it is needed to connect the antenna).
Operating principle of a physical repeater
A unit for a summer house or home is a type of repeater. Incoming pulses are processed and sent to the main station node (for an outgoing call). If a subscriber is called, the repeater works identically, interaction occurs with the consumer’s device.
The network is used to broadcast signals. You can build a simple mobile communication amplifier yourself. The external antenna receives/sends the pulse to the base, and the internal element increases the coverage in the building.
An outdoor repeater is mounted on the roof and is responsible for processing the network over large areas. From the main transmitter, through the antenna, the signal travels through wires to an amplifier, which improves the quality of coverage where it was absent.
What materials will be needed?
There is no need to buy any additional equipment. The necessary parts to create an antenna are in the workshop.
For this you will need:
- Wire, any wire except copper wire. Recommended length: 30-40 cm.
- Connecting block and fastening elements.
- Polymer pipe (up to 20 cm long).
- Cable.
A homemade antenna must be fixed during the manufacturing process, so it’s worth stocking up on electrical tape.
The issue of cable selection plays an important role. Domestic coaxial cable has a limited scope of application. It is better to choose imported analogues with double braid; they can be easily found in construction supermarkets. However, some antennas are already sold with a coaxial cable included. For example, pin models.
Antenna equipment.
Most models have a special connector for connecting to a phone. Some devices even have antenna leads. These are short pieces of cable equipped with appropriate connectors. Even if they are not included in the package, if necessary, parts can be purchased separately.
Communication range
The following factors influence the radio range:
- Location of BS and MS and terrain.
- MS power and sensitivity.
- Power and sensitivity BS.
- Antennas used on MS and BS.
- The will of the Lord God (experienced signalmen joke that this is the main thing).
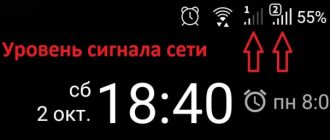
Typically base stations have a power of 20 - 30 W. Antennas are used either whip or directional. The sensitivity of base stations is -100 dB - 115 dB. The user, of course, cannot change or influence all these parameters. The output power of the phone is 0.3 - 2 W, sensitivity - 90 - 105 dB. The sensitivity of a phone is mainly determined by the technologies used to create low noise input devices. If in areas of reliable reception the difference in sensitivity and power between models is almost unnoticeable, then in an area of uncertain reception it can become critical. Often the handset shows the signal level from the base station as 1 - 2 cubes (on the scale), but cannot establish a connection: there is not enough power. And although the ETSI standard regulates the standard output powers for each class of phone, the actual value may vary slightly. Tubes from SAGEM, Alcatel, and Motorola have good sensitivity. And all old phones pass in terms of power, especially Motorola. All phase 2 phones have approximately the same power.
As for the terrain, waves travel better on flat terrain and along the river. The higher you are (within reason), the better the signal. The forest sometimes dampens the waves more than urban buildings.
How to make an antenna yourself?
A simple antenna type is diamond-shaped. To make it, you must do the following:
- A piece of wire is bent several times at right angles to form a square.
- The opposite corners of this figure are folded inward and fastened, and a connecting block is fixed to them. This must be done so that another device can be connected to the unit. To do this, use a piece of polymer pipe cut lengthwise.
An antenna for a smartphone can also be made from other available materials, even using a tin can. For example:
- From 1 ring. A coil is made from the wire, having previously calculated the diameter (depending on the frequency of the sound). To calculate, take the ratio of 300 to the frequency indicator, and multiply this figure by the number Pi. So, for a frequency of 900 MHz, the diameter will be 0.106 m.
- Made of 2 rings connected to each other. Make 2 turns from 1 piece of wire and fasten them exactly opposite each other. Diameters are calculated in the same way as in the first example. The distance between turns depends on the frequency.
- Of 4 rings. The manufacturing principle is similar to option 2, but here they make not round turns, but figures reminiscent of figure eights. Calculations are carried out in a similar way.
In the above options, the weakest signal gives 1 turn, and the strongest signal gives 4 turns.
The listed devices can be used as an independent repeater. Moreover, in such systems, 1 antenna can be installed as internal, and 2 as external.
Lightning protection
Finally, about a very important topic. Mobile devices are carried in a pocket and the issue of lightning protection for them is tantamount to lightning protection for the owner himself. A normal person would not go to a high place in a thunderstorm, either with or without a telephone. However, a normal antenna is a completely different matter. When installed outdoors, it faces a lot of risks: from a direct lightning strike to a corona discharge. In both cases, the equipment connected to such an antenna is guaranteed to be sent for repair and, in many cases, to a landfill.
Even the harmless mirror described in the previous section, which is not connected to the modem by any wires at all, can damage it in a thunderstorm. Lightning discharges produce radio waves with a very wide spectrum of frequencies, and by chance such a spectrum can contain decent power concentrated precisely in the frequency range of the modem antenna. Microwave semiconductor elements in a modem can easily fail. Unfortunately, civilian consumer equipment is not protected from lightning in the same way that radio and electronic equipment for scientific or military purposes is protected.
ADVICE! In the event of a thunderstorm, turn off all antennas connected to your devices and remove modems exposed to reflectors. This will save you a lot of money on the purchase of new equipment and reduce the risk of data loss, which can be more expensive than any money.
Fastboot Mode, what should I do?
In general, the function is very useful, because it gives more freedom in controlling the gadget through the computer, but it happens that no one called the window, but it appeared intrusively and you do not know Fastboot Mode how to get out of it. The window itself looks approximately the same in all smartphones; it contains: technical information about the smartphone and its configuration and some mode parameters.
There are several main reasons why you might end up in this menu:
- You accidentally pressed the lock key and the volume key at the same time; the principle is different in some models;
- System failure in the gadget.
When it says Fastboot Mode, the first thing you need to do is check to see if you can switch to normal mode and there are no problems with the system. To do this, you need to use the volume control, by pressing up you will change the active element, when you reach the inscription “Normal Boot” press the volume button down to activate the element.
This situation also happens when you turn on the mode for working with a PC, and after that it automatically goes to the Fastboot window or after picking up the gadget from the service center you forgot to disable this function. Regardless of the reason for the appearance, the standard launch is available in a similar way (except for problems with Android), in the same way you can turn off the function.
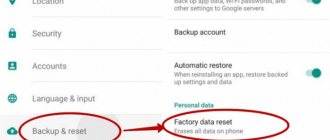
Also, so that a window with a similar mode does not appear again, you can disable the function in the settings. If you do not use these features, then it’s better to do so, you will deactivate it, but you can return it to working condition at any time, but it will not disturb Fastboot Mode on the phone. This is done this way:
- Open the "Settings" menu;
- Select the “Screen” section;
- Click on the “Fast loading” tab;
Uncheck the box of the same name.
This way you can block the unwanted appearance of the Fastboot window, and if such a need arises, you will return it to the active position.
A little theory
Antenna parameters differ for 3G or 4G Internet. The frequency range at which the desired operator operates is important. To assemble the correct antenna you need to know it. To do this, go to your phone's network settings and search for network operators. In the given list with many 2G positions, you need to look only for 3G and 4G. Knowing which operator provides the required coverage in a given area, you can buy a suitable SIM card from this operator and a modem, and you can make the antenna itself with your own hands.
When assembling the antenna, it is important to observe all dimensions down to the millimeter. They are different for each type of network. Typically, the 4G network operates with a frequency of 2600 MHz, in 3G - 2100 MHz. Sometimes 4G and 3G have a frequency of 1800 or 850 MHz.
4G antenna diagram for 2600 MHz frequency.
3G antenna diagram for frequency 2100 MHz.
3G and 4G antenna diagram for 1800 MHz frequency.
3G and 4G antenna diagram for 850 MHz frequency.
The following shows the antenna manufacturing process (use the dimensions only for the frequency of your mobile operator).
As an example, a 3G antenna will be assembled for a frequency of 2100 MHz. The manufacturing process for devices with different parameters is similar, but differs in the diameter of the segments and the distance between them. First you need to cut 6 disks out of tin. I use thin sheet copper because it is easy to cut with office scissors. The diameters of the antenna segments according to the diagram should be 100, 74, 54, 39, 39, and 39 mm.
Since it is important to maintain dimensions down to the millimeter, it is better to first drill a hole to match the diameter of the existing stud, and then use a compass to construct a plane for cutting out the disk.
On a disk with a diameter of 74 mm, you need to prepare a hole for soldering the wire strand. It is drilled at a distance of 11 mm from the edge. When working with the 3G range, this antenna requires the connection of 2 coaxial TV wires. The length of each of them should not exceed 12 m. The second hole must also be drilled at a distance of 11 mm from the edge, but at an angle of 90 degrees relative to the first.
Now, having attached a 74 mm disk to a large 100 mm segment, you need to make markings for large holes for entering the coaxial television cable along with the braid.
From a pair of ordinary television F connectors you need to break off the protruding part, as I did, and press them into the existing holes on the 100 mm disk. For reliability, it is better to crimp the connectors a little.
Now you need to fix the disks to the pin in the specified order and in compliance with the distance suggested by the diagram. The distance between the 100 and 74 mm segments is 10 mm, in the next transition between the disks the distance will be 9, 33, 33 and 33 mm, respectively. Each element is secured with two nuts, one on each side.
During assembly, you need to double-check the distance between the disks, since deviation will lead to a decrease in the quality of signal reception.
Next you need to connect the coaxial cables to the large drive. This must be done so that the central copper core of each wire fits into a thin hole on the adjacent segment with a diameter of 74 mm. After installation, the wire must be soldered, without bending it in any way.
A wooden, plastic or metal strip that acts as a holder must be attached to the protruding tail of the pin on the back of the antenna. For reliability, coaxial cables can be tied to it so as not to create a load on the thin tin disk to which they are soldered.
Now you need to attach Pigtail connectors with adapters to the free ends of the coaxial cable. They are the ones that connect to the 3G 4G modem. The antenna is ready, all that remains is to install it.
We connect the antenna to a 4G modem that already has a SIM card of the selected telecom operator.
To achieve maximum reception quality, you need to move the antenna outside the room. It needs to be placed slightly higher than the roofs of nearby buildings to minimize possible interference and prevent noise. You need to point the antenna directly at the nearest tower that broadcasts the Internet signal. To find out where it is located, you can use the Netmonitor application. Such a simple antenna is capable of picking up signals from towers located at a distance of even more than 30 km.
The manufacturing process of a 4G antenna is also shown in this video:
Homemade author: KREOSAN
Popular homemade products on our website
- Homemade antenna for digital TV DVB-T2: photos and…
- A simple homemade antenna for receiving digital TV:...
- Homemade 4G antenna that enhances the Internet signal:...
- Do-it-yourself karting: drawings, dimensions, detailed description
- A simple homemade antenna for digital TV DVB-T2:…
- Homemade compressor (60 photos and detailed description...
- Waste oil furnace: drawings, photos and…
- Homemade vertical wind generator: drawings,…
- A car mechanic’s homemade roll-away bed: photos,…
- Do-it-yourself stove for a cauldron: dimensions, photos,…
- Homemade camp stove: drawings, dimensions, photos
- DIY horizontal bar: drawings, dimensions and photos...
- DIY band saw: detailed dimensions,…
- Do-it-yourself rocket stove for the garage: drawings,…
- Homemade stove from a heating radiator (38...