If you want to configure your Wi-Fi router yourself, change the password, the name of your wireless network, or other settings, then in any case, you will first need to go to the router settings. In the control panel, where you can set the necessary parameters. I want to say right away that this is not at all difficult. It doesn’t matter what model of router you have and what manufacturer (Tp-Link, D-Link, Asus, Linksys, Zyxel, etc.), using these instructions you can go to the control panel. The operating principle of all routers is almost the same, which means that we can access the settings using the same instructions. Yes, there are some nuances, we will definitely consider them.
A router is an independent device that runs on its own software. And it can only be accessed via a network cable (in most cases). Many people have a question: what kind of disk and drivers are included with the router? No, there are no drivers there. The router does not require drivers at all. The disk usually contains a special utility with which you can quickly configure the router. But, I would advise setting up the router through the settings, which can be accessed through a browser. And as I wrote above, this is very easy to do.
We will consider two methods: accessing the control panel via a network cable from a computer or laptop, and accessing settings via Wi-Fi from mobile devices (or also from a computer). I recommend using a network cable and a computer for this task. But, if this is not possible, then you can change some settings, or even completely configure the router from your phone, tablet, or laptop via Wi-Fi. If you want to update the firmware, you cannot do this via Wi-Fi.
Instructions for specific router manufacturers: Instructions for TP-link routers
Instructions for entering settings on D-Link routers
Logging into the control panel on Asus
Instructions for ZyXEL routers
For Linksys devices
Article for Tenda
For Netis routers
Brief plan
The article is universal and suitable for any router model. If you have problems installing, be sure to check your model by searching on our website! There you will find exact instructions for your router with pictures and videos!
And since this article is general, let’s start with a general algorithm that will allow you to install any router. So, before asking for help, you need to decide at what stage the problem arose. Here I give the steps briefly, below there will be a detailed transcript.
- Type of router - what kind of router do you have, what are we dealing with?
- Choosing a place - where to put it correctly, so that the network reaches everywhere and there is enough wire.
- We connect the wires - where correctly and why.
- Go to the router settings.
- Internet setup.
- Setting up Wi-Fi.
- Changing passwords.
Briefly go through all the steps from top to bottom and see at what stage you are stuck. Next, go to the desired chapter or simply find your model with us and familiarize yourself with the settings there. That's the whole basic installation algorithm. Then all that remains is to do it.
The instructions are suitable for any router manufacturer - be it TP- Link, D- Link, ASUS, etc.
Understanding connection settings
Before setting up a Wi-Fi router, you need to thoroughly familiarize yourself with the current status of the device and network, presented on the main page. Sometimes the router connects automatically - and then no further changes are required; in other cases, the information provided by the device will help in a potential dialogue with the provider or in independently searching for answers to questions.
The router owner needs to pay attention to the following details:
- Model name and software version.
- Network card name (MAC address), availability of wireless data transmission, channel width and type of signal transmission.
- The intended method of connecting to the Internet and the time that has passed since the device was connected.
- The specified information can be copied onto a piece of paper while setting up the router; in addition, they are always available in the “Status” section - or something similar.
What router do you have?
First, let's decide what kind of router you have. They are usually divided by connection type. Here are the most popular:
- Ethernet is the most common router, into which a twisted pair cable goes from the entrance. Nowadays, most home routers are like this. The router includes a provider cable. The maximum speed using current technologies is up to 1 Gbit/s (usually we don’t have such tariffs, everything is with a reserve).
- LTE 3G/4G – the same router with a SIM card. There is no need to install any wire, just a SIM card and operator network coverage. Internet usually costs more, but if it is not possible to run a wire, this is the most common method.
- ADSL modems – use telephone lines. Thin cord, small connector. Just like Ethernet, it requires a wire from the entrance, but it is built on an already existing telephone network. Limitations – speed up to 24 Mbit/s. Currently, this can no longer be found in large cities, but according to the experience of our consultations, there is still a lot of it in the provinces.
The installation of each type has its own nuances at the stage of connecting by wire and basic Internet setup. We will pay attention to this. Therefore, it is best to find instructions for your model.
Selecting a location
Very important nuances:
- If you need to connect a wire from the entrance (Ethernet, ADSL), make sure that it will reach the installation site. If you are installing the Internet for the first time, you can always ask the technician to pull the wire to the right place, otherwise you may have to call him again. As a rule, the provider provides this service free of charge.
- If we are dealing with wireless communications, you may need to place it near a window, especially if you use external antennas, so the signal will be better.
- For the best Wi-Fi signal coverage already in the apartment, it is best to place the router in the center of the room, taking into account the influence of the walls. In practice, this can only be done at random: install, measure, move. And so on until the best result. All theoretical measurements are nonsense, take a lot of time and often fail.
Connect the wire
If you are going to change the router, just first remember the location of all the cords on the old router and do the same on the new one!
What needs to be connected in a standard router:
- Power cable - the indicators will light up.
- The provider's wire is to the WAN port.
- A wire from the computer (if necessary, as a rule, it is necessary during the first setup) - to any LAN port.
Make sure the first 2 items are connected! There were cases where people could not set up a router without a provider cable(
If you have ADSl, then there are slight differences with the splitter. A splitter divides the telephone line into the telephone itself and the Internet. In total, connecting to the WAN becomes slightly more complicated:
With mobile networks everything is simple - just plug in a SIM card and the router will be ready to work.
As a result, everything is easy to do yourself at home! The main thing is to figure it out and do it.
Set up your wireless network
Now all that remains is to configure the Wi‑Fi network so that the router safely and quickly distributes the Internet to all your wireless devices.
To do this, you need to open the section “Wi‑Fi Network”, “Wireless Network” or a similar name. Here you can set a password for your home network, as well as select its name, standard and range.
Set a Wi‑Fi password (network key)
By default, the Wi-Fi network of a new router is not password protected. Therefore, anyone within the coverage area can connect to it.
If you don't want your neighbors to use your Internet, enable password protection. Choose a strong encryption standard, WPA2‑PSK, and enter a combination that is easy to remember but hard to guess.
Select Wi‑Fi standard
The maximum wireless network speed depends on the Wi‑Fi standard used. If your device supports 802.11ac, select it. This is the most modern and fastest standard. But some older gadgets may not be compatible with it.
If you don't see 802.11ac in the list, select 802.11n - a slower, but still relevant standard. All modern devices support it.
For convenience, enter a new network name, which will allow you to quickly find it among other connections.
Select Wi‑Fi band
If you have a dual-band router, two wireless modes will be available in the settings: 2.4 GHz and 5 GHz. You can choose any of them. But the 5 GHz frequency is usually less congested and therefore provides faster Wi-Fi speeds than 2.4 GHz. At the same time, its coverage radius is lower and not all devices support the 5 GHz band.
If you wish, you can activate both modes, then the router will create two wireless networks in different bands. Don't forget to put a password on each of them.
Go to settings
If everything is connected correctly, it’s time to go into the router settings. Let's try these links:
192.168.0.1 192.168.1.1 Login: admin Password: admin
If it doesn't fit, turn your router over and look at the sticker there. It should be something like this:
It should do. If you cannot enter the panel, look for instructions for your model. This is a mandatory step!
How to connect to the router for setup
I think that you are already aware that a router is an independent gadget with its own operating system, the main purpose of which is to connect to the provider’s network and distribute the Internet to all devices connected to it. That is why you should not look for it in the Windows 10 Control Panel or Device Manager. There are no drivers for it either because they are not needed. You need to start by connecting to the router’s local network. This can be done in two ways - via an Ethernet network cable or via a Wi-Fi wireless network:
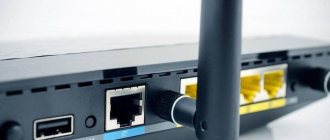
It is more convenient to connect via a network cable from a computer. Any router has a port for connecting to the provider’s network - it is signed as WAN or Internet , and there is a port or ports (usually 2 or 4 ports) for the local network, signed as LAN . This is where you need to connect the network cable - one end to the router, the other to the computer’s network card:
The most convenient way to set up a router via Wi-Fi is from a laptop, phone or tablet. Previously, several years ago, it was possible to open the router settings only through a LAN cable and nothing else. Now, fortunately, things are much better and you can take advantage of all the benefits of wireless communication.
To connect to it, you need to know the router's network name and password. The factory password is located on a sticker affixed to the back of the device.
We just pick up the device, turn it over and look for a sticker on the body. This is how it looks, for example, on a TP-Link router:
On dual-band routers, the network name for each band is specified, and the password is usually the same in both cases.
Now on your laptop or phone, open the list of networks, find the one you need and select it. You will be required to enter a Wi-Fi password - enter it and connect to the local network.
Only after this will you be able to open the router settings in a browser or through a smartphone application. The most common mistake users make is that they try to do this without connecting to the device’s network, but simply by opening a browser on their phone or launching a special program. Until you connect to the router’s network, you won’t succeed!
How to find out the address of a router on the network
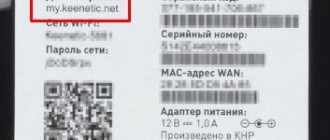
To get into the router settings, you must know what its address is to log into the control panel. You can view it again in the same sticker. There will be a small area with your default login information printed.
Modern routers already have a symbolic address written on them, which you can see on this experimental TP-Link - tplinkwifi.net. On Kinetics, the address is my.keenetic.net, on Mercusys devices - mwlogin.net, on Netis - netic.cc, etc. You must enter the address without “www”. If it immediately redirects you somewhere on the Internet, check that the address uses the https:// protocol, and not its secure version https://. Most routers do not use certificates and therefore you will not be able to log into the router via https.
On older router models, you can see the digital IP address on the sticker. Here, for example, is a fairly common model ASUS RT-N10:
Here IP 192.168.1.1 is indicated as the address for setting up the router. On TP-Link and D-Link routers you can see a different IP address - 192.168.0.1. Xiaomi devices use IP 192.168.33.1, Huawei devices can use 192.168.100.1 or 192.168.8.1. We carefully read what is written on the sticker and enter it into the address bar of the browser without errors!
Even if the router has a symbolic address for the page to enter the settings, it still has access to it via an IP address. If it doesn’t work one way, try another. According to one of the options, but it will definitely be available.
Where is the login password written on the router?
A very popular question among users is “where is the password for the router written?” It's not that simple. There is a factory password that is set to enter the web interface in the initial, “empty” configuration. And not on all models. If there is one, it will also be written on the sticker:
But don’t be fooled into thinking that all such devices use the admin and admin . Not even that. The “admin” login is used on most Wi-Fi routers and modems, but the factory password can be quite complex. This is what providers like to do on branded equipment. A striking example is the Rostelecom Rotek RX-22312 router:
Here the factory password is complex enough so that no one else can find out the configuration. But you may come across a model that does not have a password for logging into the router at all. For example, some Keenetic:
The thing is that when connecting for the first time, it will require the user to come up with and register their password to access the web interface. And it’s not simple, but more complicated. And therefore, if you don’t know it, then you simply won’t be able to go into the router settings without a full reset. In this case, here are detailed instructions for you on what to do if you forgot or don’t know the router password. She will answer all questions and help restore access to the control panel.
Setting up a network via a router
And one more important point that should not be overlooked is setting up the network adapter to connect to the router. And if problems usually do not arise with phones and tablets, then with computers and laptops there are problems. The whole point is that by default the router is configured to be the center of the home network. It has DHCP enabled, which distributes IP and DNS server addresses to connected gadgets and computers.
At the same time, a computer or laptop could previously work in some local area where IPs were registered statically and therefore, most likely, when connecting to a router from this PC you will not only be able to enter the Wi-Fi settings of the router, but also nowhere at all there will be no access. Therefore, we need to make sure that he receives everything automatically. In Windows 10 this is done as follows:
Open the system settings and go to the “Network and Internet” section. In the window that opens, in the “Status” subsection, click on the “Configure adapter parameters” link. This will take you to the list of Windows network connections:
Here you will need to select the wired or wireless network through which the router is connected and right-click on it. Select "Properties" from the menu. In the window that appears, open the properties of the IP version 4 protocol. Another window will appear where you need to check the boxes for automatically obtaining an IP address and automatically obtaining DNS server addresses. Click the “OK” button in all windows for the changes to be applied.
Internet setup
After you have entered the settings, it's time to connect the Internet.
Further settings for connecting to the Internet and creating a Wi-Fi network can be found in the specific instructions on our website for your model. What follows is just general advice!
The easiest way to do this is through the Quick Settings section. Here is an example on my TP-Link:
This mode will guide you through the steps, ask you everything you need and make the settings yourself. At the connection setup stage you will need:
- Internet login and password - specified in the provider agreement. Sometimes it's not required.
- Connection type - PPPoE (usually if a login and password is required) or Dynamic IP - if they are not required (much less often).
- For ADSL - the VPI and VCI values are relevant for them - check with your provider, each has their own, they are also written in the contract.
Set up your Internet connection
Most providers transfer the settings to the router automatically immediately after connecting the Internet cable. Check if this is the case in your case. Open a new browser tab and try visiting several sites. If they load, everything is already set up. Then you can skip this point.
If the Internet is not working yet, you will have to configure the connection manually. To do this, you need to go to the WAN, “Internet” section or with a similar name - depending on the router model - and specify the necessary parameters. Typically this is a login, password and network protocol (for example, PPPoE or L2TP) required by the provider.
All necessary settings must be specified in your Internet connection agreement. They can also be clarified by contacting the provider’s support service. In addition, the necessary parameters can be listed on its website - in the user’s personal account.
If you bought a router secondhand or have already used it with another provider, it is better to reset the old settings first. This can be done using the Reset button on the case. Most often, to reset you need to hold it down for a few seconds.
WiFi
If the Internet is working, at this stage you will be asked to provide all the data for the Wi-Fi network. What you will need for this:
- The name or SSID is how your network will be visible to everyone.
- The password - 8 characters or more - which will need to be entered to connect to Wi-Fi, so that evil neighbors cannot connect.
- Encryption – WPA/WPA2 – and only that. No passwordless methods or WEP.
After this, the network should work. Let's move on!
Installation
So, you've unpacked your brand new router, it's time to determine its place in the house. Unfortunately, the range of the router is limited, so the best option for installing it is to place it in the middle of the apartment:
If you have one room, there are no problems. But if there is a lot, install a router and walk around the apartment with a laptop or phone, measuring the signal strength so that it is enough everywhere. Choose the best point, and there will be less hassle in the future.
Another problem is to position it so that the provider’s cable can reach your router without destroying the apartment. Usually, when installing the Internet, the technician can immediately tell where to run the wire - this is done precisely for better signal coverage at home. But if it’s already lying down, you’ll have to adapt to it.
Additionally, you may need to “assemble” the router at this stage - often the antennas come unscrewed, and it would be necessary to screw them on.
Change Password
I'll leave it here just as a reminder. If you have already set a password for the Wi-Fi network, then there is no password for connecting to the router settings yet, or it remains standard.
Be sure to change it! Otherwise, any network user will be able to connect to you and activate site spoofing!
At this stage, the router installation process can be considered complete! Use it and enjoy. If something doesn’t work or any problems arise, read on or write your story in the comments.
Power and Ethernet cable
You can connect your computer to the Internet either directly, using a network cable laid by the operator in an apartment or private house, or through a router or router. The latter is more convenient, if only because the user receives a full-fledged Wi-Fi wireless network.
It doesn’t matter whether in the future he decides to find the best company and change the old provider to a new one or leave everything as it is for a few more years; The same cable is used to ensure communication; you just need to adjust the “input data”. Doing this is no more difficult than understanding why Wi-Fi on your phone is not working; Having once understood the intricacies of connecting and setting up Wi-Fi, the user will be able to repeat this operation as many times as needed in the future.
The first step you need to take to connect to the Internet using a router is to open the box with the device and carefully examine its back wall. Usually all the connectors are there; For example, we chose a model from TP-Link, which is no significantly different from the others.
On the back wall of the router there may be the following connectors necessary to establish a wireless connection (from left to right):
- Pin for connecting the power supply. Routers for home use are connected directly to the mains or uninterruptible power supply; That is why the user must choose a place to permanently place the device based on the availability of sockets within reach, the ability to lay an extension cord, and so on.
- Wi-Fi device enable/disable button. It can be placed on the front panel of the router, and is also absent on the cheapest models.
- A button or lever to turn on/off the transmission of a wireless signal that does not affect communications with the Internet via cable. Very often absent on routers, but extremely useful - especially if you plan to use the device to reconfigure your home wired network.
- Connectors for connecting USB devices and indicators of their operation. They can be used both to update the router firmware from a flash drive, and to download files directly to removable media without using a computer as a middle link - of course, if this option is supported by the device itself.
- A connector for connecting an “input” Ethernet cable, or LAN, brought into the house by the provider. In the vast majority of cases, it is painted blue and placed on the rear panel separately from the next block.
- Connectors for transmitting an Internet signal via an Ethernet cable, or WAN. Useful if you need to connect devices that are not equipped with wireless signal receivers to your home network; in addition, one of them (any) will be used during the initial setup of the router.
- Button for pairing devices using the WPS standard. It is found on most modern models and can, like the power on/off button, be located on the front panel of the device.
To connect the router to the Internet, the user needs:
- Connect the Ethernet cable to connector No. 5 (blue) until you hear a characteristic click. This allows you to receive a signal from the provider. If you later need to remove the wire, you must first carefully press on the protruding plastic handle, facing up or down, depending on the location of the connectors, and only then pull the cable.
- Connect the short Ethernet cable included in the kit to any of connectors No. 6 (orange), and the other end to the contacts of the computer or laptop that have the same shape. A wired connection is only necessary for the initial setup; then, if the device has a wireless signal reception and transmission module installed, it can be removed.
- Connect the device to the network using the power supply supplied by the manufacturer. At the same time, you can start a computer or laptop: the next step is no longer possible without a working device.
Advice: if the router is planned to be mounted in a high place (far from a desktop computer), and in the future the user assumes the need to reinstall the Wi-Fi network from scratch, it makes sense to get a long Ethernet cable, which will allow you to switch devices, even located at a great distance from each other friend.
Possible problems
The most common problems from our readers:
- Doesn’t connect to the router - try from another computer or phone, try rebooting everything, check that the cable is connected correctly. As a last resort, we reset the router (press the RESET button).
- The password doesn't work - you can't recover it, if you don't know it and nothing works, you'll have to reset the settings and install everything again.
- There is no Internet - check the type of connection (usually PPPoE), check that all devices do not have it, call your provider.
That's all the problems. If you forgot something, write below. And with that we say goodbye! Choose only WiFiGid.ru in the search!