Among all the many things you can do on your iPad, one of the simplest but most important is taking screenshots. Whether you're trying to share a funny meme or perhaps you've encountered a bug and need help, screenshots will come in handy.
However, if you are new to using iPad, you may not know how to do this. Well, this is for new users and those looking for more ways to take screenshots. We've put together a complete guide on all the ways to take a screenshot on iPad.
How to take a screenshot on iPad Pro
The iPad Pro doesn't have a Home button, so screenshots are taken with a different combination of buttons.
- Go to the screen where you want to take a screenshot.
- Make sure that all the elements you want to see in the photo are on the screen.
- Simultaneously press the Power buttons on the top of the iPad Pro and the Volume Up button on the right side of the iPad Pro.
The screen will blink white and you will hear the sound of the camera shutter clicking (if the sound is on).
Areas of application of screenshots
It has long been known that products manufactured by Apple differ from other electronic equipment for a similar purpose both in design and in some of their functions. Many of those who are not personally familiar with its products believe that they are very heavy and difficult to handle, but this is far from the case. Some operations are much easier to do on Apple than on devices from other manufacturers. One of them is taking a screenshot from the iPad screen.
Saving screen content as a screenshot can be very useful in many cases. For example, it's much faster to take a snapshot of a website page with the information you want using the display snapshot option than to highlight and paste text in the Notes app. It happens that users, in order to remember the final figure, create a screenshot with the calculations of the calculator. When planning a fishing or hunting trip, or moving around an unfamiliar city, take a screenshot from the Maps application, and you will never get lost in an unfamiliar area.
How to take a screenshot on iPad, iPad mini, iPad Air or iPad Pro (2017 and older)
- Launch the app (or apps in picture-in-picture mode) you want to take a screenshot of.
- Position the app(s) exactly how you want them to appear in the screenshot.
- Press and hold the Power
- Quickly press the Home .
- Release both buttons.
While you can try pressing both buttons at the same time, holding down the Power button a moment before pressing the Home button will reduce the chance of Siri accidentally turning on or if you need to take a screenshot of the screen. You must do this quickly or the power off screen will open.
Once the screenshot function is successfully launched, you will see a white flash and, if the sound is enabled, you will hear the sound of the camera shutter. This confirms that the screenshot was taken and saved to the iPad.
Part 3: Take a screenshot when the buttons don't work
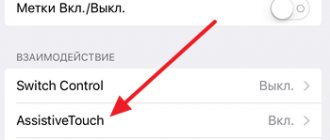
Method 1: Take a screenshot when the buttons are not working using Assistive Touch
If the power button or home button on your iPad is not working, you will no longer be able to take screenshots on your iPad using the buttons. But you can create a "soft button" on your iPad instead of hardware buttons. And you can also use the soft buttons to take screenshots easily. To learn how to take a screenshot on iPad using Assistive Touch, simply follow these steps.
Step 1: Go to Settings > General > Accessibility, then scroll down to Assistive Touch and turn it on.
Step 2. Go back to the screen you want to capture, then click on the little circle you activated just now to bring up the options.
Step 3: Now tap on Device > More and you will see the Screenshot option. Just click on this option and it will automatically take a screenshot on your iPad.
Method 2: Take a screenshot when buttons are not working with Apeaksoft iOS Screen Recorder
You can also take a screenshot on iPad using third-party software such as Apeaksoft iOS Screen Recorder. It is a professional software that allows you to mirror and record the screen of your iOS device in the easiest way. It fully supports all iPhone, iPad and iPod Touch models. And it is also compatible with iOS 11 and later. Before recording your screen, you can customize the recording settings as you wish. And when you see your iOS screen on your computer in real time, you can record it with just one click. Once the recording process is completed, it allows you to output HD videos in MP4 format with high quality. You can follow these steps to take a screenshot on iPad when the buttons are not working.
Step 1. Download iOS Screen Recorder
First of all, download Apeaksoft iOS Screen Recorder from the official website and then install it according to the instructions. Then run it on your computer.
Free Download
Step 2. Connect to the same network
The prerequisite for iPad AirPlay on your computer is that the two devices are connected to the same network. So check your Wi-Fi connection before taking a screenshot on your iPad.
Step 3, Mirror iPad to Computer
Swipe up from the bottom of the iPad screen to access Control Center. And then tap Screen Mirroring in iOS 11 (in iOS 7, 8, 9 you need to tap AirPlay; in iOS 10 tap AirPlay Mirroring). Then you need to select Apeaksoft iOS Screen Recorder to enable mirroring.
Step 4. Take a screenshot on iPad
When you see your iPad's screen on your computer, you can take a screenshot by clicking the record button. When it finishes, you will see the folder where the file is saved.
Check this post to get more screen recording app for iPhone and iPad.
How to edit screenshots using Markup
In iOS 11 and later, as soon as you take a screenshot, it will appear in the lower left corner of the screen and will remain there for a few seconds before disappearing.
With Markup, you can use a marker, pencil, eraser, or text to edit and write comments on a screenshot. You can also change the color of these tools: white black, blue, green, yellow and red. There is a markup tool that can be used to crop a screenshot. Touch and hold one of the edges or corners and drag the markup to the position you want.
There are four additional tools that can be added to a screenshot in " Markup " by clicking on the " More " button in the bottom right corner of the screen (looks like a plus symbol), namely:
- Add text field - allows you to add text to the screenshot. Click on it to select a tool, then click on the added text field so the keyboard appears so you can write your comment.
- Caption - If you already have a caption in Preview, you can add it to your screenshot.
- Magnifier - this function allows you to enlarge a specific area on the screenshot. You can change the size or border of the magnifying glass, and zoom in or out.
- Shapes - You can add a specific shape to the screenshot. You can also change the shape's outline and adjust its size and shape by dragging the edges.
If you made a mistake, you can cancel the last step by clicking the cancel button in the lower left corner of the screen. Conversely, you can repeat any steps by clicking the repeat button in the same place.
You can also share your screenshots directly from the Markup interface. Just click on the share button and select the service.
Question answer
Apple tablet users ask a lot of questions related to taking and saving screenshots.
Editing a Screenshot on iPad Using Instant Markup
Instant Markup is a new feature that appeared in iOS 11. It is a toolkit for working with images, a built-in graphic editor. With its appearance, the user does not need to download additional applications in order to somehow change or supplement the taken picture. You can edit the image just like any other photo on your device. The text overlay function, standard tools (pencil, marker, eraser, etc.), and magnification of individual fragments are available.
Where are pictures saved on iPad?
The standard built-in application for storing all photos on the device is “Photos”. It's included in every iPad's factory settings. If this app doesn't work for you, you can assign a new storage location or simply transfer screenshots to a folder or another device using the tablet's file transfer capabilities (online and offline). If the user has iCloud, the pictures will go to the “cloud” and appear on all devices synchronized with the iPad.
Where are screenshots stored on iPad and iPad Pro?
If you don't use the Markup feature, you will still have access to screenshots. You can also edit and share them using the Markup feature or photo editor for iOS.
- Launch the Photos .
- Click on " Albums ".
- Click on " Screenshots ".
You can also find screenshots in the main Photos and Camera albums, but you'll have to look for them among everything else.
Screenshot editor in iOS on iPhone and iPad: how to enable and use
Starting with iOS 11, the mobile platform for iPhone and iPad offers a new, more powerful way to take screenshots and even annotate them.
In terms of controls, the process remains the same: you press and hold for a second the Home button on the front of the case and the Power button on the left side.
Next, a small thumbnail will appear in the lower left corner of the screen; clicking on it will allow you to view the screenshot.
A special editor will appear on the display, with which you can crop images and add comments to it using a marker, pencil or pen (six colors available).
You can add a digital signature, various elements such as circles or arrows, or highlight a specific element using a magnifying glass.
If you don't want to edit the screenshot, just click the Done button in the top left corner and save it to your photo album or delete it.
ON TOPIC: How to record video from the screen of iPhone and iPad without jailbreak and a computer.
How to Take Burst Photos on iPhone
In turn, tapping and sliding the shutter button to the left will activate continuous shooting as long as you hold your finger down. Of course, there is a risk that a QuickTake video will happen instead. The problem is adding too many gestures to simple controls. But a nice feature is that the burst counter displays the number of shots taken right inside the shutter button.
♥ BY TOPIC: List of recognized songs in built-in Shazam on iPhone: how to view.
How to view photos taken in Burst mode
1. Open the Photos app on your iPhone or iPad.
2. Go to the Albums tab and select the media file type – Series. Take a closer look, serial photos are displayed in the Camera Roll as a stack of photos.
3. Tap Select in the lower corner of the screen.
4. Scroll through the virtual film slider to view the entire series of images.
See the dot below the image? This icon indicates that - according to Apple's algorithms, of course - you have the best image in terms of focus and detail. Of course, the final decision is still yours to make, and you are not at all obliged to be guided by the opinion of the “robot”.
♥ ON TOPIC: How to take photographs correctly: 12 simple tips for those who want to improve the quality of their photos.
How to take a screenshot for iPad, iPhone 8, 7, 6 and 6s, 5 and 5s and other earlier models
To take a screenshot of the screen for these mobile gadgets, press the “Volume Up” + “Home” or “Side” + “Home” key combination at the same time. If your iPad has the “Face ID” option, then the algorithm will be slightly different. To take a picture, simultaneously hold down the “Volume Up” and “Power” keys, which is located on the top edge of the tablet. If your device supports Apple Pencil stylus control, then to take a screenshot, simply swipe it up from any bottom corner.
The saved photo will appear in the left corner at the bottom of the screen. Also, like all iOS models, this thumbnail can be edited using the “Markup” option. To do this, capture the miniature for a few seconds. If you want to send a screenshot via messenger or another application, click on the photo once. To remove it from the screen, slide the thumbnail to the left.