The hard drive of my computer is HDD with a capacity of 1 TB. Recently he began to show signs of imminent death. There was a muttering and some extraneous sounds when it was working. I decided to replace it with a more modern, fast, solid-state SSD drive.
After I installed the SSD drive, I needed to transfer all the data from the old HDD drive to it. Essentially, it was necessary to clone information from one hard drive to another without losing data and the functionality of all programs, and also make sure that the computer started from the new hard drive.
I decided to do the system transfer myself. I found a simple and quick way to do this, which I will describe step by step.
We evaluate the speed of the HDD hard drive
Before starting to transfer Windows from HDD to SSD drive, I will fix the data exchange speed on the old drive.
After we clone the system to an SSD and start the computer from this disk, I will again measure the speed of data exchange with the disk and compare how much it differs from the HDD disk.
The Windows 7 operating system is installed on my computer. I will use it as an example.
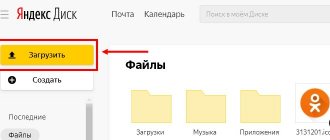
We go to the control panel - click the “Start” button and in the window that opens, select the “Control Panel” item.
In the window that opens, select “Security System”.
Next, go to the “System” link.
Opposite the “Score” item, click on the link: “You need to update the Windows Experience Index for this computer.”
In the list of the window that opens, look at the bottom line: “Main hard drive: Data exchange speed with the disk,” and to the right of it is an indicator of this speed. For me, for the HDD drive it is 5.9 out of 7.9 possible. I remember this parameter.
Basics of Sharing SSD and HDD
Just in case you are not familiar, this will help you know the difference between SSD and HDD. Essentially, because SSDs have no moving parts and use flash memory, they can read and write data much faster than a hard drive with spinning platters and a read head.
This results in everything loading faster, including your operating system, app launches, file transfers, game load times, etc. So, in an ideal world, you would have all your data on an SSD to keep everything running smoothly.
However, SSDs are much more expensive than comparable hard drives. At the time of writing, you can buy a decent 1TB SSD for around $100, and for the same amount you'll get a 4TB HDD.
If you're building a desktop computer, you can choose which drives to put in it, so the only issue is cost. But some off-the-shelf desktops and laptops come with a small SSD and a large hard drive. Let's look at how to prioritize which data goes where.
Hard drive cloning program
Many different programs have been created for transferring Windows to SSDs and cloning hard drives. I used one of them “Paragon Migrate OS to SSD”.
This program is good because:
- You can download it on the Internet without any problems. Just type in the search engine the request: “paragon migrate os to ssd Russian download” and download.
- Easy and fast installation.
- It has a very simple and understandable English and Russian interface.
- It is possible to clone a hard drive, either completely or selectively.
- It works quickly and without failures.
Download and install the Paragon Migrate OS to SSD program. After installation, a shortcut will appear on your desktop.
Necessary Requirements
When choosing a drive, you should carefully look at the storage size depending on the data that is on the hard drive. You will also need special software for cloning: there are many programs that allow you to transfer one storage device to another. Among them is AOMEI Backupper Standard, which clones not only existing data on the disk, but also deleted files.
A USB-SATA adapter will allow you to connect a solid-state drive via a laptop's USB port. A desktop computer user can skip this step by installing the SSD as an internal drive (secondary).
You will also need a standard Phillips head screwdriver.
Transferring the system from HDD to SSD
My HDD disk is divided into two C and E. I assigned the letter A to the new SSD disk, which is incorrect, purely as an example of what not to do. In the future, the system itself will rename it and we will see when this happens.
The main drive of the computer on which the Windows operating system is installed and where all programs are automatically installed is usually the C drive.
In my case, this is also drive C. I will transfer the system and all data from drive C (HDD) to drive A (SSD).
Disk cloning will be carried out in two stages, namely:
- disk cloning program;
- setting up Bios to start a computer from an SSD drive.
Estimating free space for system migration
Launch the Paragon Migrate OS to SSD migration program and click “Next”.
The program begins analyzing the hardware and searching for installed operating systems on the computer. It takes a little time.
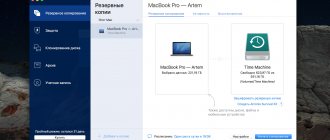
As soon as the program finishes searching, a window will open to copy the system to the SSD drive.
It will provide information about how many GB the program will copy from the old hard drive, and how much percentage will then be occupied on the new drive. In my case, the program will transfer 234 GB. On an SSD drive this volume will take up 25% of the total volume.
Also, the migration wizard prompts you to select folders that need to be copied to the new hard drive. To select, click on the link as shown in the figure below.
Selecting folders to transfer to SSD
That’s what’s good about the Paragon Migrate OS to SSD migration program: it allows you to select specific folders and files for transfer, rather than copying all the information indiscriminately.
Click on the folder selection link, and a window opens with a list of all the data on drive C.
By default, all folders and files will be activated by checking the check boxes. If you do not want to copy something, then uncheck the checkbox next to the unnecessary folder or file. I will clone the entire disk and therefore leave everything as is. After selecting, click “OK”.
The program will start calculating the copy size again, but this time taking into account the information you selected. It takes very little time.
In my case, the program calculated that 227.6 GB of information would be transferred to the SSD disk, which would take up 24% of the disk space.
After reviewing the information, click “Copy”.
In the next window, the program will warn you that during the transfer process the SSD disk will be formatted and all data on it will be lost. This warning will allow you to first copy and save the necessary information if the disk is not empty and you forgot about it.
To begin transferring data, you must agree to format the new disk. Only then will the “Next” button become available. Put a tick in the check box and click “Next”.
Macrium Reflect
The free Macrium Reflect program allows you to clone entire drives (both hard drives and SSDs) or individual sections, no matter what brand your drive is. In addition, you can create an image of a separate disk partition (including Windows) and later use it to restore the system. Creating bootable recovery disks based on Windows PE is also supported.
After launching the program, in the main window you will see a list of connected hard drives and SSDs. Mark the disk where the operating system is located and click “Clone this disk”.
At the next stage, in the “Source” item the source hard drive will already be selected, and in the “Destination” item you will need to indicate the one to which you want to transfer the data. You can also select only individual partitions on the disk to copy. Everything else happens automatically and is not difficult even for a novice user.
Hard drive cloning
The program begins copying the selected folders and files and will show how long it will take. In my case, I need to copy a lot of 227.6 GB, which will take almost 36 minutes.
Once the system migration is complete, a window will open notifying you that the data migration was successful. But that is not all. Now we need to make sure that the computer starts from the new SSD drive where we cloned the information. To do this you will need to make small changes to the BIOS.
Do not rush to close this window and carefully read the information. It practically contains instructions for BIOS settings.
Hard drive letters
As I already said, I specifically assigned the letter A to the new drive to indicate an error. As a rule, the letters A and B are assigned to devices that work with removable disks. Currently, such devices are card readers. External reading devices connected to the computer receive the following letter to designate the main hard drives.
For drives designed to read laser CDs and DVDs, the letter is assigned last and can be floating.
All hard drives are assigned the letters C, D, and so on. Any physical hard drive can be divided into several partitions, each of which will operate as a separate logical drive. In this case, each logical drive, by analogy with a physical one, will be assigned its own letter.
What happened to my drive A after migrating the system to it?
After I cloned drive C to drive A, the system automatically renamed it to drive D, since the letter A is not intended to represent a hard drive.
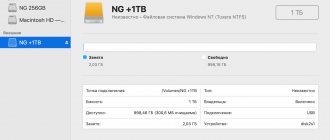
I'll open both hard drives to compare how the migration went.
As you can see, the SSD drive D has an exact copy of drive C (HDD).
It remains to change the settings in the BIOS so that when starting, the computer starts from the new hard drive.
Changing the boot order in the BIOS
The BIOS is entered when the computer is rebooted. Usually at the bottom there is an inscription to enter bioselect. It will be written down which keys need to be pressed multiple times before the operating system starts loading in order for the BIOS panel to open.
These can be the keys F1, F2, F10, f12, Esk, Delete. Sometimes entering the BIOS consists of a key combination.
After entering the BIOS, you need to enter the Boot section, and then into the partition with hard drives. The appearance of the BIOS may be different, but the essence is the same.
For example, you may have a BIOS like this. In the figure below, the Boot and Boot Device Priority section is already open. You need to click on the name of the disk opposite 1st Boot Devise and in the Options window that appears, click on the name of the desired disk. It is queued first to be read at startup.
On my computer the BIOS looks like this.
I go to the Boot section. Next, I select Hard Drive BBS Priorities in the menu and see that in the first position of the computer boot option Boot Option #1 there is an old HDD drive. SATA: WDC WD10EADS-00L5B1, and the new SATA hard drive: Samsung SSD 860 EVO 1NB is in second position.
You just need to swap them. To do this, click on the name of the disk opposite Boot Option #1 and select the model of the new SSD disk from the list. In my case, I click on the name Samsung SSD 860 EVO 1NB. It will move to the first position and become the main one when the computer boots, and the old HDD disk will automatically move to the Boot Option #2 position.
After that, press F10. The window that appears will ask: “Save configuration changes and exit setup?” — Save configuration changes and exit the setup program? We agree - “Yes” and the computer will reboot.
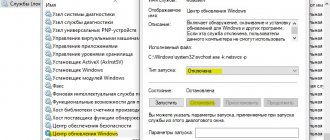
Driver Update
After making changes to the BIOS, automatic installation of drivers will begin. A message indicating successful driver installation should appear next to all disks. After which you will be prompted to restart your computer.
4. AOMEI Backupper Beta
Download https://www.backup-utility.com/download-aomei-backupper-beta.html
Products from AOMEI - the backup program Backupper and the disk manager Partition Assistant - are among the best in their niches, and among their arsenal they include the ability to clone disks. But AOMEI’s policy lately has not been particularly generous: for example, everything related to Windows porting, the company’s programs do only in licensed editions. And even Partition Assistant will clone disks for free only if there are no system partitions and Windows is installed. A narrow window of opportunity in this regard is currently present only in the free Standard edition of the Backupper program and its new incarnation, a beta version with an updated interface - AOMEI Backupper Beta. With her participation, we will look at how hard drives are cloned.
In the AOMEI Backupper Beta window, go to the “Clone” , select the “Disk Clone” .
At the “Source Disk” , we indicate the source disk to the program.
At the “Destination Disk” , specify the destination disk.
The program warns us that all partitions and data on the latter will be deleted, and it itself will be overwritten.
At the “Operation Summary” , check the “SSD Alignment” , this is the alignment of the partitions. And we can click “Edit Partitions” .
This is the ability to edit the layout on the destination disk. If it is larger in size than the source, the “Add unused space to all partitions” suggests that we distribute the remaining space evenly across all partitions. “Manually adjust partition size” option , if necessary, we can adjust the size of the destination disk partitions.
The “Copy without resizing partitions” option means cloning without any changes, leaving empty unallocated space at the end if the destination media is larger in volume than the source. We will choose it in our case. We carefully check everything and start the cloning operation with the “Start Clone” .
Finally, click “Finish” .
And we can check the work done by the program in the diskmgmt.msc .
Startup after transferring the system to an SSD drive
After updating the drivers and rebooting, the computer will start working from the new SSD drive. Since we made it the main one in the BIOS settings, the letter C will be automatically assigned to it.
The old disk automatically became disk D and you can delete all information from it, that is, completely free up space.
On my PC, the old HDD drive is not at all reliable. There is a fear that it could fail at any moment. Therefore, after transferring the system to an SSD drive, I will simply remove it from the system unit or replace it with another hard drive.
Evaluating the result of Windows migration
Visually, you can see that the Windows operating system loads in a few seconds when the computer starts, instead of several minutes. It is also very noticeable that all programs open almost instantly.
To understand how much the PC speed has increased after transferring the system from hdd to ssd, we will re-evaluate it through the control panel. To do this, we repeat all the steps that are described at the very beginning of the material.
Click "Start", select "Control Panel", then "Security" - "System" and then click on the link "You need to update the Windows Experience Index for this computer."
The following window will open with the old system parameters. To get new data, you need to click on the “Repeat assessment” link, as shown in the figure below.
After this we see that the speed of data exchange with the disk has increased by 25%.
| HDD drive | SSD drive |
| Data exchange speed – 5.9 | Data exchange speed – 7.4 |
Decide which apps to install
Once Windows is installed, you'll (hopefully) have some space left over for apps. But with limited space, which ones should you install on an SSD?
All programs benefit from the speed of the SSD—long boot times are reduced and shorter boot times become almost instantaneous. So, the most important apps to keep on your SSD are the ones you use the most. Productivity apps like Office, photo editors, and your browser are relatively small in size and benefit from speed.
If you use any powerful software such as video editors or IDEs for programming, they will work much better on the SSD as well. However, they take up a lot more space, so you may not have enough room for them. Prioritize the small apps you use most often.
Another category of applications that benefit greatly from SSDs is video games. The speed of an SSD dramatically reduces boot times, so you can install the games you always play on this drive. But since many modern games take up tens of gigabytes, you may only have room for one or two.
Why carry out the transfer?
We have already partially answered this question - this is expanding disk space. But users have to solve a difficult dilemma if their plans include integrating a newfangled SSD drive into their computer. The fact is that these devices, while possessing a huge advantage in operating speed, are characterized by a relatively small overwrite limit. Therefore, the use of such a disk for storing frequently erased and written data, that is, as a storage for various data, is very controversial.
Classic HDDs are more preferable in this regard, since they have a much longer resource: they can last up to 10 years and still be in good condition. But the low speed of data exchange via the SATA II interface does not suit many, especially if the disk is used to install the OS - it loads too slowly.
So using solid-state drives to install Windows is a completely justified solution. Another thing is that installing an operating system is a troublesome task, and in this case you will lose all the programs previously installed on the system disk.
But there is a way out - disk cloning, or an exact transfer of Windows to a new medium in the configuration that is most familiar to you.
5. DiskGenius
Download https://www.diskgenius.com
The powerful, functional disk manager DiskGenius can do a lot of things, and most of its capabilities are available in the free edition. And these possibilities include disk cloning. Storage media in the program window are displayed in the panel on the left, where you can see their sections and contents in a tree structure. Information by section is also presented in a detailed table in the main part of the window and graphics at the top.
To start the cloning operation, select “Clone Disk” “Tools” .
At the “Select source disk” , specify the source disk.
At the “Select target disk” , specify the destination disk.
In the parameter setting window, specify the cloning option:
• “Copy all sectors” – sector-by-sector copying; • “Copy all valid sectors according to the layout of the file system” – copying all available sectors according to the file system layout; • “Copy all files” – copying all files, i.e. normal cloning.
In our case, we need the latter. We start the operation with the “Start” . After which DiskGenius will warn us about destroying the contents of the destination disk and overwriting data on it.
Next, we will be offered two options for carrying out the cloning operation - in preload mode in the WinPE and the so-called hot migration “Hot Migration” , also known as “hot” cloning. Let's choose the last one.
Finally, click the “Complete” .
And we can look at the result of the work done in the window of the DiskGenius program itself.