Windows operating systems
23.08.20194703
The owner of a computer or laptop who understands what UEFI Boot is and how it differs from BIOS probably knows very well how to install or reinstall the operating system. Another question is much more interesting: how to quickly remove the old version of Windows after installing the new one. Let's try to figure out how to do this.
Removing old Windows after installing a new one - step-by-step instructions
In a situation where the computer starts to work slowly, the only correct solution among the recommendations for setting up the computer yourself, you will find reinstalling the operating system, but this is not always done correctly, so then there is a need to remove the old Windows after installing the new one. Usually the OS is installed on a clean partition, but if it so happens that you installed the new Windows operating system in the same place (in the same logical drive) as the old one, it will automatically remove the files of the old operating system into a folder called “Windows.old” " After all the necessary files have been saved, the folder with the old OS can be deleted. Moreover, there is never too much space on your hard drive. There are two ways to do this.
Device memory
Next, go to the “Device Memory” tab.
Then we go to the “Free up space now” item (Fig. 4). After which, we will see various types of temporary files that can be deleted. And thereby free up disk space.
Now, check the boxes in front of those items that we want to delete. First of all, we are interested in the item “Previous Windows installations” (Fig. 5). As we can see, they occupy 25.2 GB; you must agree, this is a very significant amount of disk space, which is wasted.
This is especially true for SSD drives, which are expensive and therefore usually have a small capacity. And here it is very important to have free space on your hard drive to install the necessary services and programs.
| Read the articles: • Blog analytics using Yandex.Metrica and Google Analytics • Automatic compression of images in Jpeg and Png on a blog • Correct insertion of images into blog articles |
Removal using Windows
Now you have already figured out the BIOS settings on your computer, your new system is running and you are ready to work. But to make it uncomplicated, Microsoft has already thought about how to remove old Windows after installing a new one in a convenient way for the user, so they added such an item to the standard software as “Disk Cleanup”. We will perform all work performed in the Windows 7 operating system. In other operating systems of the Windows family, the procedure will be the same. Let's take a step-by-step look at how it works:
- Click the Start button (bottom left corner of the screen).
- Type “Cleaning” into the search bar.
- At the top of the window, select “Disk Cleanup”.
- The application selected in the previous step will open.
In the window that appears, select the drive where the operating system was previously installed and click OK. Next, the program will estimate how much disk space can be freed up and open the following window, in which you need to check the box “Previous Windows installations” and click OK. The program will ask again if you want to delete the files. Agree, click “Delete Files”, and in a few minutes the files from your previous Windows installation will be deleted.
There is another way to open a program that will clean up the disk. Click “Start”, then “All Programs”. Then select “Standard”, then “Service”, and then “Disk Cleanup”.
Removal using TakeOwnershipPro
You can delete the “Windows.old” directory using a simple utility TakeOwnershipPro , which you can download from https://www.top-password.com/download.html. After installing the utility, it will appear as a separate item in the Explorer context menu. To delete a directory, go to the context menu for the folder to be deleted and select the “ TakeOwnershipPro ” item.
After clicking, a program window will launch where it will scan and assign rights to files and directories in order to subsequently remove them.
The scan may take two minutes or longer, depending on the size of the folder being deleted. After waiting for the scan to complete, click the Take Ownership button. After which the folder will be permanently deleted in about two minutes.
Manually removing an old Windows installation
If for some reason you want to delete the folder with the old version of Windows manually, you will have to tinker a little and make a number of settings.
First, you need to log in with an administrative account with full rights. Otherwise, you will not be able to delete the pack.
Now let's make the settings step by step:
- Open My Computer.
- Open the drive with the operating system installed (for example, local drive C).
- Find the "Windows.old" folder.
- By right-clicking on the folder, open the context menu and select the “Properties” line.
- In the window that opens, select the “Security” tab.
- Click the "Advanced" button - the "Advanced security settings for Windows.old" window will open in front of you.
- Go to the Owner tab and click the Edit button.
- In the next window, select your account as the owner, that is, the account from which the deletion will be performed, and click “Apply”.
- You will see a message stating that you have become the owner of the Windows.old folder - click OK and close the properties window.
- You can start deleting the folder with the old Windows operating system.
There are also two ways to delete a folder. The first is to right-click on the folder icon and select “Delete”. Agree that you want to delete the folder. Then empty the trash. The second is to select the folder by left-clicking the mouse, simultaneously pressing the Shift+Del keys on the keyboard, and agree to delete. The folder will be deleted bypassing the trash, that is, it will not need to be emptied.
After you have completed installing the new OS and deleting old files, we recommend reading the article about drivers for Windows 10, since not all of them are included in the installation package. If you have not yet switched to a new system, then you can find out how to download drivers for the “seven” here.
What to do with unnecessary windows files?
After removing the second Windows 7 from the computer, the old operating system files will remain. You must select the area of the hard drive where the second system was installed. The best option is to format it for later use to store information and files on it.
Partition formatting requires special attention. Please check it thoroughly before deleting all content. This disk contains the following directories: Windows, Program Files, All Users, etc. The partition name should not be “C”; it must be a different letter.
Before formatting, you can save files from this local drive if necessary.
It is recommended to first copy data from the folders: desktop, my documents, my photos, etc.
Cleaning the boot menu
After you have installed a new operating system on the same partition, you may have a problem in the form of a menu that prompts you to choose which OS to select when booting. This problem is quite easy to solve.
- Click "Start";
- In the search bar, type msconfig;
- Select this program in the search results;
- In the next window, go to the “Download” tab;
- Select the old operating system;
- Click the “Delete” button, after which the program will inform you about the need to reboot;
- Restart your computer.
After all the above steps, the operating system will boot in normal mode and the menu for selecting the operating system will no longer appear.
There is nothing complicated about how to remove old Windows installations; the main thing is to decide on the method of execution. Now you can start setting up the sound on your computer, setting up drivers, networking, and other things with peace of mind. Remember: in order to avoid the procedure of uninstalling previous versions of operating systems, it is recommended to install Windows on a pre-formatted partition. Thus, you will save your new operating system from garbage in the form of programs and files of the previous version of Windows.
Source
Using third-party programs to format the system disk
You can also delete all data from the system disk using third-party utilities. Among the most common are:
- MiniTool Partition Wizard is a secure disk manager that can work with both HDD and RAID arrays.
- EASEUS Partition Master is a utility for working with virtual hard drive partitions and physical drives, supports all file systems and has a built-in function for checking the disk for bad sectors.
- Partition Magic is a program with wide functionality for administering hard drive partitions.
- HDD Low Level Format Tool is a utility with a simple and intuitive interface that helps you permanently delete information from any magnetic media.
- AOMEI Partition Assistant is a program for complete administration of computer partitions and testing HDD sectors. A step-by-step assistant with clear tips will explain to the user all the subtleties of its functionality.
- Acronis Disk Director is an application that allows you to change disk partitions without losing data, and also helps you delete protected information or restore accidentally erased data.
Note! In order for programs to work correctly with 10, you should install their latest versions.
“Ten” is the most advanced operating system from Microsoft at the moment, according to the majority of users. As a result, there is no point in removing it, especially from laptops on which it is already pre-installed. If such a need arises, then before uninstalling Windows 10, you should make sure that you have a licensed OS distribution or a sticker with a serial number on the device case.
Removing from the download list
As a rule, the process of removing old Windows consists of the user erasing the Windows.old folder from the hard drive that appears when installing a new OS. In general, this decision is absolutely correct, and it is this process that will be discussed in the following sections - but even if the directory is completely deleted, when you turn on the computer, the operating system selection window will continue to appear.
To completely remove it (with all the data contained on the disk or virtual partition), you will have to remove Windows 7 (or another OS) from the computer. Another option involves using the “System Configuration” window:
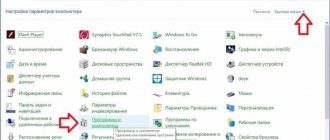
- Open “Control Panel” and go to the “System and Security” section.
- Enter “Administration” in the search bar and click on the heading that appears on the left.
- In the section with the same name, double-click on the “System Configuration” shortcut.
- Switch to the "Download" tab.
- Mark in the top list the old Windows that you want to remove after installing the new one, and click on the corresponding button.
- Consistently click “Apply”.
- Then decide when the computer should be restarted - without this step, the changes will not take effect.
Important: you need to carefully monitor which particular Windows startup entry is deleted by the computer owner - restoring old list parameters is not as simple as reducing it by one or more positions.
Stage 2: Removing system residues
After editing the boot items, you can proceed to clearing the information that remains from unnecessary Windows 10. There are several options for this procedure.
Option 1: Formatting the drive
The most radical method is to completely format the disk or partition - this ensures that all remnants of the second Windows are erased.
Read more: Formatting a hard drive in Windows 10
Option 2: Manual removal
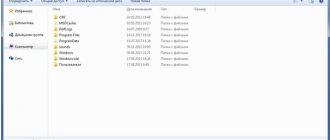
If the previous operation is not available, you can delete everything unnecessary manually. Open the drive where another copy of “ten” was previously installed. Find the folders from the list below and erase each one in turn:
- "Program Files";
- "Program Files (x86)";
- "ProgramData";
- "Windows";
- “Users” (for the English version – “Users”).
It is recommended to permanently delete by pressing the Shift+Del combination.
Now the second Windows 10 is completely removed from the computer.
EasyBSD
A convenient, easy-to-use program that allows you to edit the download list without calling “System Configuration”. A user who wants to remove the old Windows after installing a new one does not need to know how to enter the BIOS, and does not have to use the command line - the whole process is completed in a few mouse clicks:
- After downloading (link - techspot.com), installing and launching the program, you need to switch to the “Edit boot menu” tab.
- Select the old OS with a mouse click and click on the “Delete” button located at the top right.
- Confirm that you want to remove the entry from the download list.
- Click on the “Save” button and close the program.
Tip: if the wrong entry about Windows startup was deleted by mistake, you can restore the list to its original form by going to the “Add entry” tab and checking the appropriate option in the top field.
How to completely remove Windows 7, 10 from your hard drive
How to distribute Wi-Fi from a laptop to Windows - description of methods
If the OS is heavily infected with viruses or you need to install a different version of Windows, you need to know how to remove the operating system from your computer.
Important! Before you uninstall Windows, you should save all the necessary files and data to external media.
How to fully format a system disk using a bootable USB flash drive
To “reset” the hard drive and reinstall the operating system on it, you will need a bootable flash drive; to create it you need:
- Prepare a flash drive larger than 4 gigabytes.
- Download the Windows installation file image from the official Microsoft website using the link. To install the OS correctly using a flash drive, you will need a license key number. However, if you need to stop at the disk formatting stage, you can do without this data.
- Deploy the ISO image to a flash card using any image processing program (for example, UltraISO, Rufus or Alcohol 120%).
- Go to BIOS or UEFI and install boot from USB drive.
- Insert the USB flash drive into your laptop or computer and reboot the device.
- Following the installer's prompts, reach the step of selecting a hard drive for the OS.
- In the "Disk Settings" section, select the "Empty" or "Format" option.
At this stage, if further installation of the operating system is not planned, the assistant’s work can be interrupted.
After the process is completed, the device will have a completely empty hard drive.
Downloading data for a bootable flash drive from the official Microsoft website
Note! Windows distributions downloaded from file hosting services or from software collections may contain viruses, Trojans, or simply work unstably, putting user data at risk.
Disk Cleanup
If the old and new Windows were installed on the same media, be it a physical disk or a logical partition, you can remove traces of the unnecessary operating system as follows:
- Open the “Find” menu (the magnifying glass icon next to the Windows checkbox), enter “Disk Cleanup” in the search bar and click on the first result in the top list.
- Select the hard drive with traces of the old Windows from the drop-down list and click “OK”.
- Wait for the hard drive to prepare for operation.
- Check all available checkboxes and click OK again.
- And wait for the process to complete - it can take from five to ten minutes to several hours.
- Once finished, it won’t hurt to clean your computer of debris; This is not necessary, but it will allow the user to prevent some unpleasant failures in Windows.
Important: Despite popular belief, the cleanup list should not necessarily include the “Previous Installations” item. It all depends on the current state of the computer or laptop, including the extent to which the old Windows was removed; the user is only required to agree to the terms of the utility and delete all found junk files from the hard drive.
Removing Windows.old manually
Using the Disk Cleanup utility is a fairly lengthy process; If the computer owner is sure that there are no traces left on the hard drive except the Windows.old folder, you can try to delete it yourself, without resorting to the help of standard and third-party software products. To do this you will need:
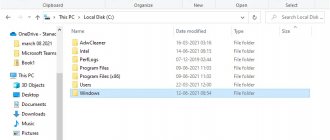
- Open Explorer and navigate to the drive containing the specified directory.
- Select by clicking the folder with the remains of the old Windows and click on the “Properties” button.
- Now click on the “Advanced” button.
- In the “Owner” field, use the “Change” link.
- Select your account as the new directory owner.
- And don’t forget to click “Apply”.
- Return to Explorer again. From here, the user can delete the Windows.old directory as in the trash, in order to then permanently erase the old Windows in the usual manner.
- So, by opening the drop-down menu, you can bypass the intermediate stage and save some time.
- All that remains is to confirm the action and wait until the files are completely erased from the hard drive - and then, as usual, clean the system of debris.
Residual files are not deleted
While following the second step of the instructions above, users may encounter an issue where the data is not erased. It can be eliminated in two ways.
Method 1: Change folder owner
Among the elements of the old version of “tens” there are also system ones, as a result of which users, when trying to delete them, are faced with an error about the lack of access rights. To solve this, you will need to change the owner of the directories, which the instructions on the link below will help you with.
Method 2: Deleting files as data for system rollback
The method above may not be effective - in this case, you can mark unnecessary files as a previous system installation by placing them in the Windows.old directory.
- Go to the drive where the required data is located. Create a new folder and name it Windows.old.
Move everything remaining from the remote system to this directory.
Next, return to the “This PC” window, select the desired drive, right-click on it and select “Properties”.
Open the "General" tab and use the "Disk Cleanup" item.
Wait for the information to load, then click “Clean up system files.”
In the next window, click OK.
Wait for the items to be removed.
The method is somewhat unusual, but very effective in solving the problem.
We told you about how you can remove the second version of Windows 10 from your computer. To summarize, we note that in fact the task is quite simple and any user can cope with it.
Command line
To remove the remnants of the old Windows, which was replaced by a new, more convenient operating system, you can use such a wonderful utility as “Command Line”; this is done in the following order:
- The owner of the computer again opens the “Search” menu, enters the request “Command Line” and right-clicks on the result that appears.
- Runs the utility as administrator.
- In the command line window, enter and apply the command rmdir /s Д:\Windows.old , where Д is the drive letter displayed in Explorer.
- Confirms deletion of the old Windows folder by entering the letter Y (Yes) and pressing Enter.
- Great! The directory containing the old Windows data has been completely deleted - and now the computer owner can use the new OS with complete peace of mind.
Stage 1: Editing the bootloader
Since during the installation of two or more operating systems changes are made to the bootloader, the first step is to edit it.
- Use the “Run” snap-in: press the Win+R key combination, then enter the text msconfig into the window and click “OK”.
Then go to the "Download" tab. A list of installed systems will be displayed here.
Now mark the system you want to erase and use the “Delete” button.
Close all open applications and restart your computer.
Thus, we have removed the other Windows 10 from the download and all we have to do is get rid of the residual files.
Overwriting files
If deleting the Windows.old folder using the previously described methods did not work out for some reason, you should try to forcefully erase the directory using a program to completely erase files. An example of a successful application is Wise Care Pro; To remove the remnants of old Windows using this program, the computer owner must:
- Download (link - wisecleaner.com), install, launch the application and go to the “Privacy” tab.
- Open the “Overwriting files” section.
- Click on the “Add files” button.
- And select the folder with traces of the old Windows in the Explorer window.
- By clicking on the “Erase” button, the user can finally and irrevocably remove the old Windows from his hard drive.
Live CD
Another almost 100% way to remove old Windows that has become unnecessary after installing a new one is to use a product for deploying the operating system without the need for installation. Using C9PE as an example, the process looks like this:
- The user starts from the Live CD and selects one of the available methods to boot the desktop.
- Waits for the information to load.
- And by opening the “My Computer” menu.
- Right-clicks on the title of the folder with unnecessary data.
- Selects the “Become an owner” option.
- Then it deletes the directory in the standard way.
Important: Depending on the file system and other settings of the system drive, it may not appear in the My Computer menu. In this case, the user should try other ways to remove the old Windows or download and run a Live CD from another developer.
Source
Additional methods to delete files from previous OS
As practice shows, some users get rid of unnecessary folders using the CCleaner program . It features a simple, intuitive interface and a convenient file manager. To work with the software you do not need to have any special knowledge. It contains tools for detailed cleaning of your computer from any junk, unnecessary and duplicate folders. You can speed up your PC, increase the available HDD memory and make its operation more stable. If necessary, the software saves backup copies of information for its subsequent restoration.
- From the main CCleaner window, go to the “Tools” item and select the “Erase Disks” tab, located at the very bottom;
- In the window on the right, indicate “Reliably erase all contents”, mark the required section, click “Erase”, wait for the process to complete and click Exit.
Please note that the option is analogous to full formatting; after performing the operation, there will be no data left on the specified drive!
Another option for eliminating the folder we are considering is the task scheduler .
- Through Start or from the taskbar, launch the scheduler;
- I'll have to look for an assignment SetupCleanupTask, then double-click on it;
- In the dialog box, right-click on the task name and click “Run”.
If the folders of the previous OS are not located on the disk with the current system to which you updated, you can simply format the media (provided that the partition does not contain materials important to you, this will delete them).