Working with files and directories on your computer can sometimes be accompanied by errors, in particular the appearance of a message with the text “Request permission from SYSTEM to change this folder.” With this development of events, it is not possible to perform any actions with the object. The problem is relevant for the operating systems Windows 7, 8, 10, and an obstacle of this kind was conceived by the developers in order to limit user intervention in system data. Most often, the error is caused by attempts to delete or correct operating system folders and files, which may be vital for the full functioning of the Windows OS, and their elimination can lead to incorrect operation.
Possible solutions
- If the problem is a software glitch, it may be enough to restart the computer.
- When using a file in another application, you need to determine which program is using it and close it. In some cases, you may also need to access the Windows Task Manager to stop background processes such as torrent clients.
Sometimes the system refuses to delete even seemingly empty folders. This may be due to File Explorer settings not to show hidden files. In other words, the folders only appear empty; they contain information that is hidden from the user. Therefore, you should first make sure that these directories really do not contain information. Otherwise, you can unintentionally erase important data and disrupt the stability of the system.
- If files and folders are visible, but they are not deleted due to the lack of rights of the account on behalf of which the system was logged in, you can do one of the following: use another entry. Restarting the system as a user with administrative rights is the easiest and most painless option. In this case, the OS settings do not change, and after carrying out all the necessary manipulations, you can return to the previous account;
- get your license. You can increase the level of rights of the current account. However, this method reduces the computer’s security not only from careless user actions, but also from malware. The virus will cause much more damage to the PC if it entered as an administrator;
- turn to third-party applications. There are utilities that specialize in forcibly deleting information, including protected information.
Uninstall by granting administrator rights
A user with normal rights can create, erase and modify most files and folders, but does not have access to modify system information, which serves to protect against unintentional and careless actions. The administrator account has no restrictions, within which you can regulate the operation of the entire system.
The best solution is to use the two entries alternately. User - for everyday work, administrator - for setting up the system.
Only an administrator can grant superuser rights to a regular account. Therefore, the following methods are only suitable if such an opportunity exists.
Through system settings
- Press the Win key or the on-screen Start button. In the search bar located at the very bottom of the list that opens, enter the query “User Accounts”.
Select “User Accounts” at the top of the list
Select “Manage another account”
Change the account type to “Administrator”
Via command line
Using the command line requires some experience, but allows you to perform many operations faster. In order to call the desired window, we will again use the search bar.
- Click the “Start” button and enter the query “cmd”. This time, right-click on the corresponding active line in the search results, and select “Run as administrator” in the context menu.
Context menu is called by right mouse button
In the console that opens, enter the desired command and press Enter
Disabling TrustedInstaller
In fact, Windows 7 has a user with even greater rights than any administrator. To protect critical components, the system creates a TrustedInstaller account, which is assigned exclusive access rights to certain files.
If a user, even with administrative rights, tries to delete protected information, the system will refuse him and show a window with the message: “Request permission from TrustedInstaller to change this file.”
Sometimes Windows refuses, citing lack of TrustedInstaller rights
To bypass the protection, you must manually grant access to the desired file to administrators, after which you will be able to delete it.
- In Explorer, select the file that you want to delete and right-click on it.
- In the context menu that opens, select “Properties”.
- Then go to the “Security” tab.
- Click on the “Advanced” button.
Click the “Advanced” button
As long as the current owner of the file is the "super administrator" TrustedInstaller, this should be corrected
We give access to all administrators
A corresponding message will notify you about the granting of rights.
We give ourselves full access
The same mechanism can be used to edit or move important files or folders. In this case, it is necessary to return all settings to their original state after completion of work, otherwise Windows 7 may begin to become unstable.
By editing the Startup list
An executable application can prevent the file from being deleted. If it is launched deliberately, it is enough to shut it down, and in some cases it is also useful to restart the computer. But programs that automatically start when Windows 7 starts will again end up in RAM and prevent you from deleting the necessary information. Therefore, you need to exclude them from the Startup list.
- Call up the “System Configuration” window. Click the on-screen “Start” button, type “msconfig” in the search bar and press Enter.
Type msconfig in the search bar and press Enter
We remove everything unnecessary from the system configuration list
If we have correctly identified the application that is interfering with our task, the file will be deleted without problems. If another program interfered, you can repeat the process for it or use Windows restart in safe mode.
Via Safe Mode
If a folder or file is not deleted due to a third-party application or malware, you can restart your computer in safe mode and thereby bypass the restriction.
Safe mode in Windows 7 involves minimal loading of system components.
- Call up the familiar “System Configuration” window.
- We select to boot in safe mode, for which in the “System Configuration” window that opens, go to the “Boot” tab.
At the bottom is the boot options area we need.
The advantage of this method is that there is no need to leave the Windows 7 shell. The disadvantages include the fact that to reboot in normal mode, you will have to repeat the same steps, only this time disable safe mode.
In order to boot the system once in safe mode, you can use another method.
- When you turn on (cold boot) the computer, press the F8 function key.
It's difficult to say exactly when to do this, so many users simply “click” the key every second until the mode selection menu is activated. Manufacturers of some laptop models define other function keys for the same purpose, so if you fail with F8, you can try other options.
Select the top option
Having loaded using any of the listed methods, we find “stubborn” files using “Explorer” and delete them.
Using the command line
You can bypass the deletion ban using a low-level tool that is already a little familiar to us - the command line.
After the window loads, you must enter the required command.
How to request administrator permission to delete a folder: detailed instructions
Sometimes you need to know how to request administrator permission to delete a folder.
This happens because when you try to delete or change a folder or file, an error appears.
It says that “You need permission to perform this operation,” and you can request it from an administrator or a group of such.
Accordingly, nothing can be done with this folder or file. Therefore, it makes sense to figure out what this error is and how you can get rid of it .
Content:
Online translators
One cannot fail to mention various online services that allow you to translate individual words, sentences or entire articles. Their main advantage is that they do not need to be installed on a computer, they are free and easy to use.
The main ones are: Google Translate, Yandex, Promt. All have their pros and cons, and the latest one offers the installation of additional software on computers, laptops and mobile devices.
However, you need to be prepared that the translated text will not always be of satisfactory quality. Unfortunately, this problem is associated with any machine translator, since its main role is not maximum beauty and readability, but assistance in understanding the general meaning of the text. Therefore, take this factor into account when using any online service or extension.
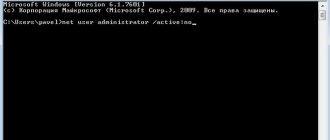
Login as administrator
In the end, you can log in not as the user you usually use, but as an administrator.
Then you will automatically receive those rights that supposedly do not exist now. To do this, you should follow a few simple steps:
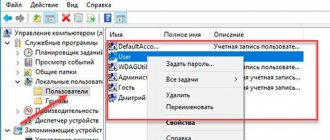
- Open the Start menu and right-click on Computer. Select "Management".
- In the panel on the left, go to the following sections: “Computer Management (Local)”, “Local Users and Groups”, then “Utilities”, “Local Users and Groups” and, finally, “Users”.
- On the Administrator user, right-click and click on Properties.
Rice. 11. Transition to user management
- Uncheck the "Deactivate account" box. Click OK and close all windows.
- Now open the Start menu, then click on the arrow next to the shutdown button and select “Change user” from the drop-down menu.
Rice. 12. User properties window and user change button
- Then you can easily select an administrator and perform all actions with the desired folder or file.
In Windows 8.1 and 10, everything happens a little differently, but all the actions are almost the same.
If this does not help, try logging in through safe mode and performing all actions with the desired folder or file. How to do this is shown in the video below.
Boot Windows 8.1 in Safe Mode: Three Methods
How to request administrator permission to delete a folder: detailed instructions
Setting permissions
After we changed the owner of the object, it remains to obtain permissions from the current user, in my case “User”.
In order to get rid of the problem, you need to do the following.
- Open the document properties, go to the “Security” section and click on the “Advanced” item.
- In the “Subject” column, find the desired user and double-click on it. If this is not the case, then check out the section below, I will tell you how to add it.
- Then in the “General Permissions” window, check all the boxes and click “OK”.
- Click “Ok” again in the remaining windows.
Done, now you can check the result.
Now let’s talk about how to add a user if he is not in the “Subject” column.
- Click the “Add” button.
- In the “Subject” line, click “Select”.
- Click “Advanced” and perform “Search”.
- In the list displayed below, select an object and click “OK”.
- Click “Ok” again.
- Then, in the “Type” line, set the “Allow” parameter and mark the necessary items below. Save the settings by clicking “Ok” in all available windows.
- Go back to the document properties and in the “Attributes” column, uncheck the existing parameters.
Try editing again, the notification “Access is not available. Request permission from TrustedInstaller to delete a folder or file” should not bother you anymore.
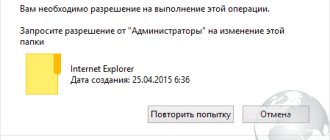
Permission from "System" or "Administrators" to change a folder in Windows 10
Sometimes when you try to delete or change a folder, Windows 10 states that you do not have enough rights for such actions, and you need to request permission from “System” or “Administrators”.
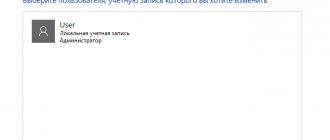
This may surprise many computer owners who are sole users, but the logic of the system is that it requires confirmation for almost everything. After this, the logical solution is to check your accounts. The easiest option is to go to Start, select Settings, open the Accounts section and click Your Data.
The account name can be different, the main thing is that “Administrator” is indicated under it. This is an important point, although, unfortunately, it does not solve the whole problem. Returning to the previous folder and trying to delete it again, the user will see a familiar message from Windows.
To get out of this vicious circle, you need to do two things:
- Become the “owner” of the folder;
- Get full rights to any actions with her.
We delete the folder that Trustedinstaller does not allow us to delete
The procedure described below will not differ fundamentally from different versions of operating systems. In all cases, the same steps must be performed.
We follow the instructions:
- Right-click on the object and go to the “Properties” section.
- Click on the “Security” tab and click “Advanced”.
- In the owner line, click on the blue “Change” link.
- In the window that opens, click “Advanced” again.
- Then we start “Search”, then select the desired user (most often it is “User”) and click “OK”.
- Click “OK” again, and then “OK” again.
- Moreover, if you change the owner of a directory, then do not forget about.
Now if we check the result, we will see another Windows message stating that we need to request permission to delete or change a specific file or folder. But not from the TrustedInstaller user, but from himself, in my case it’s “User”.
How to become an owner
First, call the context menu and click “Properties”. In the window that opens, select “Security”. The “Permissions for the Users” section will appear at the bottom of the window, and below it will be the “Advanced” button.
The second line from the top shows the owner's name "Administrators", and to the right of the name there is an "Edit" link.
A selection window will open where you will need to click on “Advanced” again (in the lower left corner)
Now there is a “Search” button on the right, which opens the ability to select a user from the list that appears. Even if a computer has a single owner who does not allow anyone else near his property, there will still be several lines on this list.
Now select the name of your account, which is displayed in the settings (“Start” - “Settings” - “Accounts”). In the example this is “Admin”.
We automatically return to the security settings tab. The owner name bar now displays the selected user. Under the line you need to tick the following item.
If you do not do this, you will have to repeat the entire procedure with internal folders to change them. We finish all this with the “OK” command.
Returning the role to the previous owner
After changes have been made to the system data, it is likely that you will need to return all the settings back. But doing this in the same way as described above will not work. You'll have to take a different path:
- Open the properties of the document you want to delete again, go to the Security part and select Advanced again.
- Click on the “Change” button.
- In the only field where you can enter something, enter the command NT SERVICE\TrustedInstaller (Figure 5).
- Confirm changes.
- We return to the previous window and click on the checkbox in replacing the owner of subcontainers.
Figure 5. Editing a file with setting rights
All these actions mean that TrustedInstaller will now again receive all rights, and it will no longer be possible to delete any files and folders, rename them or move them. But the error associated with this service will no longer appear.
How to give the owner permissions to do everything with a folder
A meticulous system of actions taken is still not enough, and you need to set permissions for your account. To do this, go again to the security properties of the folder. Below the owner's name there are 3 tabs: "Permission", "Audit" and "Effective Permissions". We are interested in “Permissions”.
There are three options:
- The list contains the name of the owner of the folder, and he has full access;
- The required name is missing;
- There is a username, but he has partial access.
If there is no name, you will have to add it by clicking on the appropriate link below.
In the new window, select the name of the subject, in the “Type” field indicate “Allow”, in the “Applies to” line, mark that the permission should apply to this folder, as well as to all its subfolders and files.
At the bottom, check the box next to “Full access”. Click “OK” and again you are automatically taken to the security settings.
If the name already exists, but it only has permissions for some actions, then you need to highlight the line and click “Change” at the bottom.
As in the previous option, give it full access. Now that the owner's name is visible in the list of permissions, the final stage remains - checking the box at the bottom of the window. And of course, click “OK”.
Now you can change or delete this ill-fated folder. If suddenly the system reports something like “the folder cannot be deleted, it is still in use,” then you should restart the computer.
Reasons for the error
Everything here is quite clear. This error occurs due to the fact that certain files are protected by the OS. If you are not the owner of a PC and this error occurs, then I advise you to contact the owner himself.
Just a moment, friends! I suggest you read articles about the dating site Tabor mobile version or how to enter the space exchange zone, as well as how to turn off the weather on the Beeline. And finally, don’t miss learning about Google Translator with pronunciation or how to register on Instagram via a computer, as well as how to clear the phone’s memory on Android.
Procedure
You will not need to obtain any permission. To obtain rights to change a directory, you must become its owner. And after that, you should give yourself (the account under which you cannot change the path to the directory or its contents) full access rights to the object - allow you to do whatever you want with it.
Changing container owner
To become the full owner of the directory, follow these steps.
1. Open the “Properties” of the directory.
2. Go to the “Security” tab.
3. Click “Advanced” at the bottom of the window.
4. Next to the Owner field, click Change.
5. Click on the “Advanced” button.
6. Search for accounts on the current operating system.
8. Also click “Apply”.
Using LiveCD
When none of the above helps get rid of the “Request permission from TrustedInstaller” notification, then LiveCDs come to the rescue.
This is a kind of life preserver (a drive with Windows installed). By booting from such a drive you will be given unlimited access to editing any type of files and directories. Since the download is carried out from under a different system. Creating a boot disk is also quite simple; for this you need a special LiveCD image and the UltraISO program.
By the way, I recently wrote a similar article on the topic of accessing the goals folder, so if you haven’t found a solution, I recommend that you read it. Perhaps some methods will come in handy.