Sometimes it happens that data from a memory card is deleted. This can be a USB drive installed in one of the computer ports, or a miniature flash drive on your phone. In both cases, most often they can be restored. For this purpose, special software is used, which we will talk about today. So, let's get down to business and figure out how to recover a file deleted from a flash drive.
The first thing I want to say is that immediately after deleting files, you should not work with your computer! When working with other objects, the operating system overwrites them over the data that was deleted. If this happens, files erased from the flash drive cannot be restored.
Reasons for deletion
The first thing I would like to say is the reasons why a file may be deleted. Most often these are careless or unconscious actions of the owner of the flash drive. For example, the user deletes some objects, at the same time capturing the data that should have been saved. There are other reasons, for example:
- virus software activity;
- damage to the drive on which the data was stored;
- errors in the functioning of various software that has access to the file system;
- Windows crash.
By the way, if the flash drive on which the data requiring recovery was stored is damaged, most often it will not be possible to restore the objects. However, if only the file system is affected, the outcome of the operation may be successful. Nobody bothers you to try, especially since you have nothing to lose in this case.
Handy Recovery – convenient and versatile
A simple program that can recover files from any digital media connected to a PC. It supports NTFS, NTFS5, FAT12, FAT16, FAT32 file systems. Works with flash drives, memory cards, hard drives. The utility eliminates the consequences of virus attacks, software failures, and emergency power outages. Recovers data from deleted folders or formatted drives. It can even return information from the Recycle Bin if you accidentally emptied it and there was something important left there. Of course, the utility does not work one hundred percent, but it gives a good chance, and considering that during the test period you can use it for free, you definitely have nothing to lose.
The program is nice because in it we can browse directories in the same way as in regular Windows Explorer. Here we immediately see all the files and folders that can be recovered. Through Handy Recovery you can also look into the trash – it will immediately be clear which files were last deleted. The data type, time of deletion, name, size are shown. The required file is quite easy to find thanks to sorting. The probability of successful recovery is also displayed here: “bad”, “average” or “good”. For neighboring files deleted at the same time, it can be completely different, and this makes it easier for us to determine which data should be allocated to return system resources.
For images with a “good” recovery probability, preview works. The utility has a simple, pleasant interface, but the percentage of data it returns is relatively low. If you can’t get your files back using Handy Recovery, you should try one of the following programs on the list.
Test trial period – 30 days. One official copy of the utility costs 1,950 rubles. Available for Windows XP/2000/NT/2003/Vista/7.
Data recovery
So, moving on, let's figure out how to recover personal files deleted from a flash drive that is unreadable. Below you will find two step-by-step instructions, the first of which is intended for a PC or laptop, and the second, respectively, for a mobile phone running the Google Android operating system. We do not have such solutions for a smartphone running on the Apple iOS operating system. The fact is that the iPhone file system is locked and you cannot access it.
On the computer
First, we will look at data recovery on a flash drive for a computer. At the same time, we will not describe many different programs, each of which is supposedly capable of returning deleted objects. We will describe in detail the process of using the best free utility, which copes with its task much better than other representatives of similar software.
So, you need to follow these simple instructions:
- First, we go to the official Recuva website and download the latest Russian version of the application from there. Install the program and launch it using the shortcut that appears on the Windows desktop.
- In this case, the system will request access to administrative rights and we will definitely need to approve it. Click the “Yes” button in the window that appears.
- A step-by-step Recuva wizard will launch, which allows, depending on the user’s preferences, to restore all disappeared objects if they are not in the recycle bin. Click on “Next”.
- Now we select the objects that we want to find and restore. These can be all types of files, just images, music, documents, videos, archives or even emails. We recommend choosing a specific type, since in this case the search will be much more successful. Otherwise, all data will be found, including, for example, Word, Excel or CHK documents. When the settings have been made, proceed to the next step by clicking on the button marked “2”.
- The system will initially offer to create a snapshot of the disk, which ensures that the deleted file cannot be overwritten during the search process. We strongly recommend the second option. But as an example, we will show work without it. Set the trigger flag to the desired location and move on.
- Now we select the place where we want to find broken files. That is, the folder, disk or drive from which the objects were deleted. In our case, this is a flash drive, which means we check the box next to the “On the memory card” item. Proceed to the next step by clicking “Next”.
- Recuva is capable of finding and recovering deleted data in two modes at once. This can be a superficial or in-depth analysis. Ideally, it is advisable to use the first one first, and then, if it does not give the desired result, resort to the second option. In our example, we will use in-depth analysis. Check the box next to its activation line and start the process by clicking on the “Start” button.
- As a result, a multi-level scanning process will start, the completion of which we will need to wait for. At the same time, during file analysis, we should not touch the computer, should not launch any applications or work with them.
- When the analysis process is completed, we will see a list of objects, opposite each of which there will be a green, yellow or red light bulb. This indicator displays the degree of file integrity. That is, if the color is green, the object will be restored one hundred percent correctly. If it is yellow, the probability of successful data return is already lower, and if the light is red, then there is little chance of success. One way or another, check the boxes next to the files that we want to restore. After that, click on the button marked with a two.
- The system will ask for the path to the directory into which the files will be restored. Specify the hard drive and when selecting, do not use the same flash drive from which you are restoring objects. When the choice is made, click on “OK”.
- As a result, a quick recovery process will occur, which we can complete by closing the small window that appears at the end.
- Files that were recovered from a flash drive using Recuva will appear in the selected directory. In this case it is the desktop.
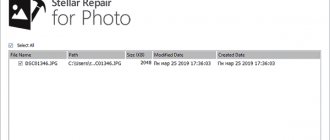
- If you have difficulty selecting files (their thumbnails are not displayed), click the button indicated in the screenshot below.
- As a result, all objects, before we restore them, will be shown with a thumbnail displayed on the right side of the program. This way we can determine whether this is the file that needs to be returned, even if its name is corrupted or displayed in hieroglyphs.
Done, we figured out how to recover a missing file from a flash drive. Now let's do the same thing, but for an Android smartphone.
By the way, there is another program that recovers files directly from the phone’s memory. If you fail to use Recuva, be sure to pay attention to 7 Data Android Recovery.
On the phone
The situation with devices running Google's operating system comes down to the fact that to access the smartphone's file system we need so-called ROOT rights. You can get them by using the application: Rootkhp Pro, SuperOneClick, iRoot or Key Root Master, downloading them from our website. But before you start, remember:
Gaining administrative privileges on Android is equivalent to hacking the operating system. Thus, you destroy the protection against viruses, make it easier for an attacker if he finds the smartphone, lose the warranty and disrupt the operation of banking applications that require authorization!
That is why our article will describe a method that works without ROOT rights. However, there are limitations; in this case, we can only restore photographs. One way or another, go to the instructions and proceed as follows:
- First of all, we go to the Google Play Market application store by tapping on its icon on the desktop of the Android smartphone.
- Activate the search bar.
- Enter the name of the DiskDigger photo recovery application, and then select the desired result from the search results.
- Click the application install button.
- We are waiting for the automatic download and installation of the utility to recover files from a flash drive on Android to complete.
- Now the program can be launched. Its shortcut will appear on the home screen of your smartphone.
- When the application opens, click on the “Start simple image search” button. As you can see, there is also a full mode that allows you to search for any type of file. However, to use it you will need the same ROOT rights.
- Next, we allow the program access to the smartphone’s file system.
- An automatic scan will start and find all objects that can be recovered.
- The scanning is completed, and we confirm this fact by clicking “OK”.
- Now we mark the photos that we want to restore. Place the checkboxes in their places and move on by pressing the button marked “2”.
- Next, select the operating mode of the file recovery utility. It could be:
- Saving files to the cloud. The most acceptable and safe option.
- Save the file to another folder on this device. Here you need to be careful not to overwrite deleted files with new objects.
- Saving files to an FTP server. Accordingly, if you have one, this option is also perfect.
- Since we chose to save the files to the same phone, we indicate the directory in which we will save the images. In this case, you want to save the pictures to the smartphone camera folder. To do this, initially select the directory indicated in the screenshot.
- Next, go to the folder we need.
- Confirm the directory selection by clicking “OK”.
- If you are offered to buy the full version of the program, we refuse by clicking “No, thanks.”
- As a result, automatic recovery of files from the flash drive will begin and within a few seconds all objects will be saved to the selected folder.
This concludes our instructions for recovering files on Android. But now it is advisable to figure out why the data from the flash drive was deleted. For prevention, let's restore the memory card according to one of the instructions.
But before you continue, remember: each of the methods below deletes all data on the memory card!
Starus File Recovery – Windows style
The program is for those who are accustomed to the Windows 7 interface. If you are comfortable moving between nested folders, if you like to see file tiles, then Starus will be most comfortable. It doesn't do anything superbly, it has drawbacks and various minor inconveniences, but it combines several features of other utilities. There's a "File Recovery Wizard" here if you want step-by-step instructions. It is not the simplest; to a person far from the PC world, the selection options in it may seem confusing, but anything is better than the harsh and unfiltered truth of R-Studio. There is an opportunity to save and mount disk images - what if this comes in handy? The program can also please you with automatic previews.
Starus File Recovery works well with damaged disk partitions, but it can also be used for flash drives with memory cards. Moreover, any storage media is instantly visible in the interface, you don’t have to search for them, and the required folder/file, if traces of them are still preserved there, is not a problem to find and recognize.
The program is paid, the full version for home will have to be purchased for 1300 rubles. In the test, unregistered version, it only allows you to track files, see if they are found and what is the likelihood of their recovery.
The utility runs under Windows 95/98/2000/XP/ME/2003/2008 Server/Vista/7/8. FAT12 logical partitions are not supported. Doesn't run on Linux or Mac.
By the way, completely similar functionality and interface are offered by another program, RS FAT Recovery, which is “sort of” made by a third-party developer. In fact, there are no differences between them, except for a couple of purely symbolic icons. And since Starus File Recovery costs a good 700 rubles less (for RS FAT Recovery the price starts at 2,000 rubles), fans of such an interface should only buy Starus, without any options.
Drive recovery
So, let's restore our flash drive so that errors do not occur with it in the future.
We use antivirus
First you need to check the drive for viruses and, if any, remove them:
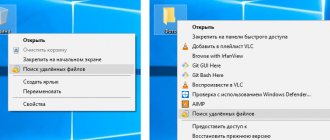
- We connect the memory card to the computer and, having found it in Explorer, right-click with the mouse. After that, from the context menu, select the check item using the installed antivirus.
- Next, having made sure that there are no viruses, we proceed directly to the process of restoring the memory card.
Complete flash drive cleaning
In order to completely erase the entire file system from our flash drive and resharpen it, we follow the following step-by-step instructions:
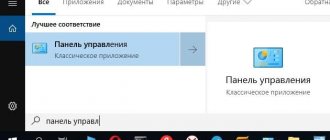
- First, we need to run Command Prompt as an administrator. To do this, open the Windows search tool and, having entered the name of the command line, right-click on the result that appears. After that, in the context menu that opens, select “Run as administrator.”
- Now you should enter the command “diskpart”, and then press “Enter” on the keyboard.
- Now you need to display a list of disks by entering the command “list disk” and pressing “Enter” again. As a result, a list of disks installed on the computer will be displayed.
- Continue very carefully! We select the disk that is our flash drive. This can be determined by the size of the drive. To do this, write “select disk (and the number of your drive)”. In our case it is “2”. To confirm, press the enter button.
If you make the wrong choice, all data on one of the hard drive partitions will be irretrievably lost!
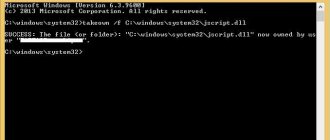
- The system will notify you that the desired drive has been selected. Once again we are convinced of the correctness of the choice. The following statement deletes not only all data from the drive, but also the file table itself. In the command line, write “clean” and press “Enter”.
- When we see a notification that the disk has been erased, we can close the command line. Next, we move on to working with disk management by right-clicking on the “Start” menu button of the operating system. The same option helps to recover a flash drive from a RAW format file when the file system has crashed.
- In the window that opens, again, by size we find the drive that we just cleared in the command line. This should be an unmarked area, highlighted in black. Right-click and select the function to create a simple volume from the context menu.
- The Simple Volume Creation Wizard will start and at the first stage we only need to click the button to proceed to the next step.
- Then we leave all the parameters as default and simply move on to the next step.
- If necessary, change the drive letter.
- Now we select the file system that will be used for our flash drive. Most often you need to choose FAT32 instead of NTFS. When the choice is made, click on “Next” again.
- We complete the creation of a simple volume by closing the wizard by clicking the “Finish” button.
- Now that our disk has been created, its automatic formatting will begin, which will be completed in a few moments. You can work with our flash drive.
If you have any problems formatting your drive, please refer to the detailed step-by-step instructions called: What to do if Windows can't complete the format?
Undelete 360 – the most stylish
A small, nice program that captivates with its original design. Plus, it's absolutely free. Created by a small team of New York enthusiasts. It is updated very rarely, it only works under Windows OS (and it has not yet been adapted for Windows 8). At the same time, it supports quite decent Russian. And – it has a beautiful interface from a visual point of view. With icons that light up in different colors and beautiful pastel colors. Even some bugs with text layering do not interfere with the aesthetic appeal of Undelete 360. In addition, this small program has a very detailed table with file data and a wonderful filter by type of information. With their help, searching for new data becomes a matter of a couple of seconds. The program works very quickly, it is responsive and is great for older PCs.
The utility is able to work with Windows 2000/XP/Vista/7 and server variations. In addition to FAT32 and FA16, it also supports FAT12. You can't expect first-class recovery here, but the program offers a fresh look at the situation, it's pleasant to work with, and if you have lost a lot of data, of which you only need to return a small part, Undelete 360 filters will be the most functional.
When starting to work with the Undelete 360 interface in Russian, please note that files and folders here are restored using the “Save” button. The icon and its name can be misleading. Still, the team working on the program is very small, and they were unable to produce a perfect translation.
The program can be upgraded to the pro version to be able to use an even more advanced filter file and open the preview function, which is relevant when working with pictures.
FAQ
Below we have provided a list of frequently asked questions and their answers:
- Is it possible to recover hidden files from a flash drive? Yes, for example, for the Recuva application it makes no difference whether these files are hidden or not.
- How to recover data from a formatted flash drive? Similar. It makes no difference whether you formatted the drive or simply deleted the data.
- Is it possible to recover data online? No, this cannot be done.
- How to recover a replaced file on a flash drive? Similar. A replaced file is considered deleted in Windows.
- What to do if the flash drive breaks and the data disappears? It looks like the drive was damaged. If the file system itself is damaged, use the instructions above. If the memory controller burns out and does not work, nothing will help.
In what cases will it not be possible to recover data from a flash drive?
Programmers and experienced users have a saying: “there is no lost data, only data to which access has been lost.” The proverb is true about 6 out of 10 times.
But there are situations when you have to put up with the loss of information:
- the file was damaged during the recording process;
- The flash drive was cleaned with low-level formatting;
- after deletion, new data was written over the erased data;
- The USB drive is physically damaged or has reached the end of its lifespan.
In other cases, the probability of recovering deleted files is quite high. In some cases, when recovery at home does not produce an effect, turning to professionals who have at their disposal not only publicly available programs can help.
Disk Drill
A utility that is especially popular among users of the Apple operating system MacOS. Only recently became available for Windows.
Disk Drill
There is a certain drawback in the form of limitations on the amount of data recovered in the free version. It is 1 GB.
Another disadvantage is the need to install the application. It’s strange, since such a procedure leads to data overwriting, and the utility itself may ultimately prevent you from returning some of the lost data.
At the same time, regular use of the program allows you to organize a full record of all deleted files and restore them through backup. Works with a large number of file systems. There is no Russian interface language here.
To work you need:
- install software on your computer;
- run the application with administrator rights;
- select media with formatted data;
- determine the appropriate scanning option;
- click on the Recovery button;
- upon completion of the scan, select files for recovery;
- click on Recover.
The probability of recovering lost information using this application is quite high.
Recuva
One of the most popular programs in its segment. But at the same time, it is inferior to many competitors in terms of efficiency and performance. This makes it a little unclear why there is such a demand.
Recuva
Yes, the program has a Russian-language interface and is distributed free of charge. At the same time, there is also a paid version, but there is not much difference between them, besides technical support.
The tool works well provided that after formatting the hard drive or flash drive is practically not used. If formatting occurs on another file system, the chances of successful data recovery are noticeably reduced.
DMDE
If you need to restore a disk that is detected in RAW format, return data from formatted media (flash drive or hard drive), this will be one of the best solutions. The program is really effective.
DMDE
The utility has a Russian-language interface. Most of the features are offered in the free version. For an additional fee, you can expand the capabilities. For home use, the regular free version is sufficient.
The recovery process itself causes some difficulties. Here you will have to understand all the functions and sections of the menu before getting started.
PhotoRec
Initially, only the console version of the program was offered, but then the seventh graphic edition appeared. This greatly simplified working with the utility for beginners and ordinary users.
Photo Recover
Interestingly, this program was developed as a tool for restoring memory cards on cameras and video cameras. But then, as development progressed, the functionality affected ordinary flash drives and hard drives.
It is distributed free of charge and supports all popular operating systems. This is not only Windows, but also MacOS, Linux.
To restore data, you must:
- extract content from the archive;
- run the file with the extension exe;
- select recovery media;
- specify a location to save the resuscitated data.
The fact that the program is free is attractive. At the same time, it works no worse than many paid competitors.