Author of the article
Kristina Gorbunova
Higher education in the specialty “Information Systems”. In the field for more than 7 years, he develops websites on WordPress and Tilda.
Ask a Question
When setting up a network in a large apartment or house, there is often a need to combine the work of two routers. WDS mode will help you cope with this task. With this technology, you can use one device as a repeater and signal amplifier. We'll tell you in detail what WDS is in a router and how to configure it.
Advantages and disadvantages
Advantages of WDS technology:
- Relative ease of setup.
- Reducing the cost of laying out a LAN line. Instead of tens of meters of wires, you can get by with 2-3 routers.
- Client MAC addresses are preserved.
- The signal is resent without additional processing, the data is simply sent to all ports.
Disadvantages of WDS:
- It is difficult (impossible) to connect equipment from different manufacturers to one network due to the use of different standards.
- Connection throughput speed decreases. This is due to the fact that data exchange occurs between a single cable communication channel.
- Network security is reduced because only static WEP keys can be used. WDS does not support dynamic generation.
What is WDS in a router?
Many people do not know what WDS mode is in a router and how to use it. WDS (Wireless Distribution System) is a technology that helps increase the coverage area of a WiFi network by combining two or more access points into one network. There is no need to use wires for connection. This is a convenient solution that allows you to quickly combine multiple routers while maintaining a single MAC address for all clients on the Internet.
A router in a WDS network can work as a base, remote or relay station. Main devices are usually connected using a wire. Remote routers are needed to connect clients via a WiFi network, and relay routers provide communication between two other stations. Its task is to relay and amplify the signal.
When setting up the mode, the user must know what WDS is in the router and what settings to change in the control panel for correct operation.
The main difficulty is to establish interaction between all stations to use the same mode. They must have the same password, encryption method and frequency.
Basic connection options
Configuring WDS on all routers is carried out according to the same scheme. The main device is connected to the Internet via a wire. It sends the signal further. The secondary router becomes a repeater. It relays the signal, thereby increasing the coverage area of the wireless network. If the WDS bridge is configured correctly, both devices will work simultaneously.
There are several WDS operating modes:
- Point-to-Point/Wireless Bridge. In this mode, the wireless access point exchanges information with the repeater. This mode is often used to synchronize equipment in two different buildings. Clients connect to the router via a wired connection.
- Point-to-Multipoint / Multi-point Bridge. It differs from the first option by using two access points.
- WDS with AP (WDS with Access Point). Allows you to connect user computers and other devices wirelessly.
Areas of use for connections based on Bridge or WDS modes
The bridge mode in the router has found application both in everyday life and in offices. In the latter case, with its help, independent subnets are created within the framework of an organized connection - the legal department has its own, and the marketers have their own.
In country houses, technology makes it possible to provide online access along the entire perimeter of the site, in the far outbuilding or in the bathhouse. The bridge is often used by residents of holiday villages, where only a few houses are connected to the World Wide Web. During vacation, by agreement, people simply connect to their neighbors.
The bridge mode is also used to monitor the territory. A modem is used to connect a video camera and a computer. Often, a router becomes a bridge for exchanging data between two PCs or for providing Internet access to equipment without a network adapter, for example, a TV.
Sometimes Bridge technology is a means of exchanging information where it is not possible to connect two points using a cable. The system is often used to connect an office building with warehouses built across the road.
Important: Before setting up a bridge between two routers, you need to make sure that there is no interference between them such as poles, buildings, trees, and so on.
Settings
The work begins with launching the web interface. At the first stage, you need to set up the Internet on the main router, and then start setting up the second device.
There are two ways to connect to the web interface:
- In the computer browser if there is a wired connection to the router.
- Via Wi-Fi using a smartphone, tablet, laptop.
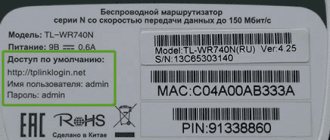
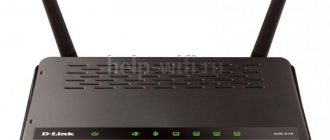
Let's look at setting up WDS using a TP-Link router as an example. On routers from other manufacturers, bridge mode is activated in a similar way. In order to access the web interface, you need to enter tplinkwifi.net or 192.168.0.1 or 192.168.1.1 in the address bar of the browser. There is a sticker on the bottom of the router case. It contains all the necessary information for launching and authorization in the web interface.
Old firmware
The old router firmware is made in a gray-green color scheme. It is found on most devices distributed by domestic providers.
Main router
Log in to the web interface and open the “Wireless Settings” tab. Change the network name and channel number to make it more convenient to configure the secondary router in the future. Save your changes.
If the router was previously connected to the Internet, then you only need to make the specified changes. If not, then you need to configure the router to connect to the Internet. Do this according to the instructions from your provider. You need to specify the connection type, connection login and password, subnet mask and other information.
Secondary
Open the section with DHCP settings. Disable this option immediately. After deactivating DHCP, only the main router will distribute network settings in bridge mode.
Disable WPS in the appropriate section. Be sure to restart the router after this.
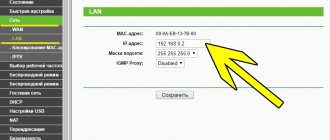
Change the router's IP address. To do this, open the Network section and find the LAN tab there. Change the last number of the IP address, for example, to 3. Save the changes and be sure to restart the device.
These settings must be made in order for the router to work normally in WDS mode. Next you need to configure the bridge.
For this:
- Go to the "Wireless" section.
- Open the “Wireless Settings” tab.
- Specify the name of the new network and write down the channel number previously set in the main router.
- Enable WDS bridging by checking the Enable WDS Bridging checkbox.
- Start searching for devices by clicking on the “Search” button.
- Find the network from the main device in the list that appears and confirm the connection.
The SSID of an existing wireless network does not need to be specified. The router will install this information along with the BSSID automatically.
New firmware
The web interface in the new firmware is designed in white and blue colors. It was released by TP-Link only for relatively new and frequently used models of routers and routers. The algorithm of actions will practically not differ from the old firmware.
Basic
- Open the Wireless tab in the left menu.
- Enter the network name.
- Set up a dedicated channel. Remember the number.
Secondary
Change the IP address of the secondary device. This is necessary to avoid an address conflict. For this:
- Open the “Network” tab, find the LAN item there.
- Change the last digit of the IP address. You can set any value except 1 and 255. Be sure to save the settings.
- Now open the Wireless tab. Set up the same communication channel there as on the main router. Specify a network name different from the main device's network name. Activate WDS and click Search. A list of all available Wi-Fi networks will appear. Select the one that applies to the main device and click “Connect”.
- A form for entering a password will open. There is no need to change other network settings. Be sure to click the “Save” button after entering the data.
- You need to reboot the router. This can be done using the button on the back of the device or using the option of the same name inside the firmware. To do this, open the “System Tools” section and go to the “Reboot” tab. There you need to click “Restart”.
- After rebooting, you need to check the WDS status. To do this, open the “Status” section. The bridge must be on.
- You need to set a password for the Wi-Fi network of the secondary router. To do this, open the “Wireless Mode” section and go to the “Wireless Protection” tab. Set the encryption version to WPA2-PSK. Enter your password in a separate field.
On devices operating in two bands (2.4 GHz and 5 GHz), WDS is configured a little differently. It all starts with changing the IP address of the second device. For this:
- open the LAN section;
- go to the “Advanced settings” tab;
- in the IP address field, replace the last digit.
Open the "System Tools" section and open the "System Settings" tab. In the window that opens, go to the “Advanced settings” section. Scroll down the settings sheet. Dual-band devices will have 2.4 GHz WDS and 5 GHz WDS. You need to activate the mode in which the main device operates.
Click on “Enable WDS Bridging” and click on “Search”.
Select the network distributed by the main device and connect by clicking “Select”.
Switch WDS/WDS Mode to “Auto”. Enter the password for the main machine. Save your changes.
Disable DHCP on the secondary device. Open the “Network” section, “DHCP Server” tab. Uncheck the active box and click on “Save”. Reboot the device for the current settings to take effect.
Aerocool Orbit
This is the most inexpensive of the more or less high-quality fans with multi-color RGB lighting.
In general, the Aerocool brand is not famous for fans; the quality of most of them leaves much to be desired, but this is an exception.
Characteristics of Aerocool Orbit
| Speed | >1200 rpm |
| Air flow | 56 CFM |
| Connector | 3-pin (MP) / 3-pin (5V ARGB) |
| Speed adjustment | DC (MP) |
| Bearing | hydrodynamic |
| Noise level | below the average |
Despite the low speed, this fan creates a normal air flow and at the same time has a low noise level, which is a merit of the successful design of the blades.
As for the backlight, the so-called addressable RGB backlight is used here, which requires the presence of a corresponding 3-pin ARGB connector with a supply voltage of 5 V on the motherboard.
Some backlit motherboards are equipped with such connectors, which allows you to flexibly control the color of each LED using special software (ASUS Aura, MSI Mystic Light, Gigabyte Fusion, ASRock Polychrome) and create unique effects.
Also, some motherboards may be equipped with 4-pin connectors for controlling the backlight (12V GRB) with a supply voltage of 12 V, with which components with the corresponding connector are compatible.
In addition, some fans are equipped with their own proprietary backlight control connector, which connects only to backlight controllers and cases from the same manufacturer.
If your motherboard does not have the required fan connector, it will work without backlighting. But this can be solved by purchasing a kit, which usually includes 3 fans, a controller and a remote control for adjusting the backlight.
In general, these fans deserve attention - they work quietly, cool well, look beautiful, and all this for a very reasonable price. Aerocool Orbit RC fan
Problems and solutions
One of the common problems when setting up WDS is the endless scanning process. Causes of this problem:
- Incorrect internet password on the main router.
- The device being configured as a bridge does not have DHCP disabled.
- Encryption works poorly or doesn't work at all.
- Channel conflict due to the use of routers from different manufacturers.
Ways to resolve scanning error:
- Check the router firmware for the Wireless Bridge item in the Wireless section. In the secondary router, enter the MAC address of the main router, and in the main router, the secondary router. Save the specified access point addresses.
- Change channels in wireless settings. This must be done on the primary and secondary devices at once.
- Make sure MAC address filtering is disabled on your main router.
Periodic connection dropouts are another problem that arises when using WDS. An exclamation mark appears on the Wi-Fi icon, and the Internet only works on the computer. The reasons are most often physical: too large a distance between two routers, a weak signal, hardware problems in the operation of the main router.
Points to consider
When purchasing devices that you plan to use to create a bridge between two routers, you need to decide on the signal reception range. If the distance does not exceed 250 meters, then household routers are sufficient. If we are talking about the interaction of devices located at a distance of several kilometers from each other, then expensive, specialized equipment will be needed.
You also need to take into account the fact that in mountainous areas or near structures that emit electromagnetic radiation, the operation of the equipment is seriously hampered, up to a complete loss of connection.
Christmas is around the corner and the best gift for any occasion is a Rubik's Cube that you can easily solve with this cube puzzle tutorial.