The problem of poor Wi-Fi signal or low speed is quite common. There are 2 different wireless network bands. For example, if a 2.4 GHz frequency is used, then when several gadgets, a TV and a computer are connected to the modem at the same time, the speed will drop so much that even pages on social networks may not load. There are several ways to solve the problem of a weak signal - connecting a repeater or having a separate access point in each room. The TP-Link RE200 Wi-Fi signal repeater is one of the most advanced, providing a 5 GHz range and a stable signal.
Repeater description
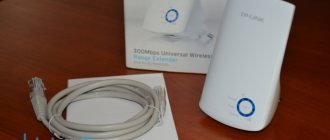
You can purchase the device at any electronics store, but it is recommended to give preference to large chain supermarkets of household appliances. The amplifier is packaged in a cardboard box painted in light colors. Included with the repeater in the box is:
- white patch cord;
- disk;
- network cable;
- Supporting documentation;
- warranty card.
The device has an attractive appearance, which allows it to fit harmoniously into the interior of any room. The dimensions are small - 65*38*110 mm. During operation, the device heats up slightly due to its clever design.
The amplifier is connected to the electrical network using an ordinary two-pole plug. It is not equipped with a separate power switch. Electricity consumption is 3.5 W.
The case is made of high-quality glossy plastic. At the top of the front side there is a manufacturer's logo, the bottom part is equipped with a light indicator and a WPS button. The back of the case is equipped with a factory reset button.
On the manufacturer's official website, the cost of the TP-Link AC750 RE200 repeater is 1990 rubles.
Equipment
Repeaters are supplied in standard cardboard boxes of the same size. In both cases, the equipment is identical: repeater, Ethernet cable and documentation.
Specifications
Wi-Fi signal amplifier repeater TP-Link RE200 has the following technical characteristics:
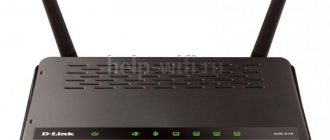
How to connect and configure a D-Link Dir model 615 router
| System requirements |
|
| Wireless Security | 64/128/152-bit WEP encryption WPA-PSK/WPA2-PSK |
| Type of sockets used | AU, US, UK, EU |
| Data transfer rate |
|
| Protocols and standards |
|
| Data reception and transmission (operating frequency range) |
|
| Interface | 1 Ethernet port 10/100 Mbps (RJ45) |
| Antenna | The device is equipped with 3 built-in antennas |
| Energy consumption | No more than 6.5 W |
Important: the TP-Link RE200 repeater can be used in combination with dual-band routers.
Bottom line
TP-Link Archer RE200 turned out to be not the cheapest, but at the same time it is quite productive, reliable and simply a nice device. With a price of around 2,500 rubles, this device is easy to set up, feels confident when operating at a frequency of 5 GHz and very decisively expands the coverage area of the Wi-Fi router. Among the shortcomings, one can only note the inability to use the device as an access point - but this problem can easily be reconciled, especially against the backdrop of the numerous advantages of the Archer RE200.
Price: ₽ 2,350
Connecting and entering settings
How to connect and configure a TP-Link router model TL WR740n
The setup of the TP-Link AC750 WiFi Range Extender repeater is quite simple; great knowledge in the field of IT technologies is not required. The easiest way to run this particular model is to use WPS technology. To implement the method, you do not need to use a PC. Just press the button located on the amplifier body and evaluate the operation using the light indicators. In this case, all factory configurations (code and access settings) are saved.
To change standard settings, you will need access to the web interface. To implement, you need to run a personal computer and the “Quick Setup Wizard” utility, the main task of which is to simplify the configuration process. Such settings are made extremely rarely, but it is worth briefly studying their features:
- To enter the settings (admin panel) in the address bar of any browser you need to enter the following: tplinkrepeater.net.
- A form will appear on the screen where you need to enter your login and password for authorization. The login and password are the same - admin. Spaces, underscores, capital letters, etc. none.
- As soon as the settings window opens, you need to select your region and click on the “NEXT” button.
- By default, the amplifier will detect networks at a frequency of 2.4 GHz; you need to select yours from the list.
- Specify the password for the network that needs to be expanded.
- After these simple manipulations, the repeater will search at a frequency of 5.4 GHz. The connection will be carried out according to a similar principle as from another frequency.
- The monitor will display information with all possible settings. They can be confirmed by clicking on the “Finish” button.
For inexperienced users, the TP-Link RE200 AC750 repeater is an excellent option due to its reasonable cost, ease of installation and use, and high functionality.
Strengthening the Wi-Fi network signal at 2.4GHz and 5GHz frequencies using TP-Link RE200
Let's first look at the quick setup using the WPS button. Most likely, your router has such a button. If it is not there, or this method does not work, then below I will show how to set everything up through the control panel of the repeater itself.
First of all, plug the repeater into a power outlet and wait 15 seconds for it to boot. Then, on the router, press the WPS button. On my TP-Link Archer C20i it looks like this:
After pressing the button on the router, we immediately go and press the WPS button on the TP-Link AC750 RE200 repeater.
As you can see in the screenshot above, the indicators near 5G and 2.4G came on. This means that the repeater already amplifies the wireless network in two bands. If the red indicator is on, it means that the signal from the router is very weak, and you need to install the repeater closer to the access point. And if the indicator near a certain network does not light up at all, but your router broadcasts the network at two frequencies, then this means that you need to try setting up the AC750 RE200 through the control panel. Since it is not always possible to connect to two networks at once via the WPS button and strengthen them.
Setting up TP-Link AC750 RE200 via the control panel
Plug the repeater into a power outlet and connect to it via Wi-Fi or using a network cable. Open your browser and go to tplinkrepeater.net . The login page will appear. Standard password and login: admin and admin. The settings of the TP-Link AC750 RE200 repeater will open.
Most likely, a window with a quick setup wizard will immediately appear in front of you (if not, then go to the Wireless - Connect To Existing Network tab). Just click on the “Next” button.
Select your region.
Next, the repeater will search for networks at a frequency of 2.4 GHz. Select your network and click the “Next” button.
In the next window you only need to enter the password for the Wi-Fi network that you want to expand.
Next, the repeater will begin searching for networks at a frequency of 5 GHz.
We connect to our network on a different band in the same way as I showed above. You just need to select a network, already at a frequency of 5GHz, and specify a password for it.
As a result, the router should provide information on all settings, and we only need to click on the “Finish” button.
The repeater will reboot and begin to strengthen your Wi-Fi networks. Just pay attention to the indicators on the device itself, which are near 5G and 2.4G. They should light up green. If they light red, then install the repeater closer to the router. In general, I advise you to choose a location for the amplifier so that it is located in the area of a stable signal from the router, and covers the area you need with the signal as much as possible.
Some useful tips:
1 After setup, you can turn off TP-Link AC750 RE200 and turn it on in another location. There is no need to re-configure, everything will work. The main thing is that the repeater is within the coverage area of the Wi-Fi network that you want to strengthen.
2 The repeater has one Ethernet port, and a network cable is included. This means that you can connect one device to the Internet via cable (game console, desktop computer, Smart TV). A device that does not have the ability to connect to the Internet via Wi-Fi.
3 You can always reset the AC750 RE200 and configure it again. There is a Reset button at the bottom. Press it with something sharp, hold it for about 10 seconds, and the repeater settings will be reset to factory settings.
4 If you notice any problems in the operation of this repeater, or you are unable to configure something, then try updating the firmware. Just download the new firmware version for the AC750 RE200 model from the TP-Link website, go to the repeater settings on the System Tools - Firmware Upgrade tab, select the firmware file with the .bin extension, and start the update process. Just make sure that the downloaded firmware is for your hardware version. The hardware version is indicated on the device itself.
TP-Link has a budget repeater model that copes with expanding the Wi-Fi network in the house no worse than expensive repeaters. This is the TP-Link AC750 RE200 model. What are its features, what does it look like? How to quickly set it up?
Firmware update
How to find out if a device supports the 5 GHz Wi-Fi standard
Each device needs regular flashing, that is, software updating. This can be done by following the following algorithm:
- Go to system tools and click on the “Update” line with the mouse cursor, then “Check for an update.” Medium sized blue button.
- Wait until the system finds the required update for the firmware of a specific model. If it is found, the device will not only find it on its own, but also download and install it. If there are no updates, the relevant information will be displayed on the screen.
There is another way to update the amplifier software. To do this, the update is launched manually. First you need to familiarize yourself with the current firmware version; information about it is contained at the very bottom of the pages. It is important to remember her number.
Go to the official TP-Link website. Immediately go to the repeater hardware option section - “Firmware”. Scroll the page to the beginning of the table. Compare the current (installed) version number with the latest version number indicated in the table. If they do not match, then you need to download and install the latter on your device.
Finally, you need to unpack the downloaded file and in the web interface in the same section you need to click on the “Browse” button. Specify the path to the bin file, which was unpacked from the archive a little earlier. Upload this file to the interface and start the upgrade.
While updates are being installed, the device cannot be unplugged.
Problem solving
It happens that after installing a repeater, some problems arise - the Internet does not work or the repeater does not want to connect to the wireless network. What can you advise in such a situation:
- We place the repeater closer to the router to strengthen the signal from the router.
- Resetting the repeater and rebooting the router may help if the amplifier does not want to communicate with the router.
- If the connection via WPS fails, try through the settings.
- As a last resort, I can recommend reflashing the repeater.
Meaning of indicators
The circular indicator is divided into several zones, each of which is responsible for a specific function. The sector next to the Power inscription is traditionally responsible for power and has two positions: lit (the amplifier is plugged in) and off (no power). The RE sector has three positions: lit or off (connection with the router is established or not established), blinking (the amplifier is trying to connect to the router). The sector near the Wireless inscription is responsible for wireless broadcasting. If broadcasting is in progress, the sector will flash continuously, otherwise it will not be lit. The sector near the Ethernet can take one of three positions: off (nothing is connected to the Ethernet port), on (a device is connected to the specified port, but it is not active), blinking (the device is connected and is receiving or transmitting data).
In addition to those named, there are five more sectors that are located near the signal strength icon and take on several values. The lower the signal power, the fewer sectors will light up (at maximum power, five sectors light up). If this zone is not lit at all, it means that the amplifier has not established a connection with the router. Blinking indicates that the amplifier has contacted the router, but without access to the Internet.
Correct placement of the amplifier
In order for the Wa850re to fully perform its functions, it must be installed correctly.
Setting up the device will be discussed below, but here we note that placing it on the table next to the router is not the best solution. Since the Wa850re is a repeater, it needs to be used where the router cannot cope. For example, in the back room. Here it is worth noting another design feature of the repeater. This is a small box, 65 mm wide and 110 mm high, resembling a power supply in shape and appearance. And according to the designers’ plans, it is plugged into a socket just like a power supply. No additional cables.
Archer C20 review
Despite the fact that the Archer C20 router model has been produced since 2016, it is still sold to this day! Of course, since then the device has been updated several times and something has been added, but it is still relevant, in demand and works just fine!
By the way, if you look at reviews on the Internet, you will see only positive comments where users praise the router!
Box, packaging and unpacking
As you can see, the package includes: router (with 3 antennas), power adapter, meter internet cable, instructions, warranty card. No more is needed!
Change Password
The administrator password should be changed periodically for security reasons. To do this, open the “System Tools” menu, “Password” section.
Here you need to enter the old user data, then the new ones and save the changes. The changes will take effect after a reboot.
Bridge and repeater mode
Archer C20, in addition to the main mode, can work as a bridge or signal amplifier (repeater). Both are designed to relay a Wi-Fi network from another router.
To configure operation in bridge mode, open the settings of the wireless network for which this mode will work. In the “Basic Settings” section, check the “Enable WDS” checkbox.
Below, click the "Search" button. The router will find available Wi-Fi networks. Select the one you are going to connect to.
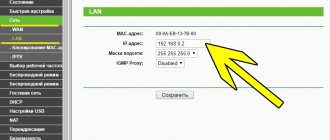
Enter your password to access the network and click the “Save” button. Now go to DHCP settings and disable the DHCP server as shown in the screenshot.
After that, open the “Network” section, LAN section and change the IP address of your router so that it differs by one digit from the IP of the main router. For example, if your main router has an address of 192.168.0.1, assign yours 192.168.0.2.
Save the changes and reboot the router.
An easy way to configure a router as a signal amplifier (repeater) is to launch the quick setup and at the stage of selecting the operating mode o.
In the next step, select the network you are going to strengthen and enter the password. Then select “Smart IP (DHCP)” for the LAN port.
In the last window, check the settings and click the “Finish” button. Your router will reboot and work as a signal booster.
How to properly connect a router to your home network
I'll start by showing you how to connect the Archer C20 after you've taken it out of the box. This router has 5 ethernet ports. One of them is blue in color and differs from the others in yellow. This is an external port called WAN or Internet. You must insert the provider cable into it that goes into your house or apartment.
Next are four yellow LAN ports, into which we will connect all home devices that have a cable connection interface - TV, computer, laptop, DVR, etc. If you connected to your provider, then leave the last LAN port number 4 for connecting a TV set-top box.