How to log in to Recovery? Many instructions for upgrading and flashing Android require you to perform actions from the Recovery menu. What kind of mode this is and why it is needed you will learn from this article. What is Recovery? Recovery is a special Android boot mode in which:
- Perform a full Android data reset
- flashing a smartphone
- get Root rights
How to log in to Recovery? The Recovery menu, as a rule, is found in all Samsung smartphones and tablets, but is absent in other brands of Android smartphones, but you can easily add it by flashing this section to your Android device.
If an Android smartphone has a Recovery menu and it has not been changed, then it is called STOCK, but if it did not have one or third-party Recovery menus were installed, it will be called CUSTOM.
Custom Recovery comes mainly in two types : CWM and TWRP , less common are 4ext , Philz CWM , (different development teams).
Method for SONY
Turn off, turn on and when Sony logo appears on the screen or when the indicator lights up - HOLD/Press (possible options):
- Volume DOWN
- Volume Up
- Click on the logo
- Or turn off Sony, hold down the “Power” button, wait for a couple of vibrations, release the power button and hold down the “Volume Up” button
If you can’t use the universal method (read below).
Smartphones without mechanical Home and Bixby keys
Hardly most of the company’s latest smartphones fit here, for example, Galaxy A50 (A51), A40 (A41), A70 (A71), A20, A30 (A31), etc. In general, if your Samsung only has two mechanical keys - power and volume, this method will help you.
Turn off your device in the same way as described above, then pick up the switched off device, press the volume up and power keys while holding them.
When Samsung appears, remove your finger from the power key. And when you see the robot, remove your finger from the volume up key. And wait for the recovery menu to load - similar to the first method.
A universal method for all Android devices using a PC and ADB tools
(Asus, HTC, Lenovo, Sony, HTC, LG, Samsung, Motorola and others, provided that recovery is available in this device)
Adb Run Program - Method 1
Using the site's proprietary Adb Run program (don't forget to enable USB Debugging)
ADB RUN working window
From the command line - Method 2
Another option is how to get to the Recovery menu using standard ADB tools and the ADB RUN program:
Connect Android to PC and type adb reboot recovery
Example in ADB RUN:
From the command line - Method 3
As practice shows on some devices (and more specifically on LG), it is not possible to transfer an Android device using the adb reboot recovery , in this case you should use the following command
adb shell
reboot recovery
There is also a command to switch to Recovery mode for LG, you need to enter the command
adb reboot —bnr_recovery
After which the device will begin to reboot in a few seconds!
Smartphones with a mechanical Home key
Suitable for Galaxy J1, Galaxy J2 Prime, Galaxy J3, Galaxy J4, Galaxy J5, etc.
We use the same volume up and power keys, only this time we add a mechanical Home key: press and hold them all until Samsung appears.
Then remove your finger from the power key while holding the other two. When the robot appears, you can remove your fingers from the remaining keys. For the rest, proceed the same as in the first case.
Just in case - how to exit recovery. And don’t confuse recovery with boot mode!
Management in the Recovery menu
Volume Up and Down —move through the menu. On/Off key —select an item in the menu. There are some Android devices that do not have a volume key ,
in this case, you will need
an OTG cable and a computer mouse.
As soon as you start putting Android into Recovery mode, connect your mouse. This concludes the article. If you don’t know how to use it and what items in Recovery are responsible for, then read the article
- FAQ Clockwordmod or complete instructions for CWM
- How to use TWRP RECOVERY
- If errors occurred when installing the update - Status CWM
That's all! There is nothing complicated! Read more different articles and instructions in the section Articles and Android Hacks . Stay with the Android +1 , it will be even more interesting!
Smartphones without a mechanical Home key with Bixby
This includes Samsung S8, S9, S10, S10+, Note 8, Note 9, etc. These devices have three mechanical keys: power, volume and Bixby.
Turn off your smartphone by pressing the power key and holding it for 1-2 seconds.
A small menu appears on the screen in which you select “Shutdown”.
The smartphone is turned off. Hold it in your hands and press and hold the Volume Up, Bixby, and Power keys.
When Samsung appears on the screen, remove your finger from the power key while holding the Volume Up key and Bixby. If everything is done correctly, you will see the robot:
At this point, you can remove your fingers from the volume up and Bixby keys.
After is:
And finally, the recovery menu:
Don't press anything, just wait for the recovery menu to load.
Methods for resuscitating Android when “bricked”
There are three effective methods for restoring Android if it loses its functionality:
- using the standard recovery environment Recovery;
- through custom Recovery;
- through a computer and special software.
Which method to use directly depends on the state of the system on the device.
Restoring a brick using standard Recovery
If, when trying to enter the workspace of the device, there are constant reboots or the phone freezes on the system logo, but the Recovery environment is working, then you are in luck, since you can restore the Android firmware through it. To do this you need:
After rebooting, the smartphone should display factory settings. If Hard Reset did not help fix the problem, we try to revive Android after unsuccessful firmware using a previously created system backup or a file with firmware downloaded from the Internet.
To restore Android from a previously created backup, you need to do the following:
- Enter Recovery mode.
- In the initial window, select Backup and Restore.
- Specify the required backup.
- Wait for the system to roll back and reboot the device.
If you did not take care of creating a return point in advance, then you can return Android to your tablet or smartphone using the downloaded firmware. In this case, we revive the gadget as follows:
- Download the firmware file to your PC specifically for your Android device model. This should only be done from trusted sources.
- We remove the memory card from the device and connect it to the computer via a card reader.
- Copy the downloaded file there.
- We return micro sd to the phone.
- We enter Recovery and select the item marked in the figure.
- We indicate the path to the firmware and start resuscitation.
Once the Android “brick” has been restored, the downloaded file can be deleted.
Using custom recovery
If the “bricking” led to the crash of not only the operating system, but also the standard Recovery, then you can restore the system using a custom recovery environment - the CWM Recovery program.
Before restoring a brick on Android, you need to install a recovery mod on the problematic device:
- LineageOS is, in our opinion, the best choice. In the drop-down menu on the left, you can select your phone model and download the correct file.
- Dirty Unicorns
- Paranoid Android
- Resurrection Remix
- We download from the network an executable file with custom Recovery of the version that suits your gadget (use the links above).
- Install the SP Flash Tool utility on your computer to install the recovery mod on Android.
- We launch the program and in the Scatter Loading line we write the path to the downloaded and unzipped recovery file. You also need to remove the selections opposite all items except Recovery.
- Click Download and connect the gadget to the PC. Until this time it must be disabled.
The installation of CWM Recovery will begin, after which you can disconnect the smartphone from the computer and proceed directly to resuscitation:
After completing these steps and rebooting, the phone (tablet) should work.
Reanimation of a “brick” via a PC and special software
When considering how to restore Android after being “bricked”, it is worth noting specialized software developed individually for each mobile device manufacturer. Thus, the FlashTool recovery program is used for gadgets from Sony and some other brands, and Odin is used for Samsung.
Let’s restore the functionality of the “brick” using Odin:
- Install this utility on your PC and download the file with Android firmware (select your model and download the file).
- Launch Odin, connect your phone to your computer and enter Recovery mode.
- In the PDA line, specify the path to the firmware and click Start.
The process of automatic system recovery will begin, upon completion of which you will again be able to enjoy your working device.
However, to install unofficial firmware, you will need a custom Recovery, such as ClockworkMod Recovery or Team Win Recovery Project.
How to enter Recovery mode on Motorola and Nexus
To enter Recovery mode on Motorola and Nexus smartphones, you need to do the following:
- Turn off the device.
- Press the Volume Down button and the Power button.
- The bootloader will appear. Use the Volume keys to select Recovery. Press the Power button to select.
All Recovery items and when they are needed
Before you go into Recovery on Samsung, you should understand why this might be useful to you:
- The device does not turn on. Either there is an endless screensaver, or there is an endless cycle of reboots, or something else is wrong.
- The smartphone has become slower.
- You want to reset your phone.
- A system update needs to be installed.
All these actions can be performed in Recovery, which is sometimes called Samsung recovery mode - due to the fact that it can “bring your smartphone back to life”. Here is a description of its points:
- Reboot system – reboot the device.
- Reboot to bootloader – reboot the smartphone and enable startup mode, in which you can perform more serious actions. This is usually the first step to root. But I don’t recommend doing this step if you don’t know what you’re doing.
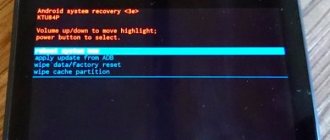
- Apply update from ADB / SD card – install the update using Android Debug Bridge or from flash memory.
- Wipe data/Factory reset. If other actions do not help, then you can reset the smartphone to the state in which it was when purchased. Please note: this action will erase all data from the smartphone. You also need to remember your Google password for the account assigned to your phone: when you turn it on, Samsung will ask for it.
- Wipe Cache Partition – clearing the smartphone cache. This wipe will not remove data from your Samsung. The procedure is safe and will help solve the problem if the phone does not want to turn on or crashes. Moreover, it can speed up and improve the operation of the device. But be very careful - you need to select this item.
- Mount /system restores system root folders and their names.
- View recovery logs – allows you to see system logs – view files with service information.
- Power off – turn off the smartphone.
Now you have basic information about the Recovery mode on Samsung - you will be able to reset or restore the system even if the phone does not start. This is a fairly simple solution to a serious problem, and I hope this knowledge has helped you. But be careful with some items and check several times what exactly you are doing in this menu.
How to exit recovery mode?
For this operation, you can use one of two methods:
- Press and hold the power button for about 7-8 seconds.
- In the menu, select the “Reboot system now” command.
That's all. It is worth remembering that using recovery mode is not always justified; in some cases (removing some third-party malware or fighting applications that do not allow themselves to be uninstalled), Safe Mode will be sufficient for the Galaxy S8, but that is a completely different story.
Easy way: search for files in Google cloud
The first method of recovering deleted data is suitable for everyone, but it works at random. Try checking Google cloud storage - your data may have been automatically synchronized with them, and a backup copy may have remained in the cloud. Depending on what you are looking for, log in with your Google account username and password to one of the following services:
For the future: To avoid losing your data, get into the habit of archiving it from time to time. To do this, go to takeout.google.com right now, click Create Archive and select what data you want to archive. After completing the procedure, you can download a copy of them from this site and then restore data from it.
You can back up your data at takeout.google.com.
Recovery Mode has several main modes, which we will list.
How to go to Download mode on Samsung
Download Mode is a downloader for Samsung devices. This mode displays some information about the smartphone or tablet. Using the Download mode, you can connect your Android device to your computer, install new firmware or a custom Recovery menu.
To enter Download mode on Samsung, you need to follow these steps:
- Completely turn off your Android device.
- Simultaneously press the Volume Down button, the Home button and the Power button.
- Confirm your choice using the Volume Up button.
Part 1: How to Factory Reset Samsung Galaxy from Settings Menu
If your Samsung Galaxy device is turned on and you can access it, the Settings menu is the easiest way to factory reset your Samsung.
It doesn't even need a computer or third-party tool. But you must understand that a factory reset will permanently erase all the content on your device, so you better back up your Samsung mobile device using Google account, Samsung account or other methods.
Restoring Android to factory settings will destroy all data and settings on your Android phone. So you have a better backup of your Samsung phone to avoid data loss.
Additionally, the design of the settings menu differs across different Samsung Galaxy devices. To help you understand this clearly, we will tell you the workflows based on device models.
On new Galaxy models running Android 7.0 and later
Step 1: Tap Apps on the home screen of your Samsung device and then open the Settings app marked with the gear icon.
Step 2: Go to General Management > Reset and click on Factory Data Reset to start the process. Or you can type "Reset" in the search bar in the Settings app to directly go to the corresponding screen.
Tip: If you want to clear the SD card on your device, check the Format SD card checkbox.
Step 3: Read the information on the screen carefully and then press RESET to continue. If you have set a security lock on your device, you will be prompted to unlock it with a password.
Step 4: If you're ready, click "ERASE EVERYTHING" to begin restoring your Samsung to factory settings.
For older Galaxy models running Android 6.0 and earlier
Step 1: Also find and launch the Settings app on your Samsung Galaxy device if it is running Android 6.0 and earlier.
Step 2: Scroll down and tap the Backup & Reset submenu. Then select the Factory Data Reset option to begin the factory reset. When prompted, enter your device PIN or password to continue.
Step 3: Tap Reset Device on the warning screen and then tap Erase Everything to start the Samsung factory reset process. Cleaning the entire device will take some time.
On Samsung Galaxy Book
The Galaxy Book is a Windows 10 combo tablet, so the design is a little different from other Galaxy devices.
Step 1: Open your Galaxy Book and select Start > Settings > Update & Security.
Step 2: Click "Recovery" from the menu list and select "Get Started" under the "Reset" section.
Step 3: There are two options for restoring Samsung to factory settings: “Keep my files” and “Remove everything”. The first one will erase all apps and personal settings on your device, but leave personal files. Later it will return the device to its factory state. Make a decision, the device will carry out your command.