Starting with Windows XP and all subsequent versions of the Windows system, there is such a function as DEP. It can be deciphered and translated as “data execution prevention.” In some cases, the operation of this service creates certain interference and then it becomes necessary to disable it. This procedure is not too complicated and many can easily repeat it, but if disabling did not give the desired effect, then DEP can always be activated again. For greater clarity, at the end of the article you can watch a video where everything is shown in detail.
How to disable DEP in windows 7/8 + video
In Microsoft Windows operating systems, starting with version XP, there is one interesting feature - data execution prevention (DEP), originally called Data Execution Prevention (DEP). Sometimes it interferes with normal operation and needs to be turned off. In principle, there is nothing complicated about this, and if no effect follows, then you can turn everything back on. There is a detailed video at the end of the article.
How to disable DEP in windows 7/8
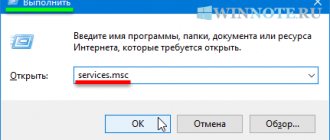
So, let's get straight to the point. Click the “Start” button and write “cmd” in the search bar. In the search results at the very top we find cmd - this is needed to launch the command line. To run it with administrator rights, right-click on the command and select “Run as administrator” from the context menu.
Accordingly, if you are currently logged into Windows as a regular user, the system will ask you to enter the administrator password.
Now, insert the command into the black window that appears and press “Enter”:
bcdedit.exe /set {current} nx AlwaysOff
The result should be the message: “Operation completed successfully”
Next you need to reboot for the changes to take effect. Thus, we have disabled DEP in Windows 7 for ALL services and programs, regardless of whether your processor supports data execution prevention at the hardware level or not.
How to disable DEP for a specific program
Could be so. To do this, go to “Control Panel -> System” and on the left side of the window click on “Advanced system settings”
In the “Performance” section, click on the “Options” button
We need the Data Execution Prevention tab. Here, in principle, everything is clear:
By default, DEP only works for essential programs and services. By moving the switch to the “Enable DEP for all programs and services except those selected below” position, we can determine for ourselves which programs need to disable the DEP function. To do this, simply select a program from the list or click “Add” and manually select the launch (.exe) file.
Please note that 64-bit applications cannot be added to this list. Also, the program itself must support working with the function disabled. In any case, you will immediately see an error message.
Here’s another thing: before disabling a function from the command line, first check to see if it worked for all your programs. Then switch first to only basic services and programs and reboot. Perhaps the problem that brought you to this article will be resolved.
How to turn DEP back on in Windows 7/8
To get everything back, run the command line “cmd” again as an administrator, only this time insert the following command:
bcdedit.exe /set {current} nx OptIn
and reboot. All.
Now a short digression: what kind of function is this and what it is used with. Data Execution Prevention is designed to protect the system from certain viruses and system security threats. But under no circumstances should this be confused with an antivirus or firewall! These are completely different things.
DEP marks some service areas in the computer's RAM as “non-executable”, and if a program tries to execute its code in this area, the function will work, the program will be forcibly closed and a corresponding message will be displayed. The fact is that some viruses can work this way, and therefore this blocking method helps prevent the execution of certain malicious code.
A function can be implemented either in hardware (using processor commands) or in software (using special software code). The hardware implementation is more reliable and, probably, all modern processors support it. So, if there are no problems, then it is better not to change anything in the settings.
But, unfortunately, this DEP function can interfere with the operation of normal programs, so sometimes it is disabled. How to do this - this article will help you!
Video tutorial on how to cancel the DEP function:
What is Data Execution Prevention?
Data Execution Prevention (DEP) is a means of protecting your computer from viruses and other security threats. DEP scans programs to ensure they are using system memory safely. If a program tries to run (execute) code from memory into the wrong image, DEP closes it.
Interesting materials:
What is post credit? What is gradual and random failure? What are duties? What is legal personality, legal capacity and legal capacity of citizens? What is the fire resistance limit of a building structure? What does it mean to present? What are suggested news in VK? What is pre-recording? What is Preparasion in dance? What is an echo sounder device?
Disable DEP Windows 7
Before you disable DEP in Windows 7, you need to understand that the PC user is taking a certain risk, because any function that is developed by Microsoft and implemented in the OS performs certain tasks.
This also applies to the DEP function, which is a kind of outpost in security issues in the latest versions of Windows OS starting with XP SP2.
What is DEP?
So, what is DEP and is it worth disabling this function?
As is known, with the advent of the first viruses, the purpose of which was mainly to steal confidential data, special programs began to be created, which later became known as anti-virus programs.
But in addition to them, Microsoft began to develop various security patches, which Windows OS users began to receive during system updates.
Of course, these updates play an important role in security issues, but not all PC users installed these updates. And they could not provide 100% protection against theft of data from a computer, especially those that are temporarily processed in the computer’s RAM.
It was necessary to create such protection that would be built into the Windows OS by default and would be supported at the software and hardware levels.
And such protection was created. They called it “Data Execution Prevention” - DEP. Translated as “data execution prevention.”
How does it all work?
In the computer's processor memory and RAM there are specially allocated areas for temporary storage of processed data, or simply, information. Also, running programs and operating system system files are loaded into these areas.
The goal of most viruses is to penetrate these areas and steal information or launch malicious code from there.
That is, malicious code can penetrate into the data processing area of RAM or processor, which does all the dirty work.
In principle, this used to happen until the DEP protective function appeared, which began to monitor and filter incoming information into the device’s RAM, cutting off virus codes.
If the code nevertheless penetrated into these areas and began to be executed, then the DEP system sees that some abnormal processes have begun to occur in the data areas that need to be stopped.
This also applies to some programs that, after or during the installation process, may incorrectly use RAM.
In this case, DEP may stop the operation or installation of this software by displaying a message stating that data execution was prevented.
As a rule, this is the main reason for disabling DEP and not only in Windows 7. Users get tired of constant messages and try to get rid of them.
Software versions
Almost all new versions of programs support collaboration with DEP.
If, after installing a certain program, a message about data execution prevention begins to appear, then do not rush to disable DEP.
Pay attention to the program version and try to update it. After the update, as a rule, the message no longer appears
If this does not help, then you can disable DEP only for this application, which will have minimal impact on reducing the security of your computer.
But first things first.
How to disable DEP windows 7
Disabling DEP in Windows 7 is only necessary as a last resort, as you reduce the security of the entire system and computer. It is better to do this only for a specific software, and not for the entire system.
You can disable DEP only when you are logged in with administrator rights.
Click the "Start" button and enter the word "System" in the search bar at the bottom.
The search result appears, click the word “System”.
Next – “Advanced system parameters”.
The System Properties window will appear.
Go to the section – Performance – “Settings”.
Next – “Preventing data execution”.
Here you can add to the exception programs and services, when launched, the unfortunate message appears.
Hardware support for DEP
Hardware support for DEP is an additional level of protection, but it is implemented only where support for this function exists in devices.
For example, all the latest types of processors have the DEP function.
It's implemented like this.
Certain areas of processor memory are marked as not containing execution code.
If suddenly in this area, some program tries to run the code, then the operation of this application stops.
https://youtube.com/watch?v=ksV0iuaCCR8
If the processor does not support DEP, then this function works only at the software level, protecting mainly the main system files.
How to enable DEP on Windows 10
The method you choose to turn DEP back on depends on what method you used when you disabled the option. Let's consider all the options.
Via "Command Line"
If you used the “Command Line”, that is, deactivated all utilities at once, you will not be able to activate additional DEP protection through the “Control Panel”, because the very “Data Execution Prevention” section will simply be missing in the window. What to do in this case?
- Log back into Command Prompt through Administrator mode using the detailed instructions in the “Disable for all utilities” section of this article.
- Paste the code you copied earlier: bcdedit.exe/set {current} nxAlwaysOn. As you can see, it hasn't changed much: instead of Off we just put On.
- After that, immediately press Enter so that the system starts executing the command.
- Restart your device for all changes to take effect. Now the required tab will appear in the “Performance Options” window. In it you can already configure the option to work only for the main programs or deactivate it for some specific ones.
Via "Control Panel"
If you turned off DEP for individual applications in the Performance Options window and now want the feature to work for them again, do the following:
- Launch the Performance Options window using the instructions in the “Deactivate specific applications” section of this article.
- Go to the large Data Execution Prevention section. You will see a list of utilities for which you previously disabled DEP.
- Select the utility for which you want to restore protection with the left mouse button. After this, click on the “Delete” button located under the list next to the “Add” button.
- Repeat the procedure for all other utilities. If you don't want to get rid of the list of applications completely, you can simply check the round checkbox to the left of the first item, which allows you to activate DEP only for the main Windows utilities and services. When you switch back to the second value, your list will again appear in the window below.
- Now click on OK and be sure to restart the system, otherwise the changes made will not take effect.
In the Registry Editor
If you created settings for individual programs in the Registry Editor, the procedure for activating the DEP protection tool will look like this:
- Call up the already familiar Layers folder in the third main block HKEY_LOCAL_MACHINE. To do this, use the instructions in the “Disable using Registry Editor” section.
- Find the entries in the list that correspond to the applications for which you want to enable DEP. Right-click on one of them and select the third option “Delete” in the small gray menu. You can also select it with the left key, and then press Delete on the keyboard.
- Confirm the cleaning by clicking “Yes” in the warning window.
- Follow the same steps for all other unnecessary registry entries and restart your computer.
The DEP function is a “protection” of the system against the launch of viruses. In some cases, it may mistakenly mistake benign programs used by a Windows 10 client for malware. If you trust these utilities, set them as an exception in the “Security Options” window or in the “Registry Editor” - the option will no longer work for them. You also have the right to disable the function completely via the Command Line, but in this case you take responsibility for the security of your computer: if a virus code gets onto your device, it will start with DEP turned off.
How to understand that the problem relates to dep
Before you try to disable something, you should figure out whether the service that has fallen out of favor relates to the problem that has arisen?
A typical example of an error associated with DEP services is the appearance of a message like “the instruction at address “such and such” accessed memory at address “other”, the memory cannot be “written” or “read”” when trying to launch certain applications. As can be understood from the description, the service, for unclear reasons, limits the program’s access to our system, causing critical errors in its operation.
First of all, it’s worth checking the application and its files for viruses - the alarm didn’t go off out of the blue. Even if no problems were found, it is worth conducting a full system scan to ensure that a virus is not missed.
If the error remains in place, but the system is still clean, move on to the next point.
Enabling or disabling DEP in Windows
As you know, the issue of computer security has been acute for quite some time. Every year, developers create more and more new security tools, which, unfortunately, correlate rather poorly with the work of the average user on a laptop. We are talking about constant errors and system conflicts that arise in certain utilities precisely because of certain system security measures. One of these is DEP. In this article we will look in detail at how to enable or disable DEP in Windows. Let's get started. Go!
If necessary, you can disable Data Execution Prevention (DEP).
The name DEP stands for Data Execution Prevention, which translates literally as data execution prevention. The essence of this function is to prevent the execution of code that is executed in non-executable memory areas. Thus, DEP prevents virus software from attacking in one direction. But often this useful function only interferes with users, causing various errors during the operation of certain programs or games.
There are several ways to disable DEP. The first (suitable for Windows 7 and 8.1) - disables this function for all Windows services and utilities. First, enter Command Prompt mode with administrator rights, and then type the following command and press Enter to start executing:
bcdedit.exe /set {current} nx AlwaysOff
Now reboot your laptop for the new settings to take effect. If you suddenly need to enable the Data Execution Prevention feature, then run the same command, just replace “Off” with “On”.
If you do not want to disable DEP completely, putting the system at risk (which is reasonable), deactivate this function for a specific utility or several utilities that are causing problems. There are two approaches to solving this problem. The first is by changing additional system parameters, the second is through the Windows registry.
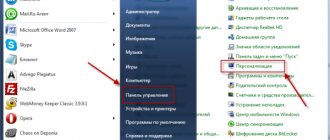
If you prefer the first option, open the Control Panel of your computer and select the “System” section from the menu, or simply right-click on the “My Computer” shortcut and click on “Properties”.
Click on the “Advanced system settings” item, and then go to the “Advanced” tab.
Next, use the “Options” button from the “Performance” section. Now go to the “Data Execution Prevention” tab and check the appropriate box depending on whether you want to activate or deactivate DEP. After making changes to the OS settings, restart the laptop.
Exactly the same can be done by editing the Windows registry (for experienced users). First, use the Win + R hotkeys to go to the Run window and type (without quotes) “regedit”. Once in the Windows registry, open the “HKEY_LOCAL_MACHINE” section and then “SOFTWARE”. Next, navigate to the “Windows NT” folder. There is a section “CurrentVersion”, and already in it - “AppCompatFlags”. You're almost there. While in “AppCompatFlags”, look for the “Layers” folder; if it is missing, create it. Now you need to create so-called string parameters for those utilities for which you want to disable DEP. The name of each string parameter must be the full path to the exe file of a specific utility or game. Set to "DisableNXShowUI".
Ready. After making changes to the system, you should restart the computer.
Although, as a rule, deactivating DEP does not lead to any serious consequences, it should be remembered that this is an important component of the computer security system that was invented for a reason, so keep in mind that refusing to use this function remains at your discretion. Only you will have discretion and be responsible for possible consequences.
How to disable DEP in Windows 10. DEP - DataExecutionPrevention - is a special system function that allows you to prevent the execution of program code in non-executable memory segments. In other words, it prevents malware or viruses from entering your computer. This feature prevents some applications from performing their tasks and can cause loading errors. Most often this happens with games, such as FIFA 18 - as a result of DEP being enabled, the appearance of error - “The memory cannot be read or written”, or “An error occurred when accessing the address...” Disabling Dep in Windows can be done completely or selectively, for certain programs with which problems arise.
Disabling for individual programs
As stated above, it would be more reasonable not to completely deactivate the function, weakening the system’s protection from virus attacks, but to disable data execution prevention only for specific programs whose operation it interferes with.
On Windows 7 this is done as follows:
- Right-click on the “My Computer” icon and open its “Properties”.
- Go to the "Advanced System Settings" tab in the left menu.
- In the Performance field, click the Options button.
You will see several tabs with useful features. For example, on the Visual Effects tab, you can disable all unnecessary design tools and speed up your Windows 7 computer. But in this case, you need another tab called Data Execution Prevention.
- ABOUT.
- Click the "Add" button and specify the path to the EXE files of the programs that you want to make exceptions.
Important: 64-bit applications cannot be added to the exclusion list. In addition, the program itself must support working with the DEP function disabled.
If one of the specified conditions is not met, then adding the application to the exclusion list will not work.
How to disable DEP in windows
Starting with Windows XP and all subsequent versions of the Windows system, there is such a function as DEP. It can be deciphered and translated as “data execution prevention.” In some cases, the operation of this service creates certain interference and then it becomes necessary to disable it. This procedure is not too complicated and many can easily repeat it, but if disabling did not give the desired effect, then DEP can always be activated again. For greater clarity, at the end of the article you can watch a video where everything is shown in detail.
What is the DEP function?
The main purpose of the DEP function is to protect your system from malicious applications and other threats that can be harmful to Windows. But don’t think that it’s like an antivirus or firewall. No, this is a completely different program that works on a different principle.
The DEP function is capable of marking various areas of RAM that are not intended for use. If any program starts to “get in” there, DEP will immediately forcefully disable it and display an appropriate error message. Viruses or incorrectly functioning applications can often work this way, as a result of which the operation of programs and services that are potentially dangerous to the system is prevented.
Usually, if there are no problems with DEP in the system, it is better not to touch these settings at all. But in some cases, a built-in utility can interfere with the operation of completely normal programs that do not pose any threat. In such cases, you have to resort to disabling this function.
How to disable DEP in windows?
Well, let's get down to business. Open the Start menu and type “cmd” (without quotes) into the search box. A list of found files will appear, at the very top there will be a program of the same name. But don’t rush to launch it, because we must work through an administrator account. Therefore, right-click on it and click on “Run as administrator”.
At the same time, if you are logged into the system with a simple user account, then you will have to additionally enter a password to log in through the administrator account, if one is set.
After these steps, a command line window will open. Copy this command into it and press the Enter key: bcdedit.exe /set {current} nx AlwaysOff
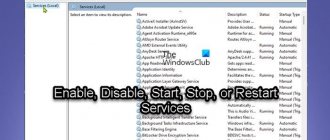
A message indicating the successful completion of the operation should appear in the window, as shown in the figure below.
For all changes to take effect, restart your computer. This is how we completely disable DEP for absolutely all applications, services and programs. This action applies in any case, even if the functionality of this function is not supported at the hardware level.
Disable DEP only for a specific application
There is another way. To do this, open the Control Panel and go to the System section. On the left side of the window, in the panel, click on the “Advanced system settings” link.
On the very first tab “Advanced”, where the “Performance” section is, click on the “Options” button.
In the next window, open the “Data Execution Prevention” tab. We see this picture.
With standard settings, this function will work exclusively with basic programs and services. But if we move the switch to the item below, where it says “Enable for all programs and services,” we will have the opportunity to select and add to the list programs that DEP will not work with. Simply select a program from the list or click “Add” and through the Explorer window, find the program’s executable file and select it.
But there is one feature: 64-bit applications will not be added to this list. And not all programs can support operation without the data execution prevention function. This must be taken into account and in such cases an error will appear.
If you disable a service via the command line, we recommend making sure that it is enabled to work only with basic programs. If it is enabled for all applications and services, then it is wise to first switch to running only essential services and restart your computer. It is quite possible that this will be enough and you won’t need to use the command line to solve the problem.
How to enable DEP?
To start this function again, open a command prompt (cmd) with administrator rights, copy it there and run the following command:
bcdedit.exe /set {current} nx OptIn
After this, restart your computer and DEP will work as before. Finally, for greater clarity, we suggest you take a look at the video, where everything is shown in detail:
prostocomp.net
Disabling DEP for certain programs
I don’t recommend getting rid of the built-in blocker at all, because it can still stop some malware. Therefore, I suggest that you disable DEP specifically for those programs that you cannot run, and not for the entire system as a whole.
But you must be sure that they do not contain viruses. Can they be trusted? Then let's get started:
- Open the System section from the Control Panel. An alternative option: right-click on the “my computer” icon and enter “Properties”.
- Go to “Advanced system settings” and in the window that appears, expand the “Advanced” tab.
- Click on the “Options” button located at the top.
- The following window will pop up, where you should go to the “Data Execution Prevention” tab;
- It has 2 checkboxes and the top one is usually activated. But you need to move the checkbox to the second one, where it says “...except those selected below.”
- Under the large field, the “Add” button will become available, which is what you need.
- Specify the path to the exe file for which you want to unblock.
- Click "OK" and restart your computer.
Disabling DEP function in windows7
Windows 7 has a very useful data execution prevention (DEP) algorithm built into it, the original name is Data Execution Prevention (DEP). The bottom line is this: the OS with hardware implementation NX (from the manufacturer Advanced Micro Devices) or XD (from the manufacturer Intel) prohibits the algorithm from executing actions from the sector of RAM that is marked as non-executable. More simply: it blocks one of the vectors of a virus attack.
Disabling DEP for Windows 7
For certain software, enabling this function prevents work processes, as well as causing a malfunction when turning on the PC. This situation occurs both with individual software solutions and with the system as a whole. Malfunctions associated with accessing RAM according to a certain parameter may be related to DEP. Let's consider ways to solve this problem.
Method 3: Database Editor
Enabling DEP: launch the Windows 7 command interpreter, and enter the command in it: Bcdedit.exe/set{current} nx OptIn Then restart the PC.
When performing these simple steps using the command line or system/registry settings, the DEP function in Windows 7 is disabled. Is there a danger in disabling the DEP functionality? Most often, no, if the program for which this action occurs is from an official resource, then it is not dangerous. In other cases, there is a risk of infection with virus software.
We are glad that we were able to help you solve the problem.
Decoding
Let's start by explaining the term. Three capital letters hide the phrase Data Execution Prevention. In our language this sounds like “data execution prevention”.
In practice, this concept means the default installed Windows function, something like an antivirus, but in fact it is not considered one. It blocks programs that want to use part of the RAM for their work, which is marked by the operating system as “unused”.
You, in turn, receive a message like this: “the instruction at address “such and such” accessed memory at address “other”, the memory cannot be “written” or “read”.” And all you can do in this situation is click “OK”.
However, that was the case before you came across this article. After reading it, such errors will not be a hindrance for you. I provide you with several ways to disable this service.
How to disable DEP in windows?
What is DEP? From the English Data Execution Prevention, which translates as “Data Execution Prevention.” Essentially, it is a security feature built into various operating systems, including windows. The function protects the system from some viruses, Trojans and other security threats; however, it should never be confused with an antivirus or an antivirus utility.
DEP is not an antivirus. DEP marks individual service areas in the computer's RAM as “non-executable”. If a program tries to execute code in this area, the function will fire, so the program will close and the user will see a message. Why was this done? It's simple: some malicious programs work using this algorithm, so forcing the application to close allows you to avoid an attack.
Of course, no one recommends disabling DEP and I am part of the same cohort of people. The problem is that in isolated cases, DEP can “interfere” with applications on the computer, so sometimes this function still has to be disabled. It is better to do this temporarily, not forgetting to turn on DEP later. The function works on Windows 7, 8 and 8.1.
How to disable DEP for the entire system?
The easiest way is to use the command line. To do this, click “Start” and in the “Search programs and files” line write cmd. A program shortcut will appear at the top of the window. Right-click on it and select “Run as administrator.”
A command prompt window will appear. Add the following line to it:
bcdedit.exe /set {current} nx AlwaysOff
Press Enter.
After you see the message “Operation completed successfully” in the command prompt window, close the window and restart your computer for the changes to take effect. This method allows you to disable DEP for all services or programs.
If you only want to disable DEP for a specific program, we'll take a different route.
Find the “Computer” icon on your desktop (if you don’t find it, click on the “Start” button and look to the right side of the window), right-click on it and select “Properties” from the menu. A window will open to view basic information about your computer. On its left side there is a small menu in which we are interested in the “Advanced system parameters” item. Click.
A window opens. On the “Advanced” tab, click the “Options” button.
Another window will open. In it, select the “Data Execution Prevention” tab. Check the box next to “Enable DEP for all programs and services except those selected below,” and use the “Add” button to add program files (.exe) that you want to disable.
Don't forget to click OK when your selection is complete.
Another similar method, but only using the Registry Editor. Open the registry editor (WIN+R, enter the word regedit in the window and press Enter). We follow the path HKEY LOCAL MACHINE - SOFTWARE - Microsoft - windows NT - CurrentVersion - AppCompatFlags - Layers. If there is no Layers item, no problem, create it yourself. Then create a string parameter in it, the name of which is the path to the executable file of the program, and specify DisableNXShowUI as the value.
I highly recommend not using this method (with the registry editor), lest you accidentally change the registry where it is not needed, so you take responsibility for performing this action.
How to enable DEP in windows?
Everything is simple here. Run Command Term as administrator and write:
bcdedit.exe /set {current} nx OptIn
Reboot the computer. All.
fulltienich.com
Method 2: Control Panel
- . With the ability to administer, we enter the OS, go to the address: Control PanelAll elements of the control panelSystem
- Go to “Advanced system settings”.
- We find the “Advanced” subsection in the “Performance” section, go to the “Options” item.
- Subsection “Data Execution Prevention”, select the value “Enable DEP for ...:”.
- In this menu, we have a choice to configure for which specific programs or applications we need to turn off the PVD algorithm. Select the program presented in the catalog, or click “Add”, select the file with the extension “.exe”.