A bootloader (Hboot) is a program that controls the kernel of your device’s operating system so that it boots normally. Moreover, this applies not only to Android, but also to other devices with an OS, such as a PC, laptop, and even an old push-button phone. In addition, it is the bootloader that gives permission to install any programs and firmware. For this reason, users are interested in factory unlocking the bootloader on an Android phone.
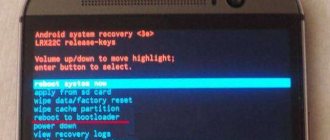
Hboot is activated when the device is turned on, and is an analogue of Bios in a computer. It prepares all the data for the kernel, loads it into memory, after which the system starts directly. If its integrity is damaged or something interferes, thanks to the bootloader you can get into recovery mode to clear the data, or perform a reset to factory settings. To do this, before turning on the device, hold down the power and volume down keys and do not release them until booting (in some cases, the combination of buttons may differ).
Why is the bootloader locked?
Manufacturers block for two reasons:
1. Oblige the owner to use the operating system that was developed for his device.
2. Security. Many smartphones and tablets are sold online or in retail stores. In both cases, the seller or intermediary may, at its discretion, add advertising or malicious software that should not exist. For the same reason, Xiaomi began to block the bootloader of devices released after 2016, due to numerous complaints about the presence of viruses in their firmware (which were not initially present).
OS Boot Principles
Just like in stationary systems, in mobile devices it accesses initialization files in the same way as, for example, Windows does when loading parameters from the boot.ini file.
If you pay attention to such data, it is not difficult to conclude that in Android systems you can easily change not only the boot method, but also the loaded OS, either manually or automatically. However, few people know that this tool itself only loads the system that is written for a specific model of smartphone or tablet.
Benefits of an unlocked bootloader
An unlocked bootloader opens up exactly the same possibilities for the user as on a PC, namely:
- Flash any operating system (available for your device).
- Installation of individual modules, OS kernels, applications, patches.
- Freely migrate between stock firmwares, especially if they are based on different versions of Android.
- Easily create backup copies of your current OS and applications, as well as restore them without using a PC.
- Use Dual-Boot and install two or more operating systems, both in internal memory and on an external SD card.
- Wider recovery options in case of unsuccessful firmware.
And this is not the entire list of possibilities after factory unlocking Android.
Risks involved with unlocking the boot loader of a device
Of course, any action that requires you handling the critical aspects of a mobile device by yourself has a lot of high risks associated with it. First, if you do not control the device with care, the outcome can be very disastrous, and once you gain access to your mobile device system files/folders, in most cases, the warranty coverage offered by the manufacturer becomes invalid instantly.
There's a reason Android devices come with locked bootloaders. However, they can be unlocked at your own risk. To see the dangers involved in unlocking your Android device, check here – the risks of unlocking Android device boot loader.
Most of all, unlocking your device bootloader to flash a custom ROM; a custom ROM does not guarantee full functionality of your device. It might not work correctly on your device, and some functions or features of your device may cease to work after this action.
Conclusion
There is no need to worry too much about problems with the bootloader, especially when it comes to personal information. Found or stolen devices most often have their data erased, and rarely will anyone restore anything. An open bootloader is more needed by advanced users who know what to do with it, regularly flash something and experiment.
Leave your questions in the comments to the article below - we will try to answer.
All publications from the series Mobile devices from the inside
1. Structure of images of partitions containing the file system.
Part 1.2. Memory layout, structure of description files and memory layout. 3. Structure of images of partitions containing the file system. Part 2.4. What is GPT? 5. Changing the memory layout of the YB1 tablet. 6. Studying the boot modes of the YB1-X90L tablet. CONTENTS
1.Introduction.2.Unlocking the bootloader.2.1. How to become a “developer”.2.2. Performing factory unlocking.2.3. Directly unlocking the bootloader. 3. Conclusion. 4. Sources of information.
Introduction
Creating homemade, custom firmware or even simply replacing screensavers in mobile devices (MDs) involves the ability to install partition images created by a third-party developer, and not by the manufacturer. This requires unlocking the MU bootloader. This process previously varied significantly depending on the manufacturer, but recently it has gradually begun to come to a standard form. Therefore, almost everything described below can be used as a practical guide for working on MUs from many manufacturers. We will focus on a detailed step-by-step guide to unlocking the bootloader of the YB1-X90L tablet, based on my experience.
Unlocking the bootloader
In the YB1-X90L tablet, the manufacturer has provided the ability for the user to independently unlock the OS bootloader. To do this, you must first perform the following steps:
- become a developer
; - Perform factory unlocking
of the bootloader.
2.1. How to become a "developer"
Any MU released by the developer has a special command section designed to configure and test the hardware and software of your MU. But these commands are not needed by a simple user in his daily process of communicating with the MU. Therefore, initially they are hidden from you, and to gain access, you need to perform a kind of shamanic dance with a tambourine
.
To perform this operation, you need to open the Settings
, go to the
System
and select the
About device
.
In the menu that opens, you need to find the item Build number
, which is located almost at the very bottom of the list,
Fig.1.
Menu About device
and click on it 7 times. You are a developer
should appear .
After that, return to the System
.
In connection with the previous actions, an additional menu item will appear in it For developers
, which was not there previously:
Fig.2.
Menu For Developers
That's it, the tablet has recognized you as a developer and new interesting commands have become available to you, for example:
- USB debugging
, which allows you to enable debugging mode when connecting the tablet to a computer via USB; - Running Applications
, which allows you to view and manage running tablet applications; - Factory unlock
, a command that allows you to unlock the bootloader.
Now you can proceed directly to removing the factory lock.
2.2. Performing a factory unlock
NOTE. When you start working on the tablet's firmware, the first thing you need to do is enable USB debugging mode.
To do this, without leaving the For Developers
, set the switch next to this command to on. A warning will immediately appear:
Fig.3.
Warning about switching on
USB debugging If the answer is positive, the debugging mode will be enabled: Fig.4.
On
“USB Debugging” mode Now, if during work an error occurs, for example:
- When loading, the tablet will reach the output of the logo image and freeze;
- The tablet will stop loading completely, i.e. don't even show the logo;
- will reboot on its own;
You will have a chance to restore its functionality by connecting to it from a PC using ADB. Here, run the Factory Unlock
.
To do this, set the switch located next to this command to the on state. A warning will appear: Fig.5.
Request to enable factory unlocking
If the answer is positive, the unlocking mode will be enabled: Fig.6.
Enable "Factory unlock" mode.
Do you think everyone's bootloader is unlocked? Noooo, the manufacturer only ALLOWED you to use the ability to unlock the bootloader, which is performed using FASTBOOT
in
FASTBOOT MODE
. If you don’t know what this mode is and how to get into it, read on.
Data recovery
On the other hand, in its standard mode of operation, restoring Bootloader after resetting the settings to factory settings is quite simple. This doesn't even require a hard reset.
You just need to reset the settings on the gadget itself, and after rebooting, the system will offer to choose an option: either use new settings on the device, or restore settings, programs and files using a Google services account. In this case, you will have to enter your Gmail address with a password, and also connect to the Internet, for example, with an active Wi-Fi connection.
2.3. Directly unlocking the bootloader
From the Android OS security system point of view, it looks like this: you can only remove the lock using the FASTBOOT
, which require access permission obtained consciously on the part of the user-turned-developer. To unlock the bootloader you must do the following:
- ADB
on the computer (PC) that connects to the tablet . - execute command in FASTBOOT MODE
Those. reboot the tablet into FASTBOOT MODE
, while the message
Bootloader locked
.
We connect the tablet via a USB cable to the PC and execute the fastboot flashing unlock command in the PC terminal.
The tablet will ask you to clear the data partition. Fig.7.
Request to clear the data section.
If you answer Yes
, the tablet will clean and unlock.
If you answer No
, then neither clearing nor unlocking will occur.
After unlocking the bootloader when entering FASTBOOT MODE,
the message on the screen in the list of parameters will change to
LOCK STATE - unlocked
:
Fig.8.
The bootloader is unlocked.
To return the lock, you need to run the reverse command
fastboot flashing lock.
Instead of typing the above commands, you can run the command file fb_unlock_YB.bat
with the following content:
fb_unlock_YB.bat
@echo off echo. echo devices echo. adb devices echo. echo reboot bootloader echo. adb reboot bootloader echo. echo variable before unlock/lock echo. fastboot getvar all > 1_Y.txt 2>&1 echo. echo unlock/lock echo. fastboot flashing unlock ::fastboot flashing lock echo. echo variable after unlock/lock echo. fastboot getvar all > 2_Y.txt 2>&1 echo. echo Termination pause
To check whether the bootloader has been installed/unlocked, in this case two service files will be created next to the command file, containing the tablet bootloader settings parameters:
- 1_Y.txt - before performing the operation: Fig.9.
Bootloader settings options before operation - 2_Y.txt - after the operation: Fig. 10
Bootloader settings parameters after the operation
We are interested in the parameters (bootloader) unlocked
(first line of the file) and
(bootloader) device-state
(fifth line of the file).
Before the operation is performed, the first line looks like (bootloader) unlocked: no
, and the fifth line looks like
(bootloader) device-state: locked
, because
bootloader is locked. After execution - (bootloader) unlocked: yes
and
(bootloader) device-state: unlocked
respectively, i.e. The tablet bootloader is unlocked.
What is the boot loader on Android smartphones
First, let's discuss what a bootloader is. A bootloader is a kind of program that initiates the booting process of a mobile operating system or a computer system; that is, a boot loader starts and loads the prior tasks & processes of an operating system.
We can also put it in this way; it is a code that runs on a device before the time the device OS starts up. All operating systems we know have boot loaders; however, the bootloaders you'll see on different operating systems are not going to be the same. It is in the boot loader that the instructions of how a device should run are contained. Also, it has some connections to the system kernel.
Many Android geeks often love to root their device(s); “Root” is a big word in the Android community; it is an action that grants you “Super User” access to manage/handle/deal with any folder or settings on a device. Unlocking Android device bootloaders allows you to perform administrative actions on the device, such as rooting an Android smartphone, flashing custom ROM to Android devices, or other admin actions associated with the system kernel.
What happens when Android turns on and starts?
What happens when Android starts up
We have a turned off smartphone running Android. Let's see what happens if you turn it on.
First, the BIOS of the mobile phone will start. BIOS (Basic Input/Output System) translated from English means “Basic Input/Output System”. It is constantly auto-saved and ensures the operation of inputs and outputs. In particular, this system also runs the bootloader.
As the name suggests, the bootloader loads other parts of the operating system, such as the kernel. The kernel of an operating system is its main part. Essentially, this is the lower level of the Android system, which is responsible for the progress of basic processes and data organization.
Then the main operating system called “ROM” starts. ROM stands for “Read Only Memory”, or “Read Only Memory”, used to store the entire array of immutable data. As a regular user, you cannot change anything in it.
In turn, the bootloader can be in three different states: “Locked”, “Open” or “Encrypted”. If the bootloader is open, deep changes can be made to the system, for example, you can install a custom operating system, also called a “custom ROM”, instead of the standard one, i.e. the “stock ROM”. But other issues, such as changing Recovery or getting root rights to a smartphone, can only be done using an open bootloader.
If the bootloader is encrypted, only the most urgent system updates from the manufacturer can be installed. The same applies to a locked bootloader, but unlike an encrypted one, it can be unlocked.
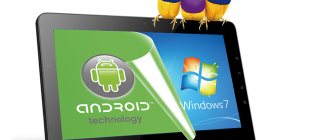
Installing another operating system
If we talk about the possibility of installing another OS, this issue is quite complicated, although we can solve it. The fact is that some manufacturers claim that after Android there will be no other system for the gadget. Purely a publicity stunt designed to advertise the installed system.
But the Chinese have already proven with their “left” HTC devices that both Android and Windows Phone can easily coexist on one device. Moreover, such models are supplied in most cases with an already unlocked Bootloader. What is it in this case? This is a tool that allows you not only to select a bootable OS, but also to install any other one by changing parameters at the system level.
In other words, the user can even do without any firmware or additional programs to optimize the operation of the installed operating system. Moreover! This does not even require specialized utilities such as optimizers, of which there are so many today that the user himself does not understand what to choose from this huge number of programs and applications.
How to unlock bootloader
ADB & Fastboot Installer
Most Android smartphones have a so-called fastboot mode. This is a kind of "advanced bootloader". Using this mode, the regular bootloader can be unlocked. The basic tool for this is Android Debug Bridge, or ADB. It is aimed primarily at Android application developers, but also provides many opportunities for ordinary users.
Once you have completed these steps, you need to connect the device to the PC in fastboot mode. Many smartphones have a special key combination for this. Alternatively, however, you can also connect your switched-on smartphone to your PC and enter the command “adb reboot bootloader” in the command prompt. However, first you must enable “USB Debugging” in your smartphone settings. If necessary, you must also enable the Allow OEM Unlocking feature.
Now you can easily unlock the bootloader with the “fastboot flashing unlock” command. Then boot into fastboot mode again and type “fastboot flashing unlock_critical” to permanently unlock the bootloader. This way you can minimize the risk that your smartphone will turn into a “brick” when installing new firmware.
Alternatively, on some smartphones, unlocking can be done using the "fastboot oem unlock" command.
However, there are exceptions. For example, Samsung smartphones do not have a real fastboot mode. Instead, there is a download mode. To unlock the bootloader, you need to use the Odin program, which can install files that can do this. This is not necessary to obtain root rights or install a custom ROM or Recovery on Samsung devices.
Another exception is smartphones from Sony. Before you can jailbreak your smartphone, you will first have to register the device on the developer page by entering the IMEI and your email to receive a special unlock code.
Read about how to install a custom data recovery system in the following material.
Photo: Chip.de, pxhere.com
Loading …
Necessary Steps
- Charge the device battery to be above 80 percent
- Backup your files; a complete backup is essential. This is because unlocking the bootloader will automatically trigger a factory reset process which will erase every user data, settings, a third-party app, etc. on the device's storage. However, pre-installed Sony apps will not be affected. Also, data saved on removable storages (such as a micro SD card) will not be modified too.
- Download (Windows)/ (Mac) Respective ADB Drivers and Install it your system.
- Download (Windows)/ (Mac) OEM and copy it into the folder
Sony Xperia devices
This action can be done by following the guide provided on Sony's official Website. However, we will list out the steps/processes to perform this action.
Note
: this will void your device warranty support
Getting started…
If your device is supported, then, go ahead with the steps below to unlock the boot loader and flash a custom ROM.
Steps
- Open your phone dialer and dial this code – *#*#7378423#*#*
- Go to Service Info >>> configuration >>> rooting status >>> Check to see if bootloader unlocking is allowed or not. If it is allowed, then continue below.
Download and Install the Sony PC Companion (Windows) or Sony PC Companion for (Mac)
Get the “download_inf.zip” file and paste it into the folder c:android-sdkextrasgoogleusb_driver
- Dial *#06#
and copy down your Sony Mobile IMEI number.
- Return to the Sony Official page, select your device model and provide your Email Id.
You will receive a link to your Email id, click on the link to get the Unlock code to use and unlock your bootloader
- Turn off your device and connect it to PC using a USB cable
Press the menu button or search or volume up button.
- Download Windows / Mac OEM and copy it into c:android-sdkextrasgoogleusb_driver.
- Now, type the following command in CMD –command prompt.
cd C:android-sdkplatform-tools; fastboot.exe -i 0x0fce getvar version; fastboot.exe -i 0x0fce oem unlock 0xKEY
Note: you have to replace the key with your own generated Key
- Tap “Enter” and wait for some time
- Your mobile bootloader is now unlocked, reboot the device.
LG devices
Here I Put only instructions and files that are not in LG devices Page, otherwise follow the instructions from official Page.
Steps
- In your Mobile Go to Setting>Developer options>Enable Oem Unlock.
- Go to and Login With Your Details.
OnePlus Devices
Usually, All OnePlus devices are Bootloader unlocked devices. If you use T-Mobile carrier device, your Bootloader is locked. So you have to unlock your Bootloader.
Steps
- In your Mobile Go to Setting>>About>>Tap 7-10 times on Build number to enable the developer options>>Developer options>Enable Oem Unlock.
- Go to Official unlock OnePlus Page and Login With Your Details.
Google Pixel Devices
Only International devices have unlocked bootloaders; If you use carrier devices like Verizon, T-Mobile, It becomes more specific, so try to follow particular guides for that. In some situations, there is no way to unlock Verizon devices, so be careful before following any steps. You can find them in https://forum.xda-developers.com/. If you have the International version, follow the below steps.
Steps
- In your Mobile Go to Setting>>About>>Tap 7-10 times on Build number to enable the developer options>>Developer options>Enable Oem Unlock.
- Go to Official Google Page and follow the unlock Instructions.
Huawei Devices
Huawei stopped providing an official bootloader unlock support from 24-May-2018. So, if you try other third party techniques, always be aware of the results.
Why unlock the bootloader?
Below we will talk about at least 3 reasons for unlocking the bootloader on Xiaomi smartphones. We advise you to carefully study each item so that no additional questions arise later.
Chinese version of the phone
When buying phones on sites such as AliExpress or Gearbest, you can find very competitive prices, which may differ from local prices by $20-50. This is why many users buy phones with low prices . Sellers, in turn, can sell the phone to the Chinese version under the guise of a global one. The Chinese version is always cheaper and can have MIUI China or MIUI Global installed on it. In both options, you will need to unlock the bootloader to receive updates, otherwise you may get bricked.
Third party firmware
The first and main advantage is the ability to install custom (unofficial) and localized (official, but with modifications specifically for your region) MIUI firmware. Some Xiaomi models accept third-party software, but in most cases, a locked Bootloader will not allow this. Now, in turn, let’s look at what custom firmware provides:
- Richer functionality and advanced options that allow you to control the entire operation of your smartphone;
- A simple interface with reduced or improved functionality.
- Advanced and sensitive GPS navigator. The location is determined several times faster than on the standard version.
- A highly optimized operating system kernel that either improves phone performance or increases battery life.
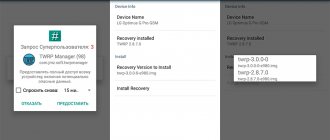
Third Party Recovery
By unlocking the bootloader, you can easily install TWRP or CWM recovery, which is necessary not only to obtain root rights, but also for other important operations on your smartphone. Let's take a closer look:
- Access to installing new firmware;
- Ability to install Magisk.
- Quick and easy backups.
- Obtaining root rights.
- Installing Google Camera.
- Removing built-in applications.
- And much more.
Root rights
And, of course, the “Superuser” mode, the benefits of which can be talked about for hours. Having an unlocked bootloader, you can either make the process of installing these rights much easier, or get them ready-made along with certain unofficial firmware. The benefits of root rights are enormous, from removing built-in advertising to overclocking the processor.
As you can see, changing the firmware, installing recovery and ROOT rights are inextricably linked, and for them to work you simply need an unlocked Bootloader.
Instructions on how to unlock the bootloader on a Xiaomi phone (official method)
Please note: previously you had to get approval to unlock the bootloader and wait several days, now you don’t need to write a letter to support.
Step 1: connect Mi account to phone
To unlock the bootloader, you must have a Xiaomi account on the device. If you don’t have one yet, read on how to create a Mi account. If an account is already linked on your phone, proceed to the second step.
Step 2: Linking your account to your device
Now you need to link your Mi account to your phone. To do this, follow these steps sequentially. Some of the steps have already been completed when checking the bootloader status using your phone. There are also visual screenshots there.
- We log out of our Mi account, this is necessary to avoid the appearance of an error
about the impossibility of verifying the device and account. - Switching from Wi-Fi to mobile Internet . This is a mandatory condition; otherwise the process will not work. Read how to set up mobile internet on Xiaomi.
- Go to the “About phone” item - click up to 7 times on the “MIUI Version” line.
- We return to the main settings menu, look for the sections “Advanced settings” - “For developers”.
- Click on the item “Mi Unlock Status”. We confirm our actions by agreeing to the warning that appears.
- Click on the “Link account to device” button.
- The MIUI system will require you to log in to your Mi account, log in.
- After successful login, your account will be linked to your phone.
- If the binding is successful, you will see the corresponding message.
- Ready. Now you need to wait until the mandatory period of 360 or 720 hours has passed .
- You can check how much time is left before unlocking using the final step.
Please note: you need to proceed to the third step only after the waiting period for confirmation of bootloader unlocking has passed. Sometimes Xiaomi developers change the timer, increasing the waiting period or, conversely, decreasing it.
Step 3: download Mi Flash Unlock program
After the mandatory waiting period ends, you will need to download the Mi Flash Unlock program. You can download it from the official website en.miui.com/unlock/. Afterwards, unpack the contents of the archive and, if desired, transfer it to the root of the system disk or leave it on the working disk. I left the archive on drive D and unlocking the bootloader went fine.
If you need a version with Russian language, download the archive on w3bsit3-dns.com. But the steps are extremely simple, use the screenshots below as an example.
Step 4: Launch Mi Flash
Now we open the Mi Flash program as an administrator, we see a white screen with text in Chinese (if the localized version is like mine, then in Russian), where the disclaimer rules are indicated. We agree and click on the appropriate button.
Step 5: Login
We are presented with a new window that requires you to log into your Mi account. Enter your password and your ID (linked phone number or email). We carefully check the specified data and keyboard layout, since it is at this stage that many users have problems with the appearance of such a notification: “ You entered your password and/or login incorrectly .” Click “Sign in”.
Sometimes a window with a procedure for checking unlock permission may appear; this may take several minutes.
Step 6: Connect your phone to your computer
Then we return to the smartphone itself. Turn it off and put it in fastboot mode by simultaneously holding down the power and volume down keys . Using a USB cable, connect the phone to the computer.
Step 7: Unlock Process
The final final stage: the program checks the device, if all conditions are met, the process of unlocking the bootloader will begin. We wait a few minutes ( in my case 25 seconds ), and if everything was done correctly, we receive a notification about successful unlocking - three green checkmarks. Ready.
Root Asus Zenfone Max Pro M1
- Once you are in TWRP Recovery, click on “Wipe > Format Data” and click “Yes” to start the wipe process.
- Once the cleaning process is complete, click Mount > Enable MTP.
- Connect your phone to your computer via a USB cable.
- Download the following two files:
- Copy the above files to your phone and disconnect your phone from your PC.
- In TWRP, tap Install > Select decrypt.zip file and follow these steps.
- Then click Install > Select Magisk zip file again and start flashing.
- Once the installation is complete, reboot your device and look for an app called Magisk Manager. If it is not installed, download Magisk Manager APK and install it on your device.
Ready!
This Magisk Manager app allows you to manage root permissions on your device (granting/revoking root permissions for apps). You may need to update it. Get the latest version of Magisk APK.
Do you want your device to be rooted?
Download a simple app called Root checker
» from the Google Play store.
Once you open the above app, it will show the rooting status on your device. Now that you have successfully rooted your Zenfone Max Pro M1, go for any MOD or custom ROM you like! This is the easiest way to install Zenfone Max Pro M1 and install TWRP on Zenfone Max Pro M1.
Unlocking the bootloader on your phone isn't always a straightforward process. The bootloader is a key part of your phone's security, and it's locked for a reason. While we can't recommend unlocking, we're not here to tell you what you can and can't do with the hardware you've bought. If you want to root your phone or personalize your Android experience with custom recoveries and third-party ROMs, well, who are we to stop you? ASUS has dedicated utilities that reduce the ZenFone bootloader unlock procedure to just a few clicks, and this step-by-step guide will walk you through the process from start to finish.
Before we get started, it helps to know what the heck you're doing in the first place. And, more to the point, why you're doing it. If your relationship with your phone doesn't go beyond standard, everyday use, and you're happy with your phone as it is, you likely don't need to unlock your bootloader or root your device at all. Unlocking the bootloader on your ZenFone is dead simple, but you should understand that it's not a something to be done on a whim, either. To quote the late Benjamin Parker: “With great power comes great responsibility.”
When you break it down, the term 'bootloader' is pretty self-explanatory: it's the program that loads when your phone boots and checks to make sure everything is as it should be. More specifically, the bootloader is looking for any unofficial software that the manufacturer (that's us, in this case) or your carrier hasn't signed off on. This is an extremely important part of your phone's security. It's what stops unapproved and potentially malicious third-party software from doing real harm. It's also what stops you from doing all kinds of fun things, like rooting to install an ad blocker, or flashing a custom ROM. Think of a locked bootloader like a gate in front of your house, designed to open only for you and no one else. It's very secure and keeps unsavory types at bay, but it also blocks the good guys that you've considered safe, like the pizza guy or your friendly neighborhood FedEx driver. Unlocking your bootloader is like deciding to leave that gate unlocked because you'd rather have pizza and packages and take your chances than keep things locked down.
So there's risk, but unlocking your bootloader can open up a whole new world of Android customizations. If that's worth the risk to you, read on for instructions on how to unlock the bootloader on your ZenFone. I'm using the 5.5-inch ZenFone 3 Deluxe for this guide, but there are bootloader unlock tools available for the , ZenFone Zoom, ZenFone 2 Laser, the ZenFone 3 Laser, the ZenFone 3 Zoom, and the ZenFone 3 Max.
First thing's first: this is the kind of party that requires a disclaimer. ASUS is not responsible for what happens to your phone if you choose to unlock your bootloader. Anything you do beyond this point is at your own risk and of your own free will.
Before you download, install, and use the Unlock Device App you acknowledge and assume complete risk to the quality and performance of this App, including but not limited to the following: once you activate the App you will not be able to recover your ASUS product (“Original Product”) back to original locked conditions; the Original Product with the activated App will not be considered the Original Product; the Revised Product will no longer be covered under the warranty of the Original Product; the software of Revised Product will no longer be considered the software of the Original Product and can no longer receive ASUS software updates; your purchased digital content may also be affected.
You also acknowledge ASUS does not guarantee service satisfaction to any Revised Product, including events involving paid service requested by you to be performed to the Revised Product.
Furthermore, such repaired Revised Product will not be covered under the warranty of the Original Product;
the software of the repaired Revised Product will not be considered the software of the Original Product and will not receive ASUS software updates. It is strongly advised that you avoid activating this App unless you fully understand and accept the risks that may arise.
Charge your phone
This is a good habit to get into before you do any kind of customizations on your phone. Whether you're unlocking your bootloader, rooting your device, or flashing a custom ROM, a perilously low battery is not your friend, and it can really throw a spanner in the works when you're tinkering. Keep it one hundred, folks (or at least above 70%).
Back up your data
Boring, but also a no brainer. When you're excited, it's tempting to play fast and loose with the rules of data management. Let this serve as a warning: unlocking the bootloader will wipe your phone of all data
, so before you touch anything, back up your device. Do not skimp on this step. It is worth the time, and you will never regret backing up your files. Google-based apps like calendar and email are easy, but we've been living in the cloud long enough that third-party app data can easily be left behind.
Lots of app developers leverage Google Play Services to offer backups of in-app data, so go through all of your favorite apps to ensure you're taking advantage if the option exists. Any photos and videos that haven't yet been synced to your cloud storage service of choice should also be actively backed up before you set out on your bootloader adventures. Don't forget about your text messages and call logs, which are stored locally and not backed up by Google. You can download a third-party backup app if you want to preserve this data for later restoration.
Allow installation from unknown sources
Visit your phone's settings menu and navigate to Security > Device administrators > Unknown sources
. Check the box and then read and agree to the scary warning.
Download the Unlock Tool to your computer
You can find the Unlock Tool for your ZenFone on the device's support pages under Drivers & Tools. If you're using a ZenFone 3 Deluxe, check to make sure you're downloading the right version. There are a few ZenFone 3 Deluxe models that vary in SoC and screen size. I'm using the ZS550KL, which is the 5.5-inch version based on Qualcomm's Snapdragon 625, so I'm using the this ZenFone 3 Deluxe Unlock Tool.
Note: this tool specifies it's for Marshmallow but it worked just fine on my ZenFone 3 Deluxe running Nougat. Proceed at your own risk!
Plug your phone into your computer and transfer the APK.
Mount your phone via USB and then unzip the Unlock Tool download. Drop the APK file into the Downloads folder on your phone. You can put it anywhere you want, but Downloads is where I like to put everything so I know exactly where to look for them later.
One last warning: back up your phone
Just in case you've gotten distracted and have been using your phone for other stuff during this process, here's your last chance to save locally stored files and manually run backups. You'll lose any data you may have generated since your last backup (like screenshots for a guide on how to unlock your bootloader, to give one totally theoretical example) so make sure you're really ready to wipe your phone.
Pull the trigger
Open up the File Manager app on your phone and navigate to Internal storage > Downloads
. You should see the APK ready to install. (If you transferred the zip file over, no worries; you can extract the APK here and then proceed with the installation.) Agree to the warnings about unlocking your bootloader. These pop up before you can install the Unlock Tool app. We'll ask you to agree to one last set of warnings before you actually run it. If you don't feel the gravity of your actions by now, you probably never will.
Fair warning: this is your last chance to bail. If you've changed your mind, just close the Unlock Tool and uninstall it like you would any other app. Otherwise, press the unlock button.
Bugs and problems
Most often, problems arise from the company’s server itself; in most cases, it is not the user’s fault. But, nevertheless, you need to know how to deal with them. We offer for your reference an approximate list of known problems and methods for eliminating them:
- Stop removing protection at 50% . The unlocking process gets halfway through and freezes. Unfortunately, this is a problem on the side of the mi.com website; nothing can be done manually. All that remains is to try again periodically.
- Error while linking account
. This is also a fairly popular problem among users. To solve this, you need to log out of your Mi account before linking your account to the device and then log in again as indicated in step 2. - I can't download Mi Unlock from the official website . If such a problem occurs, download the archive with the program from the forum with w3bsit3-dns.com or c.mi.com.
- Error logging into Mi account . Check which keyboard language is enabled, whether you entered the password correctly, and do not confuse your account ID number or linked phone number.
Bootloader unlock error: try again in 360 hours
If, when you try to unlock the bootloader, a red message appears: “Binding time is too short, Less than 72 hours” or “After 360 hours of trying to unlock the device” - then the time for mandatory account verification has not yet passed, I talked about this in the second step ! That is, you must wait the specified number of days or hours before repeating the procedure again. There is no way to bypass the timer.
If refused or the wait is more than a month
Recently, Xiaomi has stopped refusing to unlock. But if you receive a refusal, then do not despair, follow our instructions.
There are several options:
- We wait 15-20 days and re-apply.
- Create a second account and submit an application.
- We contact support.
Let's look at option 3 in more detail. Write a letter in English and send to The subject of the letter should be “Unlock Your Mi Device”. You will receive a response letter asking for your information. Copy the template they sent, fill in your details and send it to them. The permit is sent in about a day or even earlier.
If for some reason you are refused and nothing helps, which is equal to a 0.001% chance, then you can use a trick.
We switch to Parental Control mode and contact technical support called “Mi Customer Service for Europe”. We write that we cannot exit this mode (this is a popular problem). I will offer you different methods, always answer what did not help. As a result, you may be asked to unlock your device to solve this problem, or you may gently ask about it. There is a high probability that they will then ask for your data and unlock it.
Answers to popular questions
There are restrictions; officially, you are only allowed to unlock one device once every 30 days. For example, you unlocked your tablet, waited a month, and then you can unlock your phone. This question is strictly individual for everyone. If you are a beginner, not a very confident user, and only do ordinary things on your smartphone, which includes watching news, games, social networks, you do not need to carry out such a difficult operation. Unfortunately no. The most optimal and best option is the official method described above. Please clarify at what stage the problems arose and write to us in the comments, taking a screenshot of the problem. Yes, since the unlocking process requires a connected mobile Internet.
Now you know that unlocking the bootloader on Xiaomi devices is quite possible if you follow our sequential instructions. If you have any additional questions, write in the comment form below.
Sources used:
- https://androfon.ru/firmware-proshivka/chto-takoe-zagruzchik-i-polza-ot-ego-razblokirovki
- https://m.habr.com/ru/post/349066/
- https://remontka.pro/bootloader-unlock-android/
- https://ichip.ru/vzlom-android-poshagovo-razblokiruem-zagruzchik.html
- https://mi-faq.ru/kak-razblokirovat-zagruzchik-xiaomi.html
SHARE Facebook
- tweet
Previous articleAnime Live Wallpaper
Next articleHow to enable battery percentage and change quick settings on Android 6