Login as administrator. How to log in as an administrator
I think it’s no secret that starting from Windows Vista, logging into the system as an Administrator is somewhat more difficult than in Windows XP and earlier versions of this operating system. The thing is that by default, this Administrator account is blocked. Why was she blocked? It’s just that very often, when users work with the Administrator account, they put the entire system at risk, which, naturally, will be bad for them.
So, let's figure out why we shouldn't work on the computer using the Administrator account. Firstly, if you correctly understand the entire operating system, then the Administrator is the main person, that is, he has the unique ability to change all system settings without exception. Naturally, inexperienced users, as well as those who are very curious, having such a weapon in their hands, can harm their own operating system, for example, reconfigure the registry!
Sometimes we still have to log in with the Administrator account, or we may need to, in any case. For what? As you already understood, you can configure anything you want from it. That is, it is much easier to deal with problems and configuration issues from the Administrator account!
Let's finally look at the procedure itself, thanks to which we can log into the direct Administrator account in the Windows 7 operating system. The account itself must certainly be included in the group of administrator accounts.
So, first we need to open the Console called “Computer Management”. We go to Start, then click on the “My Computer” button, right-click, in the window that opens, click on the button called “Management”.
Next, select the “Computer management” icon, click on it, then enter “Local groups and users”, then click on “Utilities”, then click on the button called “Users”, find the user named “Administrator” and Click on its icon with the right mouse button. A window opens in which we need to click on the “Properties” button.
We go to the tab called “General”, after which we just need to uncheck the box next to the “”. That’s it, click on the “OK” button.
Now we simply log in to the system under the name Administrator; to do this, go to “Start” and click on the subsection next to turning off the computer, and in the window that opens, click on the button called “Change user”.
This is the simplest and most memorable way. There is also a way to add the user “Administrator", only in this case we will need to use the “Command line", which can be called using the “Start” menu, then click on the “All programs” button, open the “Standard” folder, find there “ Command Prompt" and open it as Administrator, which can be done by calling the command line context menu.
In the command line, enter the following phrase “ net user Administrator /active:yes
"(no quotes needed)! That's it, save by pressing the Enter key!
After this, you can also use the “Change user” function and we see the same result! If you need to disconnect a user, change from yes to no.
net user Administrator /active:no
Now you know how to log into Windows 7 as an Administrator.
Users often have questions about how to log into the system as an administrator. This may be needed to install and uninstall some programs, system settings, work with the command line, and perform many other tasks.
Administrator rights provide virtually unlimited configuration and management capabilities. However, great care must be taken when working, because incorrect actions can lead to system failure. In this guide, you will learn how to log in as administrator to your personal computer.
Why did the Control Panel disappear?
First of all, you need to understand whether it really disappeared or whether the link from the Start menu just disappeared. Try calling the PU through the “Command Line”, as shown in the example above. If the “Control Panel” does not open, then you really have problems and may have to reinstall the operating system or contact a specialist. If the PU window has opened, then you should check just one setting item in the Start menu.
How to enable/disable Control Panel
It turns out that displaying PU in the Start menu can be enabled in just a few clicks.
- Call the context menu of the “Start” button by right-clicking on it. Click on the “Properties” item.
- Go to the second tab, the “Start” menu, click once on the “Customize” button.
In the “Properties” of the taskbar and the “Start” menu, go to the “Start” menu tab and click the “Customize” button - A window will open with a bunch of different settings for showing and hiding items and links in the Start menu. We are interested in the “Control Panel” column, which is divided into three items:
- do not display this element (hides the PU in the Start menu);
- display as a menu (shows the control panel in the Start menu; if you hover over a panel button, all its elements are displayed in a list);
- display as a link (shows the control panel in the Start menu as a link, that is, clicking on this element will open a window with the “Control Panel” categories).
- Select the item you need and accept the changes by pressing the OK button.
Confirm the selected option for displaying the “Control Panel” with the OK button
Who is an administrator
Windows supports a computer with multiple users. This could be several family members or work colleagues. However, it would be very inconvenient if everyone could accidentally or intentionally change the settings of other people, delete other people's programs and files, and so on. In order to personalize users, everyone receives an account under which they will work.
Within the account, everyone can install and remove programs and customize their part of Windows. In addition to user accounts, there is an administrator account. He has unlimited rights and can make changes to the system that affect all users of the computer.
Incorrect operation in this account can lead to dire consequences: Windows system files and registry entries may be damaged or deleted, the hard drive may be formatted, or someone’s important software may be broken. If your computer has an administrator, logging in under his account is strictly not recommended.
We remove restrictions on authorization
It’s worth noting right away that an administrator account is not the same as a user who is a member of the administrators group. He has much greater rights and can do whatever he wants with Windows.
If you are the only user of the system or the owner of the computer, you may need to log in using this account to perform some actions. By default in Windows it is disabled and does not appear in the list of existing entries, so you cannot enter it. First you need to enable it:
Now you can log in as an administrator after restarting the computer.
Command line
Another way to remove restrictions and sign in is through the Windows console. It lacks a graphical interface, but is faster and more convenient once you get used to it. Call up the dialog box using the keyboard shortcut and R (you can press it in any input language and in any keyboard layout).
In the input field write “ cmd
"
The black window that opens is the Windows console. You need to copy the command “ net user Administrator /active:yes
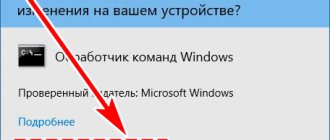
” without quotes into the input line and press Enter. Note! This utility does not support the Control + V key combination, so you must copy using the drop-down menu called up by RMB.
Close the program and restart your computer. After the reboot, in addition to the standard ones, you will see the Administrator in the user selection list. To log in, simply click on the icon.
If you want to disable this feature again, you must enter the command line again and enter “net user Administrator /active:no” without quotes.
It is not recommended to perform your daily tasks using this login. At this point, the system is more vulnerable to attacks from malware and scripts. In addition, if you are careless, you can simply damage your OS or some important data. Use this account to configure your PC, and work much better and safer under your personal login.
Each account in Windows 10 has its own access rights. Privileges can be given to both a regular user or a user with extended rights, and an administrator. If you log into the system with administrator privileges, you can do everything: change UAC, configure and administer the local network, install any applications - in general, really everything you want to do in the operating system.
Method number 1 - using the command line
How to use it? We launch the cmd mode on behalf of the administrator using any method convenient for you (for example, right-click the mouse on the “Start” button and select “Command line (administrator)” from the menu).
Now that you are logged in, enter the following command at the prompt: net user administrator /active:yes
and calmly log in to the system with maximum access rights.
This is the most accessible, simple and understandable way to log into the system as an administrator, since it does not require special knowledge and skills, and all the necessary administration skills are reduced to a banal right-click on a menu item.
Opening Windows Tools via Run, Command Prompt, and PowerShell
There are two commands that allow you to go to the Windows 11 admin panel from the system applications listed in the header:
- control admintools
- control /name Microsoft.AdministrativeTools
Open the panel from the system program “Run” (“Win + R” to call):
Open the command line (you can open it by typing “command line” or “cmd” into the “Start” search), enter one of two commands and press Enter:
Open PowerShell (you can also find it by searching “Start” using the query “PowerShell”), enter the command and then Enter:
Method No. 2 - using the “Local Security Policies” snap-in
The above snap-in is an excellent tool for OS administration. You can find out more details from the article. If you haven't used it before, now is the time to join. This mechanism is incredibly functional and capable of quite a lot, so you will use its services more than once if you want to make your work in Windows 10 more comfortable and enjoyable.
We enter it using the Win+R key combination and entering the command “secpol.msc”. An alternative method is “Start” -> “System Tools - Windows” -> “Control Panel” -> “Security and System” -> “Administrative Tools”.
Finally, if you are logged into this tool, expand the folder “Local Policies” -> “Security Settings” and on the right in the list of options select the option “Accounts: Account status 'Administrator'”.
Double-click on the parameter and activate the presented option.
We save all changes, and now you can log in under the current active account with admin rights.
Method No. 3 – using the “Local Groups and Users” utility
Again we use the “Win+R” key sequence and enter the “lusrmgr.msc” command. The equipment we need opens. We expand the “Users” branch in detail and study the list of users who have access to the system.
We select the user we need and double-click. The form for user access parameters to the OS opens. Go to the second tab “Group Membership”, and here we add the “Administrators” group to the privileges of the active user. How to do it? First, click the “Add” button.
Next, in the text field of the new form that opens, enter the name of the group – “Administrators”. After that, click on the “Check names” button. The group must be identified and its full name must appear on the same form. Click OK, and the group is added to the privileges of the active user.
Method #1 - Using the remainder of Local Users and Groups
To enable the built-in administrator account using the Local Users and Groups snap-in, follow these steps:
Open the Local Users and Groups snap-in. You can do this by entering the command lusrmgr.msc in the search bar of the Start menu. Or you can open the Computer Management snap-in by right-clicking the Computer icon and selecting Manage.
Expand the System Tools > Local Users and Groups > Users branch.
Right-click on the Administrator account and select “Set Password”.
In the “Set Password for Administrator” window, click “Proceed”.
Enter the administrator password twice and click OK.
Next, enable the administrator account. To do this, right-click on your account and select “Properties”.
Uncheck the “Account is disabled” checkbox and click “Ok”
The administrator account is now enabled and has a password set.
Method number 4 - using Windows 10 settings
Go to the “Settings” menu of the system and select the “Accounts” section. Next we need the category “Family and other users”. Here, in the section of the form we need, we perform one click on the user’s name. The “Change account type” button appears. Click on it.
As a result of such simple manipulations, a miniform appears on the screen with a choice of account type. Select “Administrator” from the list and confirm your decision by clicking OK.
Now all that remains for us is to log into the system as this user and take advantage of all the benefits of extended superuser rights.
In this article, I described several practical ways to log in as an administrator in Windows 10. In fact, such rights may be needed if you often install new applications, clean the registry, or change operating system settings. In all other cases, the rights of a regular user may be quite sufficient, and you can work successfully without administrator privileges.
In all versions of Windows that were released later than Windows XP, logging in with Administrator rights is not so easy. This can easily be explained by the fact that an account with Administrator rights has been blocked. Why was she blocked? In fact, the answer is simple - users logging into the system under this account expose the entire system to unnecessary risk. By making thoughtless changes, the user can “thwart the system” or severely damage it.
Let's take a closer look at why you shouldn't log in as Administrator when working on a computer. The entire operating system is in the hands of the Administrator, that is, he is able to influence the system through various settings. Curious or inexperienced users can harm the operating system without realizing it. For example, reconfigure the registry.
Sometimes there are situations in which it is extremely important to log in as an Administrator. I think we shouldn’t dwell on the question, why do this? As mentioned earlier, with the Administrator account, the settings of everything your heart desires are concentrated in your hands.
So, we gradually approached the consideration of the procedure itself, after completing which it is not difficult to log into the Windows 7 system with Administrator rights. The account itself must be part of the administrator account group
How to change the appearance of the Control Panel
Unfortunately or fortunately, the PU doesn’t have many appearance settings. In fact, there is only one, it consists of the “View” filter, which is in the upper right corner of the “Control Panel” window:
- category;
- small icons;
- large icons.
Photo gallery: possible options for the appearance of the “Control Panel”
Appearance of the “Control Panel” with the appearance setting “Categories” Appearance of the “Control Panel” with the appearance setting “Large icons” Appearance of the “Control Panel” with the appearance setting “Small icons” The first appearance variation is more
extensive and is designed for associatively directing the user to a section if he does not know exactly where the settings he needs are located. For example, the “Programs” category provides access to uninstalling and installing programs, assigning programs to run files with a specific extension, and much more. In the icon categories, only the item with the main functionality of removing programs from the list of installed ones is responsible for the entire category of programs.
How to log in as administrator in Windows 8?
As for the Windows 8 system, the previous two methods of logging in under the Administrator account also apply to this version.
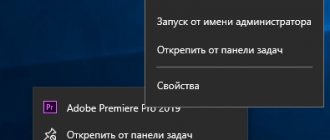
Windows 8 also allows you to run software as Administrator. Here you need to right-click on the shortcut of the program that you want to open as Administrator. This brings up a menu at the bottom of the monitor. Among the list of the menu that appears, find “Run as administrator”, launch it, and a program will open that gives you Administrator rights.
You can also make sure that a certain program is constantly launched using Administrator rights. In this regard, on the shortcut of the desired program, click on the right functional mouse button, selecting “Properties”. Next, select the “Compatibility” tab and in it check the box next to the entry “Run the program using administrator rights.” Accordingly, click “Ok”. After such actions, the program will always open with Administrator rights.
You can do the same action in another way. Right-click on the shortcut, select “Properties” and the “Shortcut” tab. Then click on “Advanced” and check the box next to “Run as administrator”. Click “Ok” in each open window.
An interesting fact encounters the user when switching to Windows 7 from earlier versions of the operating system. Here, by default, the administrator account is disabled. We will talk about how to access it in this article.
Run as administrator is gone - there is no button | point
There are often times when Windows crashes. This is very difficult to predict, but it is possible to fix it. For example, you want to run a program as an administrator. According to the standard, you right-click on the shortcut, but there is no item responsible for launching with elevated privileges. In this case, the option may be located in the Win+X menu.
It happens that opening programs as an administrator is only possible if you go to the system drive and run the program from there. For example, you need to launch the shortcut located at the path C:\Program Files (x86)\AIMP/aimp.exe, and not from the desktop.
The simplest solution is to clear the system cache. There are many ways to clean up temporary junk files. This is done as follows:
- Open Start.
- Go to the “Shutdown” menu.
- Hold down the Shift key and click on the “Shut down” button.
- Ready.
The following experience has shown that checking the system for the integrity of system files and restoring damaged ones is possible by running the following commands on the command line or PowerShell utility:
- DISM.exe /Online /Cleanup-image /Restorehealth
- sfc /scannow
Why is the administrator account disabled in Windows 7
Oddly enough, the answer to this question is obvious. Window 7, for the most part, is designed for the average user who does not understand the intricate hardware, thousands of folders and hundreds of configuration files on his PC. An account with administrator rights gives anyone unlimited capabilities, using which it is easy to accidentally damage the functionality of the software. It is worth noting that a user who wants to log into Windows 7 using an administrator account must himself be a member of the Administrators group.
What to do if a user with rights is deleted?
In some cases, a profile with administrator rights is deleted - most often due to an error in user actions. There are two ways to correct the situation - restoring your account and creating a new profile. First option:
- Right-click on the Start icon, go to “System”, then “Security and Maintenance”, “Recovery”;
- then you need to select the line “In case of malfunctions...”, then - “Reboot now”;
- in a new window go to diagnostics, then – Additional parameters and to Downloads – “Restart now”;
- after the procedure - repeat the previous step, upon completion of which press F4 to activate a secure connection;
- enter netplwiz into the command line, select the required account in the user group and call up its properties;
- after – membership in groups, where you should assign a new group “Administrators” and “OK”.
To transfer rights to a new user, go to the “Settings” section, select “Family and other people”. Add a new account, change the type (separate gray button).
An account with administrator rights allows you to perform deep customization of your computer's internal systems. Disabled by default. If necessary, it is included in any of the specified ways. The main thing is to understand what actions should be performed and follow the instructions. For work in standard mode, do not use to avoid unexpected changes in settings or delete necessary internal files.
How to activate an administrator account in Windows 7
So, if you are sure that you need to gain full control over your operating system, let’s do the following:
- press the Win+R hotkeys to open the “Run” utility window;
- in the line that appears, write the command control userpasswords2;
- send for execution with the “Ok” button;
- a window with user accounts will appear;
- in it go to the second tab on the left - “Advanced”;
- in the menu below we find a button, which is also called “Advanced”;
- Click it, a window will appear with a list of accounts;
- in the left column select “Users”;
- To the right, double-click on “Administrator”;
- inside we find a line with the “Deactivate account” checkbox marked;
- uncheck the box and click “Ok” to apply the changes.
Automatic login with administrator rights in Windows 7
If you need to constantly log into the operating system “fully armed”, and not switch to the administrator manually, you can delete other accounts for simplicity. Before doing this, it is recommended to create a restore point (in case of failures or errors, you will simply boot into the working version of the system). Further:
- Click “Start”, select “Control Panel”;
- in the “User Accounts” section, select “Add and Delete”;
- all available accounts will be shown here - select the unnecessary ones one by one;
- click once, in the action options that open, click on the “Delete” line;
- if the “Guest” account is enabled, click on it and switch it to “Disabled” mode;
- restart your PC and check if you are logged into “Administrator” automatically.
Changing your account type
If you are working under regular access, you will not be able to request temporary rights when required to perform an action. In this case, you need to set up your account. To install this mode, you will need to do the following:
- Bring up the Start menu by pressing the Win key on your keyboard or the corresponding checkbox button on the right end of the Quick Access toolbar.
- Open Control Panel.
- Go to the section called “Family Safety and User Accounts.”
- Open the user account management menu.
- Click on the “Manage another record” hyperlink.
- Select the account you need.
- Click the Change Type hyperlink.
- Here you need to check the box next to the “Administrator” item.
- Click Change.
It is worth remembering that such adjustments can only be made from another record that has the necessary rights.
Creating a Second Administrator Account in Windows 7
What if there are two or more computer administrators? It's easy to make multiple accounts with the highest rights, for example:
- You can create a new entry. To do this, go to “Control Panel” -> “Add\Remove Account”, under existing ones, click “Create a new one”. In the next window you can choose who the owner will be - an administrator or a user.
- You can add an entry to the Administrators group. Open “Add\Remove” (see above), select an account, click on it, and inside click on the “Change record type” item. Here we set the switch from user to admin.
If necessary, you can create entries without administrator rights at any time through the above “Control Panel” -> “Accounts” -> “Add and Delete”.