The Windows operating system allows several users to work simultaneously on one personal computer. At least one of the accounts created in the OS must be an administrator in order to be able to manage all Windows configurations and settings of other users. This article describes how you can gain administrator account rights in Windows 7 and be able to change any system settings. By default, when installing Windows on your computer, 2 accounts are created - a user with temporary access to administrator rights and an Administrator account with the maximum possible rights. The following article describes ways to enable the administrator account and also disable it.
What are administrator rights on Windows seven
Administrator rights represent the ability of a special user to configure and remove certain software.
During installation, the operating system automatically creates two Microsoft accounts. One is the account of a specific person who regularly uses the system, i.e., in fact, its owner. The second profile is the administrator account, admin.
Login to administrator account on Windows 7
An administrator account is needed to prevent changes to settings that could adversely affect the functioning of Windows 7. Important settings can be changed accidentally, especially if the system is in the possession of an inexperienced user.
Note! Obtaining administrator rights allows you to expand the functionality of Windows 7. You can change accounts through the registry or the command line.
On operating systems of the Windows family, it is also possible to restore the PC, that is, roll it back to its original settings. If problems, failures, or errors occur in the system, the user can roll back his desktop computer or laptop to the moment when the OS was still functioning normally by selecting the appropriate restore point.
Temporary powers
If some program or service requires active administrator mode, when you launch it, a small pop-up window will pop up in front of you. In it you must give permission to perform operations. If your account is password protected, you will need to additionally enter an access code to temporarily gain administrator rights in Windows 7.
If you often make some changes to the OS and want to disable this mode, you can temporarily log in directly as a Windows administrator.
How to log into Windows 7 as an administrator
How to Remove Administrator in Windows 10 - Disable Account
To complete this task, you will need to change your current account using a simple algorithm:
- Log in to your desktop using your account as usual. Usually the required account is already installed by default and starts with the operating system after the computer starts.
- Click on the Start menu icon.
- Expand the context window next to the “Shutdown” line by clicking on the arrow.
- From the list of presented values, select the “Log out” item by tapping on it with the left key of the computer keypad.
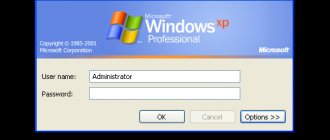
- After performing the above manipulations, a lock screen should appear, which shows all the accounts created on this PC.
- Left-click on the “Administrator” icon to log in as a superuser.
The "Log Out" option in the Windows 7 Start menu
Important! In some situations, a domain password is set on the administrator account.
Post types
In total, there are 3 types of accounts in the system - Administrator, regular User and User with the ability to access admin rights.
Windows developers strongly discourage working in a system under the Administrator account. This makes your PC very vulnerable to virus attacks and malicious scripts that can gain complete power over all services and files.
From a security point of view, it is much more correct to work under the control of a user with administrator rights. This way, viruses that have infected your computer will not be able to make global changes to the functioning of services, and if necessary, you can obtain administrator rights in Windows 7 for a short period of time by entering your account password.
How to get and remove administrator rights in Windows 7
How to enable the administrator account in Windows 10
There are several ways to obtain such rights, each of which is based on a specific knowledge base and deserves detailed consideration. Below we consider the most common methods by which an ordinary user of the operating system can have administrator rights, obtaining them in the shortest possible time, and also remove them at the right time.
How to set superuser rights through the control panel
A simple way to complete the task, which involves following the following instructions:
- The first step is to go to the Start menu.
- Place the mouse cursor on the line “Control Panel” in the parameters column on the right of the window and click on the left button of the manipulator.
- In the search window that opens, enter “user accounts” and tap on the found element.
- Click on the line “Change your account type”. Next to this value there is usually an icon in the form of a shield, which indicates the importance of the function.
- The menu that appears will contain two sections: “Regular Access” and “Administrator”. In this situation, you need to put the toggle switch in the last line to get administrator rights. Here you can set a password for your account. It’s better to come up with symbols that you won’t be able to forget later.
- To change the account type, the user will only have to tap on the corresponding button located at the bottom of the window, then the system will be able to issue the rights requested by the guest.
- Restart your PC and make sure the changes are accepted.
Obtaining administrator rights on Windows 7 through the control panel
Important! To access your account, you will need to do the same steps in reverse order.
Through the local users window
This method of establishing administrator rights is more difficult to implement. In order to properly cope with the task in the shortest possible time and not harm the functioning of the operating system, experienced specialists recommend following the following algorithm:
- Simultaneously press the “Win + R” buttons on the keyboard to open the “Run” window.
- In the “Open” line, enter the command “cotrol userpasswords2”, then tap “Enter”.
- In the account menu for all users, which appears on the monitor display after performing the above manipulations, you will need to click on the “Advanced” tab.
- Another window will open. Here you need to expand the topmost folder in the options column on the left.
- In the central part of the menu, double-tap the word “Administrator” with the left button of the manipulator.
- The parameter properties menu appears. In this window, to complete the procedure, you will need to uncheck the “Deactivate account” line, and then click on “Apply”.
- Reboot your PC for the previously made changes to take effect.
Now the Windows seven operating system will be able to give a person the opportunity to open specialized system software and change its settings at their own discretion.
Administrator rights in Windows family systems can be removed in the same way in the reverse order. The above methods are excellent for resolving this issue.
Windows seven local users window
Administrator Mode
To be able to log in to this account, users will need to activate it. You can enable it using the Windows command line:
- Press the R and Win keys simultaneously (works with any active keyboard layout and if Caps Lock is enabled).
- Type "cmd" in the empty text field.
- In the console that opens, write or copy the line “net user administrator /active:yes” and press Enter. You can replace "yes" with "no" to turn it back off.
- Now write “net user administrator *pass*”, where *pass* is the new password you chose. If you don't need it, skip this step.
- Restart your PC.
After restarting, you will be able to log in using this account.
How to set superuser rights for programs
How to change administrator in Windows 10 - description of methods
It is not necessary to obtain rights for the entire system. It is enough to install them on a specific application, with the functioning and operation of which difficulties arise. The process of carrying out this procedure takes place in the following sequence:
- Click on the icon of one or another software on the desktop.
- In the context window that should appear on the screen, select “Properties”. Typically, such a line is located at the last place in the presented list.
- Switch to the “Compatibility” tab, which is located in the top column of parameters.
- At the bottom of the section that opens, the line “Always run the program as administrator” will be written. You will need to check the box in this line to activate the function.
- Click on “Apply” and close the window.
- Check whether the software starts by double-clicking on its icon without errors or notifications.
Note! If after these manipulations the program refuses to start without administrator rights, then you need to restart your desktop computer or laptop
Changing your account type
If you are working under regular access, you will not be able to request temporary rights when required to perform an action. In this case, you need to set up your account. To install this mode, you will need to do the following:
- Bring up the Start menu by pressing the Win key on your keyboard or the corresponding checkbox button on the right end of the Quick Access toolbar.
- Open Control Panel.
- Go to the section called “Family Safety and User Accounts.”
- Open the user account management menu.
- Click on the “Manage another record” hyperlink.
- Select the account you need.
- Click the Change Type hyperlink.
- Here you need to check the box next to the “Administrator” item.
- Click Change.
It is worth remembering that such adjustments can only be made from another record that has the necessary rights.
How to remove administrator in Windows 7
Sometimes PC users need to keep only one Microsoft account. In Windows 7, it is possible to uninstall the administrator account. This procedure is carried out in the following sequence:
- According to the scheme already discussed in the article, launch the “Run” window and enter the command “cotrol userpasswords2”.
- After pressing “Enter” the local users menu will open.
- Double-click on the top folder on the left in the parameters column, thereby expanding it.
- Go to the properties of the “Administrator” icon located in the center of the window.
- Check the box next to “Deactivate account” and click “Apply”.
- Restart your computer and make sure the administrator account is uninstalled.
Disabling the administrator account through the local users window on Windows 7
Thus, the administrator account on the Windows 7 operating system plays an important role. It protects the computer from changes in system parameters, thereby maintaining system stability. This article examined all possible ways to obtain administrator rights on Windows Seven Home, Basic.
Useful tips
So, now you know how to become an administrator in Windows 7, which means you can fully manage system programs and services. But before you make any changes to them, listen to the advice and notes of experienced users:
- To quickly open the “Users and Groups” section, use the “Run” tool and enter the “lusmrg.msc” command in the appropriate field.
- Never log in as an administrator if you do not know what the specific system services and applications that you are going to disable are responsible for.
- If you are an advanced “user”, then after working in an account with “administrator” rights, do not forget to disable it. This point is especially relevant when, besides you, an inexperienced person uses the computer.