Windows 10 comes with a very powerful search tool that allows you to find exactly what you're looking for, no matter how hidden it is. The Windows 10 search tool lets you narrow your search to specific types of items, such as settings, apps, music, and individual files. You can also easily browse the Internet without opening your browser.
Using the Windows 10 system search , you can immediately search for a specific setting, app, documents, images, and websites by selecting one of these categories. From the same screen, you can return to your activity with saved files from the Windows Timeline or access TimeLine directly.
Search by category
For example, if you are looking for a specific program, click the Applications icon. Windows will display a list of applications to help you find what you are looking for. If you still can't find what you need, enter the program name in the search field.
You can also speed up your search by typing a category directly into the search bar (for example, apps:) and Windows will show you results from the correct category. You can search for any of the previously mentioned categories, as well as folders, music and videos.
Methods for obtaining the installation date of programs
- Through programs and components
- Through third party programs
- Via Windows logs
Programs and components
All the steps described below will be relevant in any version of Windows. Open Control Panel > Programs and Features
In the window that opens, find the program you need, in the “Installed” column you will see the date you need, if you click on the column at the top, you will have everything filtered by date.
Via CCleaner utility
Earlier I described to you all the advantages of the ccleaner program, in it you can also find out the installation date of the software, to do this, open the “Tools - Uninstall programs” item, here you can find the corresponding column for the desired program.
Via Event Viewer
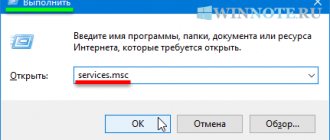
All events occurring in Windows are recorded in the Event Viewer logs. Press WIN+R and enter eventvwr.msc
In the “Event Viewer” window that opens, go to “Application”
On the right side, find the “Current log filter” item. In the Filter Current Log window, select the Msinstaller event source.
As a result, you will receive a list of events from which you can find out who installed the software and when. In my example, you see event code 11707 telling about the installation of Microsoft Visual C++ and you can see that it was installed by the user sem.
Go to Internet Search
Windows 10 lets you search the web right from the search bar , using Bing. To start an Internet search, click in the search field and select Internet. Enter your query and the results will look as if you were in a browser. Click on the result and a Microsoft Edge window will appear with the website or other online resource found.
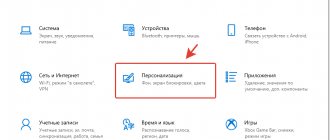
Windows Settings
For example, many are annoyed that in Windows 10 there are still two tools that concentrate operating system settings - the Control Panel (which is not accessible as such, but a good half of the settings are still configured through its sections) and Settings, which appeared in Windows 10 .
If previously everything was logical and all system parameters could be found in the Control Panel in the corresponding section, now this logic is broken. Out of habit, users try to find the setting they need in the jungle of Settings, periodically ending up in sections of the old Control Panel, which opens in a separate window.
Yes, this is how we searched for and launched the necessary tools earlier. It was necessary to remember where this or that setting was located, and each time to change it it was necessary to go all the way from the Start menu to the desired section of the Control Panel. Now the logic has changed and it is enough to remember the name of the desired setting to quickly go to the section where it is located.
However, not everything here works smoothly yet and some Windows settings still have to be searched for manually in the wilds of Settings, since they cannot be found using search and seemingly logical search queries. Let's hope that soon the operating system parameters will be completely brought to one form and the search will work as it should, for example, how it works with programs installed on the computer.
Download Everything
| Name of the program (utility): | Everything |
| Manufacturer (author): | David Carpenter |
| Status: | For free |
| Category: | Optimization |
| Installer (archive) size: | 1.5 MB |
| OS support: | Windows XP,7,8,10 |
| Interface language: | English, Russian + 35 languages |
| Safety: | No viruses |
| Similar programs: | UltraSearch and FileSearchy |
| Link to installer/website: |
…
…
On the official website of the Everything program, which lives on the link above, you will find regular installers and portable ones for different bit systems...
Use Everything toolbar as default search engine
After installing the Everything toolbar, we can already perform extremely fast searches by simply looking for the name of the file or folder we are looking for. If we think that it will only help us find documents or files, then we will also be able to access various menus and options, as well as other applications including functions, which can save us a lot of time.
When performing a search, we will notice that the list displayed is of limited use, since it only shows the names of files and folders, as well as the date they were modified. Therefore, if we are looking for a name that contains multiple files, we will not be able to distinguish it. To solve this problem, we can enable detailed view by right-clicking on the search bar and selecting the “Detail View” option from the menu to get more information in the list of results.
It not only works for searching files
Every time we perform a search, all possible data appears, both files and folders. At the top of the search, it allows us to define what types of results we want to see. This way we can select all files (“All”), only files (“Files”) or only folders (“Folders”). This will help us find the file we need faster.
In the Everything toolbar menu we can also activate other options that can help us in our search. These parameters can be regular expressions, match paths, and various ways of ordering the results. Most search options come directly from the Everything app, such as what files, locations, and data are indexed.
How to use Everything search
Please note that Everything only works with the NTFS file system.
Immediately after installation and the first launch of the program, you will see a white empty window for a few seconds.
No fuss or stress - Everything will quickly index all the files on your computer and build its database for impressive, lightning-fast performance.
At first, the program interface may seem too ascetic and incomprehensible (some strange files are displayed in the main window), but as soon as you start entering the name of the file that you want to find in the wilds of the information storage device, you will immediately understand everything.
You won’t even have time to completely enter the file name into the Everything search bar before you get the search result...
As you can see, you can even activate the preview, display the path to the file in a separate column, its size, date of modification, but let’s take it in order...
Install and configure Everything on the taskbar
The first thing we have to do is have everything installed on our computer. If we don't have it installed, you can download it for free from its Official Website. Once we have downloaded it, we only need to run the installer and its wizard will guide us through all the steps until the installation is completed quickly. After installation, we must execute it. Once executed, we can close it if we want while remaining running in the background .
Download and install Everything Toolbar
Next, we need to download the latest version of Everything Toolbar from here. It is a free and open source program that will allow us to add Everything to the Windows taskbar , so that we can write our search queries directly from the taskbar, just like in the original Windows search engine.
Now you need to unzip the downloaded zip file, open the resulting folder and right-click on the INSTALL.CMD file. A context menu will open where we must select the option “Run as administrator” so that it is installed on our toolbar. During installation, a command prompt window will open showing the installation process, which we must close.
Customize the toolbar
Later, right-click any free space on the toolbar. In the options that appear, click "Task Manager." Here we must restart the file manager by clicking on the “Restart” button.
We right-click on the toolbar again and now we make sure that the "Lock taskbar" option is disabled so that we can move items on the panel.
After making sure that the Lock Toolbar option is disabled, we right-click the toolbar again. This time we select from the Toolbar menu and then click New Toolbar , where we must select All . It will now appear in the toolbar on the right. We can increase its size and move it to the left if we want.
Remove when you no longer need it
In case at any time we want to Delete the Everything search bar, we will only need to execute the unistall.cmd file, which we will find in the Everything toolbar folder and use the Run as administrator option.
Disabling a system process
The search function in the system is implemented by the interaction of the just disabled service and the SearchUI.exe process. To remove the search, you should also block this process. This cannot be done using conventional system tools. Therefore, you will have to turn to the popular free Unlocker utility, which can edit system files.
If you do not have Unlocker on your computer, you should first install it. After this, the utility is built into the Explorer context menu.
- In the context menu of the Start button, click “Task Manager”.
- In the window of the same name that appears, go to the “Details” tab, scroll down the list until you find the SearchUI.exe line, then in its context menu click “Open file location”.
- In the next window, call the context menu of the SearchUI line, and then click the Unlocker item.
- In the window of the same name that appears, open the drop-down list of actions and click “Rename”. In the window for selecting a new name, enter a difference (for example, adding a minus sign) and click OK.
- After this, the system informs the user with the message “Object has been renamed.” Click OK again.
- To restart a computer.
Obviously, renaming it back will enable search.
Learn more about completely removing a program from your computer.
Setting up Everything
The program interface can be easily customized “in a hurry” in the “View” toolbar item...
...as well as some search terms in the “Search” item...
I recommend remembering the “hot keys” and using them - you will greatly increase the speed of working on the computer.
But as you understand, the main magic can be created in the full program settings (hidden in the “Tools” toolbar item)…
If you are an inexperienced user and are afraid of “breaking” something in the program settings - just don’t touch anything there and don’t even look at them - the advanced Windows search in the Everything program will already work many times faster, better than the standard solution.
Through the toolbar (“View”), activate preview with filters - and you will be happy...
By the way, Everything uses a minimum of RAM during its operation - to process a million files, it only needs 75 MB of this.
For example, after a clean installation of Windows 10 there will be only about 120 thousand files on the disk and the program will only need 14 MB of RAM to work.
You can safely send it to the system startup (the corresponding item in the settings is active by default) and not worry about the extra load.
How to Improve Windows Search
Absolutely free and convenient, the Everything program finds files on your computer much faster than the standard Windows thoughtful search, has convenient built-in filters and clear advanced settings.
Moreover, this third-party local search engine simply mocks the built-in solution, openly mocks it.
On the Internet I came across a lot of descriptions of a method for speeding up the built-in system search engine - they all involved deep step-by-step configuration of this matter (even through local policies and the registry), but personally it seemed to me like some kind of “crutches” for an incurably paralyzed patient.
Even after such lengthy “improvements”, Windows search is many times slower than Everything - what’s the point of “fencing the garden” if there is a ready-made, convenient, fast and advanced solution?
I read reviews about Everything on the forums and realized that a huge number of advanced users have been using this program for many years and recommend it to everyone for mandatory use.