The camera does not work in Windows 10 and messenger applications for video calling? The device is not visible to video recording programs? Let's find out in more detail the reasons that cause problems with the webcam and how to solve them.
A webcam on a laptop or desktop computer causes a lot of problems for users. Sometimes it seems that everything should work, but when you try to record a video or make a video call, the camera is not detected at all in Windows. It may not work for many reasons. It may be disabled in the laptop's BIOS/UEFI settings or in Device Manager. Or the OS does not see it due to a faulty driver. Additionally, some programs do not detect the camera because they require the user to manually select an image processing device. But this is only part of the reasons. Windows 10 has extensive privacy settings that can block apps from accessing your webcam to protect user data.
Privacy settings in Windows 10
The latest builds of Windows 10 have introduced new privacy settings that can block apps from accessing your microphone and camera. This has led to users experiencing problems with video and voice communications in Skype or Discord, as the system blocks them from accessing the device.
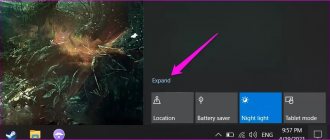
Expand the Start menu and click on the gear icon to enter Settings. Go to the “Privacy” section, then in the left panel click on the “Camera” tab.
First, make sure that the value "Camera access for this device is enabled" is displayed. Otherwise, click on the "Edit" button and move the switch to the "Enabled" position.
Also take a look at the section that allows apps to access the camera. Here too the switch should be in the “On” position.
Below you will find a list of all applications that can request access to the webcam. Make sure your voice or video calling software is allowed to use your camera, otherwise it won't work.
What is this error?
Computers running the Windows 10 operating system have a built-in Camera application. It is designed to connect a webcam and display an image on the screen. With its help, you can configure peripherals for video communication and other purposes.
However, many users, during the first or subsequent pairing, encounter a problem when the system displays the error “Could not find the camera.” It is accompanied by the code 0xa00f4244 and, as you might guess, the webcam does not function.
As a rule, the error appears at the moment when a person launches the application without a camera connected to the PC. But user reviews indicate that problems occur in the opposite situation (even if the webcam is physically connected).
Checking camera settings in programs
You also need to check the settings of the applications that you use to record video or video calls. They usually have the option to choose which imaging device you want to use. If you use Skype, in the program, click on the icon with three buttons and select “Settings”. Go to the Video and Sound tab.
Here you can specify the device for capturing video and audio. Make sure the appropriate device is selected under Camera. It is possible that Windows has a virtual camera installed that is recognized as the default video recording equipment, which is why incorrect settings are entered in instant messengers (Skype, Discord, etc.).
How to set up a webcam on a laptop
You can change your webcam settings in the desktop Camera app window. Let's talk about exactly what settings are available in this utility point by point:
- Launch the Camera program using the instructions from the first section of this article. At the top of the application window there is a photo timer (an alarm clock icon). The arrow next to it allows you to switch from automatic to professional shooting mode. On the right there are two round buttons for switching between taking photos and videos.
In the Camera application, you can select a mode (photo or video shooting), and also enable the ability to manually set all settings - To get to the settings, click on the gear-shaped icon, which is located in the upper right corner of the application window under the close icon.
- In the first drop-down menu, you can select the action that will be performed after pressing and holding the camera button. There are three options available: one shot, a whole series of photos or video recording.
Set the action that will be performed after pressing and holding the camera button - In the next menu you can flip the image you see in the application window.
If necessary, set the angle by which you want to rotate the image - In the “Photos” section, options for image proportions and framing grids are available. Depending on the type of shooting you want to use, choose a grid type. It will be easier to apply this or that method.
Set the framing grid according to the shooting method you want to use - With the Burst option enabled, you can take multiple photos until you press the camera button again.
- In the “Video” block, you can select the recording quality (depending on the maximum parameter offered by the camera itself), and also configure the flicker suppression option.
In the “Video Recording” menu, set the quality of your future media content - In the Related Options section, you can change the path to the folders where photos and videos will be saved.
In the related settings section, you can select the location of files with photos and videos taken - In addition, you can enable the use of your computer's location. The characteristics of the photo or video will indicate where it was taken.
Allow the Camera app to show your current location
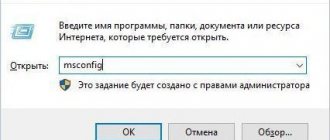
Camera disabled in Device Manager
If the camera still doesn't work, check its status in Device Manager. It is quite possible that it is disabled.
Open Device Manager with the command devmgmt.msc, launched from a Win + R window.
Find the Imaging Devices tab and expand it. Right-click on the camera to expand the context menu.
If the Enable option is displayed, it means it has been disabled. Click on the "Enable" button to reactivate it.
Need more help?
For more information about the basics of using the camera, see How to use the Camera app.
Look for answers on forums
If the solutions above don't work, try searching the Microsoft Community forum for the Windows Camera app for similar issues. If you don't find a solution, please post your problem and check back later to see the answers.
Send feedback
If you tried the steps in this article and did not find a solution to your problem, use the Windows Feedback Center to report a problem. This will help Microsoft find the root cause of this problem.
Provide details of what you were doing or describe the actions you were performing when the error occurred. Use the Recreate this issue option when submitting feedback in the Feedback Hub.
Source
Device disabled in UEFI/BIOS settings
On laptops with a built-in camera, there is an option that allows you to enable or disable it in the BIOS/UEFI. To check its condition, follow the instructions.
Expand the Start menu in Windows 10 and click on the power button. Then hold Shift and click on the “Restart” button.
The action selection window will appear. Select Troubleshooting - Advanced Options. In the next window, click on UEFI Firmware Settings. The laptop will reboot and enter UEFI settings.
Here you need to find the “Integrated peripherals” or “I/O Port Access” sections. The names may differ depending on the laptop model you are using. If there are such sections, find the “Integrated webcam”, “CMOS Camera” or similar option in the list and check that the option is Enabled.
After making changes, click on F10 or click on exit and select “Save changes and reboot” to save the settings and exit UEFI. After loading Windows 10, check if the camera works.
Complete removal
Another convenient way to remove a driver from the system is the Control Panel tool. As a rule, “firewood” is removed in the same way as regular programs. Therefore, you can use this method as well.
- Login to "Control Panel"
- Go to "Programs and Features"
- Select the required driver manually or using the search bar.
- LMB click on it and select the “Delete” option.
- Next, follow the prompts in the dialog boxes and complete the process.
- Finally, reboot your device.
Can you tell a cringe from a crash? Take this fun test and find out!
Application section
You can also start removing old drivers by using the “Application” section. This path is most convenient when cleaning graphics drivers and sound cards. When using them, separate software with a graphical interface is installed on the device, which is displayed as a separate application.
To check the relevance of this method in your case:
- Go to “Settings” then to “Applications”.
- Next we look for the one we need. For example, the NVIDIA graphics driver. Click on it and select the “Delete” option.
- Afterwards, follow the prompts in the dialog boxes.
We advise you to read all warning notices. All consequences of driver removal will be described here.
Take the test on the topic “Legends of the 90s”, remember which of these you had?
We delete all unnecessary driver entries that were deleted
So, if the solution to the question of how to remove a device driver is still open, let’s proceed to the universal and simplest method. This is the use of special programs and utilities. This path will completely erase all driver records and data and simplify the process as much as possible. That is why it is suitable for the most insecure users and those who constantly work with “firewood” and want to optimize their actions.
Below we look at some of the most popular applications.
- Driver Sweeper or Driver Fusion allows you to scan your device and automatically finds drivers and associated files to remove.
- Download the program from the official website.
- Open Driver Fusion. We are looking for the “Driver Cleaner” tab.
- Set the desired device type and manufacturer name.
- The utility will begin analyzing the PC.
- We complete the removal process.
- Display Driver Uninstaller