A printer is a very useful device, without which it is difficult to imagine your life in the modern world. Printing out abstracts, coursework, accounting reports - all this is impossible without a printer. Unfortunately, with a printer, like with any other device, problems sometimes occur. One of the most common such problems is the error “The local printing subsystem is not running.” This error occurs in a number of cases, but most often when connecting a new device.
Local printing subsystem is not running Windows 7
The reasons for its occurrence are as follows:
- necessary system components and/or services are disabled;
- system files are damaged or lost;
- the computer is infected with viruses.
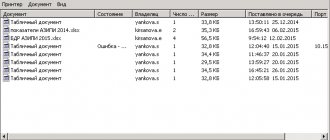
Window with a problem with the local printing subsystem
We will try to explain to you how to fix the problem in this article.
Causes of the problem and how to fix it
The most common cause of the error studied in this article is the disabling of the corresponding service. This may be due to its deliberate or erroneous deactivation by one of the users with access to the PC, various malfunctions of the computer, and also be a consequence of a virus infection. The main ways to eliminate this problem will be described below.
Method 1: Component Manager
One way to start the desired service is to activate it through the Component Manager.
- Click Start. Go to “Control Panel”.
Next, click “Programs and Features.”
On the left side of the shell that opens, click “Turn Windows features on or off.”
The Component Manager starts. You may have to wait a short time while the list of items is built. Find among them the name “Print and Document Service”. Click on the plus sign located to the left of the above folder.
Then click on the named checkbox again. There should now be a checkbox next to it. Place the same mark next to all elements included in the above folder where it is not installed. Next, click “OK”.
After this, the procedure for changing functions in Windows will be performed.
- After completing this operation, a dialog box will open asking you to restart the PC to make the final change of settings. You can do this immediately by clicking on the “Restart Now” button. But before doing this, do not forget to close all active programs and documents to avoid losing unsaved data. But you can also click on the “Restart later” button. In this case, the changes will take effect after you restart the computer in the standard way.
After restarting the PC, the error we are studying should disappear.
Method 2: "Service Manager"
You can activate the associated service to resolve the error we are describing through the “Service Manager”.
- Go through “Start” to “Control Panel”. How to do this was explained in Method 1. Next, select “System and Security”.
Go to “Administration”.
In the list that opens, select “Services”.
The "Service Manager" is activated. Here you need to find the “Print Manager” element. For a faster search, arrange all names in alphabetical order by clicking on the name of the “Name” column. If there is no “Running” value in the “Status” column, this means that the service is deactivated. To launch it, double-click on the name with the left mouse button.
Local solution
Problems of this type during device installation are extremely rare.
The method for resolving the problem given below will also help in cases where, after applying the previous method to the network, the problem is not solved.
When connecting the device, the problem usually looks a little different. It starts fine at first, may even do a few pages or part of it.
But then, after a few seconds, it disconnects and an error message appears.
In this case, you need to clean the Manager registry. You can do this as follows:
- Open the registry window - to do this, enter regedit in the Run field;
- In the registry, go to the path HKEY_LOCAL_MACHINE àSYSTEMàCurrentControlSetàServicesàSpooler (you can do this using the folders in the menu on the left);
- Find the DependOnService parameter and double-click on it;
- In the input field in the window that opens, enter the RPCSS parameter and click OK;
- Go to the path HKEY_LOCAL_MACHINEàSystemàCurrentControlSetàControlàPrintàPrinters;
- Here is a list of all existing ones;
- Delete them all using the Del button;
- Go to the path HKEY_LOCAL_MACHINEàSystemàCurrentControlSetàControlàPrintàEnvironmentsàWindowsNTx86àDriversàVersion-3;
- Here is a list of all drivers - remove them all;
- Go to the path HKEY_LOCAL_MACHINEàSYSTEMàCurrentControlSetàControlàPrintàMonitors and remove everything from the folder that opens except BJ Language Monitor, Local Port, PJL Language Monitor, Standard TCP/IP Port and USB Monitor.
Now restart your computer and reinstall it.
Source
Method No. 1. Component Activation
If system components necessary for the printer to function correctly are disabled on your computer, you can enable them using the Component Manager menu. To implement this task, follow the following step-by-step instructions:
- Click on the Start , then open Control Panel .
If after rebooting the error window no longer pops up, then you have successfully solved the problem. If not, then try other ways to solve it.
We treat the “print manager”
The local printer printing subsystem is nothing more than a Windows service called Print Manager. You can get to this service and make sure that it is running or find that it is unavailable by following the following path: “Control Panel” -> “Administration” -> “Services”.
After scrolling through the list until you find the name of the desired service, open the window with its properties and select “Automatic” in the “Startup type” drop-down list. Then click on the start button (if it is active, if not, we do nothing), close the administration window and return to installing the printer again.
Most often, this method solves the problem - the printer is installed and working in Windows. But under certain circumstances this does not happen and local printing is still not available. It is believed that the source of this problem lies in the clogging of the so-called spool. There are even recommendations for cleaning it, which, however, we will not need. So, if the printer is still not installed, move on to the next instructions.
Method No. 2. Enabling required system services
A printing error may also occur if the system services required for this purpose are disabled on your computer. To fix this, follow these steps:
- Go to the "Control Panel" . If you don’t know how to do this, then read the first paragraph of the previous instructions.
- Select the “System and Security” by left-clicking on it.
If there are no printing problems after starting the service, then the job is done.
Solving problems with opening the Add Printer Wizard
The most common is a malfunction of the system service, which is responsible for the “Print Manager”. It is caused by certain changes in the operating system, infection with malicious files, or accidentally reset settings. Let's look at all the popular methods for fixing this error.
Method 1: Scan your PC with an antivirus program
As you know, malware can cause various damage to the OS, including deleting system files and preventing components from interacting correctly. Scanning a PC with an antivirus program is a simple procedure that requires a minimum number of actions from the user, which is why we put this option in first place. Read more about the fight against viruses in our other article at the link below.
Read more: Fighting computer viruses
Method 2: Cleaning the registry
Periodically, the registry becomes full of temporary files, and sometimes system data is subject to accidental changes. Therefore, we strongly recommend cleaning the registry and restoring it using special tools. For guidance on this topic, see the following:
Read more: How to clear Windows registry errors Cleaning the registry using CCleaner Restoring the registry in Windows 7
Method 3: System Restore
If you are faced with the fact that the Add Printer Wizard stopped responding only at a certain point, and before that it was functioning normally, most likely the problem lies in some kind of system changes. You can roll them back in just a few steps. However, at the same time, your information may be deleted from the computer, so we advise you to copy it in advance to removable media or another logical partition of your hard drive.
Read more: Windows recovery options
Method 4: Scan the system for errors
The appearance of various failures in the operating system provokes a violation of the built-in and installed components, including this applies to the Add Printer Wizard. We advise you to seek help from the standard Windows utility, which is launched via the Command Line. It is designed to scan data and correct any errors found. You just need to launch “Run” with the Win + R key combination, enter cmd there and click on “OK”. In Command Prompt, type the following line and activate it:
sfc/ scannow
Wait for the scan to complete, restart your computer and check that the print service is working in the Command Prompt by typing net start spooler and pressing Enter.
Method 5: Activate Print Service Components
Document and Print Services consists of several components, each of which operates separately. If one of them is disabled, this may cause malfunctions in the functioning of the Master in question. Therefore, first of all, we recommend checking these components and running them if necessary. The whole procedure looks like this:
- From the Start menu, go to Control Panel.
- Select the Programs and Features category.
- In the menu on the left, move to the "Turn Windows features on or off" section.
- Wait until all the tools are downloaded. In the list, find the “Print and Document Services” directory, then expand it.
- Check the boxes for each directory that opens.
- Click “OK” to apply the settings.
- Wait until the settings take effect, after which you should restart your computer. A corresponding notification will be displayed in front of you.
After restarting, check the functionality of the Add Printer Wizard again. If this method does not bring any results, move on to the next one.
Method 6: Check the Print Spooler service
The Print Manager service built into the Windows OS is responsible for all actions with printers and auxiliary utilities. It must be running to do its job correctly. We recommend checking and adjusting it if necessary. You need to do the following:
- Open the Start menu and go to Control Panel.
- Select the "Administration" category.
- In it, open “Services”.
- Scroll down the list a little to find Print Manager. Double-click on this line with the left mouse button.
- In the “General” tab, check that the service starts automatically and is currently enabled. If the settings do not match, change them and apply the settings.
- In addition, we advise you to go to “Recovery” and set “Restart service” in case of the first and second failure of the service.
Before exiting, do not forget to apply all changes, and it is also recommended to restart your PC.
As you can see, there are six different methods to solve the problem with launching the Add Printer Wizard. They are all different and require the user to perform certain manipulations. Perform each method in turn until you find the one that will help solve the problem.
We are glad that we were able to help you solve the problem. Thank the author and share the article on social networks. Describe what didn't work for you. Our specialists will try to answer as quickly as possible.
When trying to connect a new printer and in some other cases related to printing materials from a computer, the user may encounter the error “The local printing subsystem is not running.” Let's find out what it is and how to fix this problem on a Windows 7 PC.
Method number 3. File recovery
If the system file structure on your computer is broken, it can cause various errors, including a printing error. To solve the problem, you will need to carry out some manipulations in the Command Line . Just follow the further instructions:
- Open the list of all programs using the Start .
Note! During the procedure, do not close the “Command Prompt” - if you need to use other programs, then simply minimize it.
If after completing the procedure the error no longer bothers you, then your mission is completed. If even this does not help, then the reason most likely lies in the presence of malicious files on your computer.
System failure message
"The local printing subsystem is not running. Reboot the system”, “The printer could not be connected”, “The printing subsystem is unavailable” - these are common errors when using printing devices in Windows 7, 8, 10. But you can fix them, in most cases, yourself, without resorting to the help of specialized services.
The causes of problems may be different:
- viruses;
- disabling a service or component;
- incorrectly installed drivers;
- problems connecting the device;
- errors in system files;
- “clogging” of the print queue.
By correcting these errors, you can restore the operation of the device.
Method number 4. Removing viruses
Getting a virus on your computer is now easier than downloading a game from torrents. Viruses penetrate deep into your file system and interfere with its correct operation. This in turn causes a number of nasty errors, including the printing error we are looking at. It is quite difficult to manually search for files containing a virus, so there are antiviruses for this purpose that do this automatically.
Let's look at an example of cleaning a system from viruses using the Kaspersky antivirus as an example. To remove viruses, follow these instructions:
- Launch the antivirus and click on “Scan” .
You can also use any antivirus from the list below:
- Avast;
- Dr.Web;
- McAfee;
- 360 Total Security.
Now that you know how to resolve the printing error, you can use your printer without any difficulties. If the instructions in the article did not help you, then refer to the guide for reinstalling the operating system.
Reinstalling the Printer
And the last option for starting the printer is to reinstall it!
If the above steps did not help, and the computer recovery function was disabled, and your OS still informs you that the printing system is unavailable, then reinstalling the printer will most likely help you. To do this, you need to completely clean your computer of old drivers and download them again. If you cannot find the installation disk, then below is a diagram by which you can do everything.
Installing a local printer on the Windows 7 operating system if there is no installation disk:
- Open the “System Properties” section by simultaneously pressing the “Pause/Break” + “Windows” keys.
- Go to the "Device Manager" tab
- Find the item we need “Printers”
- Right-click and run the driver update.
- Next you need to perform “Search on this computer”
- Click Browse and select the location of the new drivers.
After this, the drivers should be installed and the printer will start working properly!
Thanks for reading the article. We hope it helped you well! Share useful information with friends, leave ratings and reviews. Thank you!
The Add Printer Wizard allows you to manually install a new printer on your computer using built-in Windows capabilities. However, sometimes when running it, certain errors occur, indicating that the tool is not working. There may be several reasons for this problem, each of which has its own solution. Today we will look at the most popular problems and look at ways to fix them.
What to do if the spooler is heavily loading the processor
Many users of different versions of Windows often complain that the “spooler” process heavily loads the processor. The problem becomes more acute when utilization starts to reach the 80 percent mark. This is truly an atypical situation and such loading should not happen. Let's consider the possible causes and their quick independent solution.
It is not possible to reinstall the entire service separately from the operating system. To resume its correct operation, you can only try to perform the above steps.
Video
WAS THIS ARTICLE USEFUL?
DANET Great! As a sign of gratitude, tell your friends and acquaintances about the article on social networks. Use the buttons on the left or bottom of the page. It doesn't take more than 15 seconds. Thank you! No problem! Specify your problem in more detail in the comments or to a specialist in this area.
After the next Windows 10 update, all printers stopped working for some users. Moreover, they can all be displayed in the control panel, but when you try to log into the printer, you get an error connecting to the printer. Windows was unable to connect to the printer. The local printing subsystem is not running. Restart the subsystem or restart the computer.
This article will tell you how to fix a printer connection error in several ways. We will look at what to do when the local printing system is not running using the Windows 10 operating system as an example. First of all, we recommend making sure that the local printing subsystem is running, and only then proceed to the following methods.
Windows 10 uses the classic Services app to manage services, but you can also disable services in the accompanying settings. See also other solutions How to open services in Windows 10.
- How to install and configure a network printer - creating a comfortable working environment
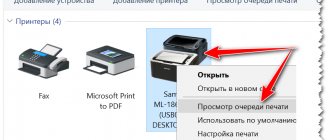
- Open services by running the command services.msc in the Win+R .
- Go to the properties of the Print Spooler , and click the Start .
The Print Spooler service allows you to queue print jobs and communicate with the printer. If you disable it, you will not be able to print or see your printers.
- Open the classic control panel by running the control panel in the Win+R .
- Next, go to the section Hardware and Sound> Devices and Printers , where we click the Add a printer .
- In the window that opens, click the button The printer you need is not in the list and select Add a local or network printer with manually specified parameters .
- Then select Create a new port and specify the port type Local Port and click Next .
- Now you need to enter the Port Name in the window that opens in the format \Name_of_your_PC_in_propertiesName_of_your_printer .
- The last step is to select the device driver by specifying the Printer Manufacturer and Printer .
Adding a printer this way usually clears up the error where Windows is unable to connect to the printer and the local subsystem is not running.
The updated troubleshooter actually works better than before, after several calls the problem was always resolved. The troubleshooter helps you troubleshoot printing problems.
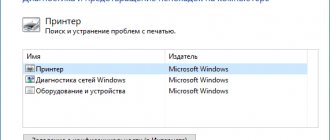
- Open Start > Settings > Update & Security > Troubleshoot .
- In the current location, highlight Printer and click Run the troubleshooter .
After which the user can only follow the steps of the troubleshooting wizard. There is a high probability that Windows 10 will fix the problem on its own.
If the printer was working normally, but after some time of use a problem was discovered with connecting to the printer, you can try clearing the Spool folder on the system drive.
The Spooler program saves the documents sent by the user and sends them one by one to the printer for printing.
To clean the Spool folder, you need to load safe mode in Windows 10. Then just go to C: Windows System32 Spool .
- C: Windows System32 spool prtprocs w32x86 – delete all contents except the winprint.dll file (in x64 versions of the operating system the folder is named accordingly).
- C: Windows System32 Spool Printers – delete all data about installed printers.
- C: Windows System32 Spool Drivers w32x86 – clean the folder from all files of previously installed drivers (in x64 operating systems, the path is Drivers x64 ).
After completely clearing all data related to printers, the user will have to reinstall the latest printer drivers.
Conclusion
- How to connect a printer to a laptop: step-by-step guide
Printer Connection Error: Windows was unable to connect to the printer. The local printing subsystem is not running. Restart the subsystem or restart the computer appears not only on the Windows 10 operating system, but also on previous versions. And the solutions have hardly changed during all this time.
You may encounter the “ Local printing subsystem is not running ” error when trying to connect a new printer, when opening the settings of an already configured local printer, or when sending any document for printing. This error can appear in both Windows 10 and Win 7 or 8.1.
The text of the error message may vary slightly depending on what action you are trying to perform on objects in the print subsystem. For example:
Error opening printer.
Windows can't connect to the printer.
The local printing subsystem is not running. Restart the subsystem or restart the computer.
Or
The Add Printer Wizard could not be opened. The local printing subsystem is not running.
In the English version of Windows, the error may look like this:
- How to make a printer network. How to connect a network printer, Windows setup
Windows can't open Add printer. The local Print Spooler service is not running, Please restart the Spooler or restart the machine.Windows cannot connect to the printer, The local Print Spooler service is not running.
First of all, you need to check whether the Print Spooler service is running. If the print service is disabled, you may encounter error 0x000006ba.
- To do this, open the services management console (services.msc);
- In the list of services, find the “ Print Spooler” service;
- Make sure that the service is running (status is “Running”) and the startup type is “Automatic”;
- Restart the service;
- If the service is not running, change the service startup type and start it;
- On the Dependencies tab, make sure that the Print Spooler service depends on the RPC (Remote Procedure Contro) and HTTP Service services. For the print service to work correctly, these services must be running. If the dependencies are not configured, you can restore them with the command: sc config spooler depend= RPCSS
You can also check the status of the print service from the command line by running the command:
sc query spooler
In this example, you can see that the service is running.
If the Print Spooler service is missing or does not start, try clearing the print queue and deleting files in the C:windowssystem32spoolPrinters folder (with the print service stopped). Then check to see if the Windows printing feature is enabled:
- Go to Control Panel -> All Control Panel Items -> Programs and Features -> Turn Windows features on or off
- In the list of components, find the “ Print and Document Services ” section;
- Make sure that the following services are enabled: Internet Print Client, LPD Print Service , and Windows Fax and Scan ;
- You can try to reinstall the components: disable them, save the changes, and then enable them again.
If the “Local printing subsystem is not running” error appears when you try to connect a shared network printer from another computer, try connecting the network printer through a local port (the printer address in the format \PCName1HP2000 is used as the port name). The procedure for connecting a network printer via a local port is described in detail in the article Printing to a network printer on Windows 10 from XP.
If all else fails, run the Fix Printing Problems Wizard: Settings -> Updates and Security -> Printer (Find and fix printing problems) -> Run the troubleshooter .
Also check the integrity of system files using the commands:
sfc /scannow
or
dism /Online /Cleanup-Image /RestoreHealth
Assigning a port
The Windows operating system has a so-called “ports” system, certain areas in the computer’s memory through which it interacts with external devices, such as a printer. Each device is assigned its own port. This is exactly what we do when solving a problem with the local printer subsystem in the case when it is unavailable or not running for one reason or another.
We perform the following sequence of simple operations:
- Launch the Windows “Add a Printer” wizard.
- Check the box for adding a local printer.
- Check the box “Create a new port”.
- Here we indicate the type of the newly created port – “local port”.
- A window will appear in which you must enter the details of the new port - its name, which indicates the path to the printer to be installed.
- In the next window, select our printer and complete the installation procedure.
In principle, this is all you need to know to cope with any difficulties encountered during installation.
If the Windows subsystem in question is still inaccessible, and the connected “device” still “does not plow or sow”, then a miracle has happened and you need to call Santa Claus for help. But such an outcome seems very unlikely.
Source: https://windowstune.ru/win7/devices7/pochemu-lokalnaya-podsistema-pechati-ne-vypolnyaetsya-v-operacionnoj-sisteme-windows-7.html