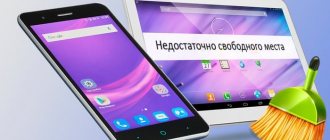
The built-in memory of an Android device often runs out quickly, so users have to store large amounts of information on microSD. But what to do if Android does not save downloaded content to the memory card - applications, photos, music, and other files?
This article is suitable for all brands that produce phones on Android 11/10/9/8: Samsung, HTC, Lenovo, LG, Sony, ZTE, Huawei, Meizu, Fly, Alcatel, Xiaomi, Nokia and others. We are not responsible for your actions.
Attention! You can ask your question to a specialist at the end of the article.
Installing applications on a CD card
More smartphones save information to the device’s memory rather than to a CD drive. Depending on the software version, there are options for moving information from the device to the drive. How to install applications on an Android SD card? You will find out by reading the article.
READ ALSO: Aliexpress: application for Android.
Migrating applications to Android 6.0
If the file has been downloaded and installed, its location can be viewed in the smartphone’s memory. To determine it on a flash drive, you must do the following:
1. In the settings you need to find the “Device” item.
2. In the “Applications” tab, select “All applications”.
3. Here you can find what you need to transfer. Clicking on the name will open the application settings.
4. In the memory you need to find the “Change” button and select “Memory Card”.
Possible problems with the flash card
Is your drive running out of free space?
- The easiest way to solve this is to purchase a larger card.
- Various utilities will help free up memory on the card. They will clear application caches, junk folders, broken files, and more.
- You can manually clean directories such as: DCIM/thumbnails (here the gadget records mini-versions of your photos; you can delete everything; the system will overwrite the necessary ones on its own) and log (you can erase the entire folder and then create a new one with the same name).
Transferring apps on Honor phones
To avoid blocking, you need to use standard application transfer.
1. In settings, open “Applications”.
2. From “All applications” select the one you need.
3. When you click on it, click the “Memory” button.
4. The “Move to CD card” button must be activated.
5. It happens that there is no such button, in which case the option is not available. But it can be activated in another way.
Transferring applications to SD via developer mode
If the above point is not found, it is possible to enable developer mode. All files will be saved to the flash drive by default. To do this you need to do the following:
- In “Settings”, find and click on the “About phone” item.
- Click on the “Build Number” tab as many times as necessary until the additional mode is enabled.
- The correctness of the actions will be confirmed by the notification “Developer mode is activated.”
- Now you need to go back to “Settings” and find the line “For Developers” at the bottom.
- There you need to find and activate “Save application to external storage”.
- As a result, all applications will be saved on the flash drive.
It is important to understand that all applications installed before enabling this mode will remain in the internal memory. We'll look at how to transfer these files to external media below.
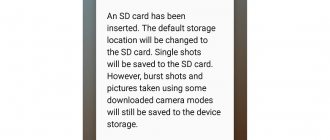
Selecting the default installation
It is possible to choose the storage location for the data. To do this you need to do the following:
- Click the “Memory” button in “Settings”.
- Click “Default save location”, select “Memory card” there and confirm what you have done.
- Rebooting will allow you to save files to the flash drive.
AppMgr III (App 2 SD) for batch moving applications
In order not to open the settings of each game or program and see whether they can be moved or not, try it - in it, the moved applications are found in a separate tab.
Hold your finger on app cards to mark them. Select the ones you need and click on the folder icon at the top. In the new window, click the red arrow, which will take you to the application details page. To go to the settings of the next selected program or game, click on “Back”.
AppMgr III will also tell you which applications are best not to install on an external drive so that all functions work correctly.
Using Android Debug Bridge on PC
Android Debug Bridge is a command line tool that allows you to interact with connected devices running the Android OS.
The utility will allow you to change the storage location of files by default, even if there is no such item in the phone settings. But the Android Debug Bridge program works exclusively on the computer. After connecting your device to your computer, it’s easy to do the following:
1. Download this program to your PC.
2. The archive is unpacked in the root directory. The operating system is usually stored there, usually on drive “C”.
3. Without turning off “Developer Mode” in the device settings, click “USB Debugging”. Now you can connect your phone to your PC using a cable.
4. You need to wait until all the drivers have finished installing, the command line should run as administrator.
5. You must enter the command cd c:\adb in command line mode. When accessing the required directory, press Enter.
6. After making sure that everything is done correctly, the following command will be useful: abd devices and confirm the operation.
7. A successfully mark about the connected device will “pop up” on the screen. We can assume that the system has detected the device.
8. Now you need to enter the adb shell pm set-install-location 2 command in the line and confirm the operation.
When everything is done correctly, the designation “0” will appear. It denotes the device memory. Now you can save applications to a memory card and other files to CD media. This principle is also suitable for returning the original settings. It is worth disconnecting the phone from the computer and checking the operating mode.
No. 2. Activating multi-window mode
Some versions of Android provide support for displaying multiple applications on the screen at once. Two applications can easily be launched in split screen mode. For example, a user can split the screen to explore a Web page on the left side while composing a social network message on the right.
When the user switches to multi-window mode, the operating system notifies about the configuration change. If the user changes the window size, those changes are applied by the system at runtime as needed. Sometimes the application does not have time to efficiently draw new areas on the screen. The problem area is then temporarily filled with the default color.
In multi-window mode, the application can be paused while remaining visible to the user. Once suspended, an application may be able to continue performing individual operations.
How to make multi-window mode available? In the developer section, enable the "Resize in multi-window mode" option. The manifest values are also not taken into account. Multi-window mode is an advantage of the latest versions of Android from Google. For such a function to work correctly, it requires both the correct operation of the operating system and the presence of support in the applications themselves. But not all developers took care of this. Enabling the option described above will give you the ability to apply the selected mode to any application.
It must be remembered that individual applications may not be displayed correctly when working in multi-window mode. For example, the player may pause if you switch to another program.
You should also know that in the Android 7 operating system from Google, multi-window mode is open to the user. But in earlier versions of the operating system, support for opening multiple windows simultaneously was generally available only to developers.
Default SD card destination without programs
This method is not recommended for beginners. Unprofessional actions can harm the system. In addition, not all devices are suitable for this method. Therefore, before starting to use this method, you should carefully weigh the pros and cons.
- Root Explorer will do the best job of all file managers. Another option that sees all root files will do.
- In the file manager, in the system subsection, find the directory called etc.
- The built-in vold.fstab file editor will help you find and open it.
- Find and change the location of the sdcard0 and sdcard lines.
- The gadget needs to be rebooted.
No. 3. Do not turn off the device screen while charging
When the smartphone screen turns off, this mode is called “sleep”. It most often triggers 30 seconds after the end of the last action. For some, this is quite enough. But if you're reading from a screen, half a minute may not be enough. Or, for example, you have to prepare a new dish according to a recipe found on the Internet. You won’t press the screen every time to prevent it from going into sleep mode. Another useful option comes to the rescue.
In the developer section, check the box next to “Keep the screen on.” As a rule, a regular smartphone turns off the screen when the device is idle. This is good for saving battery power. But in some cases such a function will really be superfluous. For example, when you want to use your smartphone as a desk clock or when traveling in a car as a navigation device. By activating the described option, you will allow the smartphone to be in working condition while it is connected to the charger.
Transferring apps to SD via mobile app
Are you wondering how to install applications on a memory card? At the same time, if it is not possible to connect the phone to the computer, there is a special application. Thanks to this software, you can easily transfer files from the memory that the device has to the drive.
- You will need to download the utility and set all the requested permissions.
- After starting the program, you need to select from the list the applications that you want to transfer to the flash drive. You can work with several products at once.
- After choosing, just confirm the operation.
This makes it possible to import and export files. Many utilities have been developed to perform this function. Which utility to choose is up to the user. But, it is worth remembering that root rights may be required for it to work correctly.
Version 4.4 and higher
Starting from version 4.4 of the operating system, a problem arose on devices: applications stopped working with files not stored in public directories, and access to the memory card became limited. This was done to increase the security of the smartphone/tablet, but brought a lot of inconvenience to users. Some app developers have been very quick to release updates to circumvent the block to some extent. But, unfortunately, not all. The problem can be solved by creating a directory on a flash drive or using third-party utilities.
Create a public folder
The authors of many programs have already added the ability to install on a card to their products. And for those applications where this bug is not fixed, there is the following method.
Let's look at the example of 2GIS
- Go to the Play Market and select the application you are looking for.
- We look at the inscription in the address bar. In this case, it is https://play.google.com/store/apps/details?id=ru.dublgis.dgismobile, that is, the name of the program will be ru.dublgis.dgismobile.
- Open the “Android” folder on the memory card using the built-in file manager (for example, “Explorer”), find “data” in it
- Create a directory here “ru.dublgis.dgismobile”
- Launch the software, specifying the created folder
- Reboot the gadget
Using additional programs
The most common program for transferring data to an SD card is Link2SD. Its main advantage is that it can not only completely, but also partially transfer applications to a flash drive. The second useful utility is SDFix. Both are distributed free of charge through Google Play, but if the second works only with Root access, then the first has some useful functions without them. Just be careful, they can move some system applications, which will negatively affect the operation of the device. Also, these applications allow you to save browser downloads to external memory, instead of the built-in one.
Common Questions
How to make applications installed on a memory card?
This issue is covered in the article, so you just need to choose a convenient and suitable method for yourself. There may be problems opening the software; there may be several ways out of the situation. The most popular is to perform the actions on another computer or try to open the software again.
The reason may be insufficient downloading of the archive. If, after following all the steps in the instructions, the PC generates an error, you need to check whether the USB debugging option is enabled. Sometimes there may be problems with the software. Here it is better to make sure that everything is functioning properly in order to correctly eliminate the cause of the incorrect operation. In addition, it is worth paying attention to the operation of the smartphone, how well it is.
Working with Link2SD
Open Link2SD and give the program Superuser rights.
A window will immediately appear asking you to select the file system of the hidden SD card partition. Check the desired ext version and click OK. If the window does not appear, open the menu on the left and click on “Recreate mount script”.
Next, click the “Reboot device” button to mount the second partition of the memory card. Next will be a reboot.
After starting Android, go to Link2SD, click on the three dots in the upper right corner and select “Multiple”.
Check the required applications and open the menu again. Click on "Submit".
Next, select which application files you want to transfer to the second partition of the SD card. You can only move data files using the paid version of the Link2SD application.
There is also the “Move to SD card” function, which moves applications using the standard apps2sd method, which is not available to users whose devices do not have the Link2SD utility installed.
If you need to move one game or program, find it in the list, click on it and select “Send” or “Move to SD card”.
In order to move applications back, select them and click on “Return” or “Move to phone”. If you need to merge partitions, simply format the SD card in the “Settings” → “Memory” menu.
No. 4. Speeding up system animations
In the corresponding settings section, which is now available to you, activate the positions:
- "Window Animation";
- "Animation of transitions";
- "Animation Duration".
This useful set of options will significantly speed up the visual performance of Android. Some manufacturers, in pursuit of external effects, load the system with bright and beautiful animation, so Android starts to work slower.
Developers add animation to smooth transitions between menus and applications. But this can create an undesirable effect: the power of devices is increasing all the time, all applications open very quickly, but the animation is lagging. Sometimes it even becomes completely unnecessary and inappropriate. Graphic delights today do not impress users much.
Now you have the opportunity to independently set the display time of animation elements or simply disable them. Some users note that after this the system starts working much faster.