Not all active iPhone and iPad users know about the ability to remotely connect from one device to another.
This is not hidden secret surveillance of a child, wife or husband, but a broadcast of what is happening on the screen of a mobile device, approved on both sides.
Topic: how to stream from iPhone
Don’t count on remote control; these are, after all, Apple gadgets with all the limitations, but you can easily see what’s happening on the screen.
Why is this necessary?
Firstly, this way you can remotely provide assistance to friends who are experiencing problems working with an iPhone or iPad. If earlier we connected to the computers of mothers, fathers, grandparents, now we can connect to their smartphones or tablets.
I often use this trick myself to answer my mom’s questions when working with the iPad.
Secondly, it is so convenient to support corporate devices, answering questions from not the most advanced users. Either the accountant will lose the application he needs, or the director will lose his dock with icons.
There is no need to run anywhere, just a couple of seconds and we can see what is happening on the problematic device.
Thirdly, this way you can show other users some moments when working with the device, brag about completing games or something else.
Remote Control Applications
There are a huge number of applications for remotely managing a tablet. We will look at only 5 of them, which in our opinion are the best:
- The first program that allows you to remotely control an iPad from a computer is Screen NVC. The first part for the computer can be downloaded from, the second part. The application has many functions and its main disadvantage is that it is paid.
- The second program is TeamViewer: Remote Control. The first part is downloaded, the second. In addition to a huge number of possibilities, the application allows you to configure computer control via iPad. Plus, TeamViewer is absolutely free. One of the best programs in our review.
- The third application is Splashtop 2 Remote Desktop. You can download it (on the right side of the computer program) and (for the computer itself). The program is also very functional. The disadvantage is that it is paid (although the amount you will have to pay for it is very small, only a little more than 4 dollars).
- The fourth iPad control program is the most expensive on our list. This is iTeleport. You can download it from . It will cost more than 24 dollars. The main advantage is support for an unlimited number of devices.
- The fifth and final program that allows control from the iPad and vice versa is “Remote Desktop” from Microsoft. You can find it at . Gesture control and many functions related to connecting to a remote desktop are implemented. The main drawback is the lack of support for MAC OS.
Light control
Another interesting topic that I would like to touch upon in this essay is controlling light from the iPad. About 10 years ago, the first production samples of the Smart Home system were presented. Its essence is as follows: many sensors are installed that constantly count information and provide the most comfortable conditions for a person.
In addition, with the development of smartphones and tablets, it became possible to organize control of various devices from them.
Organizing light control from a tablet is quite simple, but it will require some costs. To do this, install special lamps equipped with transmitters, or a whole complex that controls all lighting in the house; In turn, special software is installed on the tablet. After this, you can adjust the comfortable lighting level without leaving your seat.
Splashtop 2 Remote Desktop
Splashtop 2 is one of the most flexible and customizable remote access applications available. If you only need basic features, the program will cost $19.99. However, access to more specific features, such as a joystick for games, is available through in-app purchases.
Splashtop 2 is the most functional application among its kind, but it only supports Mac and PC. By the way, it is now on sale at a big discount!
Splashtop Personal
Splashtop Inc.
Price: Free
Download
Price: Free
How to remotely connect to an iPhone or iPad
Remote control of iPhone is implemented in many programs, the most popular utility being TeamViewer.
If the user does not know how to control iPhones from a computer and TeamViewer, then he needs to follow the instructions described below.
First, you need to download and install the TeamViewer QuickSupport utility on your iPhone (iPad) and download and install the full version of the application on a second device (PC or mobile gadget).
Selecting “Control Center” → “Customize controls” in settings
Now you need to add the “Screen Recording” icon to the control center. To do this, go to “Settings” → “Control Center” → “Customize Controls” and click the button next to “Screen Recording”.
Clicking the Screen Recording button
Next you need to open TeamViewer QuickSupport. An ID for connection will appear in the program, after which you need to open the program on the second device and enter this password in it.
Then they approve the remote connection by clicking the “Allow” tab in the “Allow Remote Support” dialog box on the managed gadget.
Clicking the Allow tab in the Allow Remote Support dialog box
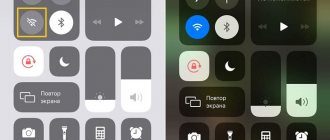
Next, open the “Control Center”, where you press and hold the “Screen Recording” button until the settings window appears. It requires you to activate TeamViewer and click on the “Start Broadcasting” tab.
Click “Screen Recording” → “Start Broadcasting”
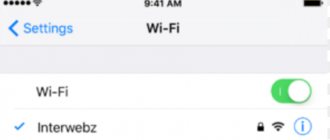
Now you need to click “Screen Share” on the device from which you will be viewing.
Clicking "Screen Share"
After this, the iPhone screen image will begin broadcasting.
Note! For convenient use of the utility, it provides online chat, sending pictures, as well as the “Screenshot” function.
Program lock
Often problems with remote access to iPhone are due to the fact that firewalls and antivirus programs block programs from connecting to the Internet.
Program blocking by antivirus
To solve the problem, you need to add the utility to the exceptions. This is done in the antivirus settings. In the firewall, this requires opening the Windows Control Panel and selecting “Firewall” from the list that opens. After that, in its settings you need to select “Allow interaction”. A new window will open, where opposite the program name you need to check the boxes “Private” and “Public”.
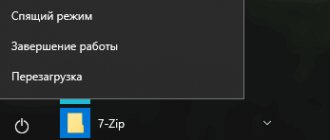
Important! We must remember that the program must be run as a PC administrator. To do this, right-click on the program shortcut and select the desired item in the list that opens.
Possible problems when connecting remotely to an iPhone or iPad
During startup or while the application is running, sometimes the message “TeamViewer is not ready to test the connection” or “Commercial use detected” appears. They arise for a number of reasons, since the free version of the utility has restrictions.
Reasons for these messages:
- end of traffic allocated for one session;
- poor Internet or its complete absence;
- blocking the program by a firewall or antivirus. Using an old version of the application;
- incorrect operation of the utility;
- technical work on the developers' server;
- suspicion of commercial use of the program (most often associated with a large list of connected devices).
If the application does not connect to the second device or has stopped working, then you need to:
- restart the software;
- remove the blocking.
Bad Internet
A common reason for lack of connection is often poor quality Internet or its complete absence. In this case, you need to use an alternative connection method. For example, you can connect to a wireless public Wi-Fi hotspot. If you are using a USB modem, then you need to try changing the network type (from 3G to 4G or vice versa), etc.
TeamViewer is not working correctly
Connection failure sometimes occurs due to incorrect operation of the program or installation of an old version of the utility. To eliminate this, the user needs to completely remove the program from the device, then download a new version from the developers’ website and install it on a PC, laptop or mobile gadget.
Sources:
https://ipadstory.ru/udalennoe-upravlenie-kompyuterom-s-ipad.html https://itc.ua/articles/udalennoe_upravlenie_cherez_web_6011/ https://glazeandcoffee.ru/upravlyat-kompyuterom-s-telefona-iphone/ https http://mirinfo.ru/ios/udalennoe-upravlenie-iphone.html
What is it for?
- Using this function, you can help friends and acquaintances solve problems with their device from a distance. For example, you can help a relative who is not familiar with modern technology understand the various nuances of operating the device.
- In addition, the ability to remotely view screen images helps provide technical support for corporate devices.
- The third way to use a remote connection can be to share the screen while playing games or various moments when working with the device.
Rescue + Mobilefor iOS
A similar set of functions is offered by the developer LogMeIn, Inc. Its product, Rescue + Mobilefor iOS, allows you to remotely identify and fix most system problems. This support client is ready to help your device at any time, no matter where you are. There are several options for getting help: in the form of consultations via chat, “co-browsing”, tips after specialists study screenshots of iPhone system notifications.
The main thing is to have a stable connection to the Internet and follow the interactive prompts of the assistant. The communication channel during communication is protected by a six-digit code that is given to you by a technical support employee. And again, at the end of the session, no one else will be able to access the smartphone menu until you allow it.
This utility is also free. Available for download from a secure source -itunes.apple.com
By the way, always remember about safety. Once again, we remind you that you should not download such applications from dubious sites.
Use only official sources. You shouldn’t trust the first “craftsmen” you meet; check the tools they install, “filter” advice on forums.
Because all sorts of software “upgrades” create a huge gap in the protection of user data, which iPhones are so famous for. Don't give scammers a chance to connect remotely and steal information from your device.
Bomgar
A similar service is offered by the developer BomgarCorporation. This universal application is designed for both iPhone and iPad. Bomgar will allow you to receive qualified assistance remotely, no matter where the device is located. You need to first download and install Bomgar on your phone. Again, you need to install the applications on the two devices involved: an iPhone and a computer (or iPad).
Also, to communicate with technical support, you will need a stable Internet connection. If it is interrupted, the gadget may freeze for a long time.
To exclude interference from fraudsters, both subscribers (owner and master) enter codes to connect. Each communication session between a technical representative and your device is encrypted, and once it is completed, he will no longer be able to remotely log into your iPhone until you ask for help again.
During the inspection, the specialist gets the opportunity to view information about the operation of the system, clean it and update it without your participation. You can discuss problems that have arisen in real time in a secure chat by sending screenshots of your iPhone screen.
You can also find this application in the Apple store. This version is suitable for iPhone (iPad). The download is free, the volume is minimal - only 3.5 MB.
Use your Mac to control another device
- Connect your devices to a shared Wi-Fi network.
- Sign in to iCloud on both devices using the same Apple ID.
- If you haven't already, turn on Virtual Controller on your Mac.
- Use the switch to navigate the main panel of the Virtual Controller feature. Select "Devices".
- Select the device you want to control, then select Connect. You can now use the switch connected to your Mac to control another device.
Play video remotely
Of course, this concept isn't limited to playing music from another room. Perhaps your computer is set up as a media center, playing content directly to your living room TV. Your kids are complaining about being bored to death.
Control devices should not be limited to USB only. If you want, you can take your tablet, connect to this PC and find a tutorial video. on YouTube for your kids to watch.
Here's what it looked like after I connected to my Linux box and launched the CNet YouTube channel in full screen.
A video started playing on the TV in the other room and my kids went from complaining about being bored to complaining about the boring things that were now playing on the TV screen.
Okay, maybe playing Spongebob Squarepants would be smarter. Either way, you get my point. Remote control. Run whatever you want. Done.
Transferring files to TeamViewer
To do this, you can click on the “File Transfer” menu button on the toolbar, and select “File Transfer” in the context menu. After this, the “File Transfer” window will open, divided into two windows. The left window contains files from the local computer, and the right window contains files from the remote computer.
To send a file or folder, you will need to select the required object on the computer from which the transfer will be made using the “Address” field. After selecting the object, you will need to click on the “Submit” button. First, on the receiving computer, using the “Address” field, you should select the location where the file or folder will be transferred.
You can also move files using File Storage. You can open the file storage window from the “file transfer” menu or from the side window of the program by clicking on the corresponding icon.
You will need to drag the file on the computer from where you will be moving files to the storage into the “File Storage” window.
You may also be interested in:
- Universal Viewer - universal file viewer
- Everything - instantly search files and folders
In this image you can see that the file has been placed in file storage on the remote computer (dark window). After moving, the file became available on the local computer (light window).
Recording video in TeamViewer
In order to record a video session, you need to enter the “Advanced” menu and go to the “Record” item in the context menu. Here you will find options for controlling video recording: “Start”, “Pause” and “Stop”.
Using these commands, you can record a video file that will display your actions in the window of a remote computer. After finishing recording, the video file will be saved in “.tvs” format. This file can be converted to the “.avi” format so that it can be viewed on any computer.
To do this, you need to enter the main program window, open the “Advanced” menu, and select “Play or convert a recorded session...” in the context menu. After this, the “Open” window will open, in which you should select a video file with the extension “.tvs”.
Next, on the top panel, click on the “Convert” button.
In the “Convert session recording” window that opens, click on the “Convert” button. If necessary, you can change the conversion settings before starting the video file conversion process. To do this, you will need to click on the “Configuration...” button, and then in the window that opens, change the settings.
Next, the video file will be converted to the “.avi” format.
After the conversion is complete, you can play the recorded video session using a regular player.