How to distribute Wi-Fi from a modem is a popular search query. There are several ways to do this, however, in any case, you must have a modem and a device with Wi-Fi connectivity.
This can be a laptop or personal computer, the main thing is that a network adapter is installed that allows wireless connections. The devices must be connected to each other and configured correctly. After this, you can distribute Wi-Fi to all home gadgets and use access to the global network.
Methods for organizing a home Wi-Fi network
If you have access to the global network using a mobile connection via a modem, the user has the opportunity to create a wireless network and share traffic with other participants. If desired, other gadgets that have access to Wi-Fi can connect to the network.
Important! In this case, the laptop or PC will act as a standard router.
To organize a home wireless network, the following equipment is required:
- Modem with the ability to access the global network via a mobile standard or wired connection;
- A personal computer with a network adapter or a laptop with access to a Wi-Fi network. If the device can catch Wi-Fi, then distribute it accordingly.
In the Windows operating system, version seven or older, there is the ability and special tools that allow the user to create a local wireless network. In addition, there is a large set of programs and applications that allow you to carry out similar actions.
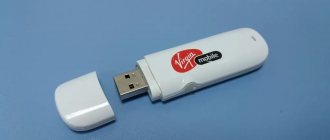
Can the modem distribute Wi-Fi? Yes, there are ready-made modems on the market with Wi-Fi distribution functionality. However, they are an order of magnitude more expensive than conventional analogues.
USB modem with Wi-Fi
If you have built-in Wi-Fi in your modem, everything is simple. Usually it is enough to insert this modem-flash drive into a computer or laptop. After which you will be asked to launch some application for installation (standard operators work through the application) or without it (for example, Iota can work immediately without installation). As a result, after the initial installation, Wi-Fi will be distributed on its own.
To set the settings for access, you need to clarify your model and go to the corresponding article on setting up your particular modem. There are many of them, the interfaces are different, it is impossible to show everything in one article. So use our search.
Settings
Before using the presented scheme, certain settings are required. If you use standard Windows operating system tools, you need to complete the following steps:
- Create and connect a network;
- Give it access to other home gadgets.
Review and configuration of the D-Link Dir-320 modem
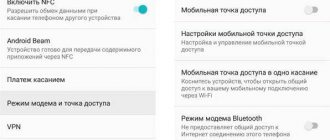
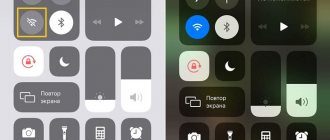
You can activate traffic distribution using the network using a set of actions on the command line. You can open access to other users in the operating system control panel. Windows 10 has a special function that allows you to simplify the method. It's called a mobile hotspot.
Note! Before starting any settings and installations, you need to log in to the Internet. To check, you can open any website in a browser.
Creating a Wireless Network
To organize a connection and gain access to it from other home devices, it is necessary to carry out preparatory steps. However, after them the network will not be active, since then a second stage of settings will be required. To create a network you need to do:
- Open command line. It is important to do this on behalf of the system administrator;
- In the window that opens, you need to enter and execute the following command: netsh wlan set hostednetwork mode=allow ssid= N key=K keyUsage=persistent. In this case, the letter N denotes the name of the connection. The letter K represents the access password, which must contain at least eight characters;
- Create a connection by entering a command.
When all the presented actions have been completed, you must enter another command. It is responsible for starting the network and looks like this - netsh wlan start hostednetwork. As a result, the user should receive a response indicating that the process completed correctly. After this, you can start the second setting item.
If an error message appears, you need to check the activity of the Wi-Fi mode. To do this, you need to open the list of available networks, so the required connection must be present. To do this, click on the Wi-Fi icon in the lower right corner.
Note! The command may also not be executed if the laptop's network module drivers are outdated, then they will need to be updated.
Access activation
When the first stage is completed, an internal local network will be created on the laptop or PC. However, other than connecting to it, it will be impossible to perform any further actions. This is due to the fact that the connection itself does not have access to the Internet. To gain access, the user must do the following:
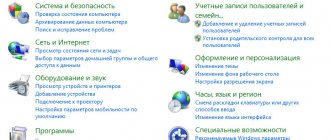
- Open the Start menu if Windows 7 is installed or the search bar in older versions.
- Open the operating system control panel.
- You need to go to the “Network and Sharing Center” tab.
- On the left side of the window that opens there will be a line “Change adapter settings”, which you should click on.
- Open the “Changing adapter settings” section.
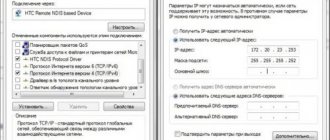
- The system will show a list of connections available for connection. In this case, the user needs to receive two: the first - with the name that was entered when entering the command described above. The second should be named after the name of the personal service provider. The second network is accessible via a modem; click on it and select “Properties”.
- The “Access” block will open, in which you need to mark the ability of other networks to use Internet access. Then indicate the created connection for which the Internet will become available. After this you need to click “OK”.
Note! There may be a system warning that changes will take effect after reconnecting.
In this case, you will need to disconnect and reconnect. After this, you can connect to the created wireless network and access the Internet.
Especially for Windows 10
If the device has an operating system in version 10, then the user has the opportunity to simplify his task. To do this you need to do the following:
- Open "Options";
- Click on the “Network and Internet” section;
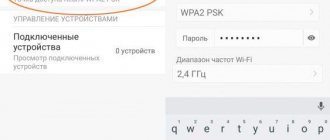
- In it, find “Mobile hotspot”, in which you need to allow data distribution;
- If necessary, in this section you can set a password and name;
- Activate data transfer.
Virtual Router Plus
It is a small program, which at the same time has very wide capabilities. It allows you to distribute the Internet using Wi-Fi on any device. There is no need for a router.
The program independently creates a virtual connection in which all gadgets gain access to the Internet as with a standard router.
To use you need to do the following:
- The first step is to launch the program.
- Then specify the name and password for the connection and the name of the connection from which the Internet will be distributed. Click on the “Start Virtual Router Plus” button. If everything is done correctly, the program window will be minimized.
- To stop Internet distribution, click on Stop Virtual Router Plus.
Note! As you can see, using the program is very simple and convenient.
ADSL modem
With ADSL modems and Wi-Fi distribution through them, everything is more complicated. Here you can’t get by by simply inserting them into a USB port; they really need to be configured. But it will be difficult to describe here how to configure a specific version of the modem. It’s easier to enter your model into our search, most likely you will end up with an article on detailed configuration. There you will learn everything in text, pictures, videos. In general, that’s not what this article is about.
I hope that everything worked out for you, and now the Internet is distributed wherever you need it. Both from a computer and from a laptop to a phone. Use it, write comments, always stay connected to Wi-Fi!
End of the giveaway
What are the differences between 3G and 4G networks: features, advantages and disadvantages
When you no longer need to use Wi-Fi, you can close it. This is done quite simply; you can enter the necessary command in the administrator command line - netsh wlan stop hostednetwork. You can reconnect the connection at any time; you can follow the steps already described. To change the password, you will need to enter the command netsh wlan set hostednetwork mode=allow ssid= N key=K keyUsage=persistent, where instead of “K” enter the new value.
Afterword
The idea is that in the same way, instead of a router, you can transfer the Internet to another computer by connecting them with a network cable. Only on another computer, in the properties of the local network connection, set it to automatically obtain IP and DNS. I haven't tested it, but it should work.
You need to understand that this method may not work with all modems and connections. Since there are a lot of different modems, operators, settings and other things, it is possible that some problems will arise during the setup process.
In my case everything worked. I hope you were able to set everything up just as well. You can ask questions and share tips in the comments.
Other programs
Activation and necessary configuration can be carried out by installing special utilities.
Switch Virtual Router
Applications for controlling Wi-Fi networks and monitoring traffic on Androdi
After downloading and installing this utility, you need to do this:
- Click on the gear in the lower corner.
- This means opening the network settings. You must enter the name of the wireless network and password. You don't have to touch other parameters.
- Return to the main page and click on “Start”. This will start distributing traffic.
- To stop, you can click on “Stop”. In addition, the main window always displays connected devices.
VRP
A universal program with which you can distribute data without unnecessary settings. You just need to download the application, launch it and enter the connection name and password. After confirmation, the new connection is activated.
Note! After enabling distribution, you must activate network access to be able to receive and transmit traffic.
In this case, in the lower corner there will be a network status icon, with which you can find out whether the connection is working.
Via router
As an example, we will use a modern inexpensive TP-Link device.
First, connect the source cable from your provider to the “WAN” or “Internet” socket.
Connect one end of the network cable to any free Ethernet port. Connect the other end to the computer's network card to create a connection and initial setup.
Open your browser and go to the address on the back of your router.
Enter login and password.
In the “Network” tab, go to “Internet”. Make sure that you automatically received an IP address from your provider or enter the data manually (they are indicated in the contract).
In the “Wireless Mode” tab, open the settings. Come up with a name for the Wi-Fi network and set a password for authorization.
Save the changes and reboot the device.
Connect to the new network and you should have Internet access.
More detailed information on setting up a router can be found in the article “How to set up a router”.