A Windows license is relatively expensive. When you are about to change your computer, for one reason or another, to another. You may be wondering how to properly transfer your Windows license?
Let's start with the fact that not every license can be transferred from one computer to another.
If you purchased a laptop or computer with a pre-installed version of Windows, then this license is called OEM.
OEM (Original Equipment Manufacturer) original manufacturer license - a license that comes with the equipment and cannot be transferred to other equipment.
You can only transfer the Retail license - also known as FPP (Full Product Package), or the boxed version. A license that was purchased separately from the equipment with the ability to install on any laptop or computer.
But keep in mind that even the Retail license must be installed on only one machine at a time.
Before activating it on another computer or laptop, you must deactivate it on the previous one. If it has already been installed.
What are the types of licenses for Windows 10?
There are two options for licensing schemes: a pre-installed OEM version and Retail (ESD or boxed version) - a version for binding not to PC components, but to an account.
OEM key is bought for pure iron. It is tied to the motherboard. It can be transferred to another device if it is confirmed that the old computer has failed and the motherboard remains the same. A Retail license (box or ESD) is purchased by users for self-installation on a PC. The key comes in two formats - digital or boxed. Both options allow you to transfer the system from one computer to another, provided that the OS on the first PC is deactivated.
Before transferring, it is important to check the version of the OS you are using. If you try to activate the Windows 10 Home Pro version with a key, the system will display a message about the key being invalid. However, the opposite effect is possible - you can use the key from the “Professional” version to install it on the “Home” version. In this case, the system will automatically update to a “higher” edition.
The same problem occurs when entering a key from Win7 or Win8. However, in this case it is possible to start the system correctly. To do this, go to “Settings” – “Activate Windows” and enter the code manually.
You can find the product key information as follows. Find the ShowKeyPlus program on the Internet. Download, install and run it. The program will display the product key.
Preliminary information
Now let's proceed directly to transferring Windows 10 to another computer. The first step is to create a backup copy of the system and reset the hardware parameters, since the target terminal may have completely different components, and it is highly undesirable to clutter the hard drive with unnecessary installed drivers.
Before using this tool, it is strongly recommended to create a restore point using the computer properties and system protection section, and also completely disable the standard antivirus and, if possible, the firewall.
What do you need to know before migrating Windows 10?
You cannot transfer the key without deactivating it on your old PC. If this is not done, then the system may work properly at first. But after a few days it will issue a warning about the need to update the “top ten”, and then it will simply stop functioning.
We offer a way to transfer the OS to another machine for those ESD keys that have already been activated. The new “ten” is activated differently. You can buy licensed Windows 10 and find out the details of its first installation from the managers of the SoftMonster online store.
Creating a system backup without being tied to hardware
The next step in transferring Windows 10 to another computer will be the usual creation of a copy of a working system, as is already clear, with all installed applications. It goes without saying that you can save it on the same bootable media, but you should especially pay attention to the required amount of free space.
To create a copy, we will use the same “Backupper”, selecting the backup section in the archiving section. Please immediately note that the previously created partition with a capacity of about 500 MB will be marked as reserved by the system, and the new system partition will be shown as drive “D”. We select it in the first step, and in the second step we specify an external non-system drive, after which we press the button to start the archiving process. Again, in order not to waste time, you can immediately check the box to turn off the PC after copying is complete. When the computer turns off, the flash drive or removable external USB hard drive can be disconnected and connected to the computer on which the system is supposed to be deployed.
How to deactivate the OS and clear the key from the registry?
An urgent question for those who are going to sell old hardware with a previously installed licensed Windows 10. By deactivating the PC and clearing the key data, you protect the purchased product from unauthorized use by the new owners of the computer. Be sure to save your license number so you can enter it on your new machine.
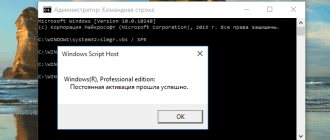
- In the search bar (the magnifying glass icon next to the Start button), type cmd. In the menu that appears, select “Run as administrator”.
- The “Administrator: Command Prompt” window will open in front of you. Type slmgr.vbs /upk and reboot the system. This will deactivate the operating system on the old PC.
- The command slmgr.vbs /cpky on the same line will clear the key from the registry. If the process completed correctly, the system will display the message: “The product key was successfully deleted.”
As a result, you will receive a working computer, but without a licensed “top ten”. Your access to some functions will be limited: personal settings, desktop personalization, etc. will be lost. However, you can continue to use the device.
Resetting hardware parameters
The flash drive from which you can boot on the target PC has been created. Now it's time to use the Sysprep utility.
You can run it through the “Run” console by entering the command of the same name in the program selection field and specifying the same system preparation file in the automatically opened “Explorer” window. Now, after it starts, the OOBE preliminary settings window will appear. Here it is important to pay attention to the preparation for use point. If you do not need to touch the activation, it is not marked (the Windows 10 profile will be transferred to another computer while maintaining the license). To reset activation, you need to tick it. It is better to set shutdown as the final action after performing the reset.
How to activate licensed Windows 10 on another computer?
In the same command line, opened as administrator, enter slmgr.vbs /ipk and the key number. That's it, you can use the OS on the new machine.
Microsoft ensures that customers do not use operating systems on two or more PCs. There is no legal way to transfer a licensed “top ten” to a new car while leaving it on the old one. If you want to leave the system on your previous PC, you will have to purchase a different key for the new one. Contact SoftMonster online store employees by phone or online chat to buy an official Windows key and use all the features of the operating system.
Find out the activation key
We have decided on the license version. But what if the activation key is lost?
Let's find out the key of the installed license on your computer.
First way
The method I described earlier in this article. It consists in using a script offered by Microsoft, this script is acceptable for Windows XP, Vista, 7, 8, 8.1 Preview.
Second way
This method is the easiest. I think many will be surprised that the program below provides such information about your Windows.
This is the way to use the Aida 64 program, any version is enough. You can have a trial or portable version.
Download the program, for example from the developer’s website aida64.com
I chose the portable version for windows.
After downloading, unpack the resulting archive and launch the program itself.
You can download the installer and install the program, there is no difference.
During launch, we will be warned that this is a trial version of the program and after this period we must purchase or delete it.
In the program window that opens, select Operating System on the left and on the right we can find our license activation key.
We save it electronically, take a photo or write it down, as you wish.
Upon completion of use, delete the Aida64 program so as not to violate the license agreement.
How to activate Win 10 when replacing PC components?
Working with an OEM key has its own nuances. This license type is tied to key PC components: the motherboard, CPU, and TRM. Replacing these parts without resetting the activation is only possible when the equipment used is completely out of order.
In this case, use Troubleshooter - an activation troubleshooter. If problems arise with the operation of the system, it appears automatically in the corresponding “Activation” section. If you took care of having a Microsoft account before problems occurred, then there will be no problems with recovery.
- Follow the path “Settings” – “Update” – “Activation” and launch the troubleshooter.
- In the blue window, click on the inscription “The hardware components on this device have recently changed.”
- The OS will perform diagnostics and automatically activate the license.
If the system detects an error or suspects the user of license abuse, contact Microsoft technical support.
What software will be required?
We've sorted out the main course of action. But you will have to use some software! Which one exactly? In principle, the Sysprep system utility built into Windows will be sufficient (it is needed in order to remove the “binding” to the hardware resources of the source PC and reset activation, if necessary) and some program for working with images (preferably having the ability to create bootable media). For ease of operation, the second utility will be the well-known AOMEI Backupper application.
Deactivate on an old PC instead of purchasing a new license
Windows licenses are expensive. An official product key from Microsoft costs between $100 and $200 and costs about the same as a 1TB SSD, 16GB of RAM, or a motherboard. And it's not a good idea to buy cheap keys for unfamiliar sites. So paying for another license when you want to decommission your old computer in favor of a new one is not the best option. The good news is that you can deactivate a PC you no longer intend to use and then transfer that license to a new computer.
The slmgr command makes this quite simple, but you should be aware of a few limitations. This will not work for OEM keys that came with the computer you bought at the store. Manufacturers embed these keys into the hardware on which they were created, and transferring them to new devices does not work. And while slmgr can deactivate any retail key (a key that you purchased separately), it will only activate the key that matches the operating system you have installed.
Windows 7 and 8 keys will still activate Windows 10, but only through the standard activation process and not through slmgr. If you enter the "Pro" key when installing "Home", then this will also fail with slmgr. To make things as easy as possible, transfer your Windows 10 Home key to your Windows 10 Home device and your Windows 10 Pro key to your Windows 10 Pro device. Otherwise, you will have to take some additional steps.
Sysprep is a standard utility for adapting Windows to new hardware.
Sysprep is a native Windows deployment tool, a utility primarily aimed at OEMs and enterprise IT professionals. Used to prepare branded and, accordingly, corporate builds of Windows. OEM assemblers and IT specialists prepare a reference image of Windows on a computer or virtual machine: updates are introduced into the system installed from the official distribution.
As well as corporate, branded or partner software, they remove or disable the functionality built into the system, and carry out the necessary system settings. Then the already configured system is untied from the components of the computer device on which the work was carried out, and identifying data is removed. And finally, they package all this into an image for deployment on the end devices of users or company employees. This can be either an installation ISO file or a backup copy. In this chain of actions, Sysprep plays the role of a mechanism for decoupling from hardware and identifying data. In what cases this utility may be useful to the average user, how it works, what limitations it has, and how to deal with them - more on that below.
The content of the article:
What is Sysprep?
The Sysprep utility removes component drivers, resets the SID, clears the system event log and Temp folders, resets activation (up to three times), and destroys restore points. In general, it makes sure that when we start again, we get a clean operating system, only with certain presets.
Areas of use
Creating reference images of modified Windows builds for deployment on multiple client computers is the main task of Sysprep. But the utility can also be used by ordinary users on their home devices. You can resort to its help in case of unstable operation of Windows after replacing components. Better yet, apply it before changing these components.
Sysprep is also a tool with which you can transfer your working system to another computer device with excellent components. Professional-level backup software for such cases provides functions such as Universal Restore , Adaptive Restore , etc. These functions essentially do the same thing as Sysprep, only during the recovery phase. Thanks to this, you can turn any old Windows backup into a reference image. But these kinds of features are rarely found on board free backups. For example, they are included in initially paid software from Acronis and Paragon , and are also supplied only in paid editions of software from AOMEI and EaseUS . If Windows is separated from its components using Sysprep, it can be transferred to another computer using bootable media from free backups, for example, from the same developers AOMEI and EaseUS.
Launching the utility
The easiest way to launch Sysprep is with the Win+R command.
Thus, in Explorer we will have direct access to its launch file.
Decoupling from components
To unlink Windows from current components before replacing them or creating a backup of the system for transfer to another device, use “Go to OOBE window” and select shutdown .
In this situation, the utility will only reset the component drivers. If you check the “Preparation for use” , a number of measures will be taken to transfer the system to a new user - cleaning the system log and temporary files, deleting recovery points, resetting the SID, resetting activation, etc.
The utility will do its job and the computer will turn off. Then you can proceed to certain actions - change components, backup the system from bootable media. With the new switch on - both on the original device and on the one where the system was transferred using a restore from a backup - we will first see how drivers are installed for new components, and then we will get to the OOBE window. OOBE window is nothing more than the system welcome screen, which we usually see at the final stage of Windows installation, where you need to specify regional data and create your account.
And since there is no need to create a new account when replacing components or restoring Windows on other computers, we can safely reset this process using the Ctrl+Shift+F3 keys. These are the keys to log into the hidden administrator account. The system will try to load it, but will deny access. Click "Ok" .
And after the restart we will see the usual lock screen with all existing accounts.
Audit mode
Audit mode provides the ability to access the Windows environment without creating a specific user account, in the mode of the mentioned administrator account.
In this mode, in fact, OEM manufacturers and IT specialists of companies configure a reference image of the system with the necessary drivers, parameters and installed software. The initial entry into audit mode is performed during the installation of Windows - the one that should subsequently become the reference image, and on which no user accounts and identifying data should exist. After the device preparation stage, we will get to the final stage of system installation, starting with setting regional settings. And here we press the keys Ctrl+Shift+F3.
After the reboot we will be in audit mode. The latter boots with the Sysprep window running by default for convenience. In fact, in this mode you can start modifying Windows. If in the process of making changes to the system, for example, when installing certain software, a reboot is required, all you need to do is close the utility window. And reboot as usual. After rebooting, the system will start again in audit mode. Work in this mode is completed in the same way as was discussed in the previous paragraph of the article - by selecting the OOBE screen in the Sysprep window. And usually using the preparation for use option.
A reference modified Windows is usually made from a clean, newly installed system. But it is possible to create a standard based on the established system. To do this, inside working Windows you need to run Sysprep and select in its window to switch to audit mode . The final option is reboot .
By entering the audit mode, we can delete the accounts of those users who have previously worked with the system, configure what is needed, and then unlink from the components (and, if necessary, identifying data) and go to the OOBE window.
But not every working system will be able to create a reference image. This mechanism has its limitations.
Solving problems running Sysprep
Sysprep, alas, will not work if Windows was not installed completely, but updated from a previous version, cloned or restored from a backup created on another hardware. In such cases, when you launch the utility, you will usually receive a notification like this.
In this case, you can do something, although without guaranteed success in all 100% of cases.
We create a backup of the system or at least stock up on a restore point, since we will continue to work with the system registry.
Let's launch it.
Let's reveal the path:
HKEY_LOCAL_MACHINE\SYSTEM\Setup
If the system was updated from a previous version, first of all, in the “Setup” , delete the “Upgrade” .
Then open the “Setup” , click on the “Status” , here we need the “CleanupState” . Set its value to 7 .
If there is no such parameter, create it. In the context menu of the registry window, click “Create” , then “DWORD value (32 bits)” .
Let's name the parameter "CleanupState" .
Set its value to 7 . After the reboot, we try to run Sysprep again.
What should you consider when working with a new hard drive?
At the previous stage, special attention must also be paid to the hard drive itself, which will be used as the target drive. For example, if you just bought it and there is no marking on it at all, first on a working computer the disk must be initialized and formatted, using at least the operating system’s own tools in the form of a disk management utility (diskmgmt.msc) or third-party programs like that the same Partition Assistant applications from AOMEI or similar tools from Acronis.