What is cache and memory, why clear them?
Data from running applications is placed in the cache for faster work with them. That is, the application, having downloaded this data once, can retrieve it from the cache much faster than downloading it again. True, due to poor performance of the application with the cache or simply various types of failures, sometimes situations arise when the cache becomes full and is not cleared automatically.
Every app takes up memory on your phone
Phone memory is the amount of information that your phone can store on a permanent basis. Literally everything you save on your phone requires memory: contacts, messages, installed applications, and so on.
Remove unnecessary photos
The second most important “space eater” on the iPhone is photos. A dozen or a hundred pictures won’t have a big impact on free space, but many people have thousands of pictures stored in their library over the years of working with iOS, many of which are absolutely unnecessary.
There are screenshots that have lost their relevance, unsuccessful photos that they forgot to delete, duplicates or similar photographs, series in which there are 1-2 successful pictures and a dozen more blurry or defective frames.
Manually clearing a large media library is almost impossible. Special applications will help us here:
We have already talked in detail about the operation of these applications; you need to select the appropriate one and delete unnecessary photos. Don't forget to clear the Recently Deleted album in the Photos app afterwards.
Cleaning options on iPhone
Internet browsers use cache the most. They store data about the pages visited in order to open them much faster and this takes up a lot of space. But besides browsers, other applications also use cache. Literally every application installed on your iPhone needs its own cache space - at least to store information about updates. Therefore, the more applications you have installed on your device, the faster the cache will fill with information and the greater the need to clear it manually, rather than relying on automatic data monitoring from installed applications. It is likely that this will be enough to increase the stability and speed of its operation and you will not have to delete data and installed applications directly from the device’s memory.
Using standard applications
Let's figure out how to clear the cache in stock applications using the Safari browser as an example:
- Go to your iPhone's settings.
- Scroll down. Find Safari and select it.
Find Safari and select it
Click "Clear history and website data"
In a similar way, you can clear cached data from any stock apps on your iPhone. Do this if you suspect that the cache is full or specific applications have started to run too slowly.
In established
Regardless of the version of your device, not all programs can clear the cache directly through the iPhone settings.
Let's look at some cache clearing apps:
Battery Doctor
Once you have downloaded and installed Battery Doctor, do the following:
- Click on the icon on your desktop to launch the application.
- In the Junk tab, click the big Clean Up Cache button.
Click the Clean Up Cash button
Select an app to clear your cache
There is no need to clear the cache this way too often. The iPhone does a good job of this task automatically, so until the cache is really full, you don't have to worry about clearing it using special apps.
PhoneClean
The current app differs from the previous one in that it is not installed on your iPhone, rather than the Windows or Mac OS device you connect the iPhone to.
The program's operation is almost completely automated. Do the following:
- Connect your iPhone to a device with Phone Clean installed.
- Determine what exactly you want to clean. For example, App Cache to clear the cache.
- Click Start Scan.
Select the one you need and click Start Scan
Clearing cache on iPhone and iPad (video)
How to clear cache on iPhone or iPad
Cache is temporary application data that gradually accumulates on the device and can take up a really large amount of space. Clearing the cache is relevant not only for smartphones, but also for tablet devices and PCs. Often, deleting this data can eliminate software glitches and make the software run faster.
Deleting the cache on an iPhone is available both using built-in tools and third-party utilities. The manufacturer recommends using native applications.
To clear the cache on your device, you need to go to Settings, find applications and delete the accumulated data for each of them manually. For example, you can easily free up some memory by optimizing the Safari browser:
- go to “Settings” and click on the application icon;
- On the next page, click “Clear history and website data.”
This method applies to each application and may seem too long, but this way the user does not have to worry about deleting something they need, as often happens with third-party tools.
Removing an application from the device memory
There are several ways to completely erase applications to free up memory on your device. And although this can be done with the programs given above in this article, to simply remove the application, the methods that the iPhone itself offers are sufficient.
Be sure to keep in mind that when you delete an application, all saved data for that application is also deleted. You may lose important contacts or game progress. Be careful!
For the easiest way to remove an application, do the following:
- Tap on any app icon and hold your finger on it for a few seconds.
- All applications that can be deleted will have a cross in the upper left corner. Click on it to delete it.
Click on the cross to remove applications
Via iTunes.
To remove applications via iTunes, do the following:
- Connect your device and with iTunes running, select the iPhone tab.
Select the iPhone tab
Installed applications will be on the right
Click on the cross to remove the application
Be sure to click "Sync iPhone"
After the data is synchronized, the application will be deleted and the memory on your device will be freed.
Through settings
You can also delete applications through the iPhone settings. This is done as follows:
- Open settings and go to the General menu.
Go to the “Basic” menu
Select the item “Statistics”
Select the application you want to remove
Click "Uninstall a program"
Open the "Restrictions" section
Click on the "Turn off restrictions" button
Clearing memory on iPhone (video)
Disable iCloud Drive
The iCloud Drive feature, which appeared in the next iOS upgrade, provides the ability to store and synchronize data from almost any application via the cloud. Of course it's convenient. But virtual storage stores all your correspondence in instant messengers, downloaded content, and much more. etc., which in principle is not particularly necessary. Therefore, experienced users recommend disabling iCloud Drive. For this:
- Again, go to “Settings”.
- Select Apple ID.
- Find the “iCloud” item and move the special switch to the right.
If you don't want to disable iCloud Drive completely, you can simply mark those applications that should not store their data in the cloud.
That's all! Now you know how to clean out iCloud storage, and that you can do it in different ways. Try it and you will succeed!
Watch this video on YouTube
How to clear application RAM
If your device begins to slow down during active operation, it may also be due to a lack of RAM.
The applications suggested above in this article can also help clear RAM. For example, the Memory Boost option in the Battery Doctor app does just that. But there is a way to clear RAM without installing third-party applications on your device. For this:
- Unlock your iPhone.
- Press and hold your device's power button until "Power Off" appears on the screen.
- Next, hold down the Home button until yours returns to the previous screen.
- Done, RAM is cleared.
There is no need to do this procedure all the time, but if you notice that applications are starting to perform worse, do it. Cleaning RAM is especially important when surfing the Internet.
Download unused software
You can temporarily erase software that you haven't used recently. This is a built-in iOS feature that removes the application's distribution but leaves all user data associated with it in memory. In this case, a shortcut to download the program remains on the home screen.
How to do this: open “Settings”, go to the “iTunes Store and App Store” section, and turn on the “Download unused” switch.
Tips for clearing iPhone memory
Finally, let's look at several effective ways to quickly free up memory on your iPhone. Almost all of them relate to one or another specific stock application, which the user often does not pay attention to when clearing memory.
- The popular Photo Stream service is necessary for synchronizing your photos between devices. However, if you don’t have enough memory, it’s better to turn it off, especially if you really have a lot of photos. This is done in the iCloud menu, “Photos” section.
After using the device for a long time, you may notice that it begins to perform worse. Applications take longer to open or requests to process. This is a sure sign that the iPhone may need to clear the program cache, remove garbage, unnecessary documents and data, or simply free up memory on the phone itself.
Upload photos and videos to the cloud
If you don’t want to compress the video, and there are no duplicates, unnecessary screenshots or bad frames among your photos, then you can free up space by uploading content to the cloud.
Use the standard iCloud cloud (Settings - Photos - Photos in iCloud), but in this case you will definitely have to buy additional free space, because the initial 5 GB of storage is clearly not enough.
On the one hand, the Apple service fits perfectly into the ecosystem of gadgets, is present on all user devices and allows you to free up space on your smartphone without much setup.
On the other hand, you will have to pay a monthly subscription fee for iCloud, work with crutches on other platforms (Windows and Android) and endure service bugs in the form of periodically unloading original photos or phantom files that wander around devices after being deleted on one of them.
You can choose a third-party cloud with more favorable rates or a larger base storage capacity, or even create your own cloud storage.
When you first launch the client, you can download the entire gallery with one click and free up several gigabytes on your iPhone. After this, it is enough to launch the service client once every week or two and download all the photos and then delete them from the smartphone.
What is cache and memory, why clear them?
Data from running applications is placed in the cache for faster work with them. That is, the application, having downloaded this data once, can retrieve it from the cache much faster than downloading it again. True, due to poor performance of the application with the cache or simply various types of failures, sometimes situations arise when the cache becomes full and is not cleared automatically.
Every app takes up memory on your phone
Phone memory is the amount of information that your phone can store on a permanent basis. Literally everything you save on your phone requires memory: contacts, messages, installed applications, and so on.
Cleaning options on iPhone
Internet browsers use cache the most. They store data about the pages visited in order to open them much faster and this takes up a lot of space. But besides browsers, other applications also use cache. Literally every application installed on your iPhone needs its own cache space - at least to store information about updates. Therefore, the more applications you have installed on your device, the faster the cache will fill with information and the greater the need to clear it manually, rather than relying on automatic data monitoring from installed applications. It is likely that this will be enough to increase the stability and speed of its operation and you will not have to delete data and installed applications directly from the device’s memory.
Using standard applications
Let's figure out how to clear the cache in stock applications using the Safari browser as an example:
- Go to your iPhone's settings.
- Scroll down. Find Safari and select it.
Find Safari and select it
Click "Clear history and website data"
In a similar way, you can clear cached data from any stock apps on your iPhone. Do this if you suspect that the cache is full or specific applications have started to run too slowly.
In established
Regardless of the version of your device, not all programs can clear the cache directly through the iPhone settings.
Let's look at some cache clearing apps:
Battery Doctor
Once you have downloaded and installed Battery Doctor, do the following:
- Click on the icon on your desktop to launch the application.
- In the Junk tab, click the big Clean Up Cache button.
Click the Clean Up Cash button
Select an app to clear your cache
There is no need to clear the cache this way too often. The iPhone does a good job of this task automatically, so until the cache is really full, you don't have to worry about clearing it using special apps.
PhoneClean
The current app differs from the previous one in that it is not installed on your iPhone, rather than the Windows or Mac OS device you connect the iPhone to.
The program's operation is almost completely automated. Do the following:
- Connect your iPhone to a device with Phone Clean installed.
- Determine what exactly you want to clean. For example, App Cache to clear the cache.
- Click Start Scan.
Select the one you need and click Start Scan
Clearing cache on iPhone and iPad (video)
Steps
Method 1 of 7:
Delete browser history and cache
- 1
Click on “Settings” and select “Safari.”
- 2
Select “Clear History” to delete cookies and your browser history.
Your iPhone will delete all data in the Other folder that relates to your browser, which may even have a positive effect on its speed.
Method 2 of 7:
Deleting old messages
- 1 Go to Settings - Messages.
- 2
Scroll to Message History and select “Leave Messages.”
Here you can delete messages that are more than 30 days or 1 year old. This will automatically delete all old messages.
Method 3 of 7:
Deleting individual messages
- 1
Click on the “Messages” icon.
- 2
Click on the “Edit” button at the top of the “Messages” screen.
- 3
Select all message threads you want to delete.
- 4
Click on the “Delete” button.
- 5
Repeat this procedure for each chain you want to delete.
All your messages, including media, will be erased from the device.
Method 4 of 7:
Removing and reinstalling email
- 1
Click on “Settings” and select “Mail, Contacts, Calendars”.”
- 2
Select the email account you want to delete.
- 3
Scroll to the bottom of the email setup screen and select “Delete account.””
The account you selected is now removed from your device.
- 4
Go back to Settings and select Mail, Contacts, Calendars.”
- 5
Click on “Add account.””
- 6
Follow the prompts to set up your account.
Enter your email address and password.
- 7
Repeat the process above for each email account on your iPhone.
All data in the Other folder associated with email accounts will be deleted from your device X Source
.
Method 5 of 7:
Uninstalling and reinstalling applications
- 1
Click on “Settings” and select “General.””
- 2
Click on the “Used” button.”
- 3
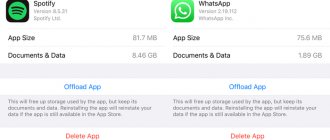
Look through the list of apps installed on your device to find the ones that take up the most space.
- 4
Click on one of the largest applications and compare the application size with the size indicated in “Documents and data.”
If the size in the Documents and Data column is much larger than the size of the application itself, you can uninstall and reinstall that particular application to free up space.
- 5
Click “Delete App” to remove the app from your device.
- 6
Repeat the procedure for each application whose “Documents and Data” takes up a lot of space.
- 7
Visit the iTunes App Store after deleting the apps and download and install the ones you need on your iPhone.
Method 6 of 7:
Deleting voice notes
- 1
Open the “Voice Memos” app on your iPhone.
- 2
Select the voice note you want to delete.
- 3
Click on the red “Delete” button.
- 4
Repeat the process for each voice memo you no longer need to free up space on your device X Source
.
Method 7 of 7:
Performing a system restore and backup
- 1
Open iTunes on your computer.
- 2
Turn off your iPhone.
- 3
Using a USB cable, connect your iPhone to your computer while holding down the Home button on your iPhone.
- 4
Continue pressing the Home button until iTunes tells you that your device has been detected in System Recovery mode.
- 5
Click on the button in iTunes that says “Restore.”
All data associated with the “Other” category will be erased from your device, while the system will be restored to a previous state based on the date the data was last backed up in iTunes.
- Please note that some cleaning apps are third-party apps and are not affiliated with or supported by Apple. You must ensure that you download apps from trusted sites and sources to avoid downloading corrupted or malicious apps to your iPhone or computer.
- Performing a system restore and backup will remove all personal data and settings from the iPhone. Make sure you have all your iPhone backups in iTunes so you don't lose any personal data while performing a system restore.
Removing an application from the device memory
There are several ways to completely erase applications to free up memory on your device. And although this can be done with the programs given above in this article, to simply remove the application, the methods that the iPhone itself offers are sufficient.
Be sure to keep in mind that when you delete an application, all saved data for that application is also deleted. You may lose important contacts or game progress. Be careful!
For the easiest way to remove an application, do the following:
- Tap on any app icon and hold your finger on it for a few seconds.
- All applications that can be deleted will have a cross in the upper left corner. Click on it to delete it.
Click on the cross to remove applications
Via iTunes.
To remove applications via iTunes, do the following:
- Connect your device and with iTunes running, select the iPhone tab.
Select the iPhone tab
Installed applications will be on the right
Click on the cross to remove the application
Be sure to click "Sync iPhone"
After the data is synchronized, the application will be deleted and the memory on your device will be freed.
Through settings
You can also delete applications through the iPhone settings. This is done as follows:
- Open settings and go to the General menu.
Go to the “Basic” menu
Select the item “Statistics”
Select the application you want to remove
Click "Uninstall a program"
Open the "Restrictions" section
Click on the "Turn off restrictions" button
Clearing memory on iPhone (video)
Delete downloaded music
Music lovers are constantly trying to protect themselves in case they end up offline. They download their favorite playlists, albums or tracks directly to the device. As a result, after a couple of months, it is musical compositions that begin to take up a lot of space on the smartphone.
First, disable automatic downloading of tracks to your iPhone that are added to your library. You can do it like this.
Then clean out your library of old songs and music that you rarely listen to. You can find such compositions using special automation commands.
Well, the most radical solution would be to go to Settings - General - iPhone Storage - Music and delete all music downloaded to your smartphone.
How to clear application RAM
If your device begins to slow down during active operation, it may also be due to a lack of RAM.
The applications suggested above in this article can also help clear RAM. For example, the Memory Boost option in the Battery Doctor app does just that. But there is a way to clear RAM without installing third-party applications on your device. For this:
- Unlock your iPhone.
- Press and hold your device's power button until "Power Off" appears on the screen.
- Next, hold down the Home button until yours returns to the previous screen.
- Done, RAM is cleared.
There is no need to do this procedure all the time, but if you notice that applications are starting to perform worse, do it. Cleaning RAM is especially important when surfing the Internet.
How to determine how much free space is left in storage
Before clearing the memory, the user should check how much memory is available to him in the “Cloud” on the iPhone. This can be done according to this scheme:
- the client logs into the cell phone settings;
- then select “Basic” from the list;
- from the list, click on the “iPhone storage” section;
- a scale will appear on the screen, it shows the amount of free memory on the smartphone;
- here you can also see how much space programs, photos and videos take up;
- It is possible to view data in the “Other” section.
Please note If the scale shows that the smartphone’s memory is more than half full, with most of it occupied by “Other” data, you need to delete unnecessary parameters from the smartphone.
Tips for clearing iPhone memory
Finally, let's look at several effective ways to quickly free up memory on your iPhone. Almost all of them relate to one or another specific stock application, which the user often does not pay attention to when clearing memory.
- The popular Photo Stream service is necessary for synchronizing your photos between devices. However, if you don’t have enough memory, it’s better to turn it off, especially if you really have a lot of photos. This is done in the iCloud menu, “Photos” section.
How to clear cache and delete “Other” on iPhone and iPad.
Over time, iPhones and iPads begin to work slower, and their built-in memory becomes clogged with all sorts of junk. This is a known fact that users of Apple devices are not happy with, but they have to put up with it. Or you can fight, for example, clear the iPhone and iPad cache, deleting which allows you to speed up work and free up valuable memory space. This instruction showed you how to clear the cache and “Other” on iPhone and iPad. We have collected only proven and effective methods.
How to effectively clear cache on iPhone and iPad without data loss
Let's start with the most optimal and effective way to clear the cache on iPhone and iPad using iTunes. This method does not delete the entire cache, but only removes the actual “garbage”. For example, after using this method, attachments in Viber or WhatsApp will not be deleted, since iTunes does not consider them “garbage”. However, there will still be a lot of free space on the device.
- What is being removed? It is the “harmful cache” that is removed from the iPhone or iPad – “garbage” that is not needed in the system.
- How long does cleaning take? From 10 to 30 minutes depending on the number of installed applications.
- Will anything important be deleted? No, all content on iPhone and iPad will remain intact.
- Will I need to enter passwords in applications? No, after restoration you will immediately be able to use any applications without having to log in.
- How much space is available? From 1 to 4 GB.
Step 1. Connect your iPhone or iPad to your computer, launch iTunes and select your mobile device from the main screen of the program.
Step 2: Check the box next to “ Encrypt iPhone backup ” and enter the password for the backup. Important! The password must be remembered.
Step 3: Click " Back Up Now " to back up your iPhone or iPad to your computer. Wait for the operation to complete.
Step 4: After backing up your iPhone or iPad, go to Settings → [ yourname ] → iCloud → Find My iPhone and turn off Find My iPhone . This is necessary for subsequent restoration from the newly created backup. If Find My iPhone is turned on, iTunes will not allow you to perform a restore.
Note: To turn off Find My iPhone, you will need to enter your Apple ID password.
Step 5. In iTunes, click “ Recover from a copy ” and confirm to start the recovery by entering the previously set password. Do not disconnect your iPhone or iPad from your computer until the mobile device has restarted and appears in iTunes.
Step 6. When the iPhone or iPad turns on, all you have to do is enter the password for your Apple ID account again and wait until all applications are installed.
All applications will be reinstalled
Ready! When your mobile device reappears in iTunes, you can immediately see how much space was freed up on it as a result of deleting the cache. In our case, an additional 900 MB appeared on the iPhone. It's important to note that this is assuming the iPhone was completely reset literally a month ago. If your iPhone or iPad has been in active use for a long time, then a lot more memory will definitely be freed up on the device.
How to Delete a Specific App Cache on iPhone and iPad
The good thing about the previous method is that all the data important to users remains on the iPhone or iPad. Documents and data, for example, the already mentioned attachments in instant messengers (these are most often photographs, many of which can be memorable) are saved. However, users most often do not care about the cache in most applications, since it does not represent any value. There is a way to delete the cache of specific applications, but it cannot be called convenient.
Step 1: Go to Settings → General → iPhone Storage .
Step 2. Wait for the list of applications to load, then select the application whose cache you want to completely delete. All installed applications in the list are sorted by size, which makes it faster and easier to identify “pests”.
Step 3. On the application page, pay attention to the “Documents and data” column. It displays the size of the application cache. To clear it, you need to click “ Delete a program ”, confirm the deletion, and then reinstall the application from the App Store.
Unfortunately, Apple has not yet implemented a more convenient way to clear the application cache on iPhone and iPad. However, this time-consuming method makes it possible to understand the cache in more detail.
How to Delete Safari Cache on iPhone and iPad
The Safari browser cache takes up a lot of space on iPhone and iPad. It is noteworthy that it is not at all necessary to actively use the browser for this. Even relatively infrequent visits to web pages through Safari fill the “cache basket” instantly. To delete the Safari cache, Apple has provided a function.
Step 1: Go to Settings → Safari .
Step 2: At the bottom of the options page, click “ Clear history and data .” iOS will warn you that the wipe will delete your browsing history, cookies, and other browsing data.
Step 3. Confirm the operation.
Clearing the Safari cache is done instantly, but you will certainly be pleased with the results. In our case, more than 700 MB of iPhone memory was freed up.
How to completely delete cache on iPhone and iPad
It is impossible to completely delete the cache, also known as the “Other” section, without performing a hard reset of the iPhone or iPad. Not a single computer utility, and especially not a single application from the App Store, can completely deal with the cache . Therefore, if the cache on your iPhone or iPad really does not allow you to live, then this radical method will really help out.
To completely reset your iPhone or iPad, you need to go to the menu “ Settings ” → “ General ” → “ Reset ” → “ Erase content and settings ”. iOS will ask you to confirm the operation by entering your password. Important! The system does this for a reason. A hard reset will erase all data . Be sure to create a fresh backup in iTunes or iCloud for later restoration.
After performing a hard reset of your iPhone or iPad, all that remains is to configure it. At the setup stage, iOS will offer to restore from a backup , which, of course, is recommended, since all important data will be restored to the mobile device. Of course, the cache is not considered such data, and it will not return to the device. If you want the most “clean” iPhone and iPad, then the device can be set up as new. In this case, your data will not be saved, but there will definitely be no cache or “Other” category left on the gadget.
How to partially clear the cache on iPhone and iPad without using a computer
If you don’t have a computer with iTunes at hand, but still want to clear the cache from your iPhone or iPad, you can use specialized applications from the App Store. Let us immediately emphasize that they clear the cache only partially , since Apple does not allow their tools to “get into places they don’t need to.”
Due to limitations, such apps cannot handle cache clearing as effectively as iTunes. However, if you can’t use iTunes, the apps will at least somehow help. The most effective of these applications are Magic Cleaner and Battery Saver .
The principle of their operation is the same. You need to launch the application and click Clena Junk or “Clean up junk”. Both apps are free but contain built-in advertising. And we note once again that such utilities are not able to effectively clear the cache, so we recommend using the first three proven methods.
Please rate this article 5 stars if you like this topic. Follow us on VKontakte, Instagram, Facebook, Twitter, Viber.
Change camera settings
For many users, video content takes up the lion's share of the memory on their device.
Filmed videos most actively fill up free space, and are subsequently reviewed or distributed extremely rarely. Most videos end up being stored on the smartphone.
In the iOS settings (Settings - Camera - Video Recording) the difference in file size with different resolutions is clearly demonstrated. So, by lowering the quality from 4K to 1080p, you can halve the final size of the video.
If you refuse to shoot at 60 frames per second, the video will take up one and a half times less space.
So only by compressing video quality can you reduce the final size of this content by 3 times. Already filmed videos can be easily compressed in this way.