Author of the article
Maxim aka WisH
Higher education with a degree in Information Systems. Experience as a system administrator - 5 years.
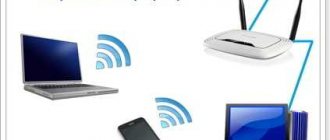
Tp-link TL WR842n is an inexpensive single-band router with a USB port. The WR842n router has several versions. Let's talk about setting up Tp-link TL WR842nd and WR842n routers, as well as their characteristics.
Overview and technical specifications
The latest version of the router is TL WR842n v5. TL WR842n v3 is an earlier version, which is now almost never seen. To begin with, here are the characteristics common to both wi-fi routers:
- Wi-Fi speed up to 300 Mbps and MIMO support, wireless network operation up to the n standard.
- Multifunctional USB port: support for file, media, FTP and print servers. Possibility of connecting 3G/4G modems to the USB port.
- Supports IGMP Proxy, bridge mode and 802.1Q TAG VLAN for IPTV Multicast.
- Up to 5 IPSec VPN tunnels to provide remote IPSec VPN connections
- Guest network provides guest users with separate access to the Wi-Fi network.
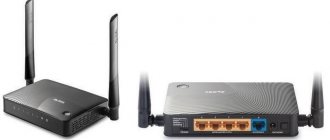
In fact, the difference between these two wireless routers is the firmware as well as the different power supplies. v5 has lower electricity consumption than v3. Otherwise, there are no differences in appearance; both TP-Link routers are white and look the same.
There is no data on hardware on the official website, but enthusiasts, when analyzing the models, collected a lot of information about these routers. They found out that in the fifth version of the router the chipset was changed and a more powerful processor was installed.
In the WR842nd router model, the firmware has been translated into Russian. The characteristics here also depend on the version, but what makes it more confusing is that there is no official data, and the models for the Chinese, European and Russian markets differ. In general, we can say that the characteristics remained at the same level, the functionality did not change. The only difference between WR842n and WR842nd is that the second model has removable antennas.
Instead of a preface
I could safely send you to our article about setting up the 841ND, but this router has some innovations that were not there before:
- USB port – file server (connect a flash drive and share files), print server (connect a printer and print from the network). For versions starting from version 2, support for USB modems was added.
- White antennas instead of black ones (not great, but someone was waiting for this).
- Creation of 4 Wi-Fi networks with different settings.
Those. everything is the same, only it becomes possible to use a USB port. Usually everything works out of the box, and some cases require special attention, so here I propose to focus on the basic wired Internet connection and creating a Wi-Fi access point. I suggest turning all other highlighted settings into comments. This is still the same good TP-Link with a sea of possibilities.
Indicators and connectors
There is nothing new here for those who have already seen models from TP-Link. The developers adhere to approximately the same design and layout of modules. This makes it easy to switch to a new model. Nothing has changed on the back panel.
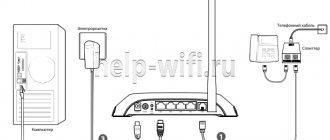
On the left is the input for the power supply, next to it is the button to turn the router on and off. Next are the ports for network cables. Home ports are highlighted in yellow, and the ISP cable socket is blue.
To the right is a button for WPS, which is also used to reset settings. The last button is to turn the wireless network on and off. The USB port for connecting modems or flash drives is located on the side.
There are no changes to the front panel either. The first indicator shows that the router is turned on and power is being supplied. The second shows the status of the wireless network. The third one is responsible for the LAN ports, showing whether cables are connected there or not. The fourth light is on when the wire from the provider is connected and work is in progress. The fifth indicator shows the connection of a flash drive or modem to the USB port. The latter displays the WPS status.
Well-known icons and a good layout will allow you to quickly figure out the connection.
Connection
Place the router close to an outlet, in an area where wires can reach. It is better to collect all equipment that requires a wired connection close to each other.
Next, plug the cable from your ISP into the blue connector at the back of the router. If you plan to connect via modem, then insert it into the USB port. After connecting the power, do not forget to press the button next to the connector to turn on the router.
Next you need to connect your computer or laptop to the router via wire. Setting up via cable for the first time is considered the most reliable. No interference or signal interruption when changing parameters.
You can also connect from a phone or tablet using the WPS button on the back of the device. Select this authorization method on your phone and click on the button.
Router tp link tl wr842nd: instructions for setting up IPTV
To configure IPTV, go to the section of the same name and specify the following parameters:
– “IGMP Proxy” – “Enable”;
- "Mode". When choosing:
A). “Automatic” – “LAN” ports using “IGMP Proxy” will work without changes, which opens up the possibility of using “IPTV” in both wired and wireless connections.
Quick setup
The Tp-link TL WR842nd router has different settings from the latest version of the Tp-link TL WR842n because the firmware was updated at different times. Let's look at the latest version; the previous ones differ only in the location of functions in the menu.
The quick setup is the same on almost all versions of the manufacturer. If the window does not appear automatically, then click on the “Quick setup” section at the top of the screen.
In the first window, select your time zone. The language changes to Russian in the upper right side of the screen. The next point is the choice of operating mode. Select the first option when working from a provider cable, the third when using a modem, and the second to combine these options.
In the next window, specify your country, city, provider and connection method. If they are in the list, then all that remains is to enter the required parameters, such as login and password or static address, which are specified in the contract.
If there are no options, then click on the bottom field “I did not find suitable settings.” We will consider this option further.
The choices in this section are entirely up to your provider. If you don’t know what to install, then call technical support or try to find instructions on the official website. Without knowing how to authenticate on the network, you will not be able to connect to the Internet. This information should also be in the contract with the provider.
The information needed also depends on the protocol. With PPPoE (used by Rostelecom), you need to enter a login and password. All this needs to be found out from the provider or read in the documents issued.
Next, they may ask about cloning a poppy address. If the provider does not use binding, choose not to clone.
Usually the modem connects itself. If not, then select the authentication type and then it will switch.
If this does not help, then check the box for manual settings and enter the data. They may be in the instructions for the modem. The next step is to enter the desired wireless network name and password for it. Finally, you need to check the entered data and complete the setup.
Advanced Features
The steps described above will ensure that the router function works. We also mentioned that the TL-WR842ND router has additional features, so we’ll briefly introduce you to them.
Multifunctional USB port
The most interesting feature of the device in question is the USB port, the settings of which can be found in the web configurator section called “USB Settings”.
- You can connect a modem for 3G or 4G networks to this port, thus allowing you to do without a wired connection - subsection “3G/4G”. A wide range of countries with major providers is available, ensuring automatic connection setup. Of course, you can configure it manually - just select the country, data service provider and enter the necessary parameters.
When connecting an external hard drive to the connector, the latter can be configured as an FTP storage for files or a media server can be created. In the first case, you can specify the address and connection port, and also create separate directories. Thanks to the media server function, you can connect multimedia devices that support wireless networks to the router and view photos, listen to music or watch movies.
The print server option allows you to connect a printer to the router’s USB connector and use the printing device as a wireless one – for example, to print documents from a tablet or smartphone.
This router supports WPS technology, which greatly simplifies the process of connecting to the network. You can learn about what WPS is and how it should be configured in our other article.
Access control
Using the “Access Control” section, you can fine-tune the router to allow certain connected devices to access certain resources on the Internet at certain times. This option is useful for system administrators in small organizations, as well as for parents who find the Parental Controls feature insufficient.
- In the “Rule” subsection, general control settings are configured: selecting a white or black list, setting up and managing rules, as well as disabling them. By clicking the “Configuration Wizard” button, you can create a control rule in automatic mode.
In the “Node” item, you can select the devices to which the Internet access control rule will be applied.
The “Target” subsection is intended for selecting resources to which access is subject to restrictions.
The function is certainly useful, especially if Internet access is not unlimited.
Manual setting
You can configure the router manually. Most often this is not particularly necessary. There will be no more functions, except that you can enter additional settings for each item. When the router menu opens, click on “Basic settings” at the top and select “Internet” on the left side. A window will open in which you need to select a connection method.
Using a static IP as an example, you need to specify the address, subnet mask, gateway and dns. Enter them after choosing the connection method
Port forwarding/forwarding
This function automatically redirects requests for certain services from the Internet to the appropriate host on your local network, located behind the router’s firewall. This function should be used if you want to create a server (for example, a Web server or mail server) on the local network behind the router’s firewall. Go to Forwarding, click Add New.
IP address - the network address of the device to which the request will be redirected Service Port - the number of the port that needs to be opened Protocol - Select the required protocol Status - Enable Click Save .
Setting up via mobile application
Not all routers support this option. The fifth version should connect, but it won’t work with the others. The application and its description are on the official website.
Download the application for your operating system version. Connect to Wi-Fi from the router. In this case, this will have to be done through authorization using WPS. When the phone is connected, launch the application and go to the controls at the bottom of the screen.
After that, select an Internet connection, and then the algorithm is the same as in the manual setup. Choose a connection method and enter data. The application will allow you to monitor connected subscribers and disconnect them if necessary.
About WPS
Does everyone know about the technology of connecting to Wi-Fi via WPS? In everyday life I prefer to disable this option. You can also set a PIN code here:
I will end here. There are a lot of settings, and even more specific tasks. Most of the questions have been described above, but if you need something extravagant, write in the comments. Let's try to update the article and understand your situation.
Wi-Fi connection and settings
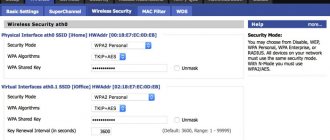
If you used the quick setup, the network is already configured and ready to go. Manual configuration requires additional steps. At the top of the window, select "Advanced settings", in the left column, select "Wireless mode", and then "Wireless settings".
Here, check the box at the very top if it is not there. Next, enter the network name and select the type of protection. Usually they leave the recommended one as the most optimal. Next, create a password. Leave the rest of the settings as they are.
Data transfer
Judging by the reviews and reviews, the Wi-Fi signal produced by the device module is quite strong and allows you to use a stable connection without loss of speed at a distance of up to 200 meters. All modern WI-FI standards are supported by this router model (IEEE 802.11 n/g/b), which allows you to achieve peak data transfer rates of up to 270 Mbit/s.
The signal reception sensitivity for speeds of 1 and 6 Mbit/s is -90 and -88 dBm, respectively. For other speeds it is -68 dBm with fluctuations within 10%.
Supported modems
The router works freely with 4g, but first check the compatibility of the models. The router came out a long time ago, so problems may arise with new models. This is a list of supported modems from the official website. Check if the one you are going to connect is there. If not, then he may make money, but it depends on luck, not on you.
Appearance
A pleasant addition to the router’s capabilities is its . This is not a utilitarian box with two antennas; the router has a rather designer, modern style.
If someone is embarrassed by the space it takes up on a table or cabinet, then this model also has a wall mount. There are grooves at the bottom for self-tapping screws.
Firmware update
After setup, you should update the firmware. This usually has a positive effect on speed and reduces the likelihood of failures. On older versions, this will allow you to add Russian to the settings. It's better to update online. Go to advanced settings, then system tools, and then firmware update. In the online section you can check for the latest versions and immediately update if there are any available.
The device can also be flashed with custom firmware that is downloaded from other sites. This is done using manual installation. There, indicate the path to the downloaded file, click on update and wait. To avoid turning your device into a brick, before this procedure, go to backup and save there.
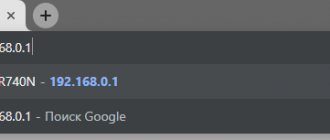
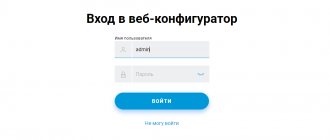
Login to the interface
Now you need to log in to the interface, because this is where you can set the necessary parameters. Go to 192.168.0.1 in your browser and enter the keywords for login/pass. The admin/admin data in both fields is suitable for new routers. Reset the settings by pressing reset if someone has previously used the router. Do you want to use your own password and login? Then we recommend going to the “System Tools” item. Here the system will prompt you to enter new authorization data. You should also enter a standard password. Having fulfilled these requirements, confirm your decision by clicking on “Apply”.