05/04/2018 windows | for beginners
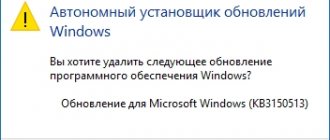
After installing Windows (or after updating Windows 10), some novice users discover an impressively sized folder on the C drive, which is not completely deleted if they try to do this using conventional methods. This raises the question of how to remove the Windows.old folder from the disk. If something in the instructions was not clear, then at the end there is a video guide about deleting this folder (shown on Windows 10, but also suitable for previous versions of the OS).
The Windows.old folder contains files from the previous installation of Windows 10, 8.1 or Windows 7. By the way, in it, you can find some user files from the desktop and from the “My Documents” folders and similar ones, if suddenly after reinstallation you did not find them . In these instructions we will remove Windows.old correctly (the instructions consist of three sections from newer to older versions of the system). You may also find it useful: How to clean up the C drive from unnecessary files.
Manual removal
Step 1. Enter the directory of the disk with the installed system.
We enter the directory of the disk with the installed system
Step 2. Select the Windows.old folder and use the “Shift+Del” combination. When prompted, confirm the deletion.
Confirm deletion
On a note! Do not delete a folder to the trash using the context menu or using the “Del” key. The hard drive will not be cleaned - the data in the recycle bin still takes up space.
Is it possible to delete the Windows.old folder
The directory is created when the OS is reinstalled and appears if auto-update is configured. System files are stored here. During a custom installation, the hard drive is not erased. Files from the previous OS version are converted into an archive, receiving allocated memory space. This is needed for:
- Personal data recovery.
- Facilitate rollback to a previous version of the system.
The folder can occupy up to 30 GB on hard drive. If you have a small SSD, the directory slows down your computer, making it difficult to install necessary programs. You can remove Windows.old, but not using standard tools - the Delete key or the menu.
Note! If there is enough space on your computer, you don’t have to do anything additional - the system will delete unnecessary files within a month. The folder will not disappear, but most of the data will be erased.
Uninstall via command line
In fact, this method is also a manual removal, but uninstallation is carried out at a low level, which guarantees a better result due to the simultaneous scanning of hard drive sectors.
Step 1. To open the command line in the Start menu, in the “Search programs and files” line, you need to enter the cmd command, call the context menu and run the handler as administrator.
Enter the cmd command
Step 2. To delete the directory, enter the command “rmdir /sc:windows.old”.
Enter the command “rmdir /sc:windows.old”
On a note! You can use rd instead of the rmdir command. Pay attention to the syntax - the command is case insensitive, that is, “RMDIR” and “rmdir” are both equivalent and equally possible. At the same time, pay attention to the directory entry - if the folder intended for deletion is named “Windows.old”, and you specify “windows.old”, then nothing will be deleted.
Step 3: Confirm deleting the Windows.old folder by pressing the “n” key and “enter”.
Confirm deletion of the Windows.old folder by pressing the “n” and “enter” keys
On a note! The “/s” switch allows you to delete a directory, including all subfolders and hidden files. If you add the “/q” key, then confirmation of the request will not be required, however, in order to avoid deleting the wrong folder, it is better to leave the request.
Why do we need the old version and can it be deleted?
Windows old is a harmless folder that appears on a computer in several cases:
- If you reinstall the system in update mode.
- When upgrading the installed version of the operating system to the maximum (Inplace Upgrade).
- When using the update function continuously).
The folder is located in the root of drive C. It can be duplicated with names that differ in nomenclature 000, 001, 002. It all depends on how often you reinstall. Although remembering so many old versions must already be tedious as they clutter your memory and slow down your work.
Old Windows is not as useless as it seems at first glance. This will be useful if you need to restore individual files from an old operating system. You can also do a full rollback (as a last resort). Stores files from the previous installation: system, user and program.
In general, after updating there is no need to keep the folder with the old system, but deleting it is not so easy. The computer gives it special rights, so if you try to clean it in the usual way, nothing will work.
Removal via Disk Cleanup
Step 1. To call the utility, in the “Search programs and files” line, you need to enter the line “Disk Cleanup” and run the program as an administrator.
In the “Search programs and files” line, enter the line “Disk Cleanup” and run the program as administrator
Step 2: Select the device you want to wipe and click OK.
Select the device on which to perform cleaning and click “OK”
Step 3. Wait for the analysis process to complete. The assessment is made by sections of the hard drive.
We are waiting for the end of the analysis process
Step 4. At the end of the analysis, a window will be displayed listing possible items for partitions to be deleted. Start the system file cleaning analysis process by clicking on the appropriate button.
We start the process of analyzing the cleaning of system files
Step 5: Select the device you want to wipe and click OK.
Select the device on which to perform cleaning and click “OK”
Step 6. Wait for the analysis process to complete. The assessment is made by sections of the hard drive.
We are waiting for the end of the analysis process
Step 7: Highlight Previous Windows Installations and click OK.
Select “Previous Windows installations” and click “OK”
Step 8. Wait for the cleaning process to complete.
Video - How to remove old Windows after installing a new one
How to free up disk space after installing Windows 10
If you have already installed the latest version of the Windows operating system, you may have noticed that the amount of free space on the system disk has decreased significantly as a result of the update. For those users who initially allocated not too much space for this section, this can turn into a real problem. In this article we will tell you how to deal with it.
The fact that installing Windows 10 requires a lot of disk space is not surprising. During the update process, installation files are downloaded from the Internet, several restore points are created, and a full backup copy of the previous version of Windows is made. Of course, all this requires more than a dozen gigabytes.
If there is still enough free space on your hard drive, then you don’t have to worry and leave everything as it is. The operating system itself will eventually delete all temporary and unnecessary files. But if there is a lot of space left, you will have to work hard and clean the disk manually. Here's how to do it.
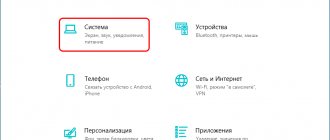
1. Click on the “Start” button, and then find the “Settings” item in the menu that appears.
2. The “Settings” window will open in front of you. Select the “System” icon in it, and then go to the “Storage” section.
3. Here you will see a list of available disks and the amount of free space on each of them. Click on the disk on which you need to free up space.
4. The next window will display a detailed breakdown of the types of data that take up disk space. By clicking on each item, you can get additional information, as well as the ability to delete files and folders you don’t need. Here's what you should pay attention to first.
- "System and reserved." Here you can delete copies of system files that are saved to restore your computer to a previous state. But it’s better to do this only if everything works fine for you.
- "Applications and Games." In this section, you can view your installed programs and remove old or little-used ones.
- "Temporary files". The most interesting section for us, in which you can, with a clear conscience, get rid of garbage, temporary files and, most importantly, the backup of the previous version of Windows. In total, this procedure will bring us several tens of gigabytes, but keep in mind that after this you will not be able to roll back. So think twice.
- "Other." Experienced users can dig deeper in this section. Here they can find Windows 10 installation files and some other things that they should get rid of.
In general, this post-installation cleaning of Windows 10 can easily free up 30–40 GB of disk space for you. But once again we want to warn you that all the actions described above should be performed thoughtfully. It is imperative to make a backup copy of your important data.
How to get rid of Win Old in the top ten editions 1803 April Update and 1809 October Update?
In addition to the above methods, the OS builds in question include a new option for cleaning the Windows.old folder. Please note that the absence of a folder to delete will make it impossible to return to previous versions of Windows.
- Go to Start and go to “Settings”, then to “System”;
- A small menu is displayed on the left side of the interface, find the item “Device memory” or “Storage”;
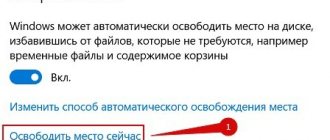
- In the “Storage Control” tab, click “Free up space now”;
- The search procedure for subfolders, files and folders may take some time;
- The next step is oh;
- Select the “Delete files” option located at the top;
- Congratulations, you were able to use the new operating system tools and get rid of outdated data.
Automatic cleaning
2. Go to the first section “System”.
- Freeing up more than 10 GB of disk space: how to remove a previous version of Windows 10
3. Visit the “Device Memory” subsection.
4. Activate the “Storage Control” option.
5. Click on the link “Change automatic method...”.
6. If you need to delete it immediately, click “Clear Now”.
You can also get rid of the rest of the garbage that clutters up the system volume: temporary files, the contents of the Recycle Bin, packages for installing drivers, thumbnail images, etc.
You may find the following instructions helpful: “Different Installation Methods.”
- How to delete the windows.old folder in Windows 7 8 10 if access is denied
Residual files are not deleted
While following the second step of the instructions above, users may encounter an issue where the data is not erased. It can be eliminated in two ways.
Method 1: Change folder owner
Among the elements of the old version of “tens” there are also system ones, as a result of which users, when trying to delete them, are faced with an error about the lack of access rights. To solve this, you will need to change the owner of the directories, which the instructions on the link below will help you with.
Method 2: Deleting files as data for system rollback
The method above may not be effective - in this case, you can mark unnecessary files as a previous system installation by placing them in the Windows.old directory.
- Go to the drive where the required data is located. Create a new folder and name it Windows.old.
Move everything remaining from the remote system to this directory.
Next, return to the “This PC” window, select the desired drive, right-click on it and select “Properties”.
Open the "General" tab and use the "Disk Cleanup" item.
Wait for the information to load, then click “Clean up system files.”
In the next window, click OK.
Wait for the items to be removed.
The method is somewhat unusual, but very effective in solving the problem.
We told you about how you can remove the second version of Windows 10 from your computer. To summarize, we note that in fact the task is quite simple and any user can cope with it.
Stage 1: Editing the bootloader
Since during the installation of two or more operating systems changes are made to the bootloader, the first step is to edit it.
- Use the “Run” snap-in: press the Win+R key combination, then enter the text msconfig into the window and click “OK”.
Then go to the "Download" tab. A list of installed systems will be displayed here.
Now mark the system you want to erase and use the “Delete” button.
Close all open applications and restart your computer.
Thus, we have removed the other Windows 10 from the download and all we have to do is get rid of the residual files.