Recovery - system software that allows you to conveniently and without special skills (knowledge of console commands, etc.) flash new firmware, patches, create system backups (firmware images) and other actions that are not standard for the average Android user, but necessary. The stock recovery that comes with the device by default usually has limited functionality, but craftsmen and diverse development teams have created many alternative versions of recovery for all Android devices. The most popular third-party recovery is ClockworkMod. In this post we will take a closer look at all the recovery options. ClockworkMod - installation, configuration, menu description, backup, firmware installation.
Installing CWM - Rom Manager Project
All you need to install Recovery on your Android smartphone or tablet is:
- Installed Root rights
- Unlocked Bootloader (HTC, Huawei, Nexus, Sony)
- Install from the Google Play app store - TWRP Manager
- Launch the application, select your model and click the button to install Recovery
That's all! There is nothing complicated! Read more different articles and instructions in the section Articles and Android Hacks . Stay with the Android +1 , it will be even more interesting!
CWM Recovery is an Android recovery environment modified by third-party developers, designed to perform many non-standard operations from the point of view of device manufacturers. The CWM recovery is being developed by the ClockworkMod team, but their brainchild is a fairly adaptable solution, so many users bring their own changes and, in turn, adapt the recovery to their devices and their own tasks.
Interface and control
The CWM interface is nothing special - these are ordinary menu items, the name of each of which corresponds to the title of the list of commands. Very similar to the standard factory recovery of most Android devices, only there are more items and the expandable lists of applicable commands are wider.
Control is carried out using the physical buttons of the device – “Volume+”, “Volume-”, “Power”. Depending on the device model, there may be variations; in particular, the physical Home button or touch buttons under the screen may also be used. In general, the volume keys are used to move through items. Pressing “Volume+” leads to moving one point up, “Volume-”, respectively, moving one point down. Confirmation of entering the menu or executing a command is by pressing the “Power” key or the physical “Home” button on the device.
Installation *.zip
The main, and therefore most frequently used, function in CWM Recovery is the installation of firmware and various system patches. Most of these files are distributed in *.zip , so the corresponding CWM recovery item for installation is called quite logically - “install zip”. When you select this item, a list of possible paths for the location of the *.zip . It is possible to install files from an SD card in various variations (1), as well as download firmware using adb sideload (2).
An important positive point that allows you to avoid writing incorrect files to the device is the ability to check the firmware signature before starting the file transfer procedure - the “toogle signature verification” item.
Cleaning partitions
To eliminate errors when installing firmware, many romodels recommend cleaning the Data and Cache partitions before carrying out the procedure. In addition, such an operation is often simply necessary - without it, in most cases, stable operation of the device is impossible when switching from one firmware to a solution of another type. In the main menu of CWM Recovery, the cleaning procedure has two items – “wipe data/factory reset” and “wipe cache partition”. In the drop-down list after selecting one or the second section, there are only two items: “No” - for about to start the procedure.
Creating a backup
In order to save user data in case of problems during the firmware process, or to be on the safe side in case of an unsuccessful procedure, it is necessary to create a backup copy of the system. The developers of CWM Recovery have provided this feature in their recovery environment. The function in question is called when selecting the “backup and storage” item. This is not to say that the possibilities are varied, but they are quite sufficient for most users. You can copy information from device partitions to a memory card – “backup to storage/sdcard0”. Moreover, the procedure begins immediately after selecting this item; no additional settings are provided. But you can determine the file format of the future backup in advance by selecting the “choose default backup format” option. The remaining menu items “backup and storage” are intended for restore operations from a backup.
Mounting and formatting partitions
The developers of CWM Recovery have combined the operations of mounting and formatting various partitions into one menu, called “mount and storage”. The list of revealed capabilities is minimally sufficient for basic procedures with device memory sections. All functions are performed in accordance with the names of the list items that call them.
Additional features
The last item in the main menu of CWM Recovery is “advanced”. This, according to the developer, is access to functions for advanced users. It is not clear what the “advancement” of the functions available in the menu is, but nevertheless they are present in the recovery and may be needed in many situations. Through the “advanced” menu, you can reboot the recovery itself, reboot into bootloader mode, clear the “Dalvik Cache” partition, view the log file and turn off the device when all manipulations in the recovery are completed.
Advantages
- A small number of menu items that provide access to basic operations when working with device memory sections;
- There is a function for checking firmware signatures;
- For many outdated device models, this is the only way to easily make a backup and restore the device from a backup copy.
Flaws
- Lack of Russian interface language;
- Some non-obviousness of the actions proposed in the menu;
- Lack of control over procedures;
- No additional settings;
- Incorrect user actions in recovery can damage the device.
Despite the fact that the recovery from ClockworkMod is one of the first solutions that ensured widespread Android customization, today its relevance is gradually decreasing, especially on new devices. This is caused by the emergence of more advanced tools with more functionality. At the same time, CWM Recovery should not be completely written off as an environment that provides firmware flashing, backup creation and restoration of Android devices. For owners of somewhat outdated but fully functional devices, CWM Recovery is sometimes the only way to maintain a smartphone or tablet in a state that complies with modern trends in the Android world.
Installing ADB and Fastboot recovery
First of all, you need to download the CWM recovery image for the desired phone model and rename it as CWM.img. And you also need to download the corresponding USB drivers for the phone and install them on the PC. Next, configure ADB and Fastboot on your PC. To do this, download and unzip the ADB files.
Installation procedure:
Download CWM Recovery for free
Download the latest version of the application from Play Store
Rate the program:
★★★★★ out of 5 (votes)
Similar programs and articles:
Share this article on social networks: Modified recovery from the ClockworkMod team. The main purpose of CWM Recovery is to install firmware, patches and modifications to the software of Android devices. ★★★★★ out of 5 (votes) System: Android Category: Program Reviews Developer: ClockworkMod Size: 7 MB Language: English Version: 6.0.5.3
Installation of modified firmware is performed through custom recovery - an installer program on the phone. One such program is clockworkmod, or CWM for short. What capabilities and features of the flasher you will learn from this article.
Samsung recovery
You may be interested in: Website content analysis: why it is needed and how to do it yourself
The step-by-step installation guide for CWM touch 6.0.3.2 is not difficult to follow. You will need the latest version of Odin_v3.07.zip on your PC and then install the application after extracting it. Next, download Samsung CWM Recovery. img to your computer and convert the *.img file to a *.tar.md5 file.
After converting the above downloaded file, you need to prepare your Samsung Galaxy S4 i9500 to enter boot mode. Turn off the phone, and then press Volume Down and Power at the same time. Launch Odin on PC and then connect Samsung to it via USB. After successful connection, wait for a while and then find the ID, the COM with its ID will be yellow. In the Odin settings, select the Reset and AutoReboot options. By clicking on the PDA select the downloaded one and then convert the CWM Touch Recovery 6.0.3.2 Samsung Galaxy S4 i9500.tar file. Click “Start” to initialize the installation, when the process is completed, the text PASS will appear in green. Select "Reboot system now".
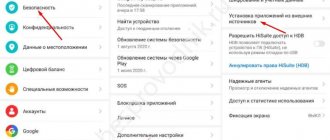
What is CWM recovery
CWM is a type of modified “recovery mode” with expanded capabilities compared to the official version, which is used by electronics manufacturers. Installation restrictions have been lifted, allowing owners to install third-party firmware and other modifications - kernels, patches or applications.
If CWM recovery is available, users should take a more careful approach to the choice of installed firmware and add-ons. Since incorrect actions will lead to software damage to the device, sometimes without the possibility of lifting it at home or in a service center.
CWM recovery sections
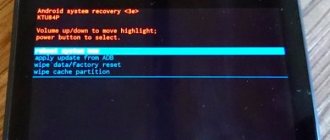
- Reboot system – restart the system.
- apply update.zip from sdcard – install the archive with the image/update located on the memory card.
- wipe data/factory reset – deleting user information.
- wipe cache partition – clears the cache in the internal memory section.
- install zip from sdcard – installing an archive from a memory card.
- backup and restore – saving an image of the entire system or only a specific partition. Restoring a previously created image or partition.
- mounts and storage – contains items for mounting the system, drives and other partitions. More cleaning and formatting tools.
- advanced – additional tools. The section contains items for clearing the Dalvik cache, rebooting recovery, and more.
CWM recovery sections of the Touch version
reboot system now – reboot the device.
install zip – section with options for choosing to install a system image, update, or install from external memory.
wipe data/factory reset – this section allows you to erase user data. Often necessary to install a new mod or to reset settings and reconfigure the system.
wipe cache partition – delete a cache partition.
backup and restore – this section contains items on saving images of the system/partition, as well as returning a backup in case of unsuccessful manipulations with the system or in case of a rollback from one firmware to another.
mounts and storage – contains settings for mounting and cleaning partitions.
advanced – includes the functions of going to recovery or bootloader, turning off the device, clearing the cache, etc.
Installation methods for CWM recovery
If you have root rights, installing CWM is possible using the Rom Manager program or other analogues that allow you to set a custom recovery mode. However, this method is extremely undesirable, since it often leads to freezing during the boot process of the device or other problems. The reason is the lack of compatibility of the program with a specific device. Therefore, it is better not to use this installation method unless there is precise evidence that the method works.
The best and proven installation method is via fastboot. To install, you need to enter the appropriate fastboot mode on your phone, connect the device to the computer and flash CWM to the recovery section. In this case, the bootloader on the device must first be unlocked. A detailed description of the installation can be found individually for each model, taking into account the distinctive features of the file system, platform, etc.
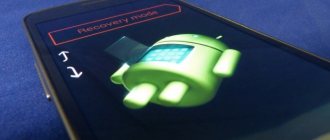
Launching ClockworkMod Recovery
There are several ways to boot your tablet or phone into ClockworkMod Recovery.
1. Using the ROM Manager program, selecting “Load Recovery Mode” from its menu.
2. By pressing a specific key combination when turning on the device. This combination depends on the device model. On many devices, you can get into recovery by pressing the volume down and power buttons at the same time when turning them on.
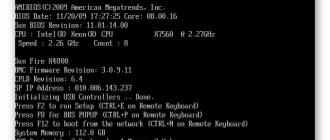
3. Using the ADB program. If you have set up a connection to your computer using the ADB program, you can boot your tablet into recovery using the command: adb reboot recovery
Conclusion
The article describes in detail what CWM recovery (clockworkmod recovery) is, the main features and menu structure, as well as where to download and how to install CWM recovery. The utility will become indispensable when uploading third-party images, mods and other improvements.
Have you used CWM recovery or do you prefer TWRP? Write your opinion in the comments.
Description of the functions and capabilities of ClockworkMod Recovery (CWM), as well as an example of creating and restoring a firmware backup and installing a .zip archive.
Possible difficulties
During the installation of an alternative Recovery Mode, in particular CWM, various difficulties and errors may arise. Which of them are the most common and how to solve them?
CWM Recovery does not recognize the memory card
CWM makes it possible to update your phone using an archive. When opening Recovery, the user sees a message that the flash card cannot be mounted. After installing another card, even with less memory, the problem disappears. The reason lies in the Windows system itself. The fact is that it diverges from card formatting standards. To ensure formatting is performed in accordance with the specification of SD/SDHC/SDXC flash cards, and not just in standard form, it is recommended to use specialized software, for example, SD Formatter.
The SD Formatter program allows you to correctly format the SD card
CWM does not see the internal memory of the device: problem solution
When the recovery files are located on the internal memory, and therefore can only be recovered from there, a problem may arise. When you connect the USB cable to the PC and enable USB Debugging, the program reports that the Android device is not detected and you need to enable USB Debugging.
To solve this problem:
- Connect the device as a camera, not a storage device. If there are other options available, choose them.
- Install universal drivers.
- Find a more suitable Recovery program for your device.
What is CWM?
CWM is a custom recovery that allows you to backup firmware and user data. In addition, the utility can install third-party software, custom OS builds and other modifications on the device. ClockworkMod can be installed in place of the factory recovery menu, or next door, giving you the opportunity to work with both recoveries.
An approximate list of ClockworkMod Recovery features:
- firmware of various software (from OS builds to simple application updates);
- installation of official updates, as well as third-party modifications and system fixes;
- connection to a PC in mass storage mode;
- connection to a PC for debugging in the ADB terminal;
- backup and restoration of firmware and individual areas of device memory (system, settings, applications and data);
- reset the system to factory settings, clear cache and dalwick cache, clear battery statistics;
- working with a memory card.
Software SP_Flash_Tool
It copes well with the task of flashing Android phones. First of all, you need to download the compressed program file to your computer as follows:
Description of CWM menu items
Depending on the recovery version, menu items may differ. However, below are all the main sections and functions of CWM that are present in most assemblies:
- reboot system now - reboot the device into the system;
- apply update.zip from sdcard – installation of the “update.zip” archive (must be located in the root of the memory card);
- wipe data/factory reset - complete reset of settings, data and cache and return to factory state;
- wipe cache partition - clearing the storage area for temporary files;
- install zip from sdcard — installation of a .zip archive from a memory card (you can select an archive with any name in any directory on the memory card). Items in this menu: apply update.zip - completely similar to “apply update.zip from sdcard”;
- chooze zip from sdcard - select .zip on a removable drive;
- toggle signature veritification - enable or disable archive signature verification;
- toggle script - enable or disable the approval script, allowing you to select priority actions (not intended for everyday tasks).
- Backup - creating a backup of firmware and user data.
- mount /system - mounts the main firmware partition;
- Reboot Recovery - restart the recovery (if CWM is installed next to the stock one, the stock recovery will be loaded);
* Partition mount items indicate commands that will be executed after selecting the appropriate item. Thus, if it says “mount /system”, then the system partition is not currently mounted and you need to run the mount command.
Backup system and user data via CWM
Making a backup is quite simple:
- reboot into CWM;
- select “ backup & restore ”;
- click “ backup ”;
- confirm the choice in the “ Yes ” item and wait;
- exit CWM using the “ reboot system now ” item.
Along the path root of the memory card/clockworkmod/backup , your backup will be placed. Depending on the version of CWM, this may be a folder or archive with .img or .tar files. The name of the backup, by default, consists of the date and time the operation was performed. You can add notes to the name, but only in Latin letters and numbers (otherwise, the recovery will throw an error).
Restoring firmware from backup via CWM
The recovery procedure is just as simple:
- launch CWM;
- select “ Backup & restore ”;
- Click “ restore ” and look for the required backup copy;
- Confirm your choice in the “ Yes ” section.
If you need to recover data from a specific memory area, do the following:
- launch CWM recovery;
- select “ Backup & restore ”;
- Click “ Advanced Restore ”;
- We look for the required backup in the list;
- mark the required partition ( boot , system , data , cache , sd-ext );
- Confirm your choice in the “ Yes ” section.
Creating a backup image
Saving the current state of the phone is a prerequisite before flashing the phone's firmware. This image will be recorded to the SD card and then copied back up to your computer. Some things to remember before flashing your phone via CWM Recovery:
You may be interested in:Jaguar F-Type: photo, review, technical specifications, reviews
Since each phone has different settings, the easiest way to determine the correct one for your Android model and version is to simply Google: YOUR-PHONE YOUR-ANDROID-VERSION root.
Nandroid is an application that can take pictures of the entire smartphone and also restore them from instant photos. You can install functions via CWM Recovery only on rooted phones. The creation will take about 5-10 minutes, the process will create a new temporary directory on the SD card, which can be saved as a phone recovery disk.
Installing firmware, kernels and updates via CWM
Before installing anything, be sure to make a backup of the current firmware. Make sure your device's battery is more than half charged. Disconnect your smartphone or tablet from your PC or charger. Place the file that needs to be installed on the memory card (preferably in the root to make it easier to search). If you are installing new firmware, be sure to wipe the user data partition using “ wipe data/factory reset ”. Instructions:
- install the drive into the device;
- launch CWM;
- select “ install zip from sdcard ”;
- then click “ choose zip from sdcard ” and select the required archive;
- we confirm our intentions with the “ Yes ” button and wait for the installation to complete;
- then we do Wipe cash and advanced/Wipe dalvik-cash ;
- go to the main menu and click reboot system now .
That's all. For more detailed instructions on working with CWM, look for the description of the necessary operations in the topics of your devices on the forum.
In general, the buyer of any Android device receives out of the box a device designed for the “average user.” Manufacturers understand that it will still not be possible to satisfy the needs of absolutely everyone. Of course, not every consumer is ready to put up with this state of affairs. This reality has led to the emergence of modified, custom firmware and simply various improved system components. To install such firmware and add-ons, as well as manipulate them, a special Android recovery environment is required - a modified recovery. One of the first solutions of this kind that became available to a wide range of users is ClockworkMod Recovery (CWM).
CWM Recovery is an Android recovery environment modified by third-party developers, designed to perform many non-standard operations from the point of view of device manufacturers. The CWM recovery is being developed by the ClockworkMod team, but their brainchild is a fairly adaptable solution, so many users bring their own changes and, in turn, adapt the recovery to their devices and their own tasks.
Content:
The CWM interface is nothing special - these are ordinary menu items, the name of each of which corresponds to the title of the list of commands. Very similar to the standard factory recovery of most Android devices, only there are more items and the expandable lists of applicable commands are wider.
Control is carried out using the physical buttons of the device – “ Volume+ ”, “ Volume- ”, “ Power ”. Depending on the device model, there may be variations; in particular, the physical Home or touch buttons under the screen may also be used. In general, the volume keys are used to move through items. Pressing “ Volume+ ” leads to moving one point up, “ Volume- ”, respectively, moving one point down. Confirmation of entering a menu or executing a command is by pressing the “ Power ” key or the physical “ Home ” button on the device.
The main, and therefore most frequently used, function in CWM Recovery is the installation of firmware and various system patches. Most of these files are distributed in *.zip , so the corresponding CWM recovery item for installation is called quite logically - “ install zip ”. When you select this item, a list of possible paths for the location of the *.zip . It is possible to install files from an SD card in various variations (1), as well as download firmware using adb sideload (2).
An important positive point that allows you to avoid writing incorrect files to the device is the ability to check the firmware signature before starting the file transfer procedure - the “ toogle signature verification ” item.
To eliminate errors when installing firmware, many romodels recommend cleaning the Data and Cache before carrying out the procedure. In addition, such an operation is often simply necessary - without it, in most cases, stable operation of the device is impossible when switching from one firmware to a solution of another type. In the main menu of CWM Recovery, the cleaning procedure has two items – “ wipe data/factory reset ” and “ wipe cache partition ”. In the drop-down list after selecting one or the second section, there are only two items: “ No ” - for about to start the procedure.
In order to save user data in case of problems during the firmware process, or to be on the safe side in case of an unsuccessful procedure, it is necessary to create a backup copy of the system. The developers of CWM Recovery have provided this feature in their recovery environment. The function in question is called by selecting the “ backup and storage ” item. This is not to say that the possibilities are varied, but they are quite sufficient for most users. You can copy information from device partitions to a memory card – “ backup to storage/sdcard0 ”. Moreover, the procedure begins immediately after selecting this item; no additional settings are provided. But you can determine the file format of the future backup in advance by selecting “ choose default backup format ”. The remaining menu items “ backup and storage ” are intended for recovery operations from a backup.
The developers of CWM Recovery have combined the operations of mounting and formatting various partitions into one menu, called “ mount and storage ”. The list of revealed capabilities is minimally sufficient for basic procedures with device memory sections. All functions are performed in accordance with the names of the list items that call them.
The last item in the CWM Recovery main menu is “ advanced ”. This, according to the developer, is access to functions for advanced users. It is not clear what the “advancement” of the functions available in the menu is, but nevertheless they are present in the recovery and may be needed in many situations. Through the “ advanced ” menu, you can reboot the recovery itself, reboot into bootloader mode, clear the “ Dalvik Cache ” partition, view the log file and turn off the device when all manipulations in the recovery are completed.
Advantages
- A small number of menu items that provide access to basic operations when working with device memory sections;
- There is a function for checking firmware signatures;
- For many outdated device models, this is the only way to easily make a backup and restore the device from a backup copy.
Flaws
- Lack of Russian interface language;
- Some non-obviousness of the actions proposed in the menu;
- Lack of control over procedures;
- No additional settings;
- Incorrect user actions in recovery can damage the device.
Despite the fact that the recovery from ClockworkMod is one of the first solutions that ensured widespread Android customization, today its relevance is gradually decreasing, especially on new devices. This is caused by the emergence of more advanced tools with more functionality. At the same time, CWM Recovery should not be completely written off as an environment that provides firmware flashing, backup creation and restoration of Android devices. For owners of somewhat outdated but fully functional devices, CWM Recovery is sometimes the only way to maintain a smartphone or tablet in a state that complies with modern trends in the Android world.
You can download CWM Recovery for Android for free >>> HERE