Installing or reinstalling Windows is a fairly simple and automated operation, however, only if you have a working disk drive or at least a flash drive with a recorded image of Windows XP, 7 or the desired version. Reinstallation can be more problematic, especially when you need to save data. And if there is no disk or flash drive, how can you install and reinstall in this case? Our article will describe in detail how to reinstall a working version of Windows 7 without using a disk or flash drive.
Short description
The operation itself is quite simple, and for an experienced user the introductory words will suffice. Let's break the process into several stages:
- Compresses the hard drive and allocates the required amount of memory.
- Copying data from an image from the OS to a previously prepared memory location.
- Creating an installation “disk” that is located inside the selected memory area using the EasyBSD utility.
- Installation of Windows OS , as well as its configuration.
These factors will be described in more detail below, so that any user will be able to figure out how and what to do.
A quick way to install Windows without a disk or flash drive
The best way to get rid of viruses and constant crashes in the operating system is to install a new OS. Most often, installation occurs by creating a bootable USB flash drive or using a disk with a new system, but there are several quick methods that will help you install a new copy of Windows without using third-party digital media.
The following OS replacement options are suitable for personal computer users who:
- The drive is broken, damaged or missing.
- No DVD.
- It is not possible to use Flash media.
- There is no external HDD drive.
Preparing a partition for installation files
Create a section
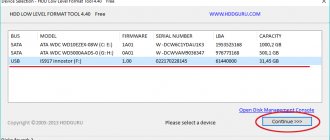
The first step is to install a partition on the disk where the installation files of the Windows operating system will be stored. To do this you need to go to “ Disk Management ”. To get to this submenu, you need to right-click on “ My Computer ”, select the “ Management ” tab, and in it there is “ Disk Management ”. You can also enter “ Disk Management ” through the search and you will immediately be taken to the desired page. There you can also track the amount of memory on a flash drive or other devices. The option we need looks like this:
Here you can see the amount of available and busy information on the hard drive. For our operation, it is important that the hard drive is already divided into two partitions , as in the picture. After fulfilling this factor, we divide the second disk (in our case D) into two different sections. To do this, right-click on drive D, and then select the “ Shrink Volume ” tab. After clicking, a window pops up asking you to enter how much to compress the disk. You need to enter a value slightly larger than the size of the Windows image. Although there is often enough memory for laptops, to save money, enter 150–300 megabytes more than the image weighs. Click “ Compress ”. The compression itself will not last long - about five minutes, no more.
Converting a Partition
After that, we need to convert the space we just shrunk into a clean partition. By right-clicking on the rectangle indicating unallocated space, select the “ Create simple volume ” tab. It looks something like this:
The wizard will start. Without much thought, we click on the Next button everywhere, there is nothing particularly important in it. After creating the volume, we proceed to the main part of the work.
Shrink Disk function
Now the most interesting thing is that we need to “pinch off” some space from one of the disks (if you have several of them) to create bootable media.
- To do this, open the built-in Disk Management
.
In the “ten” this is done as easily as possible - right-click on the “ Start”
" and click on the "
Disk Management
" item in the pop-up menu that opens.
In the "seven" this is done as follows.
Press the
Win+R key combination. In the Run , enter this command - diskmgmt.msc - click " Ok ".
Here we see several sections. If there are more than 1 physical disks, then they will also be displayed. Based on the size of each and the letter that is assigned to the partition, we can determine which disk we need. Sections " Reserved
“or simply without a letter, having a volume of 100-450 MB, plus or minus, we don’t touch them. We need a disk that has enough free space to create a separate partition for bootable media.
- Select it and right-click. In the context menu, select “ Shrink Volume
”.
- In the window that opens, we set the size of the compressed space, that is, we set the size of our future logical drive, from which we will make a “bootable flash drive” - your image size can be approximately from 3.5 to 4.5 (or more GB), set a minimum of 5 GB (can be 10 or 15, if the capacity of the physical disk itself allows).
Unallocated volume” will appear in the list of partitions
" The system cannot see it yet.
- Right-click on it again and select “ Create simple volume
”. - Then just click “ Next
” as many times as possible. You can change the drive letter in one of the windows to the one that is more convenient for you. But this is optional.
Scroll through the carousel to find out how to split one disk into 2 in a few clicks
Scroll through the carousel to find out how to split one disk into 2 in a few clicks
Scroll through the carousel to find out how to split one disk into 2 in a few clicks
Scroll through the carousel to find out how to split one disk into 2 in a few clicks
Scroll through the carousel to find out how to split one disk into 2 in a few clicks
Scroll through the carousel to find out how to split one disk into 2 in a few clicks
Scroll through the carousel to find out how to split one disk into 2 in a few clicks
Scroll through the carousel to find out how to split one disk into 2 in a few clicks
Scroll through the carousel to find out how to split one disk into 2 in a few clicks
Another 5 GB one will appear in the list of local disks (or more, depending on the size you specify).
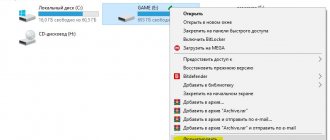
- We return to our image, which we mounted in a virtual drive and open it.
- Here we see several folders. You need to copy them all - select one folder and press the key combination Ctrl+A
(selection) and then press
Ctrl+C
to copy.
- Afterwards, we paste this whole thing into our just delivered Local disk (let it have the letter E)
( it may be called differently for you) using the combination
Ctrl + V.
This section should not contain anything superfluous. Only these folders are like in the screenshot - an unpacked image of the Windows system
.
Now the last step is to create a bootloader for the new boot disk. And this is where we need the EasyBCD program.
- We download it from the official website - on the download page, click the “ REGISTER
” button - we need a free license. - Next you need to register. Enter your name (any) and email (also any, confirmation is not required) - click here Download.
- Next
”, “
I Agree
” and “
Finish
” buttons several times
(names of buttons and installer interface in English, step-by-step instructions on screenshots in the carousel)
The working window interface will open. The first tab displays the current bootloader of your operating system. By default there is one. The version, path and other technical information are listed here.
- We are interested in the “ Add entry
” tab, where in the second section “
Removable/external storage
” we switch to the
WinPE
and specify the path to the bootloader file. - In the Explorer window, go to our created disk, to which we copied the unpacked Windows image files.
- Here we are interested in the sources
, and in it the
boot.wim
- select it with a mouse click and click “
Open
”. - Next, click the green plus button to add the bootloader file.
We can return to “ Current Menu”
"EasyBCD utility and make sure that we have a new bootloader named "
NST WinPE image
".
Copying installation data
Opening Daemon Tools Lite or another version available on your laptop, select an image with Windows 7 or 8. The next step is to click on the “ Add Image ” tab. After it appears in our program, click on “ Mount ”. A screenshot of this operation is shown below.
From the virtual drive we copy all the data, including folders and files, to a small disk that we created about 10 minutes ago. You can find out the name of the disk by looking at the letter located under the button panel.
For what
So, first, let's talk about why you should rack your brains with reinstalling the operating system without disk media. In fact, the question “how to install Windows without a disk?” every user thinks about it at least several times in his life.
Very often there are no disks at hand, or a virus that has been picked up completely blocks the computer’s ability to burn bootable disks. System restore and system rollback do not help. Then the option of healing Windows without a disk is very suitable. So let's see what significant advantages this approach has.
Creating a virtual disk
The next step will be to work with the latest utility, which is called EasyBCD. After starting the program, click on Add entry. Among several tabs, select WinPE. In the name field you need to enter the name of the section we created. By default, in all laptops on which Windows is installed, it is called “New Volume”. So we write in the “Name” category. In the “Path” let there be a boot.wim , which is located in the sources inside the image.
Method No. 2: Reinstalling the system using the Recovery program
For those who are looking for a hint on the question of how to reinstall Windows without a disk if the system also does not boot, the long-awaited answer will be the Recovery utility built into the laptop software. It is presented on almost all modern laptops, although under different names. For example, Toshiba laptops have Recovery Wizard installed, Samsung laptops have Recovery Solution, Hewlett Packard laptops have HP Recovery Manager. However, regardless of the name, their purpose is the same - to help reinstall Windows without a disk, returning it to factory settings.
True, you can launch Recovery only on a laptop with an unformatted working hard drive on which Windows 7 was previously installed. To launch it, in particular, you will need to reboot the system and press the corresponding hotkey several times when starting Windows:
Further instructions will be determined by prompts from the utility itself. For example, on Samsung, the action plan will look like this:
Windows installation
After completing the entire operation, click on the Current settings button. With its help, you can make sure that your actions were not in vain. If a new entry appears: congratulations, you have completed all the work yourself. As you can see, installing or reinstalling Windows without a disk and without a flash drive is very simple! After restarting the computer or laptop, in the special menu for selecting the operating system, select “ New Volume ” and start the standard process of installing or reinstalling Windows.
Working with user data
If you do not have a new disk, then the task before us is to transfer data from the system partition, install the operating system on it and configure it by installing the latest updates and software.
If the user needs to copy some data from the previous Windows, then we can simply transfer either all the data to the data partition, or the desktop, my documents and downloads folder (usually all data is stored there). You can also ask the user to indicate exactly where the files that are important to him are located.
Features for Windows XP
It is worth noting that installing Windows XP is a little different. The process itself has changed significantly and more data is required from the user. Therefore, there are problems with Windows XP when they try to install it not from a disk. This trick allows the installation of Windows 7.8, but does not allow the installation of XP due to the absence of some data, such as the boot.wim , which is needed for one of the most important installation processes. If you want to install Windows XP, then you need a slightly different reinstallation method. One of the simplest is system update . However, reinstalling XP using this method will only update the system and will not install another OS.
Reinstalling XP from your hard drive will allow you to perform an operation that is similar to the previous one. The difference between them is that the latter option will help even when the system does not boot.
First you need to transfer the distribution folder to your hard drive .
After this, we do not need to update the system, but completely install it again by selecting “ New installation ” in installation mode. The next step will be collecting data and general installation of Windows XP in the usual way - as from a disk. Your OS will be in the windows.0 , but you can rename it.
Method number 1: System rollback
If Windows 7 not only boots, but also responds normally to commands after a restart, you can try to reinstall it using a standard Windows rollback to the previous (working) state. How do we act? First, open the “Start” menu, go to “Control Panel”, and from there to the “Recovery” section:
Then in the window that appears, click the “Start recovery...” button to launch the Windows Recovery Wizard and click “Next”. After that, select the appropriate date option for reinstalling Windows 7 and click “Finish”, proceeding to this step using the “Next” button:
As a result of such simple manipulations, the system will be automatically updated without an installation disk, without affecting documents, media and other files valuable to users stored on the computer.
Deleting the Windows.old folder in Windows 7
Files from the previous version of Windows remain on the computer in the “Windows.old” folder. They take up a lot of space on the system disk, so they should be deleted.
We will remove unnecessary files using the built-in Disk Cleanup system tool.
Follow these steps:
- Press the "Win" + "R" keys.
- In the “Run” window, enter the command: “cleanmgr” (without quotes), press the “Enter” key.
- The program estimates the amount of space that can be freed on the “C:” drive.
- In the “Disk Cleanup (C:)” window, click on the “Clean up system files” button.
- The utility will again estimate the amount of disk space available for freeing.
- In the window that opens, check the box next to “Previous Windows installations”, and then click on the “OK” button.
- In the warning window, agree to permanently delete these files.
- Wait until the data is deleted from your computer.
Open the “C:” drive in Explorer to make sure that the “Windows.old” folder has been removed and the disk space occupied by the previous version of Windows 7 has been freed up.
Preparing to reinstall Windows
Let's get started:
First of all, you need to take care of the safety of important data: copy all photos, videos and documents to reliable storage, this can be removable media or the cloud. And if your OS does not boot, you can try booting from a Live CD to copy the data. Or connect an external hard drive and remove the necessary files from your drive.
Reinstalling Windows, in this case we will talk about “Seven”, is very simple.
You will need a Windows 7 image. You can download it online or purchase the boxed version. For those who don’t know, this is a version of the OS on a disk or flash drive that you can buy in a store.
If with boxed versions everything is clear: you pay money - you get a ready-made image, then in the case of purchasing online, this downloaded image must first be prepared, that is, written to a USB flash drive or disk. The most common program for burning images is UltraISO. The utility is free and easy to use, and the Internet is full of information on how to prepare bootable media for installation on computers.
Set boot priority in BIOS
Conventionally, we have prepared the image, now you need to install it on your computer.
- To do this, insert the media into the computer; if it is a flash drive, then it is better to insert it into the connector on the back of the case,
- Turn on the computer or reboot it.
- In BIOS go to the “Boot” menu,
- In the “Hard Disk Drives” section, click “Enter” on “1st Drive”,
- Here we select our drive with the recorded image and press “Enter”, then “Esc”,
- Next we need to configure the boot order from the media, that is, set its priority,
- Go to the “Boot device priority” section,
- Click on “First boot device” and again – “Enter”, here we indicate USB or disk.
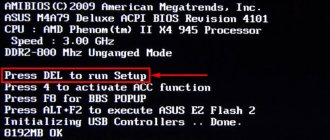
In the BIOS, you must first configure the boot priority from a flash drive or disk. To do this, when rebooting, you need to actively press one of the function keys to enter the BIOS. Most often this is “Delete” for computers and “F2”. But there may be another key; you can find out more precisely from the hint on the start window when loading the OS. In the form of a line like this.
"Press DEL to enter Setup"
In this case, the “Delete” key was used on the computer to load the BIOS.
In more modern motherboards, the interface is usually graphical, but it is not difficult to understand. Just look for the “Boot” and “Boot device priority” sections.
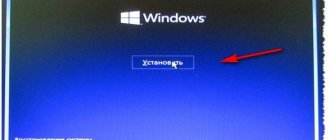
Loading a USB flash drive or disk with an image via the Boot menu
This manipulation is needed only once, and after installing Windows, everything will need to be returned to its place. Instead, you can simply reboot, at the moment when information about the installed memory appears on the screen, press the key to enter the Boot menu. Usually these are the "F11", "F12" or "Esc" keys, but not always. Again, there is a hint on the initial loading screen. In the “Boot menu” window, select your storage medium (disc or flash drive) and click “Enter”.