Start installation
At the very beginning, the installation program will offer a choice of the following options:
- Installed system language
- Time and Currency Format
- Keyboard layout
If you need a Russian-language system, then all menu items should have the values “Russian (Russia)”, “Russian (Russia)” and “Russian”. If you downloaded the Russian image of Windows 10, then these items will have the following default values.
To continue, you need to click the “Next” button (highlighted in orange in the picture below).
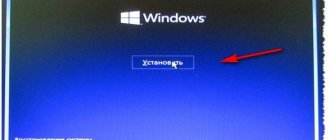
In the next window, you need to click on the “Install” button (highlighted in orange in the picture below).
It may take some time before the next installer window appears. In it you will need to enter the Windows product key - the Windows 10 license key. If you have previously installed your licensed copy of Windows 10 on this computer (or it has already been installed by the manufacturer or seller of the computer), or you simply want to use the trial period, then you do not need to enter the key .
If you entered the product key, then to continue you need to click the “Next” button (highlighted in orange in the picture below). If you decide not to enter a product key, then you need to click the “I don’t have a product key” button (also highlighted in orange in the picture below).
If you selected the “I don’t have a product key” option, then you will be presented with a choice of the edition of the operating system that you want to install. To continue, you will need to select the desired edition of the operating system and click the “Next” button (highlighted in orange in the picture below).
In the next window, you will see the Windows 10 license agreement. To continue the installation, you need to accept it (by checking the box “I accept the license terms”), and click the “Next” button (both items are highlighted in orange in the picture below).
Now you will be presented with a choice of Windows installation type. The first method is needed when you want to upgrade from a previous version of Windows to the one on your flash drive (for example, from Windows 8 to Windows 10). The second method is needed for a complete installation from scratch, when you need to completely reinstall the system, or install the system on a new (clean) hard drive (SSD, or other drive).
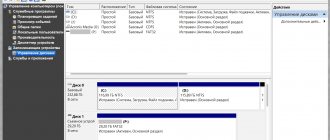
After this, you will see a window with a choice of the hard drive on which you want to install Windows.
Logging in with an offline account in Windows 10
How to change account on Windows 10
Log in to your offline account as follows:
- On your desktop computer or laptop, go to the “Settings” section, then “Accounts” - “Your data”.
- Among the displayed subsections, the user needs to select the “Login with a local account instead” option.
The user will only have to enter all the data correctly.
How to log in with an offline account in Windows 10
Working with a hard drive
Below are four possible options for dealing with the hard drive, depending on the availability of information on it and your plans:
- If you already have partitions on your hard drive from a previous operating system, and you do not want to delete them, you can install Windows 10 on one of them, including the partition with old Windows. In this case, the Program Files, Program Files (x86), Users and Windows folders will be moved to the Windows.old folder, and the previously installed operating system will no longer be functional.
- If you have information on your hard drive, but it is of no value to you, you can simply delete itby highlighting each section and clicking the “Delete” button. After this, you can split the hard drive into the necessary partitions, or use all the disk space for one partition - just below it is written how to do this.
- If you have a blank hard drive and you don't want to split it into different partitions (or the storage capacity does not allow this), then you can simply click on the “Next” button - the Windows installer itself will create service partitions and begin the installation.
- If you have a blank hard drive and you want to partition the hard drive, then you need to select the desired hard drive and click on the “Create” button, then enter the digital value of the volume of the partition to be created, and click on the “Apply” button to create it.
When creating a partition on an empty hard drive, Windows will automatically create one or more additional partitions - this is normal and necessary for the operating system to function.
Having finished with the partitioning and selection of the desired disk for installing Windows, you need to click the “Next” button to begin installing the operating system.
Setting up basic settings
The first real interaction with the system will be required when the “Let's start with the region” window appears. This is right?" — here you will need to select the country in which you are going to use Windows (Russia is selected by default). Having selected the desired state, you need to click the “Yes” button.
Next, the system will ask you to select the correct keyboard layout (Russian is selected by default). Having selected the one you need, click “Yes” again.
In the next window, the system will ask if you would like to add any additional keyboard layout - if you do not require any specific layout (Ukrainian, Kazakh, etc.), then you need to click on the “Skip” button.
After this, the system will provide a choice of what you are setting up Windows for - for personal use (including home use), or for work use (in an organization). Select the first item and click “Next”.
Selecting an account type
If you have a working Internet connection, you will be required to sign in with a Microsoft account. If there is no connection, you will first be asked to connect it (including via Wi-Fi); if it fails, you will be asked to use an offline account on your computer.
An offline account is an account that will only exist on a given computer. It's worth using if you don't want to use a Microsoft account. However, if you want, you can always turn your offline account into a Microsoft account.
Now we will look at each of these options in detail:
- Create a new Microsoft account
- Using an existing Microsoft account
- Using an offline account.
Create a new Microsoft account
- If you want to use a Microsoft account, but you don’t have one, you need to select “Create an account” (highlighted in orange in the picture below).
- A window will open asking you to enter your email address. After the address has been entered, you need to click the “Next” button (highlighted in orange in the picture below).
- In the next window you will need to enter the password that will be used for this account. The password must be 8 characters long, include numbers, uppercase and lowercase letters. When you have finished entering your password, you need to click the “Next” button (highlighted in orange in the picture below).
- Next, you will need to select the country of your current residence, as well as your date of birth. Having finished with this information, you also need to click on the “Next” button (highlighted in orange in the picture below)/
- Then, Windows will prompt you to create a PIN code for the device, and even if you don't want it, you will have to set it. To do this, you will need to click the only button “Create PIN code” (highlighted in orange in the picture below).
- On the next screen you can set a PIN code for this device. The PIN code can contain both numbers and letters (if the “Include letters and symbols” checkbox is checked). After entering the desired PIN code, you need to click “OK” (the button is highlighted in orange in the picture below).
This completes the creation of a Microsoft account.
Using an existing Microsoft account
- If you already have a Microsoft account and you do not need to create one, then in the “Email, phone or Skype” field, you need to enter your email address, phone number or Skype login, and then click on the “Next” button "
- In the next window you need to enter your account password.
- After this, you will be required to create a PIN code. The procedure for creating it is described in detail above, in the section on creating a new Microsoft account.
Using an offline account
- If you chose to use an “offline account”, then after that, a window will open in front of you asking you to use a Microsoft account. If you are not going to do this, then you should click on the “Limited Features” button.
- After this, you will be prompted to enter your username, password, and security questions to recover your password.
The trick is to set a password without security questions, do not set it during installation - leave it blank. If necessary, you can always set a password later.
This will complete the creation of an offline account.
Microsoft forces users to use company accounts, but there's a way around it
Microsoft is slowly but surely trying to wean users off local accounts in Windows 10. In particular, this applies to the latest builds of the operating system from Redmond. The bottom line is that the fall update introduced changes to the Out-of-the-Box Experience (OOBE) procedure. They consist of hiding the ability to enable a local account if the PC is connected to the Internet during the installation of Windows 10.
In this case, although the system asks to connect, it does not warn that in this case only the option to register a Microsoft account will be available. By the way, in the May update the company slightly let go of the reins, although not for everyone. Users report that about 6% of newly installed systems offered the ability to enable local accounts even if there was a network connection. What this is connected with is unclear.
Please note that the difference between a local account and its Microsoft counterpart is significant. The first allows you to minimize, albeit relatively, the transfer of data to the company. This also allows you to use different passwords for different PCs, without cluttering the system with applications from the Windows Store and other services. A Microsoft account, according to the company, has its own advantages. This includes single sign-on, access to universal applications, and work with subscriptions like Xbox Live. However, it is outrageous that the company simply decides for users what is best for them.
At the same time, during the installation of the OS, it is persistently prompted to connect to the network. If there is a wired connection, then everything will happen automatically. Otherwise, the system will require a Wi-Fi connection and authorization with a Microsoft account. And there simply won’t be a local account option.
Even the old option of entering the “left” email address does not work. In fact, the only official option left is to log in using a Microsoft account, after which you can already register a local account. But there are also a couple of unofficial ones. They work, in particular, for version 1809, which is still used by about 30% of the “ten” audience.
The first is to skip connecting to Wi-Fi. You need to ignore the helpful suggestion to “go back and think,” click “No” and still get access to the page where you can register a local account.
If you skipped this step and are stuck on the “Log in with a Microsoft account” page, simply unplug the network cable, turn off the router or Wi-Fi. The system will naturally try to connect to the Internet, but will not be able to and will be forced to redirect you to the local account page. You may need to press the Back button several times.
In build 1903, the “Skip” option was replaced with “I don’t have Internet access.” When you select this option, the system will allow you to proceed to setting up a local account. And on the Microsoft account screen in the lower left corner there is the desired “local account” option. That's what was required.
Further customization
In the next window, Microsoft will offer to send your activity log to access various Windows components, such as the Timeline. Select “Yes” or “No” (if using an offline account, this functionality will still not be available).
If you are using a Microsoft account, you will then be asked to link your mobile phone to your Microsoft account. Depending on your preferences, you can either do this (by entering your phone number) or refuse (by clicking on the “Snooze” button).
Next, when using a Microsoft account, the OneDrive cloud storage setting will appear. By default, all contents of the Documents, Pictures and Desktop folders will be copied to the OneDrive cloud storage. You can disable this by simply clicking on the “Save files only on this computer” button.
The last system setup window is selecting privacy options. We configure them at our discretion and click on the “Accept” button.
At this point, the installation of the system is completed, the system will spend some more time on the initial setup, and will be ready for use.
How to add a user to Windows 10 for remote access via RDP?
If you plan to use the created account to connect the user to the computer via remote desktop (the RDP function is fully available in PRO versions). In the “properties” of the computer, select “Advanced system settings”:
Go to the “Remote Access” tab, then first configure the ability to connect to RDP, and then select the users of your computer who, after completing all the settings, will be able to work remotely:
Next, add, write the name of the desired user, check. It is highly recommended to set a password for the user for successful connection!
Only specified users will be able to connect via RDP. That's it, we did it, nothing complicated! Bye!
Author of the publication
offline for 2 months