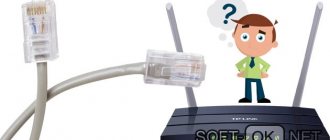
The Internet and network technologies have long been an integral part of our lives. And if the Internet stops working, then for most this is a serious problem. This article will consider a situation in which the Internet and local network do not work, and in the lower right corner of the monitor near the clock a red cross icon with the inscription “Network cable is not connected” is displayed, although the cable is inserted into the computer’s network card.
If the computer does not see the network cable
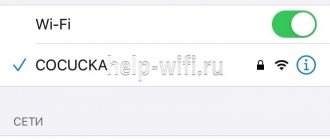
A crossed out network icon in the notification area of the computer desktop is the first sign that the PC “does not see” the network cable.
A crossed out network sign in the taskbar means that the computer does not see the network cable
The first thing you need to do in this case is to check the physical connection of the Ethernet cables to the RJ-45 network connectors (ports).
Most RJ-45 ports have two indicators - green or orange "LINK" and yellow "ACT".
RJ-45 port LEDs
Important! A steady "LINK" light indicates that the Ethernet cable is normally connected to the port, as well as to the network device at the other end of the cable. The flashing “ACT” indicator indicates data transmission.
During normal operation of the Internet cable, the indicators have a characteristic light
The RJ-45 connector may have one combined “Link/Act” indicator. Also, on many router models, connector indicators are located on the front panel of the device.
On some routers, connector indicators are located on the front panel of the device
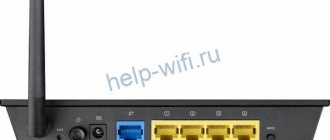
The router port, signed as INTERNET or WAN, is intended for connecting an Internet cable coming from the provider. The port to which the Ethernet cable connecting to the PC is connected is usually labeled as LAN or Ethernet.
Connection diagram of the Internet cable to the router and PC
Often there is also a connection scheme in which the Internet cable is connected directly to the PC.
Internet cable connected directly to PC
What does error 651 mean when connecting to the Internet?
Error 651 - Connection via WAN Miniport (PPPoE) is a connection error that occurs when you try to start a high-speed connection on Windows 7 and Windows 8 to connect your computer to the Internet using the PPPoE protocol.
Interesting materials:
How to return income tax from salary? How to return trips by train? How to return the volume control? How to return a Yandex string? How to get my work book back? How to restore vibration on the Honor keyboard? How to return the virtual keyboard? How to behave after abdominal surgery? How to behave with an Aquarius man? How do scales determine your fat and muscle percentage?
Checking network indicators
Step 1. Check if the PC and router are turned on (if the router is on the network). The switched on state of the devices is indicated by their glowing indicators.
Glowing indicators on the router mean that it is connected and working correctly
Step 2. Check if the connector indicators are lit where the Ethernet cable is connected:
- PC network card indicators.
Checking the light of the PC network card indicators - Router front panel indicators.
Checking the indicator light on the router panel
The absence of network port indicators may mean:
- poor contact in the RG-45 connector;
- Ethernet cable damage;
- port malfunction;
- using a crossover cable;
- PC network card malfunction.
Settings
The next option is also not so rare. Often the network card does not see the cable from the Internet if the network settings are messed up. This phenomenon usually does not cause panic among users.
To eliminate this situation, the user is asked to open the “Network Control Center”. In the window that appears, look at the results. If there is a red cross between the computer and the connection, there really is a problem with the Internet. Most likely, the network card does not see the cable due to incorrect settings.
Correcting the situation boils down to the user clicking on the red cross between the PC and the Internet, and then waiting for the test results. Once it is completed, you can follow the help wizard to set up your network.
If the network card no longer sees the cable, you need to contact your provider. Data is taken from him to configure the network, which is entered into the appropriate fields (for example, IP address). It is proposed to work in the same “Network Control Center”.
Identifying the causes of the malfunction
To identify the cause of the problems, you first need to check the reliability of the Ethernet connectors.
Step 1. Press the connector tab and remove it from the RJ-45 connector. Then insert the connector back into the port until you hear an audible click.
We press the connector tab and remove it from the RJ-45 connector, then insert it back again until a characteristic click is heard.
Step 2. Slightly tug the connector by the wire back and forth, making sure that the connection is established normally.
Pull the connector by the wire back and forth to make sure the connection is normal
Step 3. If all connectors are connected securely, you need to check the integrity of the Ethernet cables. Follow the cable from the computer to the place where it goes into the shield, inspecting it for physical breaks and damage.
Checking the integrity of Ethernet cables
Step 4. If the cable connecting the PC and the router is damaged, replace it with a working one.
If the wire connecting the PC and the router is damaged, replace it with a working one
Step 5. If the Internet cable coming from the provider is damaged, cut off the damaged area, extend the cable and re-crimp it with an RJ-45 connector.
On a damaged Internet cable from the provider, cut off the damaged area, extend the cable and re-crimp it with an RJ-45 connector
Reference! You can also call the Internet provider company so that they check the connection on their part, and call a specialist to carry out extension and re-crimping of cables.
A malfunction in the cable connecting the PC and the router may also result in a “burnout” of the router port. In this case, you need to switch the cable coming from the PC to another LAN port of the router for testing.
Switch the cable coming from the PC to another LAN port of the router to check the functionality of the router port
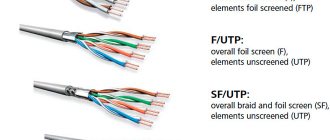
Another possible cause of problems with the cable connecting the PC and the router when setting up the connection for the first time is the use of a “crossover” (cross-) cable instead of a “straight” (patch cord).
Older network device models do not support the Auto-MDI(X) crossover and straight-through cable switching interface. If both the network card and the router do not support Auto-MDI(X), the Ethernet cable must be replaced with a “straight” one.
To connect, you need to use a “straight” (patch cord) Internet cable instead of a “cross” (cross-)
Correct connection
First of all, you should check whether the cable is actually connected to the appropriate port on the computer and router. The motherboard has a network connector - Ethernet, where you need to insert the power cord connector. In the router, the patch cord is connected to one of the LAN ports. They are usually yellow in color. Mechanical damage to the connectors on the PC or router also prevents the signal from passing through the cable. In some cases, such breakdowns can be determined visually.
You also need to inspect the wire (for visible damage or kinks) and check the integrity of the plug. If defects on the power cord are noticeable, it is better to replace the cable or re-crimp it. Crimping is done using a special tool - a crimper. It is important to follow the standards of procedure, otherwise the cable will not work at all or the error rate during packet transmission will be high. This task is best handled by professionals.
If the cable is not seen by the network card
If the connector indicators of all connected cables light up normally, or only the network card indicators of the computer or laptop do not light up, the problem may be on the PC itself.
In this case, you need to check whether the network card is enabled in the computer's BIOS.
Reference! BIOS (Basic Input/Output System) is the motherboard's "firmware" that controls the PC's devices at boot.
Step 1. Turn off the computer and turn it on again using the button on the front panel.
Turn off the computer and turn it on again
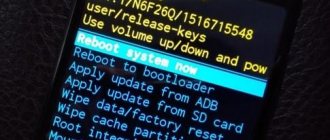
Step 2. Immediately after turning on the PC, repeatedly press the “F1” or “F2” key on the keyboard, sometimes simultaneously holding down “Fn” (usually for laptops), or the “Delete” key (for desktop PCs), until a menu appears on the monitor screen BIOS.
Press the “F1” or “F2” key on the keyboard, sometimes simultaneously holding down “Fn”, or the “Delete” key
Note! After entering the BIOS menu, you must use the keys indicated in its prompt.
In the main BIOS window, find and use the keys indicated in its prompt
Step 3. Go to the “Advanced” menu item by pressing the side arrows of the keyboard cursor and select the “Onboard Devices Configuration” item using the up and down cursor arrows. Press "Enter" on your keyboard.
Using the side arrows of the keyboard cursor, go to the “Advanced” menu item, select the “Onboard Devices Configuration” item with the up and down cursor arrows
Step 4. Use the cursor keys to go to the “Onboard Lan” item and use the “+”-“-” keys to set the “Enabled” value if it was not set. Press the “F10” key to save the settings and exit the BIOS.
Using the cursor keys, go to the “Onboard Lan” item, use the (+-) keys to set the “Enabled” value, press the “F10” key
Step 5. Press “Enter” to confirm exit and save the settings.
Press “Enter”
Checking the operation of the network card
After booting the PC, you need to check whether the network card is turned on and whether the drivers are installed on it.
Step 1. Press the “Win+R” key combination on your keyboard (“Win” is located to the right of “Ctrl”) and type “devmgmt.msc” in the window. Click "OK".
We print “devmgmt.msc” in the window, click “OK”
Step 2. In the “Device Manager” window, double-click on the “Network Adapters” section, expanding it, and see if the network adapter is present there.
Double-click on the “Network adapters” section
If the adapter is not in the section, it may be in the “Other devices” section as “Unknown device” under a question mark or exclamation mark.
We check in the “Other devices” section, check if there is an “Unknown device”
Step 3. Right-click on the adapter and select “Delete” with the left button.
Right-click on the adapter and select “Delete” with the left button.
Step 4. Click the “Action” item at the top of the window and select “Update configuration...” from the menu.
Click on the "Action" item at the top of the window and select "Update configuration..." from the menu.
Step 5. Click on the line “Automatic search...” in the window that opens.
In the window that opens, click on the line “Automatic search...”
Step 6: After installing the driver, the device will appear in Network Adapters. If the adapter is disabled (there is a red cross on the device), right-click on it and select “Enable” with the left button.
Right-click on the device and left-click on the “Enable” option.
The affected device will appear in Device Manager.
Connected network adapter device
Reference! If you cannot use the device, you must log into Windows with administrator rights. You can also try installing the network card drivers from the CD that came with the motherboard.
If you cannot turn on the board, or after turning it on it does not “see” a working Ethernet cable, the board must be replaced.
If the network card is activated and the Internet cable is working, the network icon in the notification area (circled in red) will appear uncrossed.
If the network card is activated and the Internet cable is working properly, the network icon in the notification area will appear uncrossed
All that remains is to set up the Internet and access the global network.
What to do to fix it
Oddly enough, most often the problem is of a software nature. In this regard, even a new cable cannot guarantee connection. Troubleshooting is done by installing the necessary drivers and choosing the right settings. Below are several options to correct the error, and each of them needs to be implemented.
Driver for network card
A computer consists of many components, including not only the processor and graphics adapter, but also the network card. This element is responsible for connecting to the Internet, regardless of whether a person uses a wired or wireless connection.
The next important point is that none of the PC components can work without the accompanying software. Therefore, it is important to perform various manipulations with hardware drivers. Specifically, update it:
- Right-click on the “Start” icon.
- Launch Device Manager.
- Expand the Network Adapters tab.
- Right-click on the name of your network card.
- Click on the "Update Driver" button.
During the system search for current software, you should connect your computer to the Internet using an alternative protocol (for example, Wi-Fi). Otherwise, the PC will not be able to detect the driver. As a workaround, it is suggested that you download the software manually by visiting the network card manufacturer's website.
Another solution is to force the driver to roll back. Try first removing the network adapter from the list of devices, and then update the hardware configuration through the same “Device Manager”. After this, the problem should be resolved. And if these actions do not lead to a positive outcome, then restart the software by processing the request “control.exe /name Microsoft.NetworkandSharingCenter” in the “Run” window (“Win” + “R”).
Setting the duplex speed
As an alternative solution to the problem, it is proposed to install automatic detection of duplex speed. The operation is performed through the “Device Manager”. After you find your network adapter in the list, follow the instructions:
- Right-click on the card name.
- Open adapter properties.
- Go to the “Advanced” tab and click LMB to select the “Speed/Duplex” property.
- In the “Value” tab, set the “Enabled” parameter.
Important. If there is no positive progress, it is worth setting a different value for “Speed/Duplex” - “Auto Negotiation”.
After saving the new settings, you must restart your computer for the changes to take effect. But even if in this case the computer cannot detect the network cable, you still have one more troubleshooting method.
Virus removal and system rollback
Malware often causes most of the problems that accompany computer operation. Therefore, in a situation where the PC cannot recognize the Internet cable, it is recommended to perform cleaning using a third-party antivirus or built-in security tool. In the case of Windows Defender, the following algorithm applies:
- Open Settings via the Start menu.
- Go to Update & Security and then Windows Security.
- Click on the "Open Windows Security" button.
- In the “Virus and Threat Protection” tab, click on the scan button.
At the end of the test, you will be prompted to delete malicious files. In the absence of positive changes, the only solution to the problem will be to roll back Windows to the previous restore point:
- Open Control Panel.
- Go to the "Recovery" section.
- Click on “Run System Restore”.
- Select a rollback point and confirm the operation.
Eventually the PC will return to the state where the cable was showing up unimpeded in the list of network connections. At the same time, you risk losing files if you don't make a backup copy in advance.
All indicators are on but there is no Internet!
At the end of the instructions, I decided to consider one more case. It is exactly the opposite of our situation, but it also occurs quite often. All the indicators on the router are on - Internet, WiFi, etc., but the sites do not open. What to do? First reboot the router, and then the rest of the devices!
Reboot didn't help? Then you need to go to the web interface, open the connection status and see what’s there. If the connection was successful, then you should call technical support. There may be problems with the network provider. There is a connection to his equipment, but then there is nothing.
Also, do not forget that the router itself may malfunction. It also happens. Then you will have to reset its settings to factory settings and configure it again. You can find instructions on how to set up a router for the most popular models on the pages of this site. Good luck to everyone!