The main purpose of a smartphone is to allow the user to communicate with another user. For this user, use a network SIM card. However, due to the increasing number of smartphone users, we often experience network congestion and in this case, resetting the network settings is quite a convenient way to reset the network without having to format the phone. And in this post, we will tell you how to reset your network settings.
This trick will also help you fix your WiFi or Bluetooth connection settings when you encounter a specific network. Moreover, you may have friends who would advise you to reset the network settings, but that is not what happens after resetting the network on your smartphone. In this post, we will give you a complete guide on what network settings reset is and how it will help in this matter. So, that being said, let's get straight to the article itself:
Important information
Make sure that the Wi-Fi function on your smartphone is turned on. If it is already activated, turn it off and on again.
Restart your mobile device and try again. This can help if we are talking about a one-time software failure.
Reboot your router. Remove the power cable from it, wait 3-5 minutes and connect the router to the power supply again.
The mobile hotspot does not work in parallel with Wi-Fi. Even if it is disabled, turn it on and turn it off immediately. The system may have misunderstood the status of the function as a result of a failure.
Remove or temporarily disable the antivirus or simply the Wi-Fi protection function, if the application has one.
Bluetooth and Wi-Fi operate on the same frequency, which means they can interfere with each other. Try temporarily turning off wireless technology or devices paired via Bluetooth with your phone.
Automatically setting up a Wi-Fi network on Android
In the vast majority of cases, users use automatic configuration. This means that the smartphone is initially configured and ready to connect. All you have to do is go into the Wi-Fi settings on your Android phone and turn on the wireless module.
After this, the system will start searching for available connections and give you a list. Select the desired title and connect to it. If a password is required, enter it. At this point the connection is established.
Advanced Wi-Fi settings may be required in special cases:
- If DHCP is disabled in the access point configuration.
- The network you want to connect to is hidden.
In any case, you will have to manually configure your device. How to do it? Everything is quite easy.
Method 1: Reconnect to the network
When a mobile device connects to a wireless network, it remembers its settings so it can connect faster next time. If you change these parameters, for example, the password or name, which often happens on public Wi-Fi networks, the connection will no longer be fast. In this case, you should delete the current network from the smartphone’s memory and join it again.
- Open the “Settings” of the system, then “Wi-Fi Settings”,
Tap on the name of the network and click “Forget”.
- Select it again, enter the password and click “Connect”.
Rebooting devices
Here the mobile phone is trying to connect to Wi-Fi, but the network does not load and does not connect to the access point. The Wi-Fi module, which is located in a cramped phone box, can overheat, and the system turns it off so as not to burn it completely. This protective function is also present on the router that distributes WiFi.
I recommend turning off your router first. You can touch it, if it is hot, then you should wait 10 minutes until it cools down. Overheating can occur when a large number of devices are connected at the same time. Just press the power off button. If it is not there, unplug the wire from the outlet.
The phone should also be rebooted. If it is hot, you should wait until it cools down and only then turn it on.
Method 2: Setting the date and time
Check the date and time on your device. For example, certificates that are used to identify websites have a limited lifespan. If the time and date are configured incorrectly, the browser will not be able to check the validity of the certificates, and therefore guarantee a secure connection. Other applications will operate on approximately the same principle.
- In “Settings”, open the “General Settings”, “System” or similar section, and then “Date and Time”.
- If “Auto-detection” is selected, disable the option and configure the indicators manually.
Manual IP address setting
Wi-Fi is connected but the Internet for some reason does not work. Now we will solve this problem. The router acts as a DHCP server. This is a thing that distributes its IP addresses on a local network. They are needed so that the router does not confuse who should send packets to where, the Internet, pictures, etc. (roughly speaking). It happens that the DHCP client (in this case, your phone) does not work correctly, and its IP settings do not match the settings of the transmitter, which is why the router simply does not see it.
- Also, in the same way, go to the Wi-Fi section and find your connection.
- Press your finger on the network inscription until a window like this pops up. Select “Change network”.
- Click on the DHCP section and select Custom.
- So look, you need to enter the IP of our device. You need to change the last digit to anything other than 1 and 255. You can set it to 128 like I did or set the value to 158. If the gateway is registered, leave it.
- Now scroll down a little, you will see two lines where you need to enter DNS. Be sure to provide these details: 8.8.8.8
- 8.8.4.4
Method 3: Reset network settings
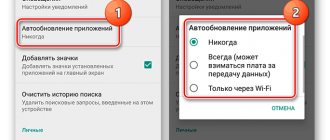
Resetting network settings will not affect other system settings, applications and personal data. Open “General Settings”, “System” or similar again, tap “Reset”,
select “Reset network settings” and confirm the action. You may have to confirm your identity to complete the procedure, i.e. enter your smartphone screen lock password.
Method 4: "Safe Mode"
The Wi-Fi function can be blocked by any software you install on your device. To test this version, let's boot Android into Safe Mode, which disables all user software, and see how the wireless network works.
- Turn on “Safe Mode”. To do this, open the “Shutdown Menu”, hold down the “Power” touch key and confirm the action.
Read about all the ways to boot an Android device in Safe Mode in a separate article on our website.
Read more: Run Android OS in Safe Mode
- Let's see how Wi-Fi works in BR. Mobile data must be turned off. We try to install an application from the Google Play Store, watch a video on YouTube, or use any other active software that requires an Internet connection.
- If everything works, then some software is blocking the connection. We remove applications one by one, starting with the most recently installed ones.
Setting up Wi-Fi on a tablet or smartphone with Android: Video
How to reset Wi-Fi settings
The first thing to note is that you are only changing the configuration for a specific connection. That is, these parameters will not apply to other networks. So, to reset Wi-Fi settings on Android for a specific connection, you just need to turn on the wireless module and hold your finger on the network you want to reset. In the window that appears, select “Forget network” or “Change configuration”.
In the first case, the settings for this connection will be completely reset, and you will have to enter the password again (if required). In the second case, you can simply manually enable the DHCP function in the IP settings. This will allow the device to automatically receive the necessary settings.
You won't be able to restore Wi-Fi settings on Android automatically. You will have to do everything manually. But, since there is nothing complicated here, it won’t take you much time.
Method 5: Router Settings
Check your router settings, especially if Wi-Fi is not working on other devices as well. We are interested in the section with wireless network settings, but for this we need access to the router’s web interface.
- We go to the web configurator, the network address of which can be found on the router body.
Enter your username and password and confirm login. We use the data that is indicated by default on the case or in the instructions for the router (usually admin and admin). Or we enter new authentication parameters if you changed the factory ones.
- We find the section “Wireless Communications”, “Wi-Fi Network” or similar. We look at the “Channel” column. If a specific channel is listed there, there is a chance that it is overloaded. In this case, tap on the corresponding area and select the “Auto” mode, thanks to which the router will automatically search for a free channel.
If desired, the least loaded channel can be determined using a third-party application, for example, Wi-Fi Analyzer.
Install and launch the software, click on the eye icon and select “Channel rating”.
If the name of someone else's network is indicated at the top, click on it and select your router.
According to the application, the router is now using the third channel, but considers the first one to be the best. The difference is small, but you can try switching to it.
Go to the web interface and change the value in the “Channel” block.
- The security type should be "WPA2-PSK".
- Channel width – 40 or 20/40 MHz. After making all changes, click “Apply”.
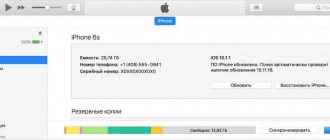
Check for router system updates. Look for this in the "System Information", "Monitoring", "Administration" or similar section. The firmware update process will differ on different models, so it is better to read the instructions, which are usually published on the router manufacturer’s website. It might look something like the screenshot below.
Reset your router. To do this, press and hold the “Reset” or “Reset” button on the device body. Most likely, some parameters will then have to be configured manually. Contact your provider if you cannot do this yourself.
Android does not connect to WI-FI, what to do, how to fix it
Android does not connect to WI-FI, what to do, how to fix it? Sometimes a problem arises when Android is unable to connect to a WI-FI wireless access point. How to solve this problem? Find out in this article!
And so you came to visit or are in a cafe, or perhaps you bought a new router and configured it to distribute the Internet via WI-FI, but your Android smartphone or tablet does not want to connect to the network or does not even see it! Don't worry, there is a way out!
Possible problems and solutions
1. If Android sees the network, but cannot connect to it, make sure you enter the password correctly !
2. If Android sees the network, but cannot connect to it, perhaps Android does not support the type of protection installed in the router, change the type of protection (read below for setting up the router)
3. If Android does not see the network, make sure that the WI-FI network is functioning , reboot the router (on/off)
4. If Android does not see the network, it is possible that Android does not support the WI-FI standard on which the router operates (read the router settings below)
5. If Android sees the network, but cannot connect to it, restart Android and the router
6. If Android sees the network, but cannot connect to it, install a special application on the device from the Google Play store - Wi-Fi Fixer. After installation, restart Android and if the Wi-Fi Fixer application does not start, launch it yourself, then try connecting to the access point (you do not need to enter any settings into the application)
7. If Android sees the network, but cannot connect to it, although the password is entered correctly, it is possible that Android does not support the WI-FI standard on which the router operates (read below for setting up the router)
8. If you have custom firmware installed on your Android tablet or smartphone, then this may be the problem, reinstall it to the official one
9. The opposite advice to the previous one, if the official firmware is installed, then you should change it to custom (for example, CyanogenMod), since it is possible that the WI-FI driver has already been updated
10. Update the firmware on your Android device
11. Perform Factory Reset/WIPE on Android
12. Perhaps you have a Dlink router?
Setting up the router
First of all, you need to get into the router settings.
Go to router settings
To do this, it is better to use a computer, as well as the FireFox or Internet Explorer browser. Let's open one of them. Next, you need to find out the entry address, which can be found by knowing the network gateway.
This address must be entered into the address bar and go. Next, you will be asked to enter your username and password, which, as often happens, is located on the bottom of the router case.
Setting up WI-FI
1. First of all, if Android does not connect, you should switch the WI-FI channel to auto
2. Change the WI-FI transmission mode standard to Mix or G only
3. It is also worth checking the number of allowed device connections to the wireless network
4. Try changing the network security method, change the encryption type from open to WPA
5. Another point worth paying attention to is the enabled DHCP server, which allows you to give internal IP addresses on the network. If you disable the DHCP server, you may experience problems connecting to WI-FI and not only with Android devices!
6. Make sure that the MAC filter is not installed in the settings!
A MAC address is a personal (individual) serial number of a network device.
Depending on the router, there may be white lists of MAC addresses or black lists.
The blacklist includes devices that are prohibited from entering the network, but other devices can.
White list - only those devices that are on this list and no other devices can connect.
To find out your personal Android MAC address, go to
Settings -> About smartphone (Tablet) -> General information
Try disabling the MAC address filter to resolve the connection problem.
If, after all these settings, Android does not connect to WI-FI, then it is worth updating the firmware either on your smartphone or tablet, as well as on the router; in rare cases, there is simply incompatibility, then nothing can be done!
See also - Android - General
Method 6: Reset settings
Judging by user comments, a full reset to factory settings often helps. It is better to do this only if the methods described above did not help, since when you activate the “Hard Reset” function, all installed software and personal data will be deleted from the device and you will be logged out of all accounts. Therefore, before resetting, make sure that you remember the authorization information in your Google account, and that data synchronization is enabled on your phone. If possible, back up the contents of your smartphone. Detailed instructions on resetting parameters to factory settings, setting up synchronization and backing up data on an Android device are available in separate articles on our website.
Read more: Reset Android devices to factory settings Enable synchronization with Google account on Android Create a backup copy of your Android device data
Using public Wi-Fi
If you are trying to connect to the network in the subway or a cafe, then they may have to re-authenticate. To do this, after connecting, go to any browser. Next, you should be greeted by a login page. There is usually nothing complicated there, you just need to go in or swipe the runners to the right to turn on the Internet.
But sometimes re-authorization on the network may be located in a different place. After connecting to the network, swipe the top menu where the quick buttons for turning on mobile Internet and Wi-Fi are located. A notification should appear there, just click on it.