Unfortunately, any program sooner or later starts to fail. A program created on the knees by students will most likely fail early, while a program created by Apple specialists will fail late. The main thing is not to get upset and know how to recover. In this article I will tell you how to reinstall “buggy” software. That is, how to completely remove iTunes from your computer and install it again.
I have long had suspicions that iTunes does not sync my Apple devices correctly. Periodically, when synchronizing, I did not see new applications downloaded in iTunes, although I was successfully reported “The last synchronization occurred 2 minutes ago.” In addition, the message was displayed that “data cannot be transferred to drive C.”
I was not very critical of this problem, but as it turned out, it was in vain.
At one not very wonderful moment, I decided to update my iPhone to the new version 8.1.3. and received a Wi-Fi update glitch. The phone turned into a brick.
Well, okay, no big deal, we’ll restore everything through iTunes. The iPhone was restored without any problems, but the downloaded applications, especially those sorted into folders, were not restored. I got a mess on my phone, which I spent the next 5 days recovering.
But this shouldn’t happen in our beloved Apple. Obviously, this is not only an update failure (this did not happen under Steve), but also a recovery failure (he himself knew about the “Tuna shoals”).
So, it's decided. Reinstall iTunes. And let's start with the fact that you need to completely remove iTunes.
Complete removal of iTunes
First, remove iTunes and related components. Please note that I am talking about COMPLETE data deletion. Those. after that, I again created music and video libraries, but only those applications that were on the devices were registered.
interesting
The iPhone 14 series will receive a new 5G modem
The cost of the third generation iPhone SE has been revealed
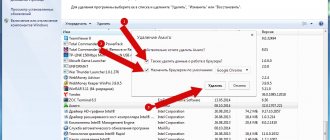
I open “Uninstall Programs” in the “Control Panel” of a Windows PC and find all the related programs. This:
- iTunes.
- Apple Software Update.
- Apple Mobile Device Support.
- Bonjour.
- Apple Application Support.
An important point is that all these programs are removed from the “Uninstall Programs” service and in exactly this order.
Part 2: 3 Ways to Uninstall iTunes on macOS 11, macOS X High Sierra
If you try to move iTunes to the Trash, you will receive a notification that "iTunes.app cannot be modified or deleted because macOS requires it." You have to click "OK" but don't have to give up anything else. But don't worry about it. You can still remove iTunes 12/11 from Mac by following these steps.
Way 1: How to Uninstall iTunes on Mac Using Terminal
Step 1. Open Terminal on Mac
Turn on your Mac. Launch the Finder application. Select Utilities from the Go drop-down menu at the top. In the Utilities folder, select Terminal. Well, you can also access the terminal using Apple's Spotlight feature.
Step 2. Uninstall iTunes on Mac High Sierra or Mojave
In the Terminal window, type "cstutil disable" and press Return on your keyboard. It can disable Apple's System Integrity Protection. If you have administrator rights, you can restart your Mac and log into your administrator account.
Later enter the command “ Cd /Apply /
"And press the "Return" key. You can see the application directory.
After that, copy and paste the command “ sudo rm –rf iTunes.app/
”, To uninstall iTunes on Mac via Terminal.
Note: If you uninstall iTunes using Terminal, the Mac will not prompt you for confirmation. Moreover, you need to enter “csrutil enable” to enable Apple System Integrity Protection again after uninstalling iTunes. Here you can also learn how to reset iTunes.
Way 2: How to Remove iTunes on Mac with Apple's Permission
Step 1. Get iTunes Information
Quit iTunes first. Select "Go" from the top Finder menu bar. Select "Applications" from the list. Find and click "iTunes.app". Then select "Get Info" from the File drop-down menu.
Step 2. Ask iTunes permission
Double-click "Sharing and Permissions" at the bottom of the iTunes About page. There is a small lock icon in the lower right corner. Enter your administrator password, then click OK to unlock the iTunes Sharing and Permissions menu.
Step 3. Ask permission to remove iTunes
You can now change the "Privilege" for "everyone" from "Read Only" to "Read Write". With this operation, you get the right to remove iTunes from Mac. Be sure to click the lock icon to save your changes.
Step 4. Uninstall iTunes on Mac
During this time, you can drag iTunes to the Trash. No error message appears. Empty the Trash and restart your Mac. You can completely uninstall the iTunes app on Mac.
Way 3: How to Uninstall iTunes on Mac Using Activity Monitor
Step 1. Quit iTunes Helper
Turn off iTunes. Drag the iTunes icon to the Trash. Launch Finder. Click Go > Applications > Utility. Find and click on Activity Monitor from the various options. Highlight "iTunes Helper" in the list. Select Quit Process from the top View list. When prompted "Are you sure you want to complete this process?", click "Exit" to confirm.
Step 2. Go to Mac login page
Click the Apple icon in the top left corner of the screen. Select "System Settings" from its list. Select Users & Groups to access the Login Items section. Check the box in front of "iTunesHelper". Then click the "-" icon below to uninstall iTunes.
Step 3. Remove iTunes with Activity Monitor
Head to the Finder app. Select "Go to Folder..." from the Go to list. Copy and paste "/System/Library/Extensions" into the space. Click OK to locate the Extensions folder.
Drag "AppleMobileDeviceSupport.pkg" to the trash. It doesn't matter if you can't find this file. Later, you can delete all iTunes-related files ending with ".pkg". After uninstalling iTunes, empty the Trash and restart your Mac.
We use specialized software
Some users may find the above steps difficult. Then remove iTunes and its components using special uninstallers. I like to use CCleaner or Your Uninstaller, which will automatically remove program information from the registry. Let's look at the example of the Your Uninstaller program. Open the utility and find the program in the list. Next, click on the blue button. Uninstaller will do everything on its own.
Checking that everything has been deleted In rare cases, some auxiliary files remain on the system. How can I check this? After completely uninstalling the program, do the following:
- Press Win+R. In the “Run” window write %programfiles%;
- Delete if the following folders remain: iTunes, Bonjour, iPod.
What are the problems?
When installing or uninstalling iTunes, error 2503 may occur. Displayed as “Itunes Error Code 2503”. This is due to the use of software from Apple Inc. The reasons for its appearance are as follows:
- Damaged or incomplete installation of the program;
- A virus that has damaged a file associated with a program.
How to fix
Let's perform the following sequence of actions:
- Go to Explorer - Windows - Temp and right-click on the folder. Next, select “Properties”;
- In a new window, open the “Security” tab, select your user
- Check the box next to “Full access” and save the changes.
An error appears during the first installation
This problem is due to the presence of viruses on your PC. Scan your PC with the antivirus installed on your system. I recommend using Dr.Web CureIt. It will scan the system and remove viruses. Download it for free from the official website at: free.drweb.ru/download+cureit+free/?lng=ru After treatment, restart your PC and try installing iTunes again.
iPodService Error
This means that the file is being used by another application. Do this:
- Close iTunes and iPod Updater;
- Launch the “Task Manager” and press the key combination Ctrl+Alt+Del;
- Go to the “Processes” tab;
- Find iPodService.exe in the list and click the “End Process” button.
Program update
Some people think that after updating the program nothing changes. However, it is not. Perhaps nothing has changed in the design, but something has happened inside: bugs have been eliminated, improvements have been added that are initially invisible to the eye. Let's figure out how to update iTunes.
How to update iTunes on your computer
Updates for iTunes are released regularly. To check their availability, go to the program. From the top menu, go to Help ® Updates. After this, the search for new versions will begin. If it is found, you will be prompted to install it. If they are missing, the message “This version is current” will appear on the screen.
If you do not want to constantly go through this long procedure, then it can be automated. Go to “Edit” ® “Settings”. Go to the Add-ons tab. Scroll down and check the box next to “Check for software updates automatically.” Now, after the release of a new version, you will immediately be prompted to install it.
Cleaning the registry
Perform the following sequence of actions:
- Press the Win+R key combination and write “regedit” in a new window;
- Next, using the Ctrl+F keys, open the search window and write iTunes there.
Right-click on the desired entry and then “Delete”.
In this way we delete all entries from the registry.
Installing iTunes
Installing iTunes on your computer is no different from downloading other applications. You can find the most current version of the program on the official website of the developers. The site automatically detects your operating system, so choosing the right version will not cause any difficulties. It is not necessary to provide your email address before downloading.
ATTENTION. It is not recommended to download iTunes from other resources. You can infect your computer. Also, older versions of the program will not work on a PC.
After downloading the file, click on it and go through the installation procedure. The first window will contain a welcome message. Just click Next.
In the second window, select the folder where the program will be installed and the version language. If you want a shortcut to appear on your desktop, check the appropriate box.
IMPORTANT. If you plan to create backups, it is better not to install the program on the system disk. This will help avoid various problems and save free space.
Now you know how to install iTunes on a PC. If your computer does not install the utility, we recommend reading our article about it.
Additional Applications
iTunes is used to perform a number of tasks. You can delete music from your iPhone via iTunes, upload photos, set a ringtone for your iPhone, etc. The correct operation of such diverse functions requires various add-ons.
The main difficulty when uninstalling iTunes is finding and uninstalling a number of additional applications, the existence of which the user may not even suspect.
To completely clear your system of programs that come with iTunes, you must also uninstall the following applications:
It is important to remove them in this order, without missing any components. Otherwise, there may be unforeseen consequences for the system. Apple support specialists do not specify what exactly the consequences will be, but you still shouldn’t ignore their recommendations.