Wireless network problems are among the most common problems when connecting your computer to the Internet.
Problems with Wi-Fi are usually caused by both incorrect configuration of the wireless module itself and the Windows operating system.
Wireless network no connection
The network connection icon is missing
One of the first problems that a user encounters when using the network is the absence of a network connection icon in the notification area. To correct this situation, you need to configure this area.
Step 1: Right-click on the Windows taskbar and left-click on Properties.
Right-click on the Windows taskbar and left-click on “Properties”
Step 2. In the next window, click the “Configure” button.
Click the “Configure” button
Step 3. Opposite the “Network” icon, select “Show icon…” from the drop-down list and click “OK”. The icon will start to appear.
Opposite the “Network” icon, select “Show icon...” from the drop-down list, click “OK”
Preparing the router
An interesting question is how to connect a hard drive to a TP Link router, but the router requires preliminary preparation. Its software needs to be updated. This is for secure data transfer.
When you open a browser, personal information should be protected. To do this, go to the official developer page, you will need to register. When you select the menu in the system, the “Firmware Update” item opens. There is an update. All that remains is to accept the user agreement.
Setting up the router
To connect via a Wi-Fi network, you need to correctly configure the router (router) you are connecting to, especially if other devices cannot connect to it.
Step 1. Connect your computer to the router using an Ethernet cable, inserting it into the RJ-45 connectors on the PC and into the LAN connector of the router.
We connect the computer to the router using an Ethernet cable, inserting it into the RJ-45 connectors on the PC and into the LAN connector of the router
Note! Router ports labeled “WAN” or “INTERNET” are usually marked in a different color and are used to connect the cable coming from the Internet provider.
Step 2 . Find out the default registration data of the router - its IP address, username and password on the bottom label of the device, in its documentation or on the Internet. If the data has been changed, remember it.
We find the default settings of the router on the device label at the bottom, if you have changed we look for your information
Reference! Since the procedure for changing router settings depends on its model, it is recommended to refer to the user manual of the specific device or look up the required steps on the Internet.
Step 3. Open an Internet browser and type the router's IP address in the address bar by pressing "Enter".
Open an Internet browser, type the IP address of the router in the address bar, press “Enter”
Step 4. In the login menu, type the “Name” and “Password” of the router and click “Login”.
Enter the “Name” and “Password” of the router, click “Login”
Step 5. The router menu will open. In the “Maximum Number of Users” column, set the number of DHCP users.
In the “Maximum Number of Users” column we set the number of DHCP users
Note! The usual limit is 50 DHCP users, but it's best to check your specific device's user manual for more details.
Step 6. Click on the “Wireless” tab.
Click on the “Wireless” tab
Step 7. Click “Basic Wireless Settings” and oh.
Click “Basic Wireless Settings”
Step 8. In the menu that opens, change the “SSID” name to any other name.
In the “Network Name (SSID)” line, change the name to any other
Step 9: Click “Save Settings” at the bottom of the page.
Click “Save Settings” at the bottom of the page
Step 10. Click on the “Wireless Security” tab and in the “Passphrase” line enter a different password for logging into the Wi-Fi network.
Click on the “Wireless Security” tab, in the “Passphrase” line, enter a different Wi-Fi password
Step 11: Click “Save Settings” at the bottom of the page.
Click “Save Settings” at the bottom of the page
Step 12. Click “Security”, and in the “SPI Firewall Protection” lines click “Disabled”.
Click “Security”, and in the lines “SPI Firewall Protection” click “Disabled”
Step 13: Click “Save Settings” at the bottom of the page.
Click on the “Save Settings” button at the bottom of the page
Step 14. Turn off the router by pressing the power button on the router itself; if there is no button, unplug the plug from the socket, wait about a minute and turn it on.
Press the power button on the router itself to turn it off, after a minute to turn it on
Step 15. Also make sure that the router is not overheating.
Reference! You may need to reset the router to factory settings according to the user's instructions, but it is best to perform such a reset after exhausting other methods of connecting to Wi-Fi.
Network cable not connected
If, when checking the connection status, a message appears that the network cable is not connected, the first thing to do is actually check that it is connected correctly and is not damaged. If possible, try using a different network cable.
Make sure the cable is connected correctly. On the router, the network cable must be connected to the WAN or INTERNET port, and the cable leading from the router to the computer must be connected to the LAN connector. There is usually only one port on a computer, so it will be difficult to make a mistake.
The WAN or INTERNET port is used to connect a network cable to the router, and the LAN ports are used to route cables to computers.
Next, check the status of the router (if you have one). Its indicators should light up as usual. If there is no indication, reconnect the router to another outlet, try resetting the settings on the router (using the “Reset” or “Reset” button) and entering them again. You should reset the settings only if you are confident that you can configure the router yourself.
Also check the status of your network adapter drivers and try updating them.
Video: checking the port on the network card and the WAN port on the router
Troubleshooting connection problems
This tool can be used for various problems in the system, including the problem with the Wi-Fi network.
Step 1. Open the search bar (see above). Type “Troubleshooting...” and click on the utility you found.
Type “troubleshooting…” into the search field and click on the utility found
Step 2: Run the Internet Connection troubleshooter.
Left-click on the Internet Connection troubleshooter
For Windows 10, on the right side of the window, in the “Internet Connection” section, click the “Run the troubleshooter” option.
Step 3 : Click Next.
Click “Next”
The tool will inform you about possible problems with the Wi-Fi network.
Read the information about the problem, click “Next”
Step 4. Restart your PC and try to connect.
Express methods
There are quick ways to troubleshoot internet problems. If your laptop won't connect to Wi-Fi, a simple reboot may help. Sometimes not all Windows services start correctly the first time. Restarting your PC will fix this problem. You can do the same with your router. The device is turned off for 1-2 minutes.
If the laptop sees the Wi-Fi network, you need to reconnect to it. Just in case, you can move the laptop and router closer to each other. It's possible that other electronic devices in your home or neighbors' homes are causing interference, making it difficult to connect via Wi-Fi.
Checking connection activity
It is necessary to check whether the connection is turned on and whether DHCP is activated in it, because The PC may not be able to obtain an IP address.
Step 1. Press “Win+R” on the keyboard (“Win” is located to the right of “Ctrl”), type “ncpa.cpl” in the line and click “OK”.
Type “ncpa.cpl” in the line and click “OK”
Step 2. In the “Network Connections” folder, find the desired wireless connection, and if it is disabled (its icon is gray), right-click on it and select “Connection”.
We find the desired wireless connection, right-click on the icon, select “Connect”
Note! If there is no wireless connection in the “Network Connections” folder, follow the text to the “Updating Network Drivers” subheading.
Step 3: Click on the connection again and select Diagnostics.
Right-click on the connection icon and select “Diagnostics”
Wait for the verification process to complete. If DHCP was disabled, this step will enable it or identify the problem.
Diagnostic completion report
What to do and how to remove the mark
If Windows cannot access the Internet, you need to find out the cause of the error. And this could be:
- problems on the part of the provider (the user cannot do anything);
- the router is faulty (from which the computer/laptop accesses the Internet);
- software error in the network card or Windows services.
Sometimes the system shows a red cross without problems. This happens more often if you have multiple network adapters installed and one of them is not in use (not enabled).
Internet works
Indicates that one of the network connections is not working. For example, a computer cannot connect to the corporate/home network to access other computers (because they are temporarily disabled or not working). At the same time, the red cross does not signal any breakdowns, but simply warns the user that the network is partially unavailable. In total, if there is a red cross on the Internet icon, but there is Internet, then there is no need to clear the error.
No Internet
It is necessary to find out the exact reason for the lack of Internet. The first step is to open Device Manager from Control Panel and check if your network adapters are working properly. Next you should check:
- cable connected;
- the router is working properly (you can try connecting to WiFi from your smartphone);
- if the Windows services responsible for the network are running (“Control Panel” = “Administration” - “Services”, select “Default” there).
In general, a red cross in the tray is a system notification indicating that the network connection is disabled or inactive. In this case, the Internet is not necessarily absent.
Manually entering an IP address
If previous solutions did not allow connections to be established, you can set its IP address manually.
Step 1. In the “Network Connections” folder (see above), right-click on the wireless network and select “Properties”.
Right-click on the wireless network and select “Properties”
Step 2: Select TCP/IPv4 Protocol and click Properties.
Select “TCP/IPv4 Protocol”, click “Properties”
Step 3. Click “Use IP Address” and enter the required connection information. Click "OK".
Check the box “Use IP address”, enter the data required for connection, click “OK”
Note! You will need to enter your own IP address for the connection. The photo also shows Google's public DNS, but you can use 192.168.1.1 as your preferred DNS server.
Correction of red crosses that appeared on local disk icons
4.1.1) In the Customize Windows column, click All Features and select Change the Look of Windows. 4.1.2) In the left menu in the list of icon groups, select “Restore” 4.1. 3) Click the "Refresh Icons" button, then click the "Restore Cache" icon
4.2) Windows 7 Manager
4.2.1) In the left menu, on the “Information” tab, select “Recovery Center”. 4.2.2) In the left menu “Recovery Center”, click “Restore icons”. 4.2.3) In the "Restore icon cache" section, click "Restore
No duplicates found
Content synchronization with Microsoft servers completed successfully. Law enforcement will contact you to discuss next steps.
These checkmarks indicate that the files have been synced (OneDrive). To get rid of it, you need to remove/disable OneDrive accordingly (Settings>System>Storage>Remove OneDrive>Apply)
Press F5 on the desktop and that's it.
Updating Network Drivers
Another common solution to network problems is updating the Wi-Fi network adapter driver, which is necessary if the network connection icon in the notification area is crossed out or is missing from the Network Connections folder.
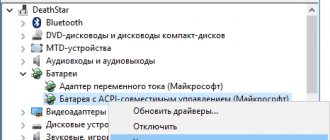
Step 1. Press “Win+R”, type “devmgmt.msc” and click “OK”.
Type the command “devmgmt.msc”, click “OK”
Step 2. In the “Device Manager” that opens, click on “Network Adapters”, right-click on the WLAN wireless device and click “Delete...”.
Click on “Network Adapters”, right-click on the WLAN wireless device, click “Delete...”
Note! If the adapter is not in the section, it may be presented in the manager tree under a question mark or an exclamation mark in the form of “Unknown device”.
No devices
Step 3. Click on “Action” at the top of the manager and select “Update hardware configuration” from the menu.
Click on “Action” at the top of the dispatcher and select “Update hardware configuration” from the menu
Step 4. Right-click on the device that appears and select “Update Drivers” from the menu.
Select “Update drivers” from the menu
Step 5. Click “Automatic search...”.
Click “Automatic search...”
After the system finds and installs the required driver, the Wf-Fi network device will appear in “Network adapters”.
Wf-Fi network device is connected
Step 6. Follow the same steps for the LAN (Ethernet) adapter.
Step 7. If the network device has a disconnect icon, click on it and select “Enable”.
Select “Engage”
Step 8: Restart your PC and check the connection again.
Unidentified network without internet access
If the computer “sees” the network and connects to it, but does not gain access to the Internet, the network status will be called “Unidentified network. Without access to the Internet." What to do in this case?
The computer “sees” the network and connects to it, but does not gain access to the Internet
Reboot the router
If you have a router installed, the first thing to do is reboot it. It may simply not have time to update the data, and because of this, access to the network will be lost. The reboot is performed in the following order:
- First, the router is disconnected from the network. It is important to unplug the cord from the outlet, and not to reboot using the button on the equipment - you need to stop the flow of electricity for a while.
- Then the router should be left turned off for 10–15 seconds.
- After this, the router is connected back to the network and wait until the indicators on it light up.
After the indication appears on the router, you can check whether Internet access is available. Usually, after a reboot, the Internet appears within 7–10 seconds.
Checking network settings
Network settings are data that allows the computer to connect to the network distributed by the provider. These settings are issued by the company providing Internet access (usually they are specified in the service agreement). Sometimes the settings on your computer go wrong, and because of this, the device cannot connect to the Internet.
In order to check the network settings, you need to open “Protocol Properties”. You can do it like this:
- Go to “Control Panel” through the “Start” menu. "Control Panel" is located in the right "Start" menu
- Select "Network and Internet".
In order to find the desired section, you should select the “Category” viewing option in the upper right corner of the screen - Open the Network and Sharing Center section.
In the Network Control Center you can check the connection status, create a new network, and carry out almost any action with your Internet connection - On the left, find the “Change adapter settings” section.
Find the section "Change adapter settings" - In the list of networks, select the one you need, right-click on it and find “Properties”. Only an administrator can open Properties. The desired network will be called “Local Area Connection” or “Ethernet”
- In the list, find the item “Internet Protocol Version 4”, select it by pressing the left mouse button once. After this, the “Properties” button under the list is activated, you need to click on it. Selecting an item is done by clicking the left mouse button once. There is no need to uncheck the box next to the item.
When the window is open, you still need to understand what settings should be entered. There are three options:
- when connecting using additional network equipment (routers, modems, routers), check the boxes next to “Obtain an IP address automatically” and “Obtain a DNS server address automatically”;
- similarly when connecting via PPPoE protocol;
- when connecting via the IPoE protocol, you must use the specified settings, and all fields in the window must be filled in. The correctness of the entered data will need to be checked by checking the network settings with the provider or in the contract. The settings must fully comply with the protocol being used. After checking, check the box next to “Confirm settings on exit” and click “OK”
Let's figure out what the IPoE and PPPoE protocols are, but we won't go into terminology. It is enough to understand what protocol is used on your communication line. To do this, just look at the network settings issued by the provider (specified in the contract).
The settings can be the following:
- password and login are used on the PPPoE protocol,
- IP address, subnet mask, gateway and DNS are used on IPoE.
If you are using PPPoE and you are connected directly, that is, you are not using a router, after checking the settings through the protocol properties, you need to recreate the network.
- Return to Network and Sharing Center. This way only PPPoE connection is configured. To configure a wired IPoE connection, use the protocol properties
- Open the “Create and configure a new connection” item.
Switching items is done by single-clicking the left mouse button - Select "Create and configure a new network" and click "Next".
The selected item will be highlighted with a bright blue background - Click on the "High Speed" option.
It may take several minutes to wait while searching for available connections - If an error appears, select “Create the connection anyway.” This error appears quite often, but the connection can still be created
- Next, you will need to enter the network settings, as well as the network name - this is the name of the connection. You can use the name of the provider company or something else.
The connection name is the name of the connection, and the username and password are the network settings. It's worth noting that the password has nothing to do with the Wi-Fi key
After this, the network will be reconfigured, and you will only have to check whether you have access to the network.
Video: checking network settings on your computer
Resetting TCP/IP Settings
Sometimes problems can be caused by internal system errors. TCP/IP is a set of network protocols responsible for data transfer. You can reset it as follows:
- Open the Run window by pressing Win + R. To open the input window, press the Win and R keys simultaneously
- Type “netsh int ip reset resetlog.txt” into the field and press Enter on your keyboard.
It is important to enter the command correctly, respecting punctuation marks and case - Restart your computer.
Checking drivers
The reason for the lack of access may be outdated drivers (usually this problem is associated with a recent update of the operating system). Let's check their condition.
- Once you open the Start menu, type “Device Manager” into the search box. The required item will be at the beginning of the list of query results
- Expand the “Network adapters” item, right-click on the one you need and select “Update drivers...”.
To expand a tab, you need to left-click on the inverted check mark icon next to it - Select the option with automatic search. After this, a message about the update results will appear.
“Automatic search” activates the system’s independent search for drivers on internal Windows network storages
In addition, by right-clicking on the driver name, you can select “Uninstall”, and then restart the computer. Then when you turn on the system will automatically install the missing driver.
After removing the drivers and restarting the computer, the system will automatically install the appropriate drivers
If there is an exclamation mark next to the driver icon, you will need to completely reinstall the drivers and check the functionality of the network card installed in the computer.
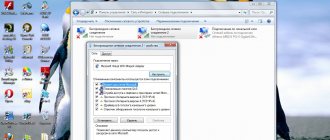
Disable Windows Firewall
Firewall is a useful OS security feature, but it can cause problems with your Wi-Fi connection. You need to temporarily disable the Firewall and see if any changes occur.
Step 1. Press “Win+R”, type “control” in the menu and click “OK”.
Press “Win + R”, type in the “control” menu and click “OK”
Step 2: In Control Panel, click on System and Security.
In the “View” mode, check the “Category” value, click on “System and Security”
Step 3: Click "Windows Firewall".
Click "Windows Firewall"
Step 4: Click “Turn firewall on or off...”.
Click on “Turn the firewall on or off...”
Step 5. Select "Disable..." for both types of networks and click "OK".
Select “Disable…” for both types of networks, click “OK”
Step 6. Restart your PC and try to connect.
PPPoE diagnostics
Additionally, in order to find out the causes of errors when using PPPoE, you can use the Troubleshooting Center. Then the system will independently check for errors and offer possible solutions.
PPPoE (Point-to-Point Protocol over Ethernet) is a communication protocol over an Ethernet network that operates on a point-to-point basis and provides the user with a number of capabilities: encryption, authentication and data compression. It is necessary for the user authorization system, which makes it easier to track the time of provision and payment of network services.
Right-click the network connection icon and click the Diagnose Problems button. After this, an analysis will be performed, Windows will try to cope with the difficulties on its own, and then prompt you to perform several actions.
Error 619
Restart your computer and disable all security systems: antiviruses and Windows Firewall. The latter is disabled in the following way:
- In Control Panel, open Security and Windows Firewall. From the "Control Panel" in the "Categories" view mode, go to "Security", then to "Firewall". In a different viewing mode in the Control Panel, immediately open the desired section
- On the left, select Enable or Disable. Disabling Windows Defender poses a risk of virus infection, so if disabling it helps, please report it to Microsoft technical support so that the company can help fix the problem and keep your computer safe
- Check the box next to “Disable Firewall.” If the action does not help, return to this window and check the boxes next to “Enable firewall”
Error 633
There is only one solution:
- Restart your computer.
- Try connecting to the Internet again.
- Create a new connection.
Error 638
Main causes:
- damage to the network cable;
- malfunction of drivers or network card;
- incorrect connection settings;
- problems with network equipment (router);
- presence of viruses on the computer.
First of all, do two things: check the integrity of the cable and the presence of indications on the router. Never neglect these steps when you have problems with the Internet, so as not to waste time trying to solve a problem caused by mechanical damage.
It is clear that if the cable is damaged, you need to call your provider. But if there is no indication on the router (which indicates that the device is de-energized), you should try reconnecting the router to a different outlet before replacing it.
After checking the functionality of the router and the integrity of the cable, check your computer for viruses with any antivirus program.
If the above does not help, recreate the connection to the network - check the correctness of the entered settings both on the router through its settings, and on the computer itself through the protocol properties. Both actions are described in detail in the previous paragraphs of the article.
Error 691
The only reason for error 691 to occur is an incorrectly entered password and login (network settings). Therefore, the first thing you need to do is recreate the connection. The process has already been described earlier - you need to go to the “Network Control Center”, select the “Create a new connection” option and then enter the correct network settings. After this, restart your computer and check your internet connection.
If the action does not help, report the problem to your provider. There may have been a line failure that caused the error.
Error 720
The easiest way to solve this problem is to reinstall the operating system. To do this, just download the operating system file to disk from the Windows website (or purchase the disk in the store) and run it on your computer.
You can also try updating the TCP/IP protocol. The action is described above, but you can also perform a deeper operation by completely reinstalling the stack. Reinstalling the stack yourself is dangerous - you will have to work with system files, and their damage will affect the operation of the computer. Therefore, try simply updating the stack, and if the action does not help, contact your provider or professional technician for help.
Video: connection errors via PPPoE connection and their elimination
Updating the adapter's network settings
Step 1: Click the magnifying glass icon next to or in the Start button menu.
Click on the magnifying glass icon next to or in the Start button menu
Step 2. Type “cmd” in the line, and click on the utility, run it as an administrator.
We type cmd in the line, and by right-clicking on the utility, run it as an administrator.
Step 3. Type two lines, pressing "Enter" after typing each:
- ipconfig /release;
Type the command “ipconfig /release”, press “Enter” - ipconfig /renew.
Enter the command “ipconfig /renew”, press “Enter”
Step 3. Restart your PC and try to connect.
First actions
First of all, let's check the connection. If your cable goes directly from your provider to your computer or laptop, check its integrity. Once, my friend’s cat chewed the cable and spent half a day trying to figure out what the problem was. Just in case, I would pull out and insert the cable more tightly into the desired port. If this does not help, in almost 90% of cases the problem is on the provider's side. There is an option to reboot your computer so it gets a new IP address from the central router, but it's still best to call them.
If your connection is from a router or modem, also make sure that the cable is intact and is firmly attached to the port. You can try rebooting your router or modem. To do this, the device must have a special button that turns the router on or off. If there is no button, you can simply unplug and plug back in. Wait at least a minute for the router to “rest” and cool down - sometimes failures occur due to overheating.
Take a close look at the router, unplug and reinsert the cable from the ISP and check its integrity. You can also go out into the hall and see if anyone has cut (there have been such cases). Watch the indicators; when connected to 1 port, 1 local connection indicator should be lit. If it is off, the cable is most likely damaged. Sometimes it happens that the port is simply burned out, so just take the cable and switch to another free LAN input.
Changing adapter operating modes
Step 1. Press “Win+R”, type “ncpa.cpl” and click “OK”.
Type “ncpa.cpl” in the line and click “OK”
Step 2: Click on the folder on your wireless connection and select Properties.
Right-click on the wireless network and select “Properties”
Step 3. Find “TCP/IPv6 Protocol” in the components and uncheck it.
Find “TCP/IPv6 Protocol” in the components and uncheck it
Step 4. Click the “Configure” button.
Click on the “Configure” button
Step 5. Go to the “Advanced” tab and select “Automatic” for the “802.11n” channel. Click "OK".
Go to the “Advanced” tab, select “Automatic” for the “802.11n” channel, click “OK”
Step 6. Restart your PC and try to connect.
Step 7. If the connection does not happen, repeat “ Steps 1-4 ” of this sub-item, go to the “Advanced” tab, click on “Wireless Mode...” and change the Wi-Fi mode to 802.11b/g. Click "OK".
Go to the “Advanced” tab, click on “Wireless Mode...”, change the mode to 802.11bg, click “OK”
Step 8. Restart your PC and try to connect.
Reference! Changing the operating mode of the Wi-Fi adapter to 802.11b/g can bring it into line with the operating mode of the router.
If there is Internet
There are situations when the red cross is on, but everything is fine with the Internet. Most likely, the icon is stuck and, as a result, has not been updated. If this bothers you a lot, do:
- restart the router;
- restart your computer;
- disable and re-enable the network card;
- run standard network diagnostics.
These steps will help remove the red cross. If it continues to crash, the problem may be with Windows itself. Call your provider's technical support specialist.
The problem of no network connection is a fairly common problem. Regular users can diagnose and even fix it at home. Most of the necessary actions are performed in the operating system.
Report content
Delete a wireless network profile
If a connection profile is damaged, the best way to restore its functionality is to delete it and create it again.
Step 1: Click the magnifying glass icon next to or in the Start button menu.
Click on the magnifying glass icon next to or in the Start button menu
Step 2. Type “cmd” in the line, and right-click on the utility and run it as an administrator.
We type cmd in the line, and by right-clicking on the utility, run it as an administrator.
Step 3. Type the command “netsh wlan delete profile name = “Profile_name” and press “Enter”.
Type the command “netsh wlan delete profile name = “Profile_name”, press “Enter”
Note! “Profile_name” must be replaced with the real name of the wireless connection on the PC .
Step 4: When the process is completed, you need to reconfigure the wireless connection according to the remote connection settings.
Additional Tips
Make sure your computer is free of viruses. If possible, download new databases and completely scan your computer with an antivirus program. Clean your computer of unnecessary junk and also remove unnecessary items at startup. The easiest way is to use CCleaner. Finally, when you go to the Startup section, remove the suspicious software and then restart your computer.
Once only system restore helped me. At the same time, the Internet was everywhere except my computer. In this case, some system files and folders will most likely break, and this is the only way to solve the problem.
Disabling antivirus software
Windows components and features sometimes don't work well with third-party antivirus software, which can cause problems with Wi-Fi.
Step 1. Click the antivirus icon in the notification area, click “Manage screens...” and select “Disable for 1 hour.”
Click on the antivirus icon in the notification area, click “Manage screens...”, select “Disable for 1 hour”
Step 2. Confirm the disconnection by clicking “Yes”.
Click “Yes”
Step 3 : Check if the Wi-Fi connection is working.
Reference! If the connection works, you need to replace your antivirus program or switch to using Windows Defender.
Step 4. To enable the antivirus, click on the antivirus icon in the notification area, click “Manage screens...” and select “Enable all screens.”
Click on the antivirus icon in the notification area, click “Manage screens...”, select “Enable all screens”
Possible reasons for the lack of Internet on Windows 7
There are several reasons for the lack of Internet. Some of them relate to computer drivers and its equipment, others affect system errors and the lack of correct network settings.
The most common reasons for lack of Internet:
- mechanical damage to the cable or ports;
- lack of a network card or its drivers;
- incorrect connection settings on the computer or router;
- presence of virus software.
The Internet may also be unavailable due to a debt on a personal account or due to a line failure. Before you try to troubleshoot problems, check to see if these issues are causing them.
Checking for viruses and malware
The Wi-Fi connection may be damaged by some malicious software. If there is a virus on your PC that is blocking the connection, the antivirus will probably remove it.
Step 1. Right-click the antivirus icon in the notification area and click “Open interface...”.
Right-click on the antivirus icon in the notification area and click “Open interface...”
Step 2. Select “Run scan...”.
Select “Run scan...”
The scan will start.
Step 3. After checking your PC, click “Repair all”.
Click “Remove all”
Disabling airplane mode
On Windows 8 and 10, this mode may block Wi-Fi connections.
Click on the network icon on the taskbar and in its menu, click on the airplane icon so that the button stops being blue (disabled mode).
Click on the airplane icon so that the button stops being blue
If the taskbar icon is missing, there is an alternative way to disable it.
- Click on the “Start” button and the “Settings” icon (gear).
Click on the “Start” button and the “Settings” icon
- Click "Network and Internet".
Click “Network and Internet”
- Click Airplane Mode and toggle the switch to Off.
Click “Airplane mode” and turn the switch to the “Off” position.
Checking the services required to connect to the Internet
A Wi-Fi network requires certain services to work properly.
Step 1. Press “Win+R”, type “services.msc” and click “OK”.
Type the command “services.msc”, click “OK”
The Services window will open.
Services Window
For Wi-Fi to work, the following services must be running:
- location awareness;
- network connections;
- gateway service;
- Plug And Play;
- telephony;
- firewall;
- remote call;
- autotuning service;
- manager (including automatic) connections.
Step 2. If some of the above services are not running, right-click on the service and select “Start”. The service will start automatically.
Right-click on the service and select “Run”
Step 3: If the service does not start, double-click on it.
Double-click on a service that does not start
Step 4. Go to the “Dependencies” tab.
Go to the “Dependencies” tab
Step 5. Click on the dependent components and find out which of them still need to be running in Windows and start them.
We open dependent components with a mouse click and find out which of them still need to be launched in Windows
Step 6. Restart your PC and try connecting via Wi-Fi.
Most likely, one of the above solutions can solve your Wi-Fi connection problem.
We activate the Wi-Fi module with a key combination or switch on the laptop
Update: As practice shows, when a red cross appears on the Wi-Fi icon and the status “No connection - No connections available,” this may mean that the wireless module is simply disabled in Windows 7.
Therefore, I decided to supplement this article and show how to enable it. Special thanks to Olya, who shared this solution in the comments, and judging by the reviews, it was useful and helpful to many.
If you have a laptop, then Wi-Fi can be turned on there in two ways: by using a key combination on the keyboard, or by using a separate switch (button) on the body of the laptop itself. As a rule, such separate switches were installed only on older models.
Therefore, if you already have an old laptop, then look at the sides, on the front edge, above the keyboard, to see if there is a switch there. Usually, a wireless network antenna is drawn next to it. They look something like this:
If there is no such switch on your laptop, then try activating the wireless module with a key combination. Typically, the FN key is used for this in pair with a key from the F1, F2 series... It should also have a wireless network icon.
On an ASUS laptop, for example, these are the FN + F2 keys.
Press these keys together and look at the icon that shows the connection status. The laptop should see available wireless networks.
If this solution does not help, and the WLAN service (which I wrote about below) is working, then try downloading and installing a utility that is responsible for managing wireless networks, function keys, or power. Almost every laptop manufacturer has such a utility. You can download it from the manufacturer’s official website, on the download page for your laptop model. In the same place as the drivers. Perhaps in the "Utilities" section. After installation, you can try to activate Wi-Fi using the function keys again.
More information in the article: Wi-Fi does not work on a laptop. What to do?
What does it look like?
As I wrote, it can all look different. There may be an icon, but the nets will not catch. Or maybe not, but only the wired adapter lights up or is completely absent. In my case it looks like this:
If you hover your mouse over the icon, the message “No connections available” appears. In fact, the situation is unpleasant, but in most cases, in our experience, it is solved programmatically and on our own. But exceptions are possible; a burned-out module will give exactly the same result. So we try, test and hope for the best.
Registry crash
If you have a backup or image, it's worth using it. This will rollback all changes and resolve the error. If they are not there, then the OS has a built-in recovery procedure that will return the computer to the last point or to factory settings. Sometimes you need this option if the Internet does not work on a laptop or PC.
If the previous methods did not help, and the problem remains, then you can try to troubleshoot through the command line. This can also be tried by those who have no apparent reason for the error to appear. After all, third-party programs, plugins and other applications installed on the computer could lead to it.
To start the scanning and integrity check service you need:
The service will begin looking for damaged or missing system files. All detected files will be restored. The process itself takes quite a long time, and after it is completed, the computer needs to be restarted.