Personal data may be more valuable to the user than the iPhone itself, and Apple developers have foreseen this: any iPhone owner can use the backup function and transfer important information to the PC’s hard drive. Initially, backup copies were created exclusively through the program iTunes, but now it has become possible to copy information to the “cloud” iCloud If you have a fast Wi-Fi connection, this method is even more convenient. The article will tell you how to create a backup copy of your iPhone using iTunes, Wi-Fi and one of the alternative file managers.
Why do you need a backup?
Apple technology is considered reliable, but it does not last forever. It’s easy to imagine the following situation: an iPhone, which served for years as a personal assistant in business, suddenly broke down - it simply stopped turning on. You can go to the store and buy a new Apple gadget, but where can you get the information that was stored on the old one - phone numbers of business partners, suppliers, important notes? The answer is obvious: from a backup copy. Just connect your new smartphone to your PC and download a copy - the information will be there.
The user should be aware that not all information is stored in the backup copy - it includes:
- All photographs.
- Telephone directory plus call history.
- Notes – contents of the application of the same name.
- SMS (including iMessage ).
- Calendars and scheduled events.
- Safari information (such as bookmarks).
- Audio recordings made from a voice recorder.
- Desktop wallpaper.
- Settings for connecting the gadget to the global network (VPN, wireless network access point).
- Application settings and achievements in games.
- Location of shortcuts on the screen.
Not included in the backup copy:
- Music and video.
- Games and mobile applications.
Ringtones are only saved in the iCloud backup.
The choice of information for backup is determined by weight - say, the telephone directory and notes take up little space in memory, but are of undoubted value to the user. Movies and musical compositions weigh a lot, but they can always be downloaded again, so it is not advisable to backup them.
Movies and music albums purchased from the iTunes Store, as well as applications purchased from the App Store, are assigned to a specific Apple ID, so you won’t have to buy this data a second time if the gadget is lost or broken.
How to make a backup via iTunes?
Through the iTunes , backup copies are created in this way:
Step 1 . Connect your smartphone with a cable to your PC and open iTunes .
Step 2 . Go to the device management menu by clicking on the button with the image of a smartphone.
Step 3 . Scroll down to the “Backups” block and decide where you want to save the copy - on your PC or in iCloud .
Remember: iCloud only gives you 5GB of free storage. If you intend to make copies regularly for preventive purposes, it is better to select “This PC” as the save location.
Step 4 . Encrypt the copy if you think it is necessary - check the box next to “Encrypt iPhone backup” and enter the password twice.
Then click "Set Password".
Step 5 . Click "Create a copy now."
Step 6 . iTunes will prompt you to transfer applications from the gadget to your library. If you prefer the “With copies of programs” option, then the process of creating a backup copy will take more time, however, in the future you will not have to again
Step 7 . Wait for all 4 synchronization steps to complete. After this, you will see that the “Latest copies” field contains the current date and time, which means that the creation of the copy was successful.
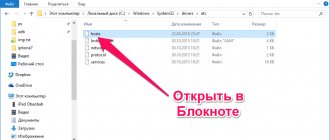
Backups on personal computers are stored at the following addresses:
- On Mac - User/Libraries/Application Support/MobileSync/Backup/.
- On Windows 7/8 – Users/AppData/Roaming/Apple Computer/MobileSync/Backup/.
There is another way to create a backup copy - through the “File” menu, select “Devices” - “Create a backup copy”.
When using this method, copies are created simultaneously in iCloud and on your hard drive.
Alternative ways to copy an iPhone
If for some reason the above backup methods do not suit you or you are looking for a better alternative solution, you can try any of the options below in practice.
Automatic transfer via iCloud
To set up an automatic backup using a cloud service, you need to follow the instructions below.
The latter represent the following algorithm:
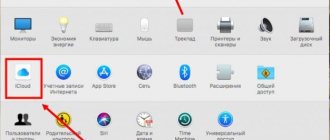
- Go to the settings menu, select “Your name” at the very top and the iCloud tab, in which we set up a backup.
- At the next stage, we connect the smartphone to a power source.
- We connect via Wi-Fi.
- You will need to make sure that the iPhone screen is locked - the backup will be created automatically.
It’s even easier to copy data directly from your iPhone to cloud storage, if, of course, you have enough data for this or are willing to buy extra gigabytes
If the image size is larger than your storage space, you may receive a warning to free up cloud space. You can purchase additional space by following the instructions.
On Mac
Apple laptops with macOS Mojave and earlier versions have iTunes, so the mechanism is clear.
You will need to follow a few simple steps:
- Open iTunes.
- We connect the smartphone to the laptop via a cable.
- We agree to trust the computer and enter the password if necessary.
- Select the connected iPhone.
- We encrypt the local copy and create an access key, which is better to write down so as not to lose it.
- Click on the option to create a backup right now and wait for the process to complete.
On macOS Catalina and later versions, we proceed in a similar way to the “Without iTunes” section.
On WindowsOS
The mechanism of action here is not very different from the above-mentioned method with iTunes.
To create a backup, just:
- Open iTunes after downloading it from the Apple website.
- Connect your smartphone via USB cable.
- Select a trusted device and enter your iPhone password.
- Go to the "Overview" tab.
- Check the box for encrypting the local copy.
- Wait for the backup to be created.
At the very end, you can similarly make sure that the latest backup was just created.
By air without wires
If desired, you can configure the backup process via Wi-Fi without connecting wires.
To do this, you must adhere to the following instructions:
- Connect your iPhone to your laptop via a USB cable and select the smartphone section in iTunes or Finder.
- Go to “Settings” and check the box next to syncing the device via Wi-Fi.
- Confirm your choice by clicking on the “Done” button below.
- Disconnect the USB cable from the phone.
- Make sure that your smartphone and computer are working on the same Wi-Fi network.
If everything is done correctly, the PC or laptop will continue to see the smartphone even without a cable.
After that, it’s enough to proceed to creating a backup right now, this will happen over a wireless network.
How to backup iPhone to iCloud?
To create a backup in iCloud , you don’t need a cable or a PC at hand - just connect to Wi-Fi. The copy is made like this:
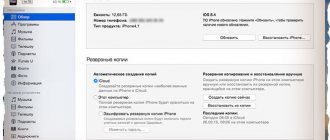
Step 1 . In Settings, find the iCloud section and go to it.
Step 2 . Scroll down and go to the “Storage and copies” subsection.
Step 3 . Make sure that there is enough space for backup in the “cloud” - in the “Storage location” block, there is an “Available” item, which indicates how much free memory is left.
In our example, 4.5 GB of 5 GB are free.
Step 4 . Find out approximately how much one of your backups weighs. To do this, you need to go to the “Storage” subsection in the “Storage location” block.
It can be seen that the weight of one copy is 485 MB; about another 2 MB in iCloud are spent on messenger and wallet data. Using simple calculations, we determine that there is enough space in the storage for about 9 more backup copies. We can also open a ready-made backup and analyze what type of data takes up the most memory.
In our copy, 482 of 485 MB are occupied by photographs . You should carefully “sort through” the album and leave only the most important pictures - then you will be able to significantly reduce the weight of one copy. You can completely exclude a photo from the backup copy - to do this, you need to switch the slider next to “Camera Roll” to the inactive position.
Step 5 . If there is enough space in the cloud, in the “Backup” block, activate the toggle switch opposite “Copy to iCloud”.
Step 6 . A confirmation window will appear - click “OK”; This will confirm that you want to start copying to iCloud .
Step 7 . Click "Create a copy" and wait for the process to complete. Rejoice: the backup is ready and saved in the cloud!
The “Create a copy” field will be inactive if the iPhone is not connected to a wireless network.
If there is not enough free space in iCloud , you can purchase it here, in the “Storage and copies” subsection through the “Buy more space” button.
The prices are very affordable: 50 GB will be available for just 59 rubles per month, and as much as 2 TB for 1,490 rubles - this is an abyss of information!
How to create a backup using the alternative file manager iTools?
attitude towards iTunes : the official program for transferring files regularly “pleases” with problems and “bugs” and, in addition, is quite difficult to master - new iPhone owners, as a rule, tend to put off getting acquainted with iTunes “on the back burner” . However, you still need to upload data to the iPhone somehow - many users turn to alternative file managers, which are simpler software. Such programs can do everything that iTunes , including creating backup copies .
iTools is the most convenient file manager for iPhone. Thanks to this program, you can perform backups completely free of charge ; in comparison, iPhone Backup Extractor (another well-known backup utility) costs $25. The advantage of iTools over iTunes is that iTools allows you to create backups of video and music files. download Russified iTools here.
Backup via iTools is carried out as follows:
Step 1 . Connect your iPhone to your PC with a cable and launch the utility.
Step 2 . Go from the “Device” section to the “Toolbox” section.
Step 3 . In the “Data Management” block, select “Super Backup”.
Step 4 . In the next window, determine what data you would like to see in the backup.
iTools doesn't copy files like, say, notes and browser data.
Check the box next to what you want, then click “Next”.
Step 5 . The next window will appear where you can determine the saving path - this is done through the “Browse” button. The default path is: D:iToolsBackup.
Step 6 . Click “Start Backup” to start the backup process.
If the copy includes only “Contacts” (as in our case), then its creation will take no more than a second. When saving heavy files (video or music), you will have to wait much longer. Signs of completion of the process are a value of 100% on the right and a check mark on the left.
Step 7 . Click "Backup complete" and find a copy in your PC memory.
If necessary, you can easily erase backups that are no longer relevant.
Erase copies from iCloud and PC
delete copies made through iTunes by finding the files on your hard drive, however, it is easier to do this through the program itself.
Step 1 . Go to the "Edit" menu and select "Settings" or press CTRL+, (comma) .
Step 2 . In the next window, go to "Devices".
iTunes backups are stored on your hard drive.
Step 3 . Select the unnecessary copy and click on “Delete backup”.
Step 4 . Confirm that you really want to delete the backup - click “Delete”.
Copies will be deleted permanently - they will not be found in the trash!
erase a backup from iCloud as follows:
Step 1 . On your gadget, go to “Settings” - “iCloud” - “Storage and copies” and go to “Storage”.
Step 2 . Go to the “Properties” of the copy that is no longer needed.
Step 3 . On the next screen, scroll down, find the “Delete copy” option and click on it.
Step 4 . Confirm that you want to delete your backup data from iCloud and stop backing up.
After this, you will notice that there is a significant increase in free space in your “cloud”.
Why transfer files from iPhone to computer
Main reasons for data transfer:
- subsequent processing of photos, video or audio using advanced computer tools;
- storing a backup copy;
- lack of free space in iPhone memory.
Anyone can add to this list. It all depends on the user's personal preferences, but the fact remains that many people really need to transfer files from iPhone to computer.
Since the iPhone operating system is closed, not every person can easily transfer data. In addition, transfer methods differ markedly depending on the computer OS. For Windows you need to take some actions, and for MacOS you need to take others.
Why is a backup not created: possible problems?
When using software to create backups, users rarely encounter problems. If you cannot create a backup via iTunes , you need to take two measures: update iTunes to the latest version (if some buttons are inactive) and check the status of the hard drive memory.
Backing up to iCloud , on the contrary, is very problematic. If the iPhone reports that copying is impossible, proceed as follows:
- Check if there is enough space in the cloud to create a backup.
- Check the quality of the Wi-Fi signal using other applications - for example, see how quickly VKontakte pictures load. If the download is slow, you might want to look for a different Wi-Fi source.
- Sign out of your iCloud and sign in again.
- backups contained in iCloud How this is done has been described previously.
If there is still no result, reset the settings: go to “Settings” - “General” - “Reset” and select “Reset all settings”. You don’t have to worry about your personal data and content: after such a reset, they will remain where they were.
A big and inexplicable problem with saving data in iCloud is definitely present in iOS 9: backups are not created or deleted! Apple developers are aware of this problem and recommend that users update to at least iOS 9.3 - this is the only way to solve it.
How long will it take for an iPhone to recover?
The process of restoring an iPhone via iTunes should not take much time, but sometimes the recovery progress window shows too long remaining time, which can reach up to 20 hours. This may be the result of an error that can be corrected and speed up the process significantly.
Interesting materials:
How to increase the sound on a laptop using the keyboard? How to increase the sound when watching a movie on a laptop? How to increase the sound in an Asus laptop? How to see a flash drive on a laptop? How to find out a laptop's IP? How to find out the Wi-Fi frequency on a laptop? How to find out the Wifi driver for a laptop? How to find out if there is bluetooth on an Asus laptop? How to find out if there is a modem on a laptop? How to find out if your laptop has miracast?