The standard Windows 10 tools include a utility for calibrating the image on the monitor (display) screen of your computer or laptop. It allows you to adjust the color, brightness and contrast of the screen for the most comfortable work in your conditions.
Note : in this article we will not delve into the professional intricacies of calibrating screens using special software or equipment. This instruction describes the procedure for setting up a monitor using standard Windows tools, without the need to download additional programs. It is perfect for beginners who have noticed any deviations in the picture quality of a laptop or desktop computer screen, or simply want to slightly adjust the image to suit themselves. The perception of color/contrast/brightness is purely individual, so you should be guided by your own instincts, but not go too far.
Another note : All procedures must be performed from an administrator account. Otherwise you will need an administrator password.
Setting the screen resolution
Setting up the screen on a personal computer, tablet or laptop with Windows 10 is not very difficult for any user. Its interface is simple and intuitive, which allows you to modify the screen at your discretion in a few clicks. To configure:
- Left-click on the “Start” button.
- Click on the “Options” icon.
In the Start menu, click on the Settings icon - Click the System icon in the Settings window.
In the "Options" window, click on the "System" icon - Open the "Screen" tab.
Review your screen settings - Check your screen resolution. It must match the recommended resolution of the device.
- If the resolution is set correctly, click on the “Graphics Adapter Properties” button.
Click on the "Graphics Adapter Properties" button - Make sure that your adapter is selected in the “Adapter Type” tab.
Check that the video adapter is installed correctly - Close Graphics Adapter Properties by clicking OK.
- Change the screen resolution if necessary.
- Close the System Settings window.
- Screen setup is complete.
Other screen parameters can be adjusted as needed.
When installing Windows 10, all screen settings are usually configured automatically. The exception is rare or outdated types of video adapters, the drivers of which are not in the database on Microsoft servers. In this case, the driver is downloaded from the manufacturer’s website or installed from an optical disc that is included with the computer or laptop upon sale. It contains distribution kits of all drivers for installed devices.
Video: how to change screen resolution on a computer, monitor or tablet with Windows 10
Monitor calibration using built-in Windows tools
First, let's look at the color calibrator in the Windows operating system. For the Windows 7 operating system, go to Control Panel - Display and find the Color Calibration tool. In Windows 10, go to Start - Settings (gear icon), System - Display - Advanced display settings, and click on Color calibration.
After you have launched the utility, you should be sure to sit comfortably and turn on exactly the lighting in which you will work with the computer. Your workplace should be sufficiently lit. Make sure the monitor is at eye level, generally as you would use it for normal work. Expand the calibration window to full screen for more precise settings. Color calibration in Windows is very rich in settings, so it is divided into six steps, which are given below:
First step
You can use the built-in image settings on your monitor or laptop (you may need a separate image utility for your laptop - it usually comes with drivers). You need to select the default settings for your monitor, or, if possible, enable automatic adjustment mode. For example, for many Asus monitors there is a Splendid utility that uses color settings templates for each individual mode of use of the monitor, according to the type of content being displayed.
Second step
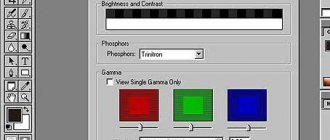
More important for laptop computers. Laptop matrices are more sensitive to color changes. Select the item “Adjust gamma”. In the middle in front of you there will be a gray square with nine dots, and on the left there is a slider that can be adjusted so that the dots on the square become invisible, that is, match the brightness against the general background.
Third step
You need to go to the “Power Options” settings, you can find them in the Windows Control Panel. Here we need a brightness control. But you can also use the + - keys in your monitor's brightness settings or the individual function keys on your laptop. An example of the setting will be an image with a man in a shirt. You need to adjust the brightness so that the suit and shirt are clearly visible on the screen, and the X mark, which is in the background, is almost invisible.
Fourth step
Adjust image contrast. Use the contrast sliders so that the folds and buttons on a white shirt do not blend into the background (wall).
Fifth step
Adjusting the balance according to the RGB scheme. You need to move the red, green and blue color sliders so that the stripes become completely gray and do not cast shades of the corresponding color.
Sixth step
This is the final step in saving the calibration settings into a separate profile. After this, you will be asked to compare the previous calibration option with the new one. If you are completely satisfied with the results, you should go to the text display settings, so do not forget to check the “Run ClearType tool” checkbox.
The ClearType setting includes displaying multiple passages (pangrams) that are read most clearly. In general, we can say that the standard calibrator in Windows is quite sufficient for ordinary users who do not work with graphics and photographs. To evaluate the new calibration profile, you can also use an example photo from the website Realcolor.ru. Choose an image that fits your screen resolution so that the picture is displayed at 100% scale as much as possible.
Increase or decrease screen brightness and contrast
Brightness and contrast are some of the main screen settings. Each user adjusts them individually to their own requirements.
Contrast on laptops and tablets is adjusted automatically. On monitors and displays of personal computers there is a Menu button, with which you can adjust the contrast using the device menu.
There are several options you can apply to change the screen brightness settings.
Changing screen brightness in system settings
There are two ways to access screen options:
- First way:
- right-click on an empty space on the “Desktop”;
- Click on the “Screen Settings” icon.
Click on the "Display Settings" icon - Second way:
- left-click on the “Start” button;
- click on the “Settings” icon;
- Click on the “System” icon.
- Open the "Screen" tab.
- Move the “Change Brightness” slider to adjust the screen brightness level.
Change the screen brightness using the Change Brightness slider - Once you've selected the optimal brightness level, close the Settings window.
Video: How to change screen brightness through Windows 10 settings
Changing screen brightness using the keyboard
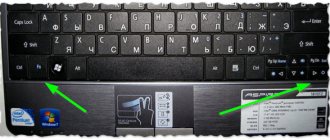
Almost all modern types of keyboards have the ability to change the screen brightness without resorting to system settings. Previously, only laptops had this feature, but now this function is also inherent in many types of personal computer keyboards. As a rule, you can change the brightness using two keys, which have a sun icon and an arrow indicating increase or decrease brightness . They are most often found in the upper or lower case of the keyboard.
Use the keys to adjust the brightness level of your screen
In some cases, you may need to press the Fn key along with these keys to change the screen brightness.
If the keys do not respond to commands to change brightness, download and install the keyboard driver from the manufacturer's website.
Changing screen brightness through Notification Center
In the Notification Center, you can set the screen brightness level only in fixed positions. To change the brightness level, follow these steps:
- Click on the Notification Center icon in the lower right corner of the screen on the Taskbar.
Click on the Notification Center icon - If the tiles in the expanded Notification Center menu are in a collapsed state, then first expand them by clicking on the “Expand” line.
- Click the screen brightness tile. The brightness level will go to 0%.
Set the required screen brightness - Sequentially click on the tile and change the brightness in 25% increments from 0 to 100%.
Change screen brightness using the battery indicator on the "Taskbar"
On laptops and tablets, there is a battery charge indicator on the “Taskbar”, which can also be used to change the screen brightness:
- Left-click on the battery charge indicator.
Click on the battery indicator - Click on the screen brightness change tile.
Adjust the screen brightness level - You can change the brightness level using fixed values from 0 to 100% in 25% increments.
- Click on the "Power and Sleep Options" tab.
Click on the "Power and Sleep Options" tab - Click on the “Advanced power settings” line on the right side of the “Settings” window that opens.
Click on the "Advanced Power Options" tab - In the “Power Options” window, set the required brightness using the “Screen Brightness” slider.
Adjust the screen brightness level using the slider - Click on the “Power Plan Settings” tab.
Click on the “Power Plan Settings” tab - In the “Change circuit parameters” panel that opens, use the “Adjust brightness” slider to achieve its optimal level when powered from the mains and from the battery.
Adjust brightness on mains and battery power
Changing screen brightness through the Start menu
You can also use the Start key to access the screen brightness settings panel. To do this you need to do the following:
- Right-click on the Start button.
- Select the "Power Management" line.
Click on the "Power Management" line - Open the "Screen" tab. Click on the “Advanced power settings” button.
Click on the "Display" icon and on the "Advanced power settings" tab - Adjust the screen brightness level in the same way as discussed in the previous paragraphs of this article.
How to set up ClearType
Also note the ClearType Configuration Tool after clicking Finish option . With it, you can adjust the quality of font display on the screen. We recommend that you spend another three minutes to fine-tune the monitor's operation as accurately as possible.
In these two screenshots above, you can see the difference between ClearType enabled (top) and disabled (bottom). It’s unlikely that anyone will want to voluntarily turn it off, but someone will definitely need more precise settings.
- If you have more than one monitor connected, then Windows will prompt you to choose which monitor to configure ClearType for. You can set parameters for two screens at once, or only for one.
- At the next stage, the system will check whether you have the optimal screen extension, since this indicator greatly affects the quality of the displayed elements. It is unlikely that any of you will have problems with this, but for the sake of appearance, Windows will perform an extra check.
- The system will then offer you five sets of text with different parameters. Take a close look at each of them and indicate which one you like best. The fonts will then be adjusted according to your preferences.
- Once the setup of the first monitor is completed, the wizard will move on to the second, third, and so on. At the end, you will see a message that the text settings on the monitors have been successfully completed.
If you want to configure ClearType without calibrating the screen, then you can do this in the following ways:
- Press Win + R and type cttune .
- Open Options and search box type ClearType . The system will immediately display the ClearType setup wizard in the search results.
- Click Win+R and enter control. In the Control Panel that opens, go to Design and Personalization - Fonts. On the left side of the screen, click Setting ClearType Text.
After this, configure the fonts as described above. Spend a few minutes fine-tuning your screens. The result of your work will be a more pleasing picture to the eye, which will have an extremely positive impact on your experience of using your device.
What to do if the screen is flickering
Frequent screen flickering in Windows 10 can be caused by two problems:
- using outdated video adapter drivers;
- incompatibility of the software application installed on the computer and system requirements.
The problem does not occur as often as it did when Windows 10 first began to spread.
This is due to the fact that the main companies that produce components for computers have brought their software applications to the required parameters. On those computers with video adapters manufactured 6-7 years ago, incompatibility may occur, since their drivers were not developed taking into account modern requirements.
To resolve the error, you need to find out whether the driver or software application is the source that creates the screen flickering. To solve the problem and restore normal operation of the screen and video adapter, you must use the following method:
- Right-click on the “Taskbar”.
- Click on the “Task Manager” line.
In the menu, click on the line “Task Manager” - Check for blinking in the Task Manager panel. If the panel blinks along with the screen, then the reason is the old video adapter driver. If this does not happen, then the reason is in one of the installed software applications.
Check for blinking Task Manager panel - Double-click the “Control Panel” icon on the “Desktop”.
On the “Desktop”, double-click on the “Control Panel” icon - Click on the “Administrative Tools” icon in the “All Control Panel Items” window.
Click on the “Administration” icon - Double-click Computer Management in the Administrative Tools window.
Double-click on “Computer Management” - Expand the Event Viewer tab in the Computer Management window.
Expand the Event Viewer tab - Expand the Windows Logs tab.
Expand the Windows Logs directory - Check the Application and System tabs for errors.
- If a software application compatibility error is detected in the “Application” tab, then remove it. Then download the latest version of the application from the developer’s website and install it on your hard drive.
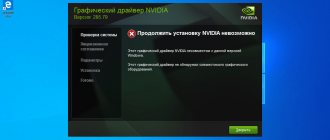
Click on the Application tab and check for errors - If an error in the “System” tab indicates that an updated video adapter driver is needed, then perform the same operations as for the software application to replace it.
Click on the "System" tab and check for errors
Video: how to update video adapter drivers in Windows 10
Troubleshooting monitor problems
If you encounter problems while setting up or using your monitor, you should try to fix them yourself.
Blinking screen
If the screen starts to flicker only in a certain application or game, this means that the program is incompatible with your build and the problem is there. If the monitor blinks constantly, then there may be two reasons: a problem with the cable or drivers.
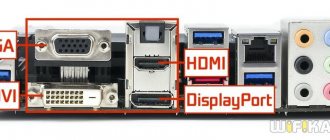
First, check that the cable connecting the monitor and the computer unit is not pinched or coming loose. Usually this is a VGA or HDMI cable. Unplug it from both connectors, plug it in again and check if the problem goes away. If possible, test the monitor using a different cable.
Check if the unit and monitor are well connected
Secondly, if you are convinced that the problem is not with the cable, update the drivers:
- Go to Device Manager, find the Display Adapters block and expand it. You will see the name of your video card or video adapter. Use it to find the manufacturer's website and download the latest driver version from it. Return to the manager and navigate to the driver update process.
Select your video adapter and proceed to update its drivers - Specify the path to the previously downloaded files and complete the procedure.
If everything goes well, the screen flickering problem should be resolved. It's also worth checking if the drivers for the monitor itself are installed. Specify the path to the previously downloaded video adapter drivers
Games don't open full screen
Some games may default to opening in a window instead of full screen. If you want to fix this, there are two ways. The first is to use the Alt + Enter combination, which gives the command to stretch the active window to the entire screen, the second is to go to the settings of the game itself and set the value to “Open in full screen mode”. Usually the second method works 100%; the game either opens full screen immediately or does so after a restart.
Enable full screen mode in game settings
Screen calibration
Users of a Windows 10 tablet or digital pen may experience that the system does not respond correctly to finger or pen touches. In this case, you need to resort to screen calibration:
- While in the Control Panel, go to the Tablet PC Settings tab.
Click on the “Calibrate” button. Click on the “Calibrate” button - Go through the calibration procedure, it is simple: just press in the highlighted areas until the system completes the test.
Tap the indicated spots to calibrate the screen
Deactivating sleep mode and turning off the monitor
By default, if the user does not perform any activity for 15 minutes, the computer turns off the monitor. After another 15 minutes of inactivity, the system goes to sleep. This is necessary to save energy. But the power saving function can be deactivated or configured:
- While in the system settings, select the “System” section, and in it the “Power and sleep” subsection.
Open the "Power and sleep" section - Set a time after which the computer should turn off, or a “Never” setting to prevent it from turning off the screen and going to sleep.
Set the time for the monitor to turn off and the system to go to sleep - If the above method did not work, go to the search system bar and find the tab rundll32.exe shell32.dll,Control_RunDLL desk.cpl,,1.
Find the tab in the Start menu search bar - Set it to "No" and accept the changes.
Set the option to "No"
Video: how to disable sleep mode in Windows 10
So, a computer monitor can be customized by changing its extension, format, brightness, contrast and scale. If there are problems with the screen, it is worth updating the drivers, checking the cable, or performing calibration. You can also configure the computer to go into sleep mode or disable it altogether.
You can adjust screen colors in the interface of the monitor itself or directly in Windows 10. If the image settings in different monitors are slightly different, then the monitor color settings in the operating system do not change. The user has the opportunity to adjust brightness, hue, contrast, saturation and even color temperature in the video card driver program.
This article will tell you how to adjust monitor colors in Windows 10. The question here is how to choose the right monitor colors so that the image looks like a real one. You can customize your monitor colors in several ways, from graphics card driver software to the monitor calibration tool in Windows 10.
What to do if applications or games do not open in full screen
All modern programs automatically adjust to the screen size. If you install an application or game that was developed many years ago for older editions of Windows, then it can be deployed in a reduced size. In this case, it becomes necessary to expand them to full screen. There are several ways to solve this problem:
- Using hot keys:
- Press the Alt and Enter keys on your keyboard at the same time;
- the application will expand to full screen;
- When you press the keys again, the application will return to its previous state.
- Changing launch options:
- right-click on the game or application icon on the “Desktop”;
- Select “Properties” from the drop-down menu;
Select “Properties” from the drop-down menu - in the panel that opens, click on the “Compatibility” tab;
Click on the Compatibility tab - press the “Run Compatibility Troubleshooter” button;
Click on the "Run Compatibility Troubleshooter" button - If the application is not maximized to full screen, then check the “Compatibility Mode” box and select the required edition of Windows from the drop-down list. Please note that the Windows 10 edition is not listed. Last on the list will be Windows 8.
Select the required edition of Windows - Click the "OK" button.
- Update video adapter drivers:
- determine the video adapter model in “Device Manager”;
- go to the manufacturer’s website;
- download and install the new driver.
- Changing game graphic settings:
- launch the game;
- go to settings;
- find the item for changing screen settings;
- set full screen mode;
- restart your computer.
- Changing screen resolution:
- right-click on an empty space on the “Desktop”;
- select "Display Options";
Select "Display Options" - change the screen resolution suitable for expanding the game or application to full screen.
Click on the required screen resolution
If a game or application requires a screen resolution of 640X480, then you can set it in the “Options” block on the “Compatibility” tab. But it must be a very old game or application that was created during the introduction of Windows into the software market.
Video: How to run an application in compatibility mode in Windows 10
What is sharpness on a monitor?
Modern monitors often have a " sharpness
"
...that is, the OS can ask the monitor
every frame to display a specific 1920×1080×32 bitmap.
Interesting materials:
How to turn on the microphone on a monoblock? How to turn on the microphone on an Asus laptop? How to turn on the microphone on a laptop in zoom? How to enable microphone on Razer Kraken? How to turn on the microphone on Samsung? How to turn on the microphone on Viber? How to turn on the microphone on WhatsApp? How to enable PUBG microphone? How to enable microphone in Google Chrome? How to enable microphone in settings?
Calibrate the touch screen on Windows 10 tablets
The touch screen must be calibrated to ensure that the tablet responds adequately to finger touch. If the device is not calibrated, then instead of the letters you press, others will appear on the screen or the image will rotate one hundred and eighty degrees .
To calibrate the touch screen, you need to do the following:
- Open Control Panel.
- Tap the Tablet PC Settings shortcut.
- Press the "Calibrate" button.
Touch the Calibrate key - Answer “Yes” to the User Account Control prompt.
- The calibration program will start.
- In the program window, touch the areas marked with a cross on the touch screen.
- Apply the changes.
- Reboot your tablet.
- If the calibration was completed with errors, then click “Reset” and repeat the calibration.
Disable turning off or dimming the screen
With prolonged inactivity, the display screen goes dark after a certain period, and after a few minutes the computer goes into sleep mode, turning off completely. In the system parameters, you can set the option to turn off sleep mode and screen dimming . To disable the energy saving mode, you need to perform a number of operations:
- Left-click on the “Start” button.
- Open Settings.
- Select the "System" section.
- Click on the “Power and Sleep” icon.
- Click the "Advanced power options" button.
- In the “Power Options” window, click on the “Configure power plan” button.
Select "Power Plan Settings" - In the “Turn off display” line, disable screen dimming when running on AC power or battery power. To do this, select “Never” from the drop-down lists.
Select "Never" from the drop-down list - Similarly, in the fields next to the “Put the computer into sleep mode” icon, disable putting the computer in the off state.
In the drop-down list, click on “Never” - Click "Save Changes".
When working with a standalone device, it is not recommended to disable screen dimming and sleep mode. Disabling will lead to faster battery drain and, as a result, to a decrease in the user's time working with a laptop or tablet.