08/02/2016 windows | for beginners | internet | programs
In my previous article about distributing Wi-Fi from a laptop, comments appear every now and then on the topic that these methods refuse to work in Windows 10 (however, some of them work, but the problem is most likely in the drivers). That’s why it was decided to write this instruction (updated in August 2016).
This article contains a step-by-step description of how to distribute the Internet via Wi-Fi from a laptop (or computer with a Wi-Fi adapter) in Windows 10, as well as what to do and what nuances to pay attention to if the described does not work: the hosted network fails to start, the connected device does not receive an IP address or works without Internet access, etc.
I would like to draw your attention to the fact that this kind of “virtual router” from a laptop is possible for a wired connection to the Internet or for connecting via a USB modem (although during the test I now discovered that I can successfully distribute the Internet, “received” also via Wi-Fi). Fi, in the previous version of the OS this did not work for me personally).
Presets
First you need to make sure you have a working wireless adapter.
The presence of a special driver on the Wi-Fi adapter is also required, which is usually automatically installed by the system. You can find out about its availability in the “Device Manager”:
- Using the right mouse button, click on the “This PC” icon on the desktop and select “Manage”, and then in the left corner click on “Device Manager”.
- Open “Network adapters”, where there should be no marks with an exclamation mark as an unidentified device
- In turn, the adapter, which contains the word “Wireless”, must have the “on” state. To enable the adapter, you need to right-click on it and select “Enable device”.
Distribution also requires a properly functioning Internet connection. The fact of connection can be determined externally - by a cable inserted into a special connector on a laptop or a 3G/4G modem into a USB connector.
You can also check in the following way:
- Launch the Run window using the Win+R key combination.
- Enter the command services.msc and click OK.
- For convenience, arrange the list by name and click on “WLAN Auto-Configuration Service”.
- Make sure the service status is "Running". If this is not the case, then use the right mouse button to click on the name and select “Run”.
An error titled “The hosted network could not be started... are not in the required state...”
It often happens that on Windows 10, when starting a virtual network, a window appears with the message “ The hosted network could not be started. The group or resource is not located...operations" or " The Wireless Network AutoConfig (wlansvc) service is not running. Failed to start hosted network "
To fix this problem, you need to enter the “ Device Manager ”: open the “ Start ” menu, and then “ Settings ” of the PC and go to “ Devices ” and open “ Device Manager ” at the bottom right. Then, in the open manager, click on the “ View ” tab, in the menu that opens, click on the line “ Show hidden devices ”.
In the “ Network Adapters ” folder, find the “ Microsoft Hosted Network Virtual Adapter ” adapter. Then right-click on it and select the line “ Engage ”.
Then try again to launch with this combination - netsh wlan start hostednetwork .
- There may be other services that will appear as unused and need to be started as well.
- If there are no signs of a wireless Wi-Fi network and its adapter is not reflected in the device manager, most likely the laptop does not have a driver for it. It is also possible that the driver does not support virtual networking. In this case, you need to download the latest (updated) drivers from the official website of the laptop manufacturer.
If the “ Hot Spot ” function has already been launched previously, then there should be no problems with the distribution of the Internet via Wi-Fi on Windows 10.
Standard Wi-Fi distribution from a Windows 10 laptop
One of the ways to distribute wireless Internet in Windows 10 is to distribute it from a laptop using a standard function without special programs and entering commands into the console. This is done by using a mobile hotspot in Windows 10.
Algorithm of actions:
- Right-click on the “Windows” sign in the lower left.
- Go to “Settings” (looks like a gear), then select “Network and Internet”.
- A list with available functions will appear on the left side, which includes the hotspot. Click on it.
- In the window that appears, the name of the Internet connection for sharing on different devices is indicated.
- You need to set a password and create a Wi-Fi network name.
- Move the slider to the “On” position. to allow the received connection.
- Using the network name with a password, you can connect no more than 8 devices to the hotspot.
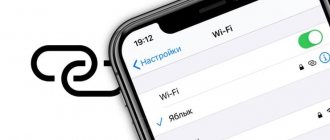
- Disabling Wi-Fi sharing is available in the same place where the wireless connection is turned off (in the “Network” window of the taskbar).
To prevent the hotspot from functioning in vain, you can perform a remote launch from another device. The function is activated in the same access point settings, which will work if Bluetooth is turned on on these devices and they are connected to each other.
How to distribute Wi-Fi from a laptop via a mobile hotspot is described in this video:
Mobile hotspot
As part of update 1607, released in the summer of 2016, there is a “Mobile Hotspot” service, thanks to which it is easy to enable and configure the distribution of the World Wide Web on a laptop with Windows 10.
To start distributing Internet on a laptop with Windows 10 using the built-in hotspot utility, you need to:
- go to “Settings” and click on the “Internet Network” icon;
- select “Mobile hotspot”;
- set a landline connection through which you receive the Internet;
- click “Change” and type the name of the connection to be created;
- move the slider of the “Allow use...” switch;
No more than 8 gadgets can simultaneously connect to the created network. Connection on any devices is the same as when using a router.
Distribution via command line
If the previous method did not help, then the option using the command line is more likely to be successful. Its implementation involves the following actions:
- Open “Start” and immediately start typing “commands”.
- “Command Prompt” will appear in the list. Right-click on it and select “Run as administrator.”
- After starting, type netsh wlan show drivers This will help you find out whether your wireless device can support distribution.
- Among the text in the window that opens, you need to find the field “Support for a hosted network” and make sure that o.
Otherwise, you need to reinstall or roll back the driver, and then try again.
How to organize Wi-Fi distribution from a laptop:
- Enter into the command line netsh wlan set hostednetwork mode=allow ssid=okwifi=okwificom
But at the same time, change “ okwifi ” to something else at your own discretion. This will be the name of the wireless network. And replace “ okwificom ” with the invented password for this network.
Don't close the command line window, you'll need it a little later!
- In order for users to connect to a laptop that distributes the Internet, they need to:
- Click "Start".
- On the left, select “Settings” (gear icon), and then select “Network and Internet”. Click on the blue link “Configure adapter settings”.
- A new window will open. Right-click on the “Wireless Network” icon and select “Properties” from the context menu that appears.
- In the window that opens, go to the “Access” tab and check the “Allow other network users to use this computer’s Internet connection.” Save changes.
- At the command line enter netsh wlan start hostednetwork
This phrase is used to start the access point. All wireless devices in the laptop's Wi-Fi signal area will be able to see this network and connect to it using the specified password.
- netsh wlan stop hostednetwork in the command line
The procedure for managing wireless data transfer is not necessarily always done using command line scripts. Commands are written to a “bat” file. Distribution is controlled using three commands:
- netsh wlan start hostednetwork - Wi-Fi starts (with open access to the Internet connection, it becomes available to other devices);
- netsh wlan stop hostednetwork - stop Wi-Fi and stop transmission;
- netsh wlan set hostednetwork mode=allow ssid= okwifi. com key= okwificom keyUsage=persistent - the network name and/or password is changed.
To create batch files, you will need to create a txt file (you can give it any name you want). You just need to write the command into this file and change its extension from .txt to .bat .
To change the extension, you need to right-click on Start and select Explorer. Next, click on the “View” tab at the top of the panel and on the right on “Options”. In the window that opens, go to the “View” tab and uncheck the “Hide extensions for registered file types” checkbox. Click OK.
Now you can see the extension, which can be renamed to .bat . Opening such a file starts the execution of the command. Therefore, it is convenient to create a separate file to start and stop distribution. If necessary, you can change the command by right-clicking on the file and selecting “Edit”.
The implementation of Wi-Fi distribution from a laptop with Windows 10 via the command line is shown in this video:
Checking the possibility of distribution
Before you start setting up your computer, you need to check whether it can work as a router.
Algorithm:
- open the command prompt with administrator rights;
- type “netsh wlan show drivers”;
- When technical information about your Wi-Fi adapter appears, check to see that the word “Yes” appears next to “Hosted Network Support.”
If support does not work, then you need to find the Wi-Fi adapter drivers in the device manager and, if necessary, update them. It is better to install those that were downloaded from the equipment manufacturer’s website.
In some cases, rolling back the driver to an earlier version may help. For this:
- right-click on the “Start” menu;
- call “Device Manager”;
- in the “Network Devices” subsection, select the required equipment and right-click;
- in the menu that appears, click on “Properties”;
- go to “Driver”;
- click “Roll Back”.
In any case, you need to ensure that the PC supports network hosting; without this, all further configuration is meaningless.
Distribution using special programs
To distribute Wi-Fi from a laptop with Windows 10 to other devices, you can download a special program designed for distributing a wireless network. Their advantage is that they have richer functionality compared to conventional methods. There are usually no difficulties with distribution.
MyPublicWiFi
Algorithm of actions:
- Download the installation file from the official resource - https://www.mypublicwifi.com/publicwifi/en/index.html Launch it. During the installation process of the program, you will not need to install any third-party applications, which is rare for a free product.
- Run the program using the administrator name by right-clicking on the shortcut and selecting the required line.
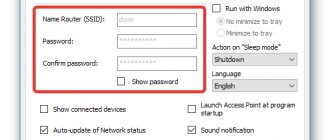
- All fields must be filled in:
- the first field is with the name Wi-Fi;
- the second - with a password, which must consist of at least 8 characters;
- in the third field you need to select the connection intended for sharing.
- Put o.
After clicking the network launch icon, it can be used by other devices.
More details about the settings of the MyPublicWiFi program are described in this video:
Virtual Router Plus
Setting up this free application follows a similar principle:
- To download, use the official resource - https://virtualrouter-plus.ru.softonic.com During installation, no third-party software will be installed.
- Launch the program using a shortcut on the desktop.
- Fill in the fields by entering the network name, password and selecting the involved connection.
The disadvantage of the program can be considered the lack of a checkmark to allow the use of the Internet transmitted via Wi-Fi by other devices. You will need to go to “Properties” – “Network adapters” – “Access” and make the appropriate checkbox.
Watch the video that explains how to install and configure the Virtual Router Plus program:
Connectify Hotspot
There is a free version of the program (with limitations) and paid versions “Pro” and “Max”. The installation procedure is easy and straightforward, but it is necessary to restart the laptop after installation.
When you first start, a free option is offered, you will need to enter a key or make a purchase. The next steps are:
- For simple distribution from a laptop, select “Wi-Fi Hotspot access point”, and in the “Sharing Internet access” column, enter the name of the connection to be distributed.
- In the line “Network access” (for “Max”), the router mode or “Bridged” mode is possible. The latter implies that all devices connected to a given point have one local network with other devices (connected to the original distributed network).
- In the “Access point name” and “Password” column, enter the desired name and password.
- In “Firewall” (“Max” and “Pro”) you can configure access to the local network and enable the built-in ad blocker.
- Select "Start Hotspot". The access point will start and the connection will become available from each device.
- In “Clients” you can monitor all connected devices with their traffic.
When you log into Windows, by default, Connectify Hotspot will start in auto mode and in the same form as when you turn on or restart the laptop (the access point will start again). You can change this in “Settings” – “Connectify launch options”.
The capabilities of the Connectify Hotspot program and the features of its configuration are described in this video:
Due to the autostart of the access point in Windows 10, difficulties may arise for the Mobile Hotspot.
You should not download and use several programs at once - you need to give preference to one of them. If one program gives an error indicating that it cannot be started, then other programs will also give it: most likely, the reason is the Wi-Fi adapter (the driver is missing, incorrect or disabled). The programs work on a similar principle, their difference lies only in the interface and a number of minor functions.
How to set up MyPublicWiFi
This is a free analogue of Connectify for creating an access point. The MyPublicWiFi application is another WiFi distribution on a laptop, and it’s completely free. The program is very light and fast. After a simple installation, just run the utility as an administrator:
Then you will see a window in which 3 main parameters for setting up the access point are available: Network name (SSID), Security key (wireless network password) and Internet connection , which will be available to clients.
In the Management tab, in addition to enabling program autoloading (bottom mark), there is another interesting function - the Enable Firewall , by checking which you will make the use of uTorrnet and DC exchangers unavailable.
Possible problems and their solutions
When problems arise, it is not always possible to immediately diagnose the cause of the difficulty. In any situation, you can try to stop and then restart the wireless network. Often problems are successfully resolved with such actions.
What to do if the mobile hotspot on Windows 10 does not turn on?
Setting up a wireless access point in the parameters is theoretically simple, but in practice many users see some kind of error.
There are various ways to resolve the issue:
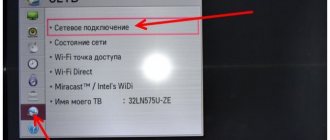
- Reset settings in the following sequence:
- "Network and Internet"
- "State"
- "Network reset"
- Remove the Wi-Fi driver by downloading a new one from the manufacturer’s resource. If the manufacturer has not released drivers for Windows 10, then it can be replaced with a driver from the eighth version.
- Find out if the Microsoft virtual adapter is in the “Device Manager” list and enable it.
- Use the command line configuration option.
The laptop does not distribute Wi-Fi, devices cannot be connected, distribution does not start
There are various possible reasons why a laptop with Windows 10 cannot distribute Wi-Fi:
- First of all, the necessary Wi-Fi adapter driver may be missing. To download it, it is better to use the official resource.
- Distribution may be blocked by antivirus programs. It is better to disable them when distributing Wi-Fi.
- The connection may be blocked by firewalls built into Windows.
Cannot start hosted network
In some cases, a message may appear informing you that it is impossible to start Wi-Fi or the network is in an incorrect state. In such a situation, it is necessary to turn off and restart the Wi-Fi module.
This can be done using the “Device Manager” or using a mechanical button, if it is present on a particular laptop. Similar models include Vaio and many Asus models. In addition, in the “Device Manager” you need to enable the display of hidden devices, search in the “Network Adapters” menu and then launch the virtual adapter.
Thanks to the instructions given in the article, it is possible to connect any device to a wireless Wi-Fi network distributed from a laptop running Windows 10. Each user can choose the most convenient option for setting up such distribution.
Previous post Creating a wireless local network via a Wi-Fi router
Next entry No Wi-Fi on laptop: why and what to do?
How to set up Virtual Router Plus
The Virtual Router Plus program is made from a simple Virtual Router and is not much different from the original. On the official website it was initially clean, but recently it can install unwanted software that is not so easy to uninstall.
This virtual router option itself is good and simple, but you should be careful when installing and downloading. You can download Virtual Router Plus in Russian and without unnecessary things from the official website.
- Network name (SSID) - set the name of the wireless network that will be distributed.
- Password - consisting of at least 8 characters (WPA encryption is used).
- Shared connection - select the connection through which your PC is connected to the Internet.
Conclusion
Creating your own access point and sharing the Internet is as easy as shelling pears. Especially after adding the Windows 10 mobile hotspot. You may also have to disable the firewall in Windows 10, as it may block the Internet connection.
Soft launch
Special programs have been created for this. They automatically start distribution from the laptop. They are all very easy to use, so I'll just cover the general concept of getting started. Here are some software with links for downloading directly from our portal:
- Virtual Router 3
- Switch Virtual Router 3.4.1
- Maryfi
- Connectify
NOTE! You can download these programs from official websites or other file hosting services. If the archive is broken, does not open, does not install, or errors occur, then write about it in the comments. And I, a fourth generation network magician, will help you.
- Now unpack and run the program from the archive.
- Some of them do not require installation.
- As soon as the software starts, you will see a very simple menu with start buttons, changing the Wi-Fi adapter, password, and network name. I think you will understand them.
Wireless Access Point in Windows
Windows 10 allows you to share your Internet connection with other subscribers through the method of creating a hosted network or virtual Wi-Fi. This computer function is included in the Network Shell command line and organizes a SoftAP - a wireless access point. The combination of 2 software elements will help distribute the Internet regardless of its type: wired Ethernet or Wi-Fi adapter.
To distribute the Internet from a laptop via Wi-Fi Windows 10, you first need to perform a preparatory procedure - check the network card to support this option. Secondly, set up wireless transmission. Thirdly, know how to turn it off or completely remove it from your computer.
The process should begin with the user opening Command Prompt with administrator rights and going to the Windows PowerShell (administrator) section, where he can carry out the necessary manipulations.
You must answer Yes in the User Account Control pop-up computer security window to obtain permission to make changes.
On a laptop, you can create a virtual network using Windows, through the parameters or the console
Peculiarities
The main advantage of modem mode on a computer is the ability to share the Internet with other devices. However, its work has some disadvantages:
- It is possible to disrupt the normal functioning of the network driver or applications that organize connections.
- Unlike setting up a phone, distributing Wi-Fi from a Win 10 laptop is a more complex task. Correct and consistent use of special commands to obtain virtual access information and setting appropriate parameters is required.