Author of the article
Sergey Sakadynsky
He worked in the field of IT consulting, was engaged in the creation and administration of Internet resources. 10 years of experience in designing and maintaining computer networks.
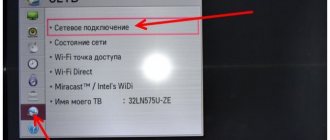
The mobile operator Yota has favorable Internet tariffs. It is also possible to connect inexpensive unlimited access. The operator does not have fixed packages. Each user designs a tariff for himself. You can refuse voice services altogether and leave only the Internet.
But in this barrel of honey there is a fly in the ointment. Yota will not allow you to use unlimited on multiple devices. I’ll tell you below how to distribute Yota Internet without restrictions via Wi-Fi.
Distribution restrictions
Restrictions on Internet distribution are dictated by purely mercantile considerations. After all, the client can purchase an unlimited tariff, enable modem mode and use it with the whole family from several mobile devices. Or even connect a couple of laptops and a TV at the dacha. The speed is not limited. Therefore, the operator monitors the Internet distribution and blocks it. The Internet works, but speed limits are introduced: it is reduced to 64 kbit/sec. That is, users can, at best, check their email or view their social media feed. And when you try to download something, the speed will be even lower - 32 kbit/sec. The tracking program is built into the SIM card. It can neither be disabled nor deleted. It will also not be possible to insert the card into a mobile router and distribute the Internet from it. The operator will see this and also reduce the speed.
At the same time, there is no ban on Internet distribution as such. For an additional fee, Yota will remove all restrictions.
Why is low speed internet poor?
Sometimes unlimited Internet distribution is significantly hampered by low server speed. The main thing is to find out why this happens. Low speed may be due to a ban from the cellular operator or incorrect TTL settings. If you plan to only use social networks, this usually does not pose a problem. But in the case when the user wants to play games and watch movies, this can significantly complicate the use of traffic. It must be borne in mind that there are other reasons for reducing speed that are not related to the ban.
Low speed during distribution is a fairly common occurrence
Most often, low speed is associated with banal network overload. This happens especially often on weekends and holidays. But there may be another important reason - the phone’s memory is full. To prevent this situation, it is recommended to enable the automatic memory clearing function.
Paid services to remove restrictions
There is a completely official way to distribute the Internet from Iota without restrictions. The operator offers three options for removing limits - for two hours, for a day and for 30 days. At the same time, you can use the Internet on at least ten devices at once. The main thing is that your smartphone can provide this. You can activate the service using a USSD command from your phone.
- To turn on the distribution for two hours, you need to dial *838*2# and press call. The cost of the service is 50-90 rubles depending on the region.
- To be able to distribute Internet throughout the day, you need to use the code *838*24#. It will cost from 150 to 190 rubles. Upon expiration, the service will be disabled automatically.
- If you plan to distribute the Internet constantly, use the “Internet distribution for 30 days” option. This will cost you approximately 350-400 rubles. You can turn the service on and off using the USSD command (*111*23#), in your personal account on the website or through the Yota application on your phone. The money is debited in full upon activation, so you must have the required amount on your balance.
Please note that you can cancel the service no later than 24 hours before its end. If you miss this deadline, it will be renewed automatically if there are funds in your account.
Editing the Hosts file for Yota
You can distribute the Internet from iota without restrictions to your computer by editing host files. This is necessary to block detection of Internet distribution, but it is necessary to install a traffic analyzer and check where Yota determines that it is limiting distribution.
Therefore, you need to find special software on the Internet.
The file itself can be found in the following path:
- Press the key combination “WIn + R” and in the “Run” window that opens, enter: “%systemroot%\system32\drivers\etc”, after which the “ets” folder will open. You need to find the “hosts” file there.
- after that you need to right-click on it and select edit as administrator
- block there the url of the site by which the distribution is determined.
This method of removing restrictions on Yota is probably the most controversial of all, but nevertheless, for clarity, we have presented it.
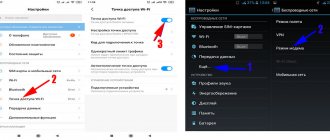
Change TTL
This is the most effective and reliable method to bypass Internet distribution restrictions. The fact is that Yota monitors the distribution using the TTL (Time to live) parameter. Let's skip the unnecessary technical details. It is important for us to know that this is the code that your phone sends to the operator's base station. For Android, iOS and Linux, the TTL value is usually 64, for Windows 128. This figure is reduced by one at each transit node.
When you enable distribution, the TTL from the device connected to your smartphone will be less by 1 - that is, 63 or 127. The operator will see this and limit the speed. To deceive the network, on devices that use the Internet from your smartphone, you need to set the TTL value to 65. The number that will reach the operator is one less, that is, 64. The base station will not see the difference between the smartphone and the devices connected to it.
To bypass the restrictions on Yota mobile Internet distribution on a phone running Windows, the TTL value on connected devices should be set to 129.
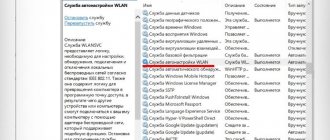
Windows
On a laptop or computer running Windows, we will change the TTL value through the registry.
- Press the Win + R keys and enter the regedit command.
- In the address bar at the top, enter the path HKEY_LOCAL_MACHINE\SYSTEM\CurrentControlSet\Services\Tcpip\Parameters.
- In the window on the right, right-click on an empty space and select “New” – “DWORD Value (32 bits).”
- We give it the name “DefaultTTL”. Double-click to open it, select the decimal number system and enter the value 65. Click OK.
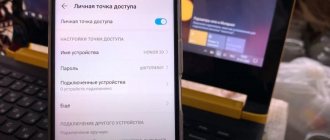
But this is not enough to start distributing Wi-Fi on Iota. The operator monitors and blocks some sites. Including the Windows update server. If you have the option to automatically download updates enabled, disable it.
- In seven, this can be done by opening Windows Update and selecting “Don’t check for updates” in the list.
- In Windows 10, right-click on the Start menu and select “Computer Management” from the list that appears. In the window that opens, go to the “Services” section, scroll down the list of services and double-click “Windows Update”. Set the Startup Type field to Disabled.
Now you can turn on Wi-Fi distribution on your smartphone and connect to it from your computer.
If you use your phone as a modem via a USB cable, you do not need to change the TTL value. In this case, the operator will not see your PC.
MacOS
On computers running MacOS, there are two ways to change the TTL. The first is a temporary replacement. The original value will be restored after the computer is restarted.
Launch the terminal and enter the command sudo sysctl -w net.inet.ip.ttl=65. Next you will need to provide your account password. The value will be changed to 65.
The second method allows you to permanently change the TTL value. But it will require editing system files. Find the “etc” folder in the root directory and create a sysctl.conf file in it. Write the line in it: net.inet.ip.ttl=65. The problem is that the etc folder is hidden and in some cases is not visible at all. To see it, open the root directory and press cmd+shift+G. In the window that opens, enter the name of the folder – etc. The contents of this folder will open.
Android
For Android devices, there are two methods. First: find the ip_default_ttl file through Explorer and edit it, assigning the value 65. But for this you need to install root rights. If you don't have them or don't even know what they are, use the second, more accessible method. Download the Terminal Emulator for Android program from Google Play. It's free and easy to use.
The program works just like the command line on a computer. Launch it and type cat /proc/sys/net/ipv4/ip_default_ttl.
A window will open with the standard value, which needs to be increased by one. After making changes, you can connect to the distribution device.
Linux
According to Ubuntu users, in this OS there are no problems with bypassing the Yota block for Internet distribution. You can distribute Yota Internet to computers running Linux without the threat of blocking. But just in case, I’ll tell you how to change the TTL in this operating system.
In the terminal, enter the command sudo vi /etc/init.d/local.autostart. The system will ask for the administrator password. Then you need to press the i key on the keyboard, and then use the command #!/bin/bashsudo iptables -t mangle -A POSTROUTING -j TTL —ttl-set 65 to change the TTL value.
To complete the procedure, we enter two more commands in turn: sudo chmod +x /etc/init.d/local.autostart and sudo update-rc.d local.autostart defaults 80.
After this, distributing Yota Internet from a smartphone to a computer or laptop running Linux will definitely not cause problems.
Description
The service is required for Beeline subscribers to share the Internet via a WI-FI point. Its activation is free. The subscriber pays for the time during which he uses the access point:
- the first connection per day for a period of one hour - no fee is charged;
- second and subsequent activation of the “Modem Mode” function – cost 50 rubles, valid until the end of the day;
- To enable and disable distribution an unlimited number of times per day, you will need to activate the service for 24 hours for 240 rubles.
It will be possible to distribute the Internet from a smartphone to other devices without this option, but the provider will limit the access speed. It will not rise above 64 Kbps.
Change IMEI
IMEI is a unique code of a mobile device by which it is identified on the network. It’s worth noting right away that electronics manufacturers do not approve of any manipulations associated with changing it. If your mobile device stops working properly as a result, it will be considered a non-warranty issue.
Changing the IMEI will allow you to move the Yota SIM card into a mobile router and distribute the Internet from it. The fact is that IMEI allows the operator to determine from which device you are accessing the network. A SIM card with a tariff for smartphones cannot be transferred to a router, modem or tablet. But you can deceive the base station by replacing the original IMEI on such a device with the smartphone code.
The code can be found on the Internet or generated with a special program. Or write it off from any smartphone. The main thing is that such a phone is not connected to Iota - the simultaneous appearance of two devices on the network with the same IMEI risks blocking both.
Changing the code on Android devices is done through the engineering menu or using special programs that are easy to find on the Internet. A mobile router or modem will require flashing. But on Apple devices there is no IMEI code at all, so this method will not work for them.
Bypass on iPhone
To do a bypass on an iPhone, you need to use the same scheme as for a regular smartphone, but in a slightly different order. First, remove Wi-Fi. Then download the AndImgTool application. See the error window and click OK. Next, turn on the Internet and use the settings menu. Enable aviation mode, reboot the apple and disable the selected mode. Wait for the application to finish downloading and use it to remove the restriction.
How to delete the Family Link application on a tablet or phone - detailed instructions
Since the application is directly connected to your child’s Google account, to delete it you will need to delete the specified Gmail account. This means that your child will lose all of their data from their Google account, including services associated with it.
Do the following:
On the child's phone
- Launch Family Link on your child's phone, go to the application menu, and select Remove account.
- On the next screen, select “Delete Account” again.
Tap on “Delete account” - Select your Gmail account as the person responsible for removing parental controls from your child's device.
- Enter the password for your Gmail account and click on the confirmation checkmark below.
Enter the username and password for your parent account - You will see a confirmation message about account deletion.
- Now let's go to the parent's phone.
On the parent's phone
- Launch “Family Link” on your parent’s phone, and in the program, select the child on whose phone you want to remove parental controls.
- Click on the image with three dots at the top right, then select “Account Info”.
- Scroll down the child's account page and click on “Delete Account”.
Select "Delete Account" - Read the deletion confirmation information.
- At the very bottom, check the three corresponding boxes, then click on “Delete account.”
Check the boxes and confirm deletion - Go to your child's phone.
- Go to the gadget settings, select “Applications” there, and remove “Family Link” in the usual way. That's all.
What does Google recommend?
Google programmers are well aware of the problems with removing parental controls. Nevertheless, despite the massive negativity from users, they are in no hurry to effectively solve the problem.
The whole template set of tips for removing Family Link from Google comes down to the following:
- Remove your child's account from the Android device.
- On your (parent's) device, launch the Family Link app.
- Select your child there.
- In settings, click “Manage settings”, then “Account info” and “Delete account”.
Of course, such a set of template advice is not informative enough. Therefore, let’s take a step-by-step look at how to remove Family Link activation on a smartphone.
How to remove parental controls from your computer
In order to remove parental controls from your computer, you first need to launch “Start” or launch the command line. In the first situation, you should enter “Gredit.msc” into the search and find the “Security Settings” window. Be sure to pay attention to the section “Computer Configuration” - “Local Policies”. Both options located there should be changed and the “Prompt for security credentials” and “Promotion without prompt” functions must be activated.
In addition, parental controls can be set on the browser platform that is located on your computer. In order to remove it, download any spy program: Snitch , Hide Trace or another. Then we activate this program and go to a prohibited Internet site. After displaying parental control protection on the screen, you refresh the page and go to a completely different site, no matter what site, where parents will need to enter a password, and with the help of spyware you will find out this password and will use it when removing parental control.
Principle of operation
The option works according to the following algorithm:
- Authorization in a user account on the tele2.ru website or in the operator’s mobile application.
- Go to page.
- Indicating the amount of transmitted traffic and entering the number to which it will be sent.
- Transaction confirmation.
Tele2 Internet distribution by sending traffic to another subscriber can be activated via a USSD request. The user will need to open the call screen and enter the combination *974*number*number of GB# . The final request looks like this: *974*7902ХХХХХХХ*5# .
Additional USSD commands for service management:
- *974# — request information about the balance of traffic available for sending;
- *974*3# — detail of transferred gigabytes;
- *974*6# — disabling received traffic;
Limits and restrictions
The following limits apply to the service:
- the minimum amount of sent traffic is 1 GB, the maximum is 30 GB;
- possible number of operations per day - no more than 5;
- The maximum amount of traffic sent per month is 30 GB.
It is allowed to send the Internet, which:
- included in the tariff plan used;
- obtained as a result of exchanging minutes for gigabytes using the option of the same name;
- added through self-configuration of the tariff by the user;
- remained from previous month to .
It is prohibited to send the Internet:
- received as a result of participation in Tele2 promotional and promotional programs;
- purchased through a bonus program;
- connected using , “A lot of Internet” and “Add traffic”.
Traffic received using the “Share gigabytes” option cannot be resent.
Details
Peculiarities :
- the option is available for subscribers of tariffs from the “My Tele2” and “Premium” line with Internet included in the monthly price;
- on tariff plans with unlimited network access, you can transfer a maximum of 30 GB;
- You can accept sent gigabytes and use them at all tariffs, including archival, corporate and hidden ones;
- the option is not tied to the region of registration of the SIM card, you can share the Internet with any Tele2 subscriber;
- the service does not work in the territory of Sevastopol and the Republic of Crimea (functionality is missing both for SIM cards registered in the region, and for numbers purchased in other regions, the owners of which are located there).
What is Family Link?
Family Link is an application designed to restrict content inappropriate for children under 13 years of age. It’s a great idea, because you can find everything on the Internet, but whether a child needs to know about it is a moot point. Therefore, parents, trying to protect their child, install Family Link on his mobile phone.
But despite the effectiveness of the application, some smartphone functions became unavailable with it, so using it ceased to be comfortable . This makes users think about deleting Family Link, but few know how to do it correctly.
What is this application for?
The Family Link application is primarily designed to monitor a child’s activity on the phone. Here are the main functions of this program:
- The most important thing is the ability to monitor the child’s location;
- Control his mobile purchases. And to be completely sure that your child will not pay for something unnecessary, you can completely prohibit him from downloading paid applications on the Play Market, limiting access to them;
- Set screen time. This will limit the number of hours spent on a mobile phone;
- Monitor the actions performed by the child. Family Link allows you to receive a detailed report on his manipulations in the smartphone.
An important detail is also that the child, even if he has found the application, will not be able to delete it on his own . His attempt to do this is doomed to failure, since the device will be blocked by the manager’s system, and only a smartphone with “parental controls” can unlock it.
What you need to uninstall the Family Link app
To remove Family Link parental controls or a child's account, you will need to use this app. Don't rush to delete your child's Google profile. It is very important. First, you need to sign out of your child's accounts on the devices they were signed in to. Only after this you need to delete it in the service. If you do the opposite, accounts on mobile devices will be blocked.
Let's look at the correct sequence of actions:
- Launch Family Link on the device your child controls.
- Select the menu icon at the top left, click it and select “Delete account.” Deleting a Google Account
- Enter your account. Enter its password.
If you do this using your device in the Family Link app, you will need to select your child's profile and find your child's device card. Next, in the settings, select “Reset password and delete data.”
If the child has not logged into the account on any device:
- Launch Family Link on your device.
- Open your child's account.
- Select "Settings", "Account Information".
- Click "Delete account" and follow the prompts that you see on the screen.
You can also delete your child's profile at https://families.google.com/families. To do this, you can use your computer's web browser. Here you need to find and indicate the child’s account.
Sending “official information” can also waste internet
In fact, of course, this option does not consume the mobile Internet so much and I have not encountered this myself, but I have seen several stories that talk about this particular “glitch” or failure, when this very service information was constantly sent. Therefore, I decided to include this item here - disabling its sending would definitely not be superfluous. How to do it?
As we see in the explanation, this information is sent daily, and does not carry any special burden other than helping Apple improve its products. Therefore, if you turn off its transmission, then nothing bad will happen, and traffic (even if small) will be saved.