Defender in the Windows 10 operating system is a standard tool that provides security when interacting with third-party files and programs. Sometimes users need to access the settings of this component, for example, to activate or disable it. In such cases, you need to launch the graphical menu, where all configurations are carried out. Next, we want to discuss exactly this topic, demonstrating the available options for moving to editing the Defender.
Method 1: Search the Start Menu
The easiest method is to find the menu you need using the search bar built into the Start menu. To do this, you just need to click on the appropriate button and start entering the request. When the appropriate "Windows Security" result is displayed, left-click on it to open the menu.
PowerShell script
For advanced users, we can recommend disabling the antivirus using a PowersShell script. This is a special shell for interacting with the system by executing special commands. The presented option is convenient in that it uses an executable program with which the user can enable and disable Defender at any time.
Important! You must run the script as an administrator.
Step-by-step instruction:
- , save to a user-friendly folder.
- On the desktop, right-click and select “Create” → “Shortcut”.
- Specify the location of the object by inserting the line %SystemRoot%\system32\WindowsPowerShell\v1.0\powershell.exe -ExecutionPolicy Bypass -File “script_address”, where instead of “script_address” you will need to specify the real location of the previously created file.
Now you can pause the antivirus by running the created script through a shortcut. Enabling Defender is done by reactivating the executable file.
Method 2: Options Menu
As you know, Windows Defender in the latest version is located in a separate section of the Settings menu, so the main method of accessing this component is through this snap-in. You can do this as follows:
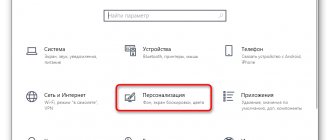
- Click the Start button and go to Settings by clicking on the gear icon.
- Here you need the last item “Update and Security”.
- Use the panel on the left to navigate to Windows Security.
- Click on “Open Windows Security” or go to the protection areas yourself by selecting the appropriate item in the list.
- Now you can proceed to managing the protection of the operating system. A brief security overview presented on the main page of the service will help you understand this.
Why do you need Windows Defender?
The Windows 10 system is equipped with standard antivirus software, which protects the device from malicious code and virus applications.
Windows Defender tasks are as follows:
- Scan RAM to identify potential security threats.
- Prevention of hacker attacks on the Internet.
- Protecting user information.
- Maintaining the correct functioning of the operating system.
- Assistance in updating components and installed programs.
Note! According to the results of studies conducted by independent companies, the standard protection product ranks last in the ratings.
Windows Defender can be overly intrusive and does not allow you to install applications from trusted sources that it considers unreliable. Therefore, it may be necessary to turn off the service. Simply stopping the execution of the application will not work permanently, since the component is integrated into the system. The program is disabled automatically only when installing proprietary antivirus software.
If the user is confident in the reliability of the Internet resources he visits and the programs he installs, he can disable Windows Defender in Windows 10 temporarily or permanently.
Negative consequences of the security program:
- increased consumption of computer resources;
- blocking the download or installation of programs.
Note! To install some programs correctly, you need to temporarily disable your antivirus.
Method 3: Control Panel
Windows 10 developers are actively moving settings from the Control Panel menu familiar to many to Settings. However, now you can still find many useful accessories and options there, which also applies to the Defender we are considering today. Its opening is carried out as follows:
- Open the Start menu and search for the Control Panel application.
- Here you are interested in the “Security and Service Center” section.
- In the window that appears, expand the “Security” category.
- Click on the words “View in Windows Security” next to the required option.
- After this, a window will immediately open and you can begin configuring the necessary options.
Temporarily disabling protection
Sometimes it is necessary to temporarily suspend the built-in antivirus. For example, when it is necessary to install a “broken” program or application that does not meet the requirements of the operating system developer’s security policy.
This can be done through the system settings in the “Virus and Threat Protection” menu. To temporarily suspend, you will need to deactivate real-time protection. The user will be asked to define a time interval after which the utility will launch automatically.
Inexperienced users are recommended to use third-party programs to deactivate Defender, which make the task easier due to a simplified interface and the absence of unnecessary options. The tools built into the operating system allow you to flexibly configure security and monitor every stage of the operation.
Method 4: Windows 10 Defender Executable
This method, like the one discussed below, only allows you to launch the security service itself, without getting into the previously seen graphical menu. This option is suitable for those users who are interested in introducing this service into active operation mode. This is done using the corresponding executable file.
- Open File Explorer and navigate to the system partition of your hard drive.
- Here open the “Program Files” directory.
- In it, find the “Windows Defender” directory.
- All that remains is to launch the “MpCmdRun” file by double-clicking on it with the left mouse button.
After this, the console window will appear for just a second, and then it will automatically close. The service is now running and automatic virus scanning should begin, if scheduled.
Via Registry Editor
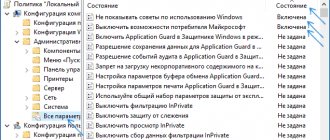
Microsoft has removed the ability to completely disable the antivirus through the registry. The company claims that when a user installs a third-party antivirus, Windows security is automatically disabled and does not work. In particular, the DisableAntiSpyware , which will not work even when creating keys. I do not recommend doing this method, since the consequences are unknown after the latest updates. You can simply familiarize yourself with this method, it is exactly the same as in Group Policy, only through the registry. Also, if you have the HOME edition, you can:
- Windows 10 Home: Activate Local Group Policy
Not a worker. For informational purposes only
Step 1 . Press Win+R, write regedit to enter the system registry and follow the path:
- HKEY_LOCAL_MACHINE\SOFTWARE\Policies\Microsoft\Windows Defender
- Navigate to the Windows Defender .
- Right-click the empty field and select New > DWORD (32-bit) Value.
- Create a new value named DisableAntiSpyware with a value of 1 .
To enable protection back, set the value back to 0, delete the key, then the partition (folder).
Step 2 . Now create a new subfolder Real-Time Protection in the Windows defender for this:
- Right-click on the Windows defender > New > Partition .
- Name the new partition (folder) Real-Time Protection .
Step 3 . In the newly created Real-Time Protection , you will need to create four new keys with the value 1 . Click on the right side of the empty New > DWORD Value (32-bit) and:
- DisableBehaviorMonitoring
- DisableOnAccessProtection
- DisableScanOnRealtimeEnable
- DisableIOAVProtection
Restart your computer and Windows 10 Defender will be disabled completely.
Method 5: Run Utility
The last method in our article today is almost identical to the one mentioned above, but the action itself is performed in just a few clicks. To do this, you will have to launch the Run utility using the Win + R keys and enter C:\Program Files\Windows Defender\MpCmdRun.exe there. After pressing the Enter key, the service will be automatically started in exactly the same way as shown earlier.
After launching Defender in Windows 10, each user needs to perform a number of different actions in this menu, for example, activate it, disable it, or add exceptions. Separate materials on our website will help you understand this. You can access them by clicking on the links below.
Removing the notification icon
You can turn off Windows Defender 10 permanently only if you clearly understand the actions being performed, otherwise it is not recommended to make changes to the system configuration. You can remove the icon located in the notification area and hide pop-up warnings from the utility.
Note! In early builds of Windows 10, protection occurs in the background. In new builds, the icon is located in the tray.
Step by step guide:
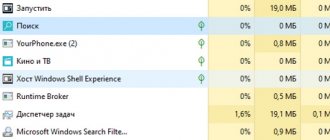
- Open “Task Manager” using the Ctrl + Shift + Esc keys.
- Find the Windows Defender notification process.
- Right-click (RMB).
- Select “Cancel task”.
This is a temporary measure that disables notifications only for the duration of the current session. After the reboot, the icon will be in the same place. To completely remove it, you need to edit the startup list:
- Launch "Task Manager".
- Open the “Startup” tab.
- Find the defender icon.
- Click Disable.
Microsoft's antivirus utility will no longer appear in the taskbar, but will continue to work.