Syncing your iPhone and iTunes used to mean that you had to connect your iPhone to your Mac or PC and either sit and watch the progress bar or leave it and come back when you thought it might be ready. Luckily, there is now a better solution for syncing your iPhone. Now you can completely set up your iPhone and iTunes account wirelessly on your PC or Mac. No more hunting around this white cable. You'll never have to fiddle around under your desk again to try to connect a USB cable to your computer. See: 10 Amazing Tips and Tricks for Using iTunes on Mac
Read more iPhone reviews
Wireless syncing works when your iPhone and computer are connected to the same wireless network and when your iPhone is connected to a power source. You will also have to keep your computer turned on and iTunes running. This means you can leave your iPhone charging overnight and wake up to have your iPhone and iTunes fully synced.
The more content you've purchased, the longer it will take, but wireless sync covers everything: apps, music, bookmarks, books, contacts' calendars, movies, photos, notes, documents, and ringtones all sync wirelessly through your network.
When your iPhone is connected to power and on a Wi-Fi network, it appears the same as if it were connected to your computer via a USB cable. This means you can also change settings and other settings wirelessly.
Ironically, you need to connect your iPhone to your computer to enable wireless syncing, but after that it's all free.
What program is needed for iPhone on a computer?
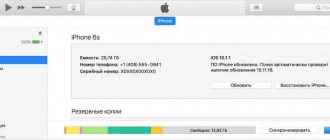
Launch the iTunes app on your Mac or Windows computer. Connect your iPhone, iPad, or iPod touch to your computer using the USB cable that came with your device. Then select your device in iTunes.
Interesting materials:
Why do the leaves of female happiness turn yellow? What should I do? Why is the zodiac sign Pisces like this? Why am I calling and there is no dial tone? Why does sound lag behind online video? What are kidneys? Russian Post who sent a registered letter? Russian Post Column where is it? LTE support what is it? NFC support what is it? NFS support what is it?
How to connect other Apple devices to your computer via Wi-Fi
How to share Internet from iPhone via USB to external devices
To connect additional devices to your computer via Wi-Fi, use the settings. If a modem is installed in an institution or at home, its mode is in effect, allowing you to distribute mobile data from a smartphone, iPhone or iPad. This happens when there is no Wi-Fi network available. To properly configure the mode, the user will have to go to the “Settings” section by selecting “Cellular” or “Settings”. After that, select the “Modem Mode” option, then click “Enable”.
Important! If you encounter problems setting up mobile data “Modem Mode”, you need to contact your mobile operator. When the user explains their problem, the specialist will be able to resolve the problem, telling them step by step how to perform the actions. Difficulties associated with the lack of a modem mode are sometimes considered. Accordingly, the user will have to choose a specific tariff that will provide fast access to the Wi-Fi network. If this method does not help, you will have to go to the nearest branch.
Another option for connecting to the device is being considered. Modem mode operates via Wi-Fi, Bluetooth or USB. When the smartphone connects to the access point in tethering mode, the blue icon lights up. This line indicates the number of connected devices to a single network access. To see how many devices are connected to a single network in modem mode, you need to determine the operator services and check the iPhone model.
If other devices successfully connect to the access point in tethering mode via Wi-Fi, you can only use the cellular data network. Typically, the connection to the Internet is made through a host device.
To connect you need to do the following:
- Wi-Fi network
If you need to connect to the device via modem mode, the user needs to select the “Settings” option, then go to the “Cellular” section, click on “Modem Mode” or “Settings” and “Modem Mode”. The mode must be enabled. After successfully completed actions, you should check the Wi-Fi password, as well as the name that is indicated on the mobile device.
Note! Until the process is completed, you should not close the page.
After this, you select the device you want to connect. Initially, you will have to open the “Settings” option, Wi-Fi. A list of iPhones or iPads will appear on the screen. Then you will have to click on the Wi-Fi network you want to connect to. If necessary, enter a password for modem mode.
- Bluetooth connection
To check whether your iPhone or iPad is connected, go through “Settings” to the Bluetooth section. There is no need to close the window. The user must then follow the requirements of the Mac or PC to properly set up the Bluetooth network connection.
Tethering mode supports Wi-Fi connections via Bluetooth on Mac, PC, and other devices. To connect another iOS device, the user will have to use a Wi-Fi network.
- USB
First, you need to make sure that you have the latest version of iTunes installed on your Mac or PC. Then you should take your iPhone or iPad and connect it to your computer. To do this, you can use the USB cable that comes with the kit.
A couple of tricks
- Syncing an iPhone over Wi-Fi is slower than using USB, so if you're dealing with tons of content, it's best to use the traditional method.
- With Wi-Fi Sync, you can connect your phone to more than one computer at the same time (as long as the devices are signed in to the same Apple ID).
- Even though the iTunes screen states that you must be connected to a power source while syncing, technically this is not entirely true. You can continue syncing using solely your gadget's battery. However, if the battery is low (say, the charge shows less than 20%), it is definitely worth connecting to a power source to prevent premature battery shutdown while transferring files.
Pairing apps
The original iTunes is not the only program for synchronizing iPhone with a computer. There is software from third-party developers. This
- iFunBox is an application for synchronizing both devices, which allows you to share files from different media;
- iTools is an analogue of iTunes that stands out for its speed. Provides mutual access and provides many possibilities. Including functions as a file manager;
- iExplorer, unlike the previous software, this program is paid. The functionality is not very wide: sharing media files, creating backup copies. But the speed of work is quite high.
What are the advantages of this type of connection?
Not many people know about this iTunes feature when it comes to syncing without physically connecting any cable. The main benefit you get is the comfort you get with this wireless system. If you are a person who needs to constantly sync iPhone content with PC or Mac content, this is undoubtedly the most recommended method. You'll only need to do the first sync through the classic system, but beyond that you won't have to worry about connecting it.
That's why when you have a new iPhone in your hands, it's best to always activate this option. Keep in mind that by activating it you will forever limit yourself to this option since you can also use a physical connection. After all, these are the alternatives that Apple offers to completely get rid of the cables that can be connected to computers.
How to Link iPhone to PC on Windows 10 Fall Creators Update
At the end of July, Microsoft released a new build of the Fall Creators Update, which allows you to link your Windows devices with Android and iOS devices. Instructions on how to connect an Android device to a PC have already been written, now let's talk about how to connect an iPhone to a PC.
To do this, you need a computer updated to build 16251 (you can check this in Settings > System > About):
Now you need to install a program with which you can transfer links from iPhone to PC. It's called Continue on PC and is available for free on the App Store. Install and run it:
Click on the Try it now button, in the Safari that opens, click on the Share button > More > enable Continue on PC:
Now go back a step and click on the Continue on PC program icon. When you first launch, you will be asked to sign in to your Microsoft account, after which you can select the device to which to send the link:
The link sent this way will automatically open in Edge on PC.
Connection problems: devices cannot see each other
It is possible that you may encounter a problem when the iPhone does not see iTunes when connected via Wi-Fi. The reasons for this can vary from faulty Wi-Fi systems to problems with something else. If your mobile device does not want to work via Wi-Fi, there are a certain set of steps that most likely contain the key to solving your problem:
- Sometimes, if things fail, canceling and then repeating the synchronization processes helps. In most cases, this step gives a positive result.
- Finally, make sure that the devices belong to the same network. Otherwise, the mobile gadget does not see the PC and they cannot exchange files with each other.
- The network you need may be faulty. Then it makes more sense to switch to another network.
- Reboot your Apple gadget or your PC.
- So use a USB cable.
Published by ProfiAppler Don't forget to read the comments, there is also a lot of useful information there. If your question is not answered, but later comments are answered, then your question is answered in the article, respect other people's time.
You may also be interested
How to update iPhone 6S to iOS 12
Instructions
Note that starting the synchronization process always requires a large amount of energy. Therefore, charging when in offline mode should be at least 20%. If you look at the official information, you can read the recommendation that the device must be connected to the mains in order to avoid disruption of the synchronization process.
Follow our instructions . First, let's install and test special software. Let's start with a desktop computer or laptop, where we will determine whether iTunes is connected or not. We download the application for synchronizing iPhone from PC to your computer or laptop, and open it in the standard way, if you have an installer.
It is important to make a disclaimer here. Although the connection involves wireless communication, the first setup will still require a USB cable.
Open the iTunes program menu, find the “Browse” tab and the corresponding “Sync with this iPhone over Wi-Fi” option. Check the box and click "Apply".
With this action, you will detect a specific Apple device in your immediate environment for synchronization on your computer monitor. Then unplug the cord from the mobile device. Now you have configured a physical interface for sharing over a Wi-Fi network.
Attention! Synchronization is only possible for multimedia, text, and backup files. If you try, for example, to synchronize databases, a message will pop up warning you that this type of data has not been authorized.
The actual start of synchronization begins with setting the settings on the main screen of the iPhone by going to the “Settings” application. Moving down the menu, select and click "Sync with iTunes over Wi-Fi." After which summary information about active computers will become available.
All that remains is to confirm your intention to synchronize with the desired PC. This is done by clicking the “Synchronize Now” button at the very bottom of the current window.
I would like to draw your attention to the following: if the connection is successful, the label on the button should change to “Cancel synchronization.”
Video instructions are available here:
Difference between official and unofficial synchronization
It exists and concerns purely technical aspects. The difference is in the number of simultaneous connections. The unofficial utility allows you to access the exchange with only one computer in the iPhone settings. Whereas the official installation will allow complete synchronization of all PCs located within the coverage area of one WI-FI network.
Part 2, Best iTunes Alternative
In fact, syncing iTunes with Wi-Fi is not the only way to sync your iPhone. For example, Apeaksoft MobieTrans is the best alternative to iTunes, which includes extensive features:
- Transfer data from iPhone to computer or other iOS device in one click.
- Backup iOS data from iPhone to computer in original state.
- Preview and manage iPhone data for selective transfer or backup.
- Support a wide range of data types such as photos, music, videos, contacts, messages, etc.
- Compatible with iPhone XR/XS/X/8/8 Plus/7/7 Plus/6/6s or earlier, iPad and iPod Touch.
What is synchronization for?
Data synchronization is the elimination of differences between two copies of data. It is assumed that these copies were previously identical, and then one or both of them were independently changed. How data is synchronized depends on additional assumptions made.
Interesting materials:
How to adjust the sound in headphones on your phone? How to update emoticons on your phone? How to crop a photo on your phone? How to empty the trash on a Nokia phone? How to clear the phone's memory if it won't turn on? How to clear phone memory on Android Samsung? How to clear system memory on your phone? How to clean the camera glass on your phone? How to clean your Samsung phone from unnecessary files? How to clear all history on your phone?
iPhone doesn't show up in iTunes
If, after following the above instructions, your gadget is not displayed in iTunes, then the most significant reason for this is the process called “Apple Mobile Device Helper”. It must be closed in both OS X and Windows.
Related articles:
iTunes does not see iPhone in Windows 10 and MacBook
The computer does not see the iPhone via USB or WiFi
Solving the problem for OS X
- You need to close iTunes.
- Then we launch “Activity Monitor”, which is located along the path /Applications/Utilities/.
- Using the Finder search bar in the upper right corner, determine “AppleMobileDeviceHelper”.
- Now you need to click on the process itself and on the “Quit Process” icon in the upper left corner of the system monitoring.
- We confirm the completion of the process.
- Launch iTunes and check whether the gadget is no longer invisible when connected to Wi-Fi.
Solving the problem for Windows
- You need to close iTunes.
- Open the built-in task manager by simultaneously pressing the “Control+Alt+Delete” key combination, and select the “Service” tab.
- We find the process under the name “AppleMobileDeviceHelper.exe” or “Apple Mobile Device” (depending on the version of Windows installed on the computer).
- You should right-click on the process and restart it. You can also left-click on it to complete the process completely.
- Launch iTunes and check the visibility of the smartphone when connected to Wi-Fi.