If you came to this article, then you had to face a problem when the laptop does not turn on and a black screen appears. This is the most common problem associated with laptop hardware, or, to be more precise, with hardware settings.
We thank the laptop repair service FIXIT.BY (Minsk, Belarus) for their help in preparing this material.
Below we will look at how to reset hardware settings. This method helps when the hardware settings are lost, but it will not help if your laptop was flooded with water.
In the article “The laptop does not turn on, reasons and solutions,” we looked at the physical problems associated with the appearance of a black screen.
You perform all actions at your own peril and risk; if you are not sure about something, it is better to contact the service center. Typically, the cost of repairing a laptop differs significantly from the cost of repairing computers.
What does this malfunction mean?
There are many reasons why a laptop won't boot after turning it on. Often when this malfunction occurs, the laptop's indicators light up and you can also hear its fans running.
Sometimes you may also hear one or more beeps immediately after switching on.
If the problem appears while booting Windows with a flashing black or blue screen, the problem is related to loading the operating system itself. In this case, you need to go to the “Laptop freezes while loading Windows” section at the bottom of the article.
If you suspect that your device is being stopped at POST before booting into the operating system, you will need the information below.
Reference! POST is a procedure for checking the functionality of a PC, carried out immediately after turning it on.
The meaning and process of the POST procedure
This type of malfunction also does not mean that the information on the laptop’s hard drive has disappeared forever. Typically, once the problem is resolved, this data becomes available again.
Repairing a computer or laptop in a workshop
If the laptop does not respond to the power button and you cannot enter the BIOS, you should seek help from qualified specialists. Moreover, if the laptop was purchased recently and the warranty period has not yet expired, repairs may be free.
If the warranty card is still valid, it is better not to disassemble the laptop yourself. But if you have already tried to figure out the problem and opened the device’s case, tell the technician about this to simplify diagnostics.
Sources
- https://FB.ru/article/165177/pochemu-ne-zapuskaetsya-noutbuk-chto-delat-spisok-vozmojnyih-neispravnostey
- https://datbaze.ru/computer/esli-noutbuk-ili-kompyuter-ne-zagruzhaetsya.html
- https://tehnofaq.ru/noutbuk-ne-vklyuchaetsya-ne-goryat-indikatory-puti-resheniya-problemy/
- https://pomogaemkompu.temaretik.com/1798674235506297653/pochemu-ne-vklyuchaetsya-noutbuk-prichiny-neispravnosti-i-kak-ih-ustranit/
- https://www.atmir.ru/sovety/521-knopka-noutbuka-ne-rabotaet.html
[collapse]
Make sure the laptop is completely turned off
There is a common problem with booting personal computers running Windows OS - sometimes PCs have difficulty resuming from Sleep Mode or Hibernation.
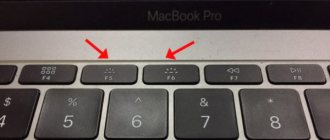
To solve this problem, you need to completely turn off your PC by pressing and holding the Power button for about 5 seconds.
Press and hold the power button for about 5 seconds
After completely turning off the power, turn on the laptop in the usual way and check that it boots.
Laptop turns on and won't boot
The source of this problem may be the BIOS or, more precisely, its settings. Try setting the default settings.
This function may be in different places in different BIOSes, but its name usually looks something like this: “default BIOS settings”.
It is also possible that after starting the system you saw the message “Press F1 to continue.”
Typically this problem occurs when the battery installed on the motherboard (not the main battery) shows the wrong time or BIOS settings.
Another problem could be the hard drive. You can tell if it makes a squeaking or crackling sound.
There could also be a problem with the RAM. You may just need to unplug the RAM and clear the contacts.
Laptop stops at POST self-test
Disconnect external devices from the laptop
If your PC is having trouble booting, there is a possibility that external devices may cause it to freeze during POST, especially if it occurs without a BIOS error message.
Reference! BIOS is a set of microprograms for activating the hardware of a personal computer.
To troubleshoot the problem, start the laptop with only the most necessary equipment.
Before turning on the laptop, disconnect all external devices connected to it
Fault checking via POST messages
When starting up, the laptop can produce an audio message in the form of a special code consisting of long and short beeps.
If the POST check is successful, there is usually one beep, and in case of failures, several beeps are issued in different sequences.
Step 1. Record the output signal when you turn on the laptop.
We record the signals generated when the laptop is turned on
Step 2. Find out what type of BIOS the laptop supports in the documentation for the device or via the Internet.
Common laptop BIOS types:
- Intel;
- AMI;
- UEFI;
- Phoenix-AWARD.
Step 3. Refer to the documentation on your laptop or via the Internet to decipher the sound code. Read detailed information about what BIOS beeps mean when you turn on your computer in our new article on our portal.
Reference! POST errors are quite specific and if the user is lucky enough to receive such an error, it is necessary to try to resolve the said problem.
However, the laptop may turn on, freeze, or reboot without achieving POST results or producing any errors.
Disable unnecessary storage devices
If your laptop tries to boot from a USB device or optical drive that has no bootable data, it may hang during POST. Therefore, it is necessary to disconnect all storage devices from the laptop, if they were connected.
Disconnect all storage devices from the laptop if they were connected
Change device boot order
If possible, set the BIOS as the first boot device to be the laptop's hard drive instead of a USB, CD/DVD drive, or other boot devices.
Step 1. After turning on the laptop, repeatedly press the “Del”, “F2” (or “F1” buttons, holding down “Fn” first) until the BIOS menu appears on the screen.
Note! The key or key combination to enter the BIOS menu can be found in the documentation for the laptop.
Step 2. Use the keyboard arrows left and right to go to the “Boot” tab.
Use the keyboard arrows left and right to go to the “Boot” menu
Step 3. Use the up and down arrows to move to the “Boot Device Priority” line, press “Enter”.
Use the up and down arrows to move to the “Boot Device Priority” item, press “Enter”
Step 4. Next, use the up and down arrows to go to the “1st Boot Device” sub-item. Press “Enter” and select the hard drive in the menu that opens. Press “Enter” again.
Using the up and down arrows, go to the sub-item “1st Boot Device”, press “Enter”
Select the hard drive using the keyboard arrows and press “Enter”
Step 5. Go to “Advanced”, expand “SATA Operation” and select compatibility mode for IDE or ATA drives. Press "Enter".
Go to the “Advanced” item, select “SATA Operation”, set the compatibility mode with IDE or ATA drives, press “Enter”
Step 6. Press “F10” on the keyboard, then “Enter” to save the settings and exit the BIOS.
Press “F10” on the keyboard, then “Enter”
Software reset BIOS settings
Incorrect BIOS settings are a common cause of PC locking during POST. To do this, they need to be reset to stable factory values.
Step 1. After turning on the laptop, repeatedly press the “Del”, “F2” (or “F1” buttons, holding down “Fn” first).
Step 2. Go to “Exit”, select “Load Optimal Defaults” and press “Enter”.
Go to the “Exit” item, select “Load Optimal Defaults”, press “Enter”
Step 3. Press "Enter".
Press “Enter”
Step 4. Make changes to the BIOS, if necessary - for example, set the date and time.
After resetting the settings, change the date and time in the main tab “Main”
Step 5. Go to “Save Changes and Exit” and press “Enter”, then press “Enter” again to exit the BIOS.
Go to the item “Save Changes and Exit” and press “Enter” twice
Hard reset BIOS settings
If you cannot enter the BIOS menu using the keys, you can clear its hardware configuration by removing the battery from the laptop motherboard.
In many laptop models, you can get to the battery by removing a special cover on the bottom panel of the laptop. If there is no such cover, you will need to partially disassemble the device.
Important! Before disassembling the laptop, you must make sure in its instructions that the device is not under warranty. Otherwise, you need to contact its technical support service.
Step 1. Turn off the laptop, disconnect all wires from it, turn it over, and slide the battery latches.
Turn off the laptop, unplug it from the power supply, turn it over and slide the battery latches
Step 2: While holding the latches (if necessary), slide the battery and remove it.
Move the battery and remove it
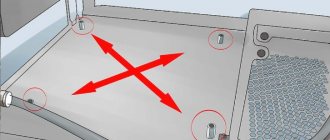
Step 3. Remove the bottom panel by removing the necessary screws.
Remove the bottom panel by unscrewing the necessary screws
Step 4. Carefully remove the battery, paying attention to its polarity.
Carefully remove the battery, paying attention to its polarity
Step 5: Press and hold the laptop's power button for 15 seconds to remove charge from the laptop's capacitors and speed up the reset.
Press and hold the power button for about 5 seconds
Step 6. Wait 40 minutes and insert the battery back, observing the polarity.
Checking contacts, modules and devices
In addition to BIOS settings, problems with booting a laptop can be caused by:
- power cables inside the laptop;
- memory modules and expansion cards;
- loose cables, especially the screen and hard drive cables.
Step 1. Check all available connections, their fastening and replace faulty equipment, if identified.
We check all available connections, their fastening and replace faulty equipment
Step 2. Reassemble the laptop in the reverse order and turn it on, checking if it boots.
Reassemble the laptop in reverse order and turn it on
Step 3. If necessary, go into the BIOS and make the necessary settings.
It is also necessary to check and, if necessary, replace the laptop's power supply, because it is a common cause of these problems.
Check the laptop power supply and change if necessary
POST test card
You can check the operation of the laptop hardware when it boots up using the POST self-test card. It will help you determine what is causing it to stop downloading.
The POST test card is a diagnostic tool that displays error codes generated during PC startup to identify problems with its memory, hard drives, keyboard, etc.
For laptops, POST cards are available with miniPCI or USB connection options.
POST cards with miniPCI or USB connection options
When you turn on the laptop, codes are displayed on the map screen indicating which device is currently being tested.
Having reached the problematic hardware, POST stops working and a code for the faulty hardware of the device is displayed on the screen.
The POST card screen displays a device hardware fault code
The decoding of the codes can be found in the instructions for the test card.
For example, if the test card displays error number 28 on a Dell laptop, it means the CMOS battery is bad and needs to be replaced.
Replacing laptop parts to identify faults
If the user does not have a POST card, but has spare parts, one can try replacing each piece of laptop hardware with an equivalent working one, one at a time.
For example, replacing RAM, as well as a hard drive, is not very difficult, and is usually carried out after removing the cover covering the compartment intended for this.
Replacing RAM and hard drive on a Samsung Series 3 NP305E5A-A03US laptop (example).
Step 1: Remove the 3.5mm screws securing the bottom cover of the laptop.
Unscrew the 3.5 mm screws securing the bottom cover of the laptop
Step 2. Using a thin plastic piece, insert it into the slot and slide the cover to the side.
Using a thin plastic piece, insert it into the slot and slide the lid to the side
Step 3. Pull the cover out of the guide slots and remove it.
Pull the cover to remove it from the guide grooves, remove it
Step 4. Remove the screws securing the hard drive.
Unscrew the screws securing the hard drive
Step 5. Gently pull the cable to disconnect the hard drive from the laptop motherboard.
Pull the cable to disconnect the hard drive from the laptop motherboard
Step 6: Remove the hard drive from the slot by lifting it up.
Remove the hard drive from the slot by lifting it up
Step 7. Install the replacement hard drive.
Installing a replacement hard drive
Step 8: Place your thumbs on the RAM module latches to release them from the slots.
Place your thumbs on the latches of the RAM module
Step 9. Carefully remove the memory module by pulling it out of the connector.
Carefully remove the memory module by pulling it out of the connector
Step 10. Replace the module with a new one by carefully inserting it, aligning the tab or cutout in the module with the tab in the connector.
Step 11. Reassemble the laptop and try to turn it on.
Assembling the laptop and turning it on
Reference! For instructions on replacing components of a specific laptop model, please refer to its instruction manual.
Malfunction of the cable or laptop screen
A laptop screen (matrix) malfunction is usually caused by mechanical damage or manufacturing defects.
Signs of matrix malfunction:
- reddish ripples appear on the display, which may be caused by a malfunction of the matrix or its cable;
- a normal image is present only on one part of the screen, and multi-colored stripes appear on the other;
- There is a violation of the color rendering of the matrix with replacement of the displayed colors (black-white, red-yellow, etc.).
The probability of a breakdown of the matrix cable connecting the screen to the laptop motherboard is quite high, because... it crosses the movable hinge and bends when opening and closing the laptop screen.
A laptop screen (matrix) malfunction is usually caused by mechanical damage or manufacturing defects
Signs of a matrix cable malfunction:
- There is no image on the screen due to the noise of the fans and the hard drive loading the OS.
- Blackouts, distortions and ripples on the screen. If you move the screen, the image is restored.
However, the listed symptoms are not always associated with a defect in the laptop cable or matrix. In the cases described, professional diagnosis of the malfunction is necessary.
Reference! It is better to repair the cable and matrix of a laptop in a service workshop, because This is due to technical difficulties that can cause additional malfunction if handled incorrectly.
Display problems
The display of modern laptops is a matrix connected to the motherboard using a special cable with its own chip. It works using LED or AMOLED technologies. Problems with the screen are rare because it is one of the most durable components in terms of longevity. But it also happens that the matrix was broken, or it produces so-called “broken pixels” and an error occurs.
The screen consists of a huge number of dots that form a picture, painted in a certain color. “Dead pixels” mean that one or more pixels are not working - they are black. It also happens that the laptop display does not turn on at all, that is, the screen continues to show a black background, and when you start your device at night, the screen does not light up at all.
So what to do if the laptop does not turn on due to the matrix? The first thing you need to do is make sure that the reason is really in the matrix. It is enough to turn on the equipment and observe its reaction. In this case, as a rule, cooler noise should appear. Next, the speakers will play the sound that appears when your laptop starts up. All indicators, light bulbs, and keyboard (if it has built-in LEDs) will work fully. This is a sure sign that the problem is hidden in the matrix.
If you have a black screen on your laptop, then another way to check why the laptop is not working is to connect an external monitor. This could be a projector or TV that supports an HDMI connection. If there are no other problems with your hardware, you will notice that a full image will appear on the secondary monitor screen.
You will ask the question - what to do if the laptop cannot turn on due to the matrix and nothing lights up on it. The only thing we recommend doing is taking it to a service center. You can also reinstall the matrix yourself, but you need to choose exactly the model that is designed to work with your device. Installing other matrices is strictly prohibited - this will not only lead to unstable screen operation in the future, but can also cause problems during assembly. You can check the name of the matrix installed on your gadget on the Internet.
Laptop freezes while loading Windows
In addition to faulty PC hardware, stopping, freezing, or rebooting without an error can also occur due to problems with the operating system.
Solving the problem of freezing while loading Windows
These problems may occur on the Windows splash screen or on a black screen, with or without a blinking cursor.
Reference! Before following the recommendations below, it is important to follow the steps in the “Make sure the laptop is completely turned off” at the beginning of the article.
Go to Safe Boot Mode
For Windows 7:
Step 1. When turning on the laptop, press and hold the “F8”, “F1” or “F12” key.
When turning on the laptop, press and hold the “F8” key
Step 2. When a special menu appears, select “Safe Mode” with the cursor arrows and press “Enter”.
Use the cursor arrows to select “Safe Mode” and press “Enter”
For Windows 8 and 10:
Step 1. Boot from a recovery disk or bootable USB flash drive.
Step 2. In the language selection window, press “Shift+F10”.
In the language selection window, press “Shift+F10”
Step 3. Type the sequence: “bcdedit /set {default} safeboot minimal” and press “Enter”.
Type the sequence “bcdedit /set {default} safeboot minimal”, press “Enter”
Remove conflicting drivers
Step 1. After Windows has booted securely, press the key combination “Win+R”.
Press the key combination “Win + R”
Step 2. Type “devmgmt.msc” in the menu and click “OK”.
Type “devmgmt.msc” into the menu and click “OK”
Step 3. Identify conflicting and uninstalled devices in the Device Manager, marked with a question mark or exclamation mark, by opening the device branches by clicking on the triangle icon.
Expand the device branches by clicking on the triangle icon to identify a conflicting or uninstalled device
Step 4. Delete the marked devices by right-clicking on them and selecting “Delete” with the left mouse button.
We delete the marked devices by right-clicking on them and selecting “Delete” with the left mouse button.
Step 5. When asked about deleting, click “Yes”.
Scan your PC for viruses
A virus or other malware may cause problems starting Windows. NOD32 antivirus is well suited for scanning in safe mode.
If problems arise with the system, scan it with the installed antivirus
Check your hard drive for errors
Step 1. Press “Win+R”, type “cmd” and click “OK”.
Type “cmd” and click “OK”
Step 2: Type “chkdsk /f /r” and press Enter. The system will check the disk for errors and correct them.
Type “chkdsk /f /r” and press “Enter”
Start from last known known good configuration
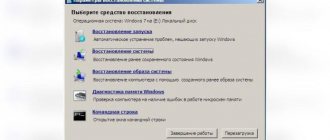
If Windows won't boot, loading the Last Known Good Configuration may help.
Step 1. Press “Win+R”, type “control panel” and click “OK”.
Type “control panel” and click “OK”
Step 2: Select Large Icons and click Recovery.
Select “Large icons” and click “Recovery”
Step 3. Select “Start recovery...”.
Select “Start recovery...”
Step 4 : Click Next.
Click “Next”
Step 5. Select a restore point and click Next.
Select a restore point and click “Next”
Step 6 : Click “Done.”
Click “Finish”
Windows recovery will start.
We are waiting for the recovery process to complete
Step 7: A message indicating the restoration has been completed will appear. Restart PC.
Click “Reboot”
Reference! When troubleshooting Windows problems, recommendations related to the laptop hardware are also suitable.
For example, you can replace the hard drive data cable, which affects the stability of loading the operating system, and the CMOS battery after 3 years of operation of the device.
Perform a clean installation of Windows
If, despite the steps taken, Windows still freezes, perform a clean installation from the installation disk or USB flash drive.
If all else fails, perform a clean installation from the installation disk or USB flash drive
Introduction.
The laptop turned off and won’t turn on, do you need to urgently run to the store for a new one? The laptop turns off and won’t turn on - a typical problem that many users come to me with. First of all, it is necessary to find the true reason for such a “turn”. Oddly enough, there may be many reasons for this; I suggest familiarizing yourself with the minimum “base” required to resuscitate your laptop at home.
Cleaning required
If the laptop turns off 30 minutes after turning it on, you need to check the condition of the cooling system. The air vents can simply become clogged with dust. In the most advanced cases, situations may arise that require full professional service. In particular, if the laptop turns off 5 minutes after turning it on (or less), even in idle mode, then there is no heat dissipation from the processor. This suggests that you need to remove the radiator and change the thermal paste. It dries out over time.
Checking the temperature is quite simple. This can be done in the BIOS, the processor parameters section contains data on the temperature of the crystal, or using a monitoring program, many of them are capable of writing a log to a file. You can estimate the rate of temperature growth and its value at the time of shutdown.
Important! You should not neglect cleaning your laptop. Systems built on Intel processors are quite unpretentious, but overheating causes a drop in frequency and overall performance. But for devices based on AMD solutions, high temperatures are strictly contraindicated. The processor may fail.
CPU overheating
Overheating of the processor is a very dangerous situation. It is necessary to clean the fan and change the thermal paste. But this does not always solve the problem of rebooting the laptop on its own. Sometimes they produce laptops in a hurry and do not carry out all the necessary tests.
As a result, cooling becomes poor. Even cooling tables and stands do not help, and as a result, an independent reboot begins. This happens especially often during the game.
Read Laptop does not read disk - what to do and reasons