If you've never looked at the statistics of the data stored on your iPhone or iPad, then by going to Settings → General → iPhone Storage or opening the Browse menu in iTunes on your computer, you will most likely be surprised at the volume of the “Other” section that can occupy several gigabytes, depending on the period of use of the operating system. What kind of “Other” is this and what it is eaten with - we will understand further in the material.
ON THE TOPIC: How to recognize a drowned iPhone, or where the moisture (water) sensor is located on the iPhone XS, X, 8, 7, 6s, etc.
When the first drives with a capacity of more than 1 GB appeared in smartphones, as well as support for high-capacity microformat memory cards, it seemed that the problem of data storage on mobile devices had been solved for decades to come, and the development of cloud services foreshadowed rosy prospects. However, in practice and at the present time, most users are still forced to use digital space sparingly, which is especially important for owners of iPhone and iPad with a minimum amount of built-in memory.
So, if you are faced with the problem of not having enough space to download new applications or, for example, taking photos and videos in maximum quality, then it would not be a bad idea to regularly get rid of the contents of the “Other” section. This storage segment is permanently filled with mostly unnecessary data as the iPhone or iPad is actively used.
ON TOPIC: How to remove red eyes from photos on iPhone or iPad without additional applications.
What is "Other" on iPhone and iPad
Until 2015, this section of the iDevice storage was filled with a huge amount of unsorted data; it stored: all correspondence with attached attachments, calendars, reminders, notes, contacts, program data, iOS settings and much more. Therefore, if your gadget has iOS 8 or an earlier version of the operating system installed, then the amount of space occupied by the “Other” section can reach any size.
With the release of iOS 9, the situation has improved significantly; now the “Other” section includes:
- Cache;
- Data about the device and iOS itself;
- Software updates;
- Siri Voices;
- Underloaded files;
- Results of failed or interrupted synchronization;
- Original photos with filters applied;
- Etc.
ON TOPIC: How to disable iOS updates on iPhone and iPad.
How to find out the exact size of the “Other” section
As mentioned above, detailed statistics on the use of the built-in iPhone or iPad storage can be found both in the iTunes desktop client and directly on the device itself.
How to find out the size of the Other section in iTunes on your computer
Connect the gadget to the computer using a cable, wait until it is detected in the program, click on the device icon that appears:
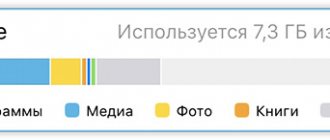
Go to the Overview section and at the very bottom there will be a graphical chart of storage usage. To view the exact location data, click on the area of interest.
How to find out the size of the "Other" section directly on your iPhone or iPad
On your iOS device, open the Settings app and go to General → iPhone Storage.
Please note that the size of the Other section may differ between iTunes and iOS due to different media cache sorting criteria.
ON TOPIC: Unload unused ones, or how to set up automatic removal of unnecessary applications on iPhone and iPad.
Getting rid of your browsing history and clearing your browser cache
Let's look at this cleaning method using Safari as an example.
- First, from the main menu, go to “Settings” and open the “Safari” application.
- In the Safari browser settings window that opens, select “Clear history and website data.” This will not only free up space in the “Other” section, but can also have a positive effect on the speed of the program itself.
It is worth noting that the cleaning principle is the same for all browsers. Accordingly, if you use several browsers, it is advisable to repeat this procedure for each of them.
Do I need to clear the “Other” section?
iOS has a special feature that automatically removes unnecessary data from the “Other” section if necessary (for example, if there is not enough space to download an application or other content).
In this case, only those files that the system considers absolutely useless or renewable will be deleted from the storage, and this does not include all the digital garbage that is stored on your smartphone or tablet.
At the same time, Apple does not provide the user with tools to independently clean the “Other” section and, moreover, prohibits third-party applications from doing this.
Therefore, the salvation of drowning people is in the hands of the drowning people themselves. Below you will find several methods for cleaning the “Other” section on iPhone and iPad with varying degrees of efficiency and labor intensity - for some it will be enough to regularly get rid of the main garbage, while others will prefer to occasionally carry out general cleaning by wiping dust in all corners of the system.
ON TOPIC: How to reduce mobile Internet traffic consumption on iPhone. 13 tips.
We use special software
You can use special applications to clear the cache. They work efficiently, but the memory is not completely cleared. This is due to additional protection in iOS.
There are a lot of cleaning apps on the App Store. The Magic Cleaner and Clean doctor applications are especially popular.
Magic phone cleaner
Using this program you can clear duplicate photos, contacts, screenshots.
Main functions:
- auto-cleanup of duplicate photos;
- merging contacts into one;
- cleaning files;
- photo compression;
- video compression.
Clean doctor
Using this program you can also remove system junk and duplicate files. You can clear your calendar and recurring contacts data. The program can sort information and large files. The application is focused on deleting photos and videos; it optimizes the device's memory.
How to Clear Other on iPhone and iPad
Option #1 - restoring a backup (recommended)
Perhaps the most acceptable method for most users is clearing the “Other” section, which will, in most cases, free up a significant amount of memory without resorting to purges and repression of useful content. In this case, the cache and useless garbage will be cleared not in portions as needed, as iOS itself does automatically, but immediately and completely.
This method is convenient because it does not affect application data. That is, your logins and passwords on social networks, bookmarks in browsers, attachments in instant messengers, etc. will be saved.
To create a backup copy of an iPhone or iPad, the following procedure is provided:
1. Connect your iPhone or iPad to your computer using a USB cable;
2. Launch the iTunes application on your PC or Mac. The connected iOS device should be detected in the upper left corner of the iTunes window; click on the iPhone or iPad icon;
3. Go to the “Overview” section, in the list of “Automatically create copies” options, select “This computer” and check the “Encrypt backup copy” checkbox;
4. Set a password and be sure to remember it (it’s better to write it down);
5. Click “Create a copy” now.
After the backup has been created, you can proceed to restoring data on your iPhone or iPad, to do this:
1. Disable the “Find My iPhone” function in the iOS menu Settings → Apple ID section (Your name) → iCloud.
To do this, you will need to enter the password for your Apple ID account, and after completing the backup restoration procedure, do not forget to reactivate the function.
2. Return to iTunes, click the “Restore from a copy...” button and select the last backup created (the date and time will be indicated);
3. Enter your password and wait for the recovery to complete;
4. When the iPhone or iPad automatically restarts, enter your Apple ID password and wait for the content to load;
5. The recovery is complete, the “Other” section is cleared, you can disconnect the device from the computer.
Option number 2 - erasing all settings and content (factory settings)
The most aggressive method that allows you to get rid of all data on the device (including both necessary and unnecessary), while completely clearing the gadget to the state of the operating system “from the factory.” It’s hardly reasonable to carry out such actions just to free up a few extra hundred megabytes of memory, but to cheer up a rather cluttered iOS that has been actively used for a long time without reinstallation is quite possible.
It is important to understand that after the procedure is completed, you will receive a “naked” gadget without previously installed applications, saved contacts, etc. At the same time, by reinstalling the applications, you will receive clean programs without additional data (for active users of instant messengers, for example, Viber or Telegram attachments alone can take up several gigabytes of storage).
Reset settings and content as follows:
1. Go to the Settings menu → General → Reset → Erase content and settings;
2. Enter your password and confirm deleting all settings and content;
3. Set up iPhone as new without restoring backup.
Upload photos and videos to the cloud
If you don’t want to compress the video, and there are no duplicates, unnecessary screenshots or bad frames among your photos, then you can free up space by uploading content to the cloud.
Use the standard iCloud cloud (Settings - Photos - Photos in iCloud), but in this case you will definitely have to buy additional free space, because the initial 5 GB of storage is clearly not enough.
On the one hand, the Apple service fits perfectly into the ecosystem of gadgets, is present on all user devices and allows you to free up space on your smartphone without much setup.
On the other hand, you will have to pay a monthly subscription fee for iCloud, work with crutches on other platforms (Windows and Android) and endure service bugs in the form of periodically unloading original photos or phantom files that wander around devices after being deleted on one of them.
You can choose a third-party cloud with more favorable rates or a larger base storage capacity, or even create your own cloud storage.
When you first launch the client, you can download the entire gallery with one click and free up several gigabytes on your iPhone. After this, it is enough to launch the service client once every week or two and download all the photos and then delete them from the smartphone.


