How to set time and date settings on Android
Smartphones based on the Android operating system offer the user two ways to set the time. Moreover, it is not always necessary for a person to independently change the parameters, as is the case with a mechanical watch.
Automatic setup
The simplest method requires the owner of the mobile device to press a couple of buttons. In this case, the time is determined using data from the SIM card and GPS. The smartphone understands where the owner of the gadget is and, depending on the time zone, sets the current date and time.
To use automatic setup, you will need:
- Open phone settings.
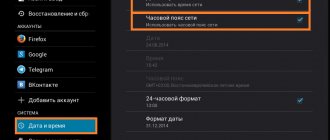
- Go to the “Date and Time” section (can be located in the “Advanced” or “Advanced Settings” sub-item).
- Activate the “Network date and time” slider.
By default, your phone uses automatic time detection. That is, when turning on the gadget for the first time, the owner does not have to configure the settings.
After completing these steps, the user will see that the indicators exactly correspond to the current time in the locality where the person is located. Even if the owner of the device decides to travel across one or more time zones, there is no need to change the settings. There is also no need to change the clock hands from summer time to winter time.
Manual setting
The automatic detection function does not always work reliably. Sometimes the indicators go wrong for no apparent reason or when crossing time zones for a short time. Therefore, the user should have an alternative option that involves manual configuration.
To set the date and time yourself, you will need:
- Follow steps 1-2 from the previous instructions.
- Click on the “Date” tab and set the necessary parameters.
- Repeat the operation with the “Time” sub-item.
If the “Date” and “Time” tabs are inactive (cannot be pressed), then you must first disable the automatic parameter detection function.
Manual adjustment in most cases does not allow you to set an absolutely accurate time. Therefore, when using this method, do not rely on your smartphone clock when you need to know the parameters with an accuracy of the second.
How to select, set, or add a new time zone
To find out the time zone of your region, go to https://www.gmt.su/city-time/country/Russia/ and find the city closest to you in the list. On the right side of the page you will see time zone information. For example, in Kaliningrad it is GMT +02:00. You will need to select this information in the settings of your phone.
To set your chosen time zone, follow these steps:
- In your phone settings, find the “System” section and open the “Date and Time” item in it.
- Click on “Select time zone” and select the one you need in the list that opens.
- If the time zone is constantly being reset, then in the “Date and time” section, enable the “Use network time zone” function. This will allow the device to determine your location via the Internet and select the time zone.
Try to check and adjust the time at least once every two months. Better yet, set up automatic synchronization via the Internet. If you still encounter problems with the settings, reboot your phone or reset its firmware to factory settings. And remember: the exact date and time are important for the operation of applications and the phone as a whole.
If the time on your phone is wrong
One of the main problems of mobile device users is incorrect time. If the indicators lag or are late by 1-2 minutes, then the situation does not cause much discomfort. But at the same time, the time and date are off by several days or hours. And then you must definitely decide, having first understood the reasons for its occurrence.
As a rule, time is lost due to the following factors:
- removing the battery;
- reboot the device;
- removing the SIM card;
- system failure.
First of all, it is recommended to activate automatic detection of date and time in the settings.
If after this the indicators diverge from the current data, you should restart the device. If the screen shows the wrong time with the automatic detection function activated, you can switch to manual settings by setting the current data by checking the exact clock.
If after this the time still continues to go wrong, run a virus scan. The operation is carried out both through a standard security tool and using special applications.
The final option is to reset the smartphone to factory settings. The action is performed through the “Backup and Reset” settings section. If this does not help solve the problem, there is reason to think about replacing the mobile device.
To avoid losing files after a reset, take care to create a backup copy of your data in advance.
Summing up
If for one reason or another the date or time on your smartphone is incorrect, then you can set the correct one at any time using manual or automatic settings, as well as by installing the program described above. On newer devices, the date and time are rarely lost even after rebooting the gadget. But older devices still fail, and because of this, the date and time may be lost.
And also, if the date and time on the photo of the Android phone is incorrect, then the corresponding indicator will be displayed when taking a photo. The display of time on photos can also be turned off in the settings, but not in the main settings. To do this, you will need to turn on the camera and adjust the display from there. But if for some reason this cannot be done, then we recommend that you download the date and time on Android using some third-party applications.
Setting time and date on Android
How to place a clock on your home screen
By default, the time on your smartphone is displayed in the system bar, which is located at the top of the screen, and on the desktop of the device. If you need a big clock but don't have one, scroll through your desktop screens. One of them must show the current time.
If there is no clock, do the following:
- Hold your finger on an empty area of the screen for a couple of seconds.
- Go to the widgets section.
- Select your watch.
- Confirm use of the widget.
Now the selected zone will always display the time. If necessary, through the “Widgets” section you can change the display format from digital to analog clock.
How to place a clock on your lock screen
It is not always convenient for the user to remove the screen lock to see the time. This is especially true in cases where a person’s hands are busy with something. Or, for example, he cannot access the desktop using a fingerprint scanner because his hands are wearing gloves.
In such a situation, activating the clock on the lock screen helps. Thus, even a person who does not know the password can become familiar with the time.
To set the clock on the lock screen, you need to:
- Open device settings.
- Go to the “Screen” section.
- Select “Screensaver”.
- Activate the function.
- Check the “Clock” box.
The menu item names may differ depending on the device model.
Now you will always see the time even on a locked screen. Please note that the indicators are the same as the information presented on the desktop and in the system tray.
How to add hours for other cities
Sometimes a person needs to keep track of time in several cities at once. The functionality of the smartphone allows you to display the clocks of at least two cities on the screen. Here's how the option is activated using a Samsung phone as an example:
- Hold your finger on a free area of the screen.
- Go to the widgets section.
- Click on "Clock".
- From the options offered, select double watches.
- Specify the cities for which the time will be set.
Since there are smartphones from a variety of manufacturers on the market, on some devices you will have to resort to the help of special widget applications. At the same time, individual gadgets by default make it possible to display the clocks of three, or even four cities. You can clarify the information through your phone settings, as well as in the widgets section.
The best clock widgets
You can set a clock on your desktop or smartphone lock screen not only using built-in tools. Also, users of the Android operating system can choose from several hundred widgets from third-party developers. We have selected the 5 best options that you can download completely free through Google Play.
| Name | Description | Rating |
| Transparent clock and weather | One of the most popular and stable widgets with a bunch of settings. The user can set not only the time display, but also the display of weather information in his locality or in another city. | ★★★★★ |
| Sense Flip Clock & Weather | An excellent option for those who need to constantly see information about time and weather. The program offers widgets in three sizes that can be placed anywhere on the screen. | ★★★★★ |
| DIGI Clock Widget | If you are not satisfied with the standard font when displaying the time, it is recommended to use the DIGI Clock application. It comes with a variety of display styles that you can edit to your liking. | ★★★★ |
| Digital clock widget | The application works perfectly even on older versions of the Android operating system, offering the user many settings for the background and time format. | ★★★★ |
Digital Clock Widget Xperia | A nice widget that uses the clock style of Sony Xperia smartphones. Adjustable color and font alternate here with standard settings that guarantee accurate time display. | ★★★ |
The widget installation process is the same regardless of which application the user chooses. So, when using the Minimal Clock application, you need to do the following:
- Download and install the program via Google Play.
- Tap on a free area of the screen.
- Select the widget you are interested in.
When using third-party programs, font and background settings are edited both through the application itself and the widget. Before downloading, it is recommended that you read the information provided on the program page on Google Play.
Setting up the ClockSync application
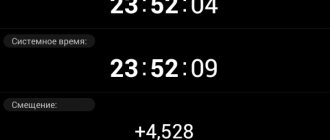
So, let's run the program and check the deviation of the current time on the mobile device from the time on the synchronization servers.
Setting up the application
As you can see, there is a deviation, albeit a small one. The time difference is indicated in the “Offset” line. Therefore, the gadget clock needs to be adjusted a little. But before that, we invite you to familiarize yourself with the opportunities that the ClockSync developers offer us. Using the context menu, open the application settings.
Menu settings
First of all, we advise you to enable automatic time synchronization by checking the appropriate box. Please note that the user is given the right to independently specify the synchronization server. But you should only do this if you are absolutely confident in your actions.
The developers took into account the previous wishes of the Internet community and equipped ClockSync with the ability to record completed operations - you can view the program’s operation log at any time in the “History and Statistics” section.
History and statistics
Let's move on. Option “Detect time zone”. This may come in handy for those of you who travel a lot. Why waste personal time adjusting your watch when flying from one country to another? Let the “smart” gadget do it!
Timezone
As we noted at the beginning of the article, ClockSync strongly requires the user to have root access, but the application copes with its duties quite well without it. You just need to specify the required operating mode in the program settings.
Selecting the application operating mode
Well, at the very end of the list of features there are purely cosmetic items: whether it is worth notifying you that the time is synchronized or not, whether it is worth turning off the device screen while the program is running, what color scheme the application should be painted in, and so on.
Color Settings
This concludes our brief overview of ClockSync settings. It's time to sync our mobile clocks. We go to the main screen of the program and see that the time shift has not gone away. Open the auxiliary menu and select “Synchronize”.
Synchronization
Since our device is “rooted”, the application will ask for permission to gain unlimited access to system functions. We allow it.
Access to features
After a few moments, the digital clock of the experimental gadget will be synchronized, and the internal time of the system will not differ at all from the reference values on the synchronization server.
Sync Time Values
That's all. We dare to hope that we were able to convince you that for the Android operating system, time synchronization is a simple and very necessary process.
>Synchronization program for Android: Video