There are many times when you may want to increase the microphone volume in Windows 10/11. For example, when communicating with friends or colleagues on Skype, during a team meeting in Microsoft Teams, or when using any other application that may require the use of your system's microphone. Sometimes when using these apps, the microphone volume may drop, and that's when you might want to turn up the microphone volume.
In such cases, you should increase the volume to improve the sound quality and communicate normally during an online meeting. There are two ways to increase the microphone's low volume and improve sound quality. Let's see how:
Reasons for quiet sound in the microphone
The main reasons why sound is recorded too quietly:
- In the sound settings, the volume level for the microphone is set to very low.
- Incorrect audio recording device drivers are installed.
- The device is of too low quality, or the microphone does not work at all.
- The built-in battery is low. Relevant for wireless microphone models, that is, those that have a radio module.
Who are you in the world of The Witcher?
How to increase microphone volume
Microphone volume in Windows is controlled by the following components:
- Built-in volume indicator. The one located in the tray. In Windows 10, it has been “moved” to the Settings menu.
- Sound card driver. This is relevant for cases where the microphone is connected specifically to it (as a rule, this is a pink 3.5 mm jack).
- Additionally, the volume of the device can be controlled by the program used in which the sound is recorded. Most often, these are special audio players or instant messengers (Skype, Viber).
Accordingly, if microphone amplification is required, then you need to check the volume settings in both the Windows settings themselves, the driver, and the application used.
Can you tell a cringe from a crash? Take this fun test and find out!
What to do if you can’t programmatically increase the sound
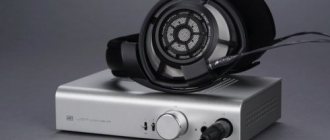
You can improve the signal not only with the help of programs, but also by using an amplifier. There are 2 options: purchasing ready-made equipment or making the device yourself. Most often, purchasing factory-made devices is impractical, because their cost is comparable to the price of a new good microphone. However, the option is well suited for people who do not know how to handle a soldering iron and often record video: in this case, the sound quality should be professional.
Using ready-made amplifiers
The finished amplifiers are placed between the PC and the recording device. The output is connected to the computer, and the input is connected to the microphone. The only drawback of such equipment is the inability to work with the built-in components of a laptop. Owners of laptop computers will have to connect an external device. The cost of budget amplifiers starts from 1.5–2 thousand rubles. Such devices are sufficient for everyday tasks, but for professional activities you will have to consider more expensive options.
Increase microphone volume in settings on Windows 10 and 7
In both Windows 10 and 7, you can adjust the microphone volume through the Control Panel.
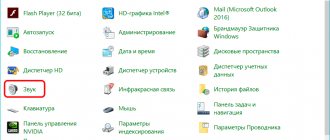
- Login to “Control Panel”
- In the window that opens, you will need to go to the “Sound” tab.
- Then go to “Recording” and double-click on the microphone to go to “Properties”
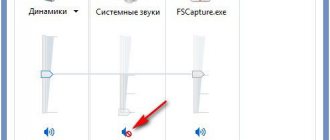
- In the next window, go to the “Levels” tab and set the slider to 100%.
- Then click "OK".
In Windows 10, you can also adjust the microphone volume through the Settings menu.
- Press the keyboard shortcut Win + R
- Go to the "System" section
- Next you need to select “Sound”
- Then, on the right side of the window, find the “Input” item and click “Device Properties.” And there will be a corresponding slider.
You can also make the microphone louder in Windows 8 in the same way.
M or F? Take the test and find out who you are in everyday life: are you a man or a woman?
Codecs
You can improve your laptop's microphone with "Realtek High Definition Codecs", a codec and control panel for improving the sound it outputs, suitable for all types and types of audio recording equipment. We perform the following steps:
- We go to the official website.
- Select Realtek HD Codecs.
- Download the current version of the program according to the installed operating system;
- Install the utility using the installer;
After installing the program on your computer, you need to configure it:
- In the control panel, find and launch “Realtek HD Manager”;
- Open the “Microphone” tab;
- Activate echo and noise reduction functions;
- Click OK and save your changes.
Now the program is configured and ready to work. It will help significantly improve the performance of the microphone on your laptop.
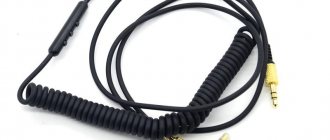
How to increase microphone volume on headphones
To increase the volume of the headphone microphone, it is recommended to do the following:
- If there is a regulator, set it to the maximum value.
- Remove the foam pad (“wind protection”). Better yet, replace it. Over time, the pores in it become clogged, which impairs sound conductivity.
- Wipe the connection plug. Oxides often form there, which interfere with normal signal transmission.
Volga or Pobeda? Are you familiar with the Soviet automobile industry? Test yourself in a fun test!
How to increase microphone volume in Skype
Skype automatically adjusts the microphone volume by default. But often it does not work correctly, the recording is set too quietly or, on the contrary, too loud. Therefore, it is recommended to adjust the volume manually. This is done like this:
- Go to "Settings" of the application.
- Open the “Sound and Video” tab. Disable the indicator “automatically”, and then use the slider to set the desired value.
- Next, you can use a test call to check the current microphone volume and whether it suits the user.
Take the test on the topic “Legends of the 90s”, remember which of these you had?
Setting up audio equipment
By default, the audio card may not behave as desired. To fix this, you will have to configure it.
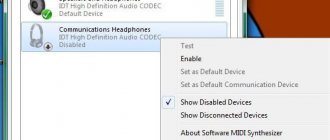
Using Windows tools
You need to go to the microphone properties. Right-click on the “Volume” icon in the tray (next to the keyboard layout selection), call the context menu. Select “Recording Devices”.
A window with several tabs will open. Their number depends on the capabilities of the sound card. The minimum set necessarily includes the “Levels” and “Advanced” tabs.
By clicking on the first one, you can adjust the recording level. The first slider adjusts the sensitivity. The second is the level of software preamplification, which increases not only the volume, but also the amount of distortion.
In the “Advanced” block, you can select one of several recording modes, differing in bit depth and sampling frequency. The higher the values, the better the sound quality and the larger the size of the resulting file.
Using third party programs
For professional sound recording, standard equipment will not be enough. But buying an expensive audio editor is not always justified. Try starting with the free, semi-professional, cross-platform program Audacity.
To change the operating parameters of Audacity, you need to select the “Settings” tab in the “Edit” menu in the top panel or press the key combination “Ctrl” + “P”.
This will allow:
- In the “Devices” block – select the recording source.
- In the “Recording” section – adjust the sensitivity. You can enable automatic recording when a signal of the set level is received. It is possible to apply overlay of several sources and many others. etc.
- In the “Quality” tab – set the bit depth and sampling rate, and also enable dithering (makes digital sound warmer, tube-like).
Increase microphone volume via module on max9812 board
MAX9812 is a module compatible with Arduino controller. That is, programmable. But it doesn't have to be used in conjunction with Arduino. By default, it just performs the functionality of a microphone amplifier. You need to do the following:
- Solder the microphone contacts to the MAX8912 GDP and MIN outputs (in any order).
- To OUT and GND - wires from the audio plug.
- Connect 3V power to positive and ground (minus to ground).
This “amplifier” also suppresses third-party noise in the range of up to 100 dB. Its only drawback is that you cannot precisely adjust the microphone volume.
Super test on the topic “Money” and how can you be friends with it?
How can you improve sound quality using equalization?
Post-processing means you have VST plugins that do a great job of this. Any graphic or parametric equalizer can handle this. First, it’s worth trimming the sub-bass to remove excess low-frequency noise from the vocals. The most important thing is not to exaggerate and remove useful frequencies in the low spectrum: up to 100-150 Hz for a male voice and up to 300-350 Hz for a female voice
Secondly, you need to understand that correcting the frequency range of recorded vocals on a cheap microphone begins with finding and isolating useful frequencies. How to do it?
To understand what changes need to be made, we divide the vocal range into 3 parts: low frequencies (from 100 to 500 Hz), mid frequencies (from 500 Hz to 2 KHz) and high frequencies (from 2 KHz to 20 KHz). In my opinion, the most problematic areas of cheap condenser microphones are in the midrange - they make our sound plastic. Using a graphic equalizer as an example, let's look at the first stage of sound improvement:
What have we done? On the graphic equalizer we set the “V” shape, thereby adding the missing low frequencies to the voice, i.e. body, and increased the so-called intelligibility in the high frequency range. Be careful and listen when you raise/lower the level of a particular frequency, because you can suppress your voice or, conversely, deprive it of useful frequencies. In our case, a gain or cut of 3.5 - 5 dB will be sufficient.
But that is not all!
The passive V-shaped equalizer still needs improvement, namely in reducing the volume of dissonances across the sound spectrum. This will get rid of all the whistling and buzzing unnecessary frequencies. How to do it?
A graphic equalizer in this regard will be much more effective than a parametric one, because with its help we see which areas cause dissonance. So, to search for “hissing” and “squeaking”, the Q value (the ratio of the central frequency of the range we have chosen to its width) should be minimal. Now we can find sounds that are unpleasant to us and lower their amplification level, but it is better to do this with the help of a dynamic equalizer, so that in the absence of resonance of the selected frequencies, the voice does not lose its natural coloring.
Now our vocals, recorded on a cheap microphone, sound much better and are ready for further processing with various plugins and other mixing tools!
Therefore, we can conclude that even with a budget microphone you can achieve decent sound for your creativity!