A computer has many functions, but its already wide functionality can be expanded by connecting new devices. One of the most important devices that can be connected to it is a microphone. A microphone is needed to communicate with people, work and record audio tracks. A microphone is a pretty useful thing, but to start using it, you first need to connect it, test it and configure it. If you don't know how to do this, the instructions in this article will help you.
How to connect a microphone to a computer
Connection for Windows 10
Some beginners who have not used a microphone before may experience one difficulty in connecting it. The difficulty is that the microphone connector in the system unit is the same as the connector for speakers and other audio headsets. But, despite the same shape, the functions of these connectors are completely different. If you connect a microphone to the speaker jack and speakers to the microphone jack, neither the speakers nor the microphone will work.
To properly connect the microphone to your computer, follow these steps:
Step 1. Find the microphone connector on the back wall of the system unit.
On a note! It is important not to confuse it with a speaker connector. A distinctive feature is the color - the microphone connector is pink, while the connector for speakers and other audio playback devices is green.
Find the microphone connector on the back wall of the system unit
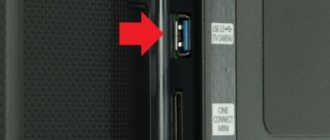
Sometimes these connectors may be on the front of the system unit (at the bottom where USB ports are usually located), but this is not always the case.
The connectors are located on the front of the system unit
Step 2. Insert the microphone plug into the pink connector. For newer computer models, in addition to the color, the logo of the corresponding device is also indicated (in this case, you will see the microphone logo).
Insert the microphone plug into the pink connector
Microphone connected
Step 3: Make sure the connection is successful. To do this, find the sound icon on the taskbar and right-click on it.
Find the sound icon on the taskbar and right-click on it
Step 4: Select the Recording Devices .
Select the “Recording Devices” menu
Step 5. Look at the list of devices and find your microphone in it. If it appears there, then you have connected it correctly.
We look through the list of devices, if there is an icon with the name of our microphone, then the connection is correct
What to do if the equipment does not work
Sometimes standard configuration methods do not allow the device to work. In this case, additional steps will need to be taken. First you need to make sure that the microphone plug has not jumped out of the PC socket. This can happen if the computer has been moved or there are small children or pets in the apartment.
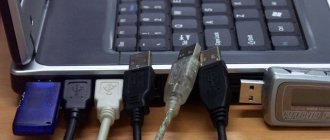
Then it is recommended to check the condition of the audio connectors on your computer's sound card. They may be damaged. If you are using a USB microphone, you should try connecting the gadget to a different socket.
If there is no sound from the microphone, you should check the functionality of the equipment on another PC or laptop. If the device does not start working correctly there, it means that the product is faulty at the hardware level. In this case, the microphone will need to be replaced. Repairing devices in most cases is not economically justified.
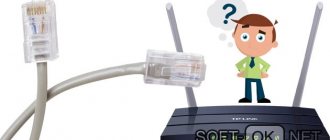
Connecting a wireless microphone
The wireless microphone works using a special adapter that is connected to the system unit. This adapter is equipped with either a TRS connector or a USB connector. Or all at once.
To connect a wireless microphone you need an adapter with a TRS connector or a USB connector.
To connect a wireless microphone, follow these steps:
- If you have a TRS connector, then you first need to connect it to a special Jack 1/4 adapter. This adapter is very cheap and is sold in almost every hardware store.
To connect the TRS connector you need a Jack 1/4 adapter - Connect Jack 1/4 (to which you previously connected the TRS plug of your microphone adapter) into the pink jack intended for the microphone.
If you have USB, then connect it to any free USB port. Insert the microphone plug into the pink connector - Make sure that the computer recognizes the new connected device. This process is described in the previous parts of the article.
Now that you've connected the microphone, it's time to move on to the next steps - testing and setup.
How to connect a karaoke microphone to speakers via a laptop
To do this, the following list of steps is presented that will definitely help you achieve results. IMPORTANT! The instructions apply exclusively to owners of Windows 7; therefore, the method is not suitable for others.
- Therefore, first you need to click on the icon that is located directly in the notification area.
- Then you should mark the line under the name “sounds”. You will have access to a pop-up window where you can click on “record”.
- Next, you need to be sure to find your device in the list, which will open after completing the previous steps. Most often, either the name of your equipment or any part of it is displayed.
- To complete the procedure, you need to double-click on the name with the right side of the mouse. Then select the “properties” line, and then “listen”. Then you need to click on the “listen from this device” section.
ATTENTION. Don’t forget to commit changes using the “save” or “apply” button. Otherwise, previous manipulations will be without result.
- At the very end, it is strongly recommended to double-check the assigned actions and try the design to work. If the sound is directly output through the speakers, you have done everything reliably.
Thus, you can see that any connection method does not require special knowledge and skills from the master. Therefore, even a novice user can cope with the work described.
You don't have to go to a karaoke bar to sing your favorite hits. There are computer programs that run the phonogram synchronously with the lyrics of the song. However, two nuances remain: which microphone to choose and how to connect the microphone to a laptop for karaoke.
Settings
The last step in connecting a microphone is to adjust the sound. Having called up the “Control Panel” screen, you need to enter the “Sounds and Devices” menu. Then the Audio section opens with Record Audio and finally the Volume tab. Click on the word "Microphone" to increase the playback volume to the desired level. As a general rule, you should set it to maximum for quality use. After applying the Enhance function, you must save your changes. In the same menu, you can also eliminate sound defects and noise using the Noise Reduction function.
If the microphone is connected to a Windows 7 computer, it is recommended that you also update the audio driver during installation. The easiest way to do this if Realtek hd is present on your system is by installing an update that will automatically update the required driver. The next microphone configuration is as follows. In the “Control Panel”, select “Hardware”, and then the user follows the chain “Recording” - “Microphone”. By right-clicking on the word "Microphone" you can see its possible properties.
After opening the “Levels” section, the video should be raised to “100”, but if headphones are already connected, leave it at “60-70”.
“Gain” is usually set to a level of “20” in decibels. All updated settings will be saved.
Microphone settings in Windows 10 are carried out using a different algorithm. By right-clicking on the volume icon, you should find the “Recording Device” section. The Recording tab opens Microphone Properties and then displays the Advanced section. The Default Format checkbox is selected and the Studio Quality option is applied. The changes you make are applied or simply saved.
In the microphone settings menu, no matter what system you're using, you'll find roughly the same settings and functions. After examining the contents of the “General” tab, the user will be able to change the microphone icon, its icon and name, as well as find information about available drivers. This tab also disconnects the microphone from the main unit. The Listen tab allows you to hear the sound of your voice, which is necessary to control the microphone.
The “Levels” tab can bring the greatest benefit to the user. Here you adjust the volume and, if necessary, connect the gain. Typically, volume is kept at 20-50, although quieter devices will require a setting of 100, as well as additional gain. In addition, the recording format, monopole setting and signal processing are determined for the microphone, which is usually only required for studio recording. You should always finish changing settings by clicking Apply to save it.
How to check the connection quality on Skype
For this purpose, a Skype service “Echo / Sound Test Service” was specially invented. When installing Skype, only this service is present in the contact list by default. To check the connection (voice only), just call there and do what the girl says. We rejoice and communicate with friends and relatives if the sound quality is satisfactory. By the way, you can record your conversations on Skype.
If your friends are hard to hear on Skype, share the news with them via social networks.
Calling over the Internet today is the most common way of communication. But sometimes this is impossible, since the microphone is most often poorly configured and the quality of the connection suffers as a result. All versions of Windows have the same microphone settings.