- 8shared
- 0Facebook
- 8Twitter
- 0VKontakte
- 0Odnoklassniki
Today, almost all laptop models are equipped with built-in webcams and microphones, allowing users to communicate with each other both in video and voice mode. Desktop computers may not have a built-in camera and microphone; in such cases, external devices are usually used. As a rule, there are no special problems with identifying a Windows camera and microphone; however, no one is immune from errors and malfunctions.
In this article we will look at the main reasons why the microphone may not work on a computer with Windows 10. These reasons can be both hardware and software, and the latter are much more common, for example, very often you encounter a problem after upgrading Windows 10 to a new one assemblies.
Microphone failure or system disconnection
Problems with the microphone can be caused by various failures at the system level or settings incorrectly set by the user. It is also not uncommon for the microphone to stop working after updating Windows 10. The search for the causes of the problem should begin by checking the audio settings. Once you open the Settings app, select the Microphone tab in the Privacy section and make sure that the device's microphone access permission is turned on, and the recording device permission for apps should also be turned on.
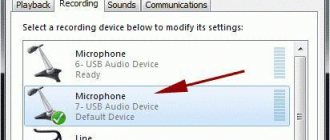
You can check the operation of the microphone in its properties. Right-click on the speaker icon in the tray, and then select “Recording Devices” from the menu.
This time, right-click on the recording device (microphone), select “Properties” from the menu and make sure that the “Use this device” option is marked “On”.
Please note the default format. The signal bit depth and frequency should be set to “2-channel, 16-bit, 96000 Hz (studio quality)”.
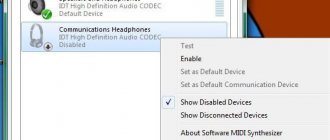
If you do not see a device in the “Sound” window, this does not mean that it does not exist at all. Right-click on an empty space in the window and select “Show disabled and disconnected devices” from the menu.
Setting up the microphone on the sound card
Before setting up the microphone, you need to connect it, otherwise the device will not be displayed. To do this, the microphone plug is inserted into the pink jack on the sound controller. Then you need to open Realtek HD Audio Manager. This can be done through the control panel by opening the line with the corresponding icon, or by clicking on the colored speaker symbol in the notification panel.
Next, in the main window you need to use the sliders to set the microphone gain and recording level. Gain should not be made above +20.0 dB, as distortion may occur. It is advisable to enable the noise reduction system by checking the boxes next to “Noise reduction” and “Echo suppression”. You can make a test recording and adjust the gain and level based on the listening results. Setting up an external sound card is only possible with connected devices and installed drivers.
Driver problems
Driver conflicts or driver failure are fairly common reasons why the microphone does not work in Windows 10. Open Device Manager and expand Audio Inputs and Outputs and see if the microphone has a yellow or red icon. If yes, this will indicate problems with the device drivers.
If your computer does not see the microphone in Windows 10, but there is some unknown device in the list, this may indicate a problem with the microphone software or that it is missing altogether. In this case, you need to download the necessary driver from the official website of your PC's motherboard manufacturer or use one of the special programs to search and install drivers.
Why doesn't the computer see the microphone?
The main reasons for the lack of communication may be the following:
- The power button on the device is not activated,
- connection errors,
- incorrect settings,
- outdated or malfunctioning software,
- breakdown of headset elements (faulty cord or plug),
- failures in the operating system.
It matters how the microphone is connected to the PC:
- headphone input,
- common connector
- two sockets are used (in devices with two plugs),
- USB,
- Bluetooth.
Depending on the connection options, the following faults may occur:
The PC audio connector is incorrectly selected. The microphone port is pink, the headphone port is green. Laptops may have uncolored inputs, but they are marked accordingly.
ON A NOTE. Some computer models provide a single input for headphones and microphones, which eliminates error.
- The device plug does not match the diameter of the audio input, it dangles in it, so there is no contact.
- The connector is dirty or its individual elements are damaged.
- The Bluetooth option is not turned on or the batteries have run out.
Various system problems
If you find it difficult to determine the source of the problem, you can use the built-in Troubleshooting tool in Windows 10, which allows you to automatically find and fix minor errors in the operating system. You can access it from the Update & Security section of the Settings app. Once you open it, select Troubleshoot – Record audio – Run the troubleshooter.
The utility will check and if problems are detected, it will automatically fix them or offer other options.
Fix Microphone Not Working on Your Windows Laptop
What could be the sources of the problem?
Before we dive into solving this problem, let's look at its source. If your microphone connected to Windows Laptop suddenly stopped working, it may be due to the reasons listed above.
1. Your microphone is muted
Sometimes installing certain third-party applications on your system changes the audio configuration, causing the microphone to turn off.
2. Your microphone is muted.
You or someone else may have accidentally muted the microphone which is causing this issue.
3. Your audio drivers are faulty.
If you have recently installed a new audio device in your system, it is possible that the newly installed drivers might not work properly with the existing one, causing this issue to occur in your laptop.
4. The laptop's audio port may be damaged or disoriented.
One of the most common causes of this problem is damage to the connector pins inside the laptop's audio port. In such a situation, it is necessary to repair the audio port.
5. There is a problem with the microphone hardware.
It's possible that the microphone you're using may have an issue with the internal hardware itself. As a result, the microphone shows problems connecting to the laptop.
Use your microphone with multiple apps at the same time
One of the reasons that the microphone does not work on a Windows 10 computer is often that it is used simultaneously by different applications, for example, a browser and some kind of Internet messenger. To prevent different programs from using the microphone at the same time, go to its properties (see third paragraph), switch to the “Advanced” tab and uncheck the “Allow programs to use the microphone in exclusive mode” checkbox.
Alternatively, you can shut down other programs that could potentially be using the microphone, but this method is not always acceptable.
Settings in communication programs
Most applications for communicating over the Internet have a separate section with settings that does not depend on system parameters. For example, we will look at the setup procedure in Skype and Discord.
Skype
We will talk about the most recent version of Skype. If this update is not available to you, you can still use the instructions - the approximate location of the sections and names remains the same:
- We go to settings through the additional menu.
- Here we open “Sound and Video”, select the device to record and adjust the volume level.
- To test the sound, click on “Make a free test call” at the bottom of the window.
During the call, you will be connected to an answering machine that will record up to 10 seconds of your speech. It will then play the recording so you can listen to it. This will allow you to understand how your voice will sound when talking online.
Discord
This application is newer than Skype, but is already very popular among gamers due to its functionality. For the microphone to work properly with it, do the following:
- Open the section using the gear.
- Go to the “Voice and Video” tab. Here you can select I/O devices (1). Below you can adjust the volume sliders (2). To listen to your voice, you need to click on the “Let's Check” button (3). You will hear a slight delay - this is normal. After listening to the voice, make adjustments to the volume level.
- If the voice sounds too quiet, try turning off automatic sensitivity detection and setting the slider to maximum.
Additionally, you can assign a hotkey and mute the microphone if necessary.
We reviewed only two current programs. If you use another application, then most likely its settings are very similar to these instructions.
Connecting multiple audio recording devices to your computer
For this reason, the microphone quite often does not work on laptops with Windows 10. When a user connects an external microphone to the laptop, the system can automatically assign it the status of the main one, while the built-in microphone will be disabled and it may remain so even after the external microphone is disconnected. The solution is very simple - after disconnecting the external recording device, go to the properties of the built-in microphone and turn it on. It is acceptable to switch between two devices if, as a result of a hardware conflict, they both turn off.
Why doesn't the computer see the microphone from the headphones?
Such gadgets are popular among gamers and those who like to communicate online, since it is more convenient to use one audio device instead of two. They differ in connection type and power supply in the same way as microphones.
Possible problems:
- Incorrect connection.
- Typically, combined models have one wire, standard or USB. In the first case, the plug is plugged into the headphone jack (on a desktop computer this is a green socket).
- Two connection cables (separate for microphone and headphone) may cause user error when selecting the appropriate ports.
Hardware problems
When a microphone is connected, but it does not work in Windows 10, hardware failure cannot be ruled out. This kind of problem is indicated by the inability to detect the device by the operating system and the lack of positive results from using other diagnostic and correction methods. In some cases, the microphone is visible in the Windows 10 Device Manager, but it does not work; updating or installing drivers does not solve the problem.
If the microphone is external, checking its serviceability is not difficult; sometimes it is enough to simply connect it to another computer. With built-in devices, everything is a little more complicated; the extent of their damage can only be determined in a specialized service center.
- 8shared
- 0Facebook
- 8Twitter
- 0VKontakte
- 0Odnoklassniki
Adjusting microphone sound quality and gain in Windows 10
How to set up a microphone on Windows 8 - ways to check
If the microphone on a computer running Windows 10 is hard to hear, then everything is fine with your privacy settings. But since the interlocutors cannot hear the user’s clear speech, this is a reason to adjust the sound recording device so that it begins to respond correctly.
This is most likely due to the fact that the computer uses the webcam's built-in microphone, which has never sounded great. To fix this, you need:
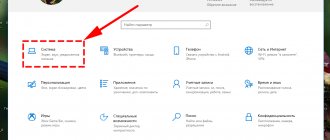
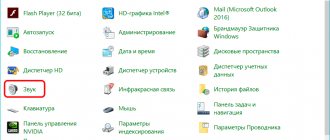
- First go to Start.
- Go to "Control Panel".
- Click on “System”.
- Next, in the menu on the left, go to “Sound”.
- In the menu that opens on the left, click on “Sound Control Panel”.
- In the new window, click on “Record”.
- In the list of connected devices, select the desired device (USB, headset).
- Then tap on “Customize”.
- In the new window, in the “Device Use” submenu, select “Use this device (“On”).
How to set up a microphone step by step
Possible problems
Let's look at the main difficulties and errors that may arise when connecting and setting up a microphone on Windows 7.
Troubleshooting
If you encounter any problems, try running the standard troubleshooter. Perhaps a scan will help determine the cause:
- First, go to the “Control Panel”.
- Here we select the “Large Icons” view type and open the “Troubleshooting” section.
- We find “Hardware and Sound”, where you need to click on “Troubleshoot audio problems” to launch the diagnostic tool. Note that there is also a button to run audio playback diagnostics here.
- Information about the procedure will appear on the initial screen. Click Next.
- The application will begin troubleshooting. Wait 1-2 minutes.
- At the end, either a notification will appear stating that everything is fine, as in the screenshot. Or a window with the cause of the malfunction. Depending on what the diagnostics “says,” choose a further course of action.
The microphone is no longer detected by the computer
If everything was fine with your recording device, but at some point it disappeared from the system and does not want to work, then you need to install the correct driver.
Before installing a new driver version, be sure to remove the old one to avoid a software conflict.
It is worth adding that such a problem can also arise with the hardware. For example, if a microphone is constantly being connected and disconnected in the system, then the fault may be in the cable or connector. We recommend checking the wire for damage and also trying to switch the microphone to the front or rear panel (depending on where it was originally connected).
The front panel does not see the device
This problem can have two reasons: a malfunction of the port on the case or problems with the connection to the motherboard, as well as driver settings.
To do this, in the Realtek HD manager you need to select the type of device connected to the front connector. Click on the connector icon and select “Microphone input”.
External sound card does not work
If we are talking about connecting a microphone not directly to the motherboard or the front panel of the PC case, but using additional equipment, then you definitely need to install the software and driver for this card.
Install the necessary programs from the disk that comes with the purchase of the sound card. If there is no disk, then visit the manufacturer’s official website and download a driver designed for Windows 7. Don’t forget to check the bitness of the operating system.
The same advice applies not only to sound cards. Be sure to install a proprietary driver for a webcam with a built-in microphone, for USB devices, etc.
No Enhancements tab
Many users do not have a special “Improvements” tab, which was mentioned a little above. Do not despair - this only indicates that you have the wrong driver installed.
To solve the problem, you need to visit the official website of Realtek (or another software manufacturer) and download the appropriate driver version manually.
It is worth noting that this tab may simply have a different name - it all depends on the driver. In some it has an English name, and in some it can generally be divided into two separate categories.
No Realtek HD utility
The same applies to the proprietary Realtek utility. For some users, this section is simply missing in the Control Panel. For the application to appear, reinstall the driver.
Sound from microphone is delayed in headphones
This problem most often occurs when using many enhancing effects, especially when it comes to third-party programs. We recommend disabling the improvements in the default system settings described above. If the situation does not change, then try reinstalling the driver.
Results
Now you can connect a microphone, configure it, or fix any audio problems. If the microphone and connector do not have hardware problems, then in most cases, standard Windows 7 functionality is sufficient to configure the device.
We read all the comments under the instructions, so you can ask any questions on this topic: connection nuances, driver installation, sound settings, and so on.
Source
Problem with headphones in Discord
If you have a problem with headphones in Discord, but they work in other applications (for example, headphones work in the browser when playing a video from YouTube), then most likely they are disabled in the lower left panel of your window in Discord, which we talked about above.
In the case of setting up headphones, the procedure will be the same as with the microphone. The only difference is that you don’t need to install drivers; the headphones work without them. The main thing is to check that the problem with headphones occurs specifically in Discord, and not in your laptop in general.
Method 1: Enable/Disable Microphone Access through Privacy Settings
This method allows you to enable or disable microphone access on your Windows 11 PC in the privacy settings. To continue, follow the instructions below:
Step 1: Press the Win + I keys on your keyboard simultaneously to launch the Settings app.
Step 2: In the Settings window, click Privacy & Security on the left.
Step 3: Now go to the right, scroll down and under App Permissions, tap on Microphone.
Step 4: Next, on the Microphone Settings screen, go to the Microphone Access section and move the slider to the right to turn it on.
*Note. To mute the microphone, move the slider to the left.
Step 5: Now go to the Allow apps to access your microphone option and move the switch to the right to allow all apps to access your microphone.
Step 6: You can also enable or disable microphone access for individual apps in the list.
For example, I wanted to disable microphone access for the Xbox Game Bar, so I moved the switch to the left and only that specific app was disabled.
You have now successfully enabled or disabled microphone access for all apps or individual apps.