Home » Uncategorized
Vladimir 04/02/2020
Blurry fonts in Windows 10 can happen for a variety of reasons, but with built-in features you can get rid of the problem in a few easy steps.
Blurred Windows 10 fonts.
Since you are brought here, it means you are also lucky, who, after installing drivers on Windows 10, began to have blurry fonts in the device manager and program installer windows. Maybe somewhere else, but these are the most obvious places. But let’s not just chat and move on to options for solving the problem. Actually, the picture below shows the problem itself. As usual, they will go from instructions that did not help to which did help, if you tried one of them, then follow the other.
Solution 1.
Right-click on the desktop and select display settings
.
We find the item change the size of text, apps, and other items (change the size of text, apps, and other items)
, if it is 125% then change it to 100% or vice versa, but probably everything will become smaller or larger. This method did not suit me, since everything became much smaller and with a good screen resolution it is not very pleasant to look at the small print. See picture 1.
Solution 2.
Let’s not go far and in the same window, under percentages, click on the advanced scaling setting.
and there will be a switch
to allow windows to fix blurry in applications (let windows try to fix apps so they're not blurry)
, if you have it turned on, then turn it off and vice versa, then restart the device. See picture 2.
Solution 3.
Click on the line or search icon next to Start
and enter
ClearType into the search -
open the found application and follow the instructions. I think you can figure it out for yourself, just choose clearer text. See picture 3.
Solution 4.
I haven’t seen it myself, but they say that Windows itself may offer to solve this problem if there is blurry text in the application, but I don’t really believe in fairy tales, so I’m attaching a picture stolen from the Internet. If you suddenly see this, agree without thinking. See picture 4.
Solution 5.
Reinstall the drivers for the built-in or discrete video card from the manufacturer’s official website, they say that this can happen if installed through any kind of DriverPack applications that automatically install drivers. So if you don’t have to install Windows on several devices a day, then it’s better to install the drivers manually.
Although at the moment Windows is quite capable of installing all drivers itself through the update center
.
Solution 6.
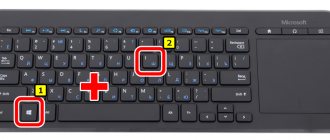
Press Win+R
and in the window that appears, write
regedit
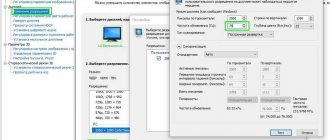
- the registry editor will open, then go along the path
HKEY_CURRENT_USER/Control Panel/Desktop,
there we look for
the DpiScalingVer
and set the value to
1018
, as in the figure below. See picture 5.
Then open the following parameter Win8DpiScaling
and set it to 1. See picture 6.
Now we need to create a new 32-bit DWORD key called LogPixels
and set its value to
78.
To do this, right-click on an empty space and the following menu will appear, in it select DWORD (32-bit) Value and rename it to LogPixels. See picture 7 and picture 8.
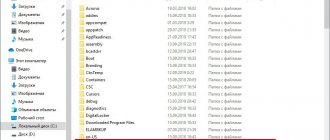
Then restart your computer and enjoy a nice and not blurry font. Although Windows stated that they fixed this problem, which existed back in 1703, but according to complaints on the Internet, it still exists. In my case, it was on build 1909. Thank you for your attention.
Source
Scaling
Firefox also includes a zoom feature. This allows you to increase the text size on any web page. For more instructions, see Font size and page scale - Increase the size of your web pages.
These wonderful people helped write this article:
Become a volunteer
Grow and share your experiences with others. Answer questions and improve our knowledge base.
Eliminate blurry program interfaces in Windows 10
With the release of Windows 10, Microsoft developers introduced a fundamentally new scaling algorithm in their new operating system, which is radically different from the algorithm that was previously used in the Windows 7 and Windows 8 operating systems. The development of a new scaling algorithm was aimed at ensuring adaptation of the interface of the new Windows 10 operating system for any size device screen, both high-resolution displays and screens of netbooks and tablet computers.
With the introduction of a new scaling algorithm in Windows 10, a large number of application programs were displayed quite normally on monitor screens with a standard resolution (FullHD, 1920x1080), but on screens with a higher resolution (Ultra HD, 2k-4k) when the scale was increased to 125% or more, the interface programs looks blurry, as if washed out, as if a picture was stretched to large sizes with an initially low resolution. The “blurring” effect is especially obvious when scaling screen fonts.
When working with certain programs, you might find that some programs have a clear interface, while others have a vague (fuzzy, blurry, interpolated) interface. Particularly interesting is the fact that the same program with a “problematic interface display” can look completely normal on another computer.
Let's look at ways to fix blurry program interfaces
1. Changing the scale
The first thing to do is to play around with the scale and try different values other than the default ones, for example setting a custom scale in the range from 125% to 250%. It may turn out that the interface blur will be less noticeable at a larger scale.
Such manipulations with setting the scaling parameters help in most cases. So, for example, for my Dell Alienware 13 laptop with an UltaHD 4k screen (3840 × 2160), instead of the 250% scale suggested by the system, the most optimal scale turned out to be 175%, at which almost all programs are displayed normally and font blurring is minimal.
2. ClearType Font Smoothing
Another simple way to solve the problem of blurry text on the screen is to set up ClearType
.
In the search window, type Cleartype
and run the program “
Setting ClearType Text
”.
After launch, the setup program will determine the base resolution of the monitor over five stages and will offer you to choose the most optimal font smoothing option, which ensures the most comfortable text display for the eyes.
By the way, in some cases, disabling ClearType anti-aliasing technology can have an unexpected effect; to do this, on the initial screen of the setup program, uncheck “ Enable ClearType”
“.
3. Updating versions of programs used
Often problems with scaling and interface blurring occur when using outdated application software designed for older versions of Windows, such as Windows XP or even Windows 98.
Technical progress does not stand still; accordingly, software developers, with the release of new versions of their programs, try to ensure their maximum compatibility with the new Windows 10 operating system and the scaling algorithm used in it. Thus, the solution to the problem may lie in simply updating the version of the application software used that is compatible with Windows 10.
4. Settings for the interface themes of the programs used
Some programs support interface themes for high-resolution displays and are adapted to the Windows 10 scaling algorithm. For example, the Steam client, along with the classic interface, allowed you to select the “Metro for Steam” tiled interface theme adapted for Windows 8, and with the release of the latest versions of Windows 10, a mode appeared “Big Picture” scaling with support for 4k displays.
5. Returning the old scaling algorithm from Windows 8
If all the methods described above do not help, the blurred program interface can be corrected by forcibly enabling the old scaling algorithm that was used in Windows 8. An archive with the necessary settings can be downloaded here
.
The archive folder contains two registry files. First file – Windows 8 DPI method
– activates in Windows 10 the old scaling algorithm used in Windows 8. The second file –
Default DPI method
– returns the standard Windows 10 anti-aliasing algorithm.
Everything is the same, but in automated mode the simple utility Windows 10 DPI Fix
What is hardware acceleration in Google Chrome
In case the previous solution did not work, we can try it with the integrated feature of the browser itself. Therefore, if we see that we have problems with Google Chrome fonts , it may be due to something internal to the program. This may happen more often when we update software. or switch to another version. This means we are not doing a new clean install, but we are making major changes.
It is when this can happen that we comment on the texts. So, one of the most common reasons for all this is hardware acceleration which is integrated into Google's own Chrome. Therefore, a solution that can help us a lot is to disable hardware acceleration in Chrome to solve the font issue. This is something that, as we will see later, we perform from Configuration menu.
First of all, it's worth knowing that when we talk about hardware acceleration, we mean something that helps improve a program's performance. In this way, Google Chrome can directly access the computer's hardware resources to directly process its tasks. All this is done without having to rely on a software layer that slows down the browser. In fact, the same is sometimes used to handle some heavy-duty activities like video streaming, which improves greatly with all this.
PS: Note
In some cases, after restarting the computer, the scaling parameters are reset to the original ones, i.e. registry key value “ DpiScalingVer”,
responsible for scaling, when exiting the system each time it returned to the original value of “1000”.
To solve this problem, you need to create a BAT file “ RestoreDPI.bat”
” with the following content (or take the ready-made file “
Windows 8 DPI method.reg
” from the archive at the link above):
REG ADD “HKCU\Control Panel\Desktop” /v DpiScalingVer /t REG_DWORD /d 0x00001018 /f
REG ADD “HKCU\Control Panel\Desktop” /v Win8DpiScaling /t REG_DWORD /d 0x00000001 /f
REG ADD “HKCU\Control Panel\Desktop” /v LogPixels /t REG_DWORD /d 0x00000078 /f
and add it to startup, then restart the computer.
Source
How to activate font smoothing in Windows 10
The task under consideration is not something complicated; even an inexperienced user who does not have additional knowledge and skills can cope with it. We will help you understand this by providing visual guides for each method.
If you want to use non-standard fonts, install them first, and only then proceed to the methods described below. Check out the detailed instructions on this topic in an article from another of our authors at the following link.
Method 1: ClearType
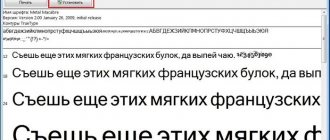
The ClearType text customizer was developed by Microsoft and allows you to select the most optimal display of system text. The user is shown several pictures, and he needs to choose which one is the best. The whole procedure is carried out like this:
- Open “Start” and type “ClearType” in the search field, left-click on the match that appears.
You will be notified that the monitor you are using is set to base resolution. Move further by clicking on the appropriate button.
Now the main process begins - choosing the best example of text. Check the appropriate option and click “Next”.
Five stages with different examples await you. They all go through the same principle, only the number of proposed options changes.
If you do not immediately see any changes, reboot the system, and then re-check the effectiveness of the tool you are using.
Method 2: Smoothing Jagged Screen Fonts
The previous method is basic and usually helps optimize the system text in the best possible way. However, in the case when you do not get the desired result, it is worth checking whether one important parameter is enabled, which is responsible for anti-aliasing. Its location and activation occurs according to the following instructions:
- Open the Start menu and go to the classic Control Panel app.
Find the “System” element among all the icons, hover over it and left-click.
In the window that opens, you will see several links on the left. Click on "Advanced system settings".
Go to the “Advanced” tab and in the “Performance” block select “Options”.
In the performance options, you are interested in the “Visual Effects” tab. In it, make sure that there is a checkmark next to the item “Smoothing unevenness of screen fonts”. If it is not there, install it and apply the changes.
At the end of this procedure, it is also recommended to restart the computer, after which all irregularities in the screen fonts should disappear.
Method 2: Glyphr Studio
Glyphr Studio is another full-fledged font editor that allows you to start with a template or load an existing file to make the necessary changes. The site provides all the required tools for working with lines and layers, which will allow you to both edit a ready-made symbol and create your own from scratch with a minimum amount of effort.
Go to the Glyphr Studio online service
- Scroll to the bottom of the site's home page and click on the link to the right of "Glyphr Studio Online."
- In the editor itself, set a name for the new font, choose the option to upload a file, or start with a template.
- Check out the list of characters present and find among them the one that you need to edit first.
- The first three tools create different types of lines. There's a rectangle, a circle, and a custom shape that you create by hand using dots.
- You independently select the number of points, after which they are combined with lines and a fill appears. This is very useful for creating comma or similar characters using a fillet.
- The next group of tools is selecting and editing points. You can add an unlimited number of points to change the bends of the lines or select any of the shapes to move, thereby changing not only the position, but also the angle of inclination.
- To switch to other symbols after the previous one has already been changed, use the arrow buttons.
- On the left panel there are several more buttons to control the selected elements. With their help, you can select, delete, clone, and move between layers. The action of each button is clear from its miniature, so you definitely won’t get confused about them.
- Switch to the layers section to view all the components of the symbols and edit them to suit your needs. Below there are three buttons for renaming and adding new layers.
- Finally, let's note the workspace settings. You independently choose the size of the auxiliary grid and the display of each line, which will help you work more accurately with each letter, number or special symbol.
- To save, click on the floppy disk icon.
- You can get a Glyphr Studio project to come back to edit later, download an OTF or SVG file.
Fixing blurry fonts
If you are faced with the fact that the displayed text not only contains small inaccuracies and defects, but is blurred, the methods listed above may not help solve this problem. If such a situation arises, first of all you need to pay attention to the scaling and screen resolution. Read more about this in our other material at the link below.
Today you were introduced to the two main methods for activating font smoothing in the Windows 10 operating system - the ClearType tool and the Screen Font Smoothing feature. There is nothing complicated in this task, because the user only needs to activate the parameters and adjust them to suit themselves.
Source
Highlight text with color
One way to highlight text in Word is to highlight it with color. This highlighting method is similar to highlighting text with a marker on a sheet of paper. The button for selecting the appropriate shade is located in the “Font” category.
Available colors - 15 pieces - from yellow to black. If the “No color” option is selected, the design for the selected fragment will be reset. Undoing recent changes is available via the Ctrl + C .