Direct X is used mostly in computer games, less often in any programs. And this driver is responsible for controlling the hardware component of the computer (video card, sound card and other input and output devices). So it’s logical to assume that if you change its parameters, system performance will increase, programs will run faster, and FPS in games will increase. Therefore, users are interested in how to configure DirectX on the system. I would like to clarify this issue a little.
Windows: How to use the DirectX Diagnostic Tool?
***
***
***
What do DirectX users call: Direct X, Direction X, Director X, Directory X...
(Computer stories)
What is the DirectX Diagnostic Tool for?
The DirectX Diagnostic Tool displays information about Microsoft DirectX application programming interface (API) components and drivers. It provides detailed information about installed DirectX components and drivers, allows you to test functionality, detect problems, and configure the system to achieve maximum performance.
How to run the DirectX Diagnostic Tool (Windows XP)
Click Start -> Run...;
– in the Run the program window, enter dxdiag in the Open text field, click OK;
– The DirectX Diagnostic Tool will start.
• The System tab provides general system information.
• The DirectX Files tab provides information about the DirectX components installed on the system.
• On the Display tab, you can check DirectDraw and Direct3D, and also enable (or disable if problems occur) DirectDraw, Direct3D, and AGP texture acceleration.
• On the Sound tab, you can check DirectSound, and also set the level of hardware acceleration (no acceleration - basic acceleration - standard - full).
• On the Music tab, you can check DirectMusic.
• On the Input tab, you can check for the presence/absence of input device problems.
• On the Network tab, you can check DirectPlay and DirectPlay Voice Settings.
• On the If all else fails tab, you can:
– run DirectX diagnostics from the Windows help system by clicking the Troubleshooting... button;
– run diagnostics of sound devices from the Windows help system by clicking the Sound... button;
– launch the system information display tool by clicking the Launch MSInfo... button;
– change the refresh rate of the DirectDraw screen (for advanced users only) by clicking the Frequency… button
The DirectX Diagnostic Tool allows you to test your system and identify the following causes of problems or incorrect operation of multimedia applications:
– incorrect versions of DirectX components (if they are listed on the DirectX Files tab, you need to update DirectX, see Windows XP: how to update DirectX?);
– lack of hardware acceleration (some programs run very slowly or do not run at all in the absence of DirectDraw or Direct3D hardware acceleration);
– incorrect installation of devices (if a joystick or other input device does not respond, it may have been installed incorrectly. Make sure the device is listed on the DirectX Diagnostic Tools Input page. Otherwise, add the device using the Control Panel);
– Unsigned drivers (Unsigned drivers have not been verified by Microsoft to be fully compatible with the latest version of DirectX).
How to check DirectPlay
On the Network page, click the Test DirectPlay button. In the Verify DirectPlay dialog box, enter a user name and select a provider. Select the Create a new session option and click OK. If you choose to connect via modem, click the Answer button in the Connect via Modem dialog box to set the modem to auto-answer mode.
After that, run the DirectX Diagnostic Tool on the other
PC
, capable of establishing the selected connection with the first computer. Click the Check DirectPlay button, enter a different name
user
, select the same provider, select the Connect to existing session radio button, and then click OK.
Some types of connections may require you to enter additional information, such as a phone number. To connect TCP/IP via a local network, the field can be left blank.
On the second computer, select the name of the session created on the first computer in the Session List dialog box, and then click OK.
After this, the conversation dialog should be open on both computers. Enter a message in the input field on one computer and click Send. The message you entered should appear in the scrolling area of the conversation dialog box on both computers.
Notes
1. Some information, such as the amount of memory on the video card or the processor clock speed, may be approximately determined by the diagnostic tool.
2. You can save all the information in a text file by clicking the Save all information... button will open
interactive
the Save As window, in which you need to select the location to save the file (default file name DxDiag, file type - text file *.txt) and click the Save button.
3. To run the DirectX 10 Diagnostic Tool on Windows Vista:
– click Start –> in the Start search line, enter dxdiag –> press Enter.
4. The DirectX 10 Diagnostic Tools window has only 5 tabs: System, Screen, Sound 1, Sound 2, Input.
Valery
Sidorov
***
• Revealing the secrets of Windows...
The DirectX Diagnostic Tool is a small Windows system utility that provides information about multimedia components - hardware and drivers. In addition, this program tests the system for software and hardware compatibility, various errors and malfunctions.
Possible causes of problems
Most often, the inability to enable hardware acceleration at the system level or in the DirectX platform settings is associated with incorrectly installed, missing or outdated drivers for the above devices.
We check them in the “Task Manager” (devmgmt.msc). If there is a yellow triangle with an exclamation mark next to the sound or video card (or the device is not detected), this is a clear sign that there are problems with the driver. It needs to be reinstalled using the system’s own database, the original disk, or downloaded distributions from the Internet.
But it also happens that everything is fine with the devices. Nevertheless, through the RMB menu we select the properties line, and in the new window on the driver tab we look at the release date. If the driver is very out of date as of the current date, click the update button and wait for the process to complete (note that Windows cannot update drivers on its own).
However, it is much better to use special search and update utilities like Driver Booster. Firstly, the appeal will be made directly to the equipment manufacturer’s website; secondly, the driver that is most suitable for the operation of the device will be installed; thirdly, it will be installed into the system as correctly as possible. User involvement is minimal.
DX Diagnostic Tools Overview
Below we will take a short tour of the program's tabs and get acquainted with the information it provides us.
Launch
This utility can be accessed in several ways.
- The first is the Start menu. Here you need to enter the name of the program (dxdiag) in the search field and follow the link in the results window.
- The second method is the “Run” menu. The Windows + R key combination will open the window we need, in which we need to enter the same command and press OK or ENTER.
- You can also run the utility from the “System32” system folder by double-clicking on the “dxdiag.exe” executable file.
The address where the program is located is listed below. C:\Windows\System32\dxdiag.exe
Tabs
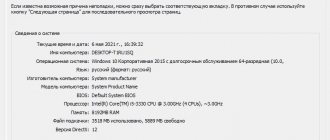
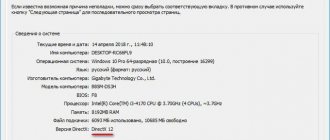
- System.
When you start the program, a start window appears with the “System” tab open. Here you can find information (from top to bottom) about the current date and time, computer name, operating system build, PC manufacturer and model, BIOS version, processor model and frequency, physical and virtual memory status, as well as DirectX edition.
How to activate DirectDraw for Windows 7
DirectDraw is one of the very first graphics subsystems that appeared with the release of Windows 7. It is part of DirectX, which was created for working with 2D graphics. This video memory manager solves many graphics problems of older games. It is with its help that such classic toys can be launched.
To activate DirectDraw (if it cannot be turned on automatically) you need:
- Click on “Start”.
- In the search field, enter dxdiag and press Enter. If the system requires you to enter an administrator password, you need to enter it and continue working.
- In the “Display” tab, in the “DirectX Features” item, you need to enable the “DirectDraw Acceleration” function if the status is “Disabled”.
Supported Versions
Why is DirectX 11.2 used instead of DirectX 12?
If you see in the diagnostic tool that the current version is DirectX 11.2, this could be caused by two main reasons - an unsupported video card (and perhaps it will be supported in the future) or outdated video card drivers.
Important update: In Windows 10 Creators Update, the main dxdiag always shows version 12, even if it is not supported by the video card. To find out which version is supported, see the separate material: How to find out the version of DirectX in Windows 10, 8 and Windows 7.
Video cards that currently support DirectX 12 in Windows 10:
- Integrated Intel graphics of Core i3, i5, i7 Haswell and Broadwell processors.
- NVIDIA GeForce 600, 700, 800 (partial) and 900 series, as well as GTX Titan video cards. NVIDIA also promises DirectX 12 support for GeForce 4xx and 5xx (Fermi) in the near future (expect updated drivers).
- AMD Radeon HD 7000, HD 8000, R7, R9 series, as well as AMD A4, A6, A8 and A10 7000, PRO-7000, Micro-6000 and 6000 integrated graphics chips (E1 and E2 processors are also supported here). That is Kaveri, Millins and Beema.
However, even if your video card seems to be on this list, it may turn out that a specific model is not yet supported (video card manufacturers are still working on drivers).
In any case, one of the first things you should do if you need DirectX 12 support is to install the latest Windows 10 drivers for your graphics card from the official websites of NVIDIA, AMD or Intel.
Note: many have encountered the problem that video card drivers are not installed in Windows 10, producing various errors. In this case, it helps to completely remove old drivers (How to remove video card drivers), as well as programs like GeForce Experience or AMD Catalyst and install them anew.
After updating the drivers, look in dxdiag to see what version of DirectX is used, and at the same time the driver version on the screen tab: to support DX 12, the driver must be WDDM 2.0, not WDDM 1.3 (1.2).
How to enable hardware acceleration on Windows 7
So, let's start with the simplest thing. First of all, let's look at the graphics. You can enable hardware acceleration (we take Windows 7 as an example, although this solution can be used in all other versions) through the settings of the graphics chip. But first you need to check whether user intervention is required.
Through the RMB menu in the free zone of the “Desktop”, go to the screen resolution and use the hyperlink for additional parameters. In the properties window that appears, look at the diagnostics tab. At the top there is a button for changing parameters. If it is inactive, then hardware acceleration is already enabled.
What is DirectX 12
DirectX 12 is an interface component that is needed for the correct operation of applications that use video card resources. In other words, DirectX 12 provides interaction between the operating system and the hardware, allowing you to get the most out of your computer.
Why DirectX 12 on Windows 10
Like any other graphics API, DirectX 12 is needed mainly for the correct operation of computer games with high-quality graphics. It allows you to use all the computer's resources to achieve better performance and get a “beautiful picture”.
You can see that the second image is better rendered: there is no blurring of trees or distant objects
In addition, this component ensures efficient use of multi-core processors and supports new graphics accelerators. That is, if your computer is equipped with one of the new high-performance video cards, then DirectX 12, unlike previous versions, will allow you to use all its capabilities to the maximum.
How DirectX 12 differs from previous versions
Even during the development of DirectX 12, manufacturers reported that it was being developed for better interaction with modern hardware. If we compare it with previous versions, we can note the following differences:
- Tiled Resources, Typed UAV and Bind technologies, which are part of the new API, more economically distribute memory resources between processes and facilitate the use of processor cores;
- new blending modes and conservative rasterization speed up the calculation of shadows and MSAA (a full-screen anti-aliasing method that slightly degrades image quality, but provides huge savings in computing power);
- the ability to combine video cards from different manufacturers into a single graphics subsystem;
- reducing the level of hardware abstraction, which gives developers better access to exploit the capabilities of the graphics chip;
- support for pipeline state objects and descriptor tables, which improves performance in algorithms for detecting collisions, calculating transparency, and building a geometric terrain model.
The above benefits are important for game developers and programmers. If we talk about the average PC user, then for him the main difference between DirectX 12 and previous versions is better performance while saving memory resources.
Video: comparison of DirectX versions 11 and 12
Is it possible to use DirectX 11.2 instead of DirectX 12
DirectX 12 comes bundled with Windows 10: all the necessary libraries are already on the computer after installing the operating system or updating it to version 10. In other words, if you installed Windows 10, then DirectX 12 is already installed. However, not all video cards support it, so sometimes, even with the latest Windows, DirectX 11.2 is used. Today this does not have a significant impact on the operation of the computer, since DirectX 12 is still a rather “raw” product. You can use DirectX 11.2 instead of version 12.
Why does Windows 10 have DirectX 11.2 installed and not DirectX 12?
You installed Windows 10, but version 11.2 is used instead of DirectX 12. Why is this happening? There are two reasons:
- DirectX 12 is not supported by the video adapter (temporarily until manufacturers release new drivers);
- The graphics card drivers are outdated (they can be updated on the official websites of NVIDIA, AMD or Intel).
Keep in mind that manufacturers will not release drivers for older video card models, so you may have to either change your graphics adapter or use previous versions of DirectX.
How to find out the version of installed DirectX
- Press the Win + R keys simultaneously. The Run window will open. Note that administrator rights are required to diagnose the system
- Enter dxdiag in the text line. Click OK.
The dxdiag command opens the DirectX Diagnostic Tool - Find the “DirectX Version” item in the “System” tab. If you have Windows 10, then the DirectX version is either 11.2 or 12
Video: how to find out the DirectX version
Install Direct X for Windows 7, instructions
You need to run the program installation file. After downloading, it is sent to the “Downloads” folder on your PC, where you can find it there. Next you need to do this:
- By double-clicking with the left mouse button on dxwebsetup.exe, you can see a new window in which, preferably, you need to select “Run as administrator” or “Open”.
- The installation wizard will launch in Russian, which, first of all, will require you to agree to the license agreement. You need to check the box next to “I accept the terms of this agreement” and click “Next”.
- The program offers to install the Bing panel, but if it is not needed, then it is better to uncheck it and continue.
- The wizard will start scanning the system to determine which libraries are installed or not. It will then display the volume of files that need to be installed. You must agree to the procedure.
- After downloading the necessary files, a window will appear indicating that the installation is complete. You need to click “Done”.
There is no need to restart your computer after installation; you can start working right away.
On newer versions of Windows OS, only DirectX updating is possible. This can be done through the website or “Update Center” on your computer.
Program installation
How to find out which version is on Windows 7
The user can independently find out which version is installed on his computer. To do this you need:
- Press the “Win” and “R” keys simultaneously.
- Type the dxdiag command on the line.
- The DirectX Diagnostic Tool window will appear, in which you need to select the Display tab.
The right side of the window will indicate the DirectX feature levels, that is, which version is installed and which it supports.
DirectX 12 installation problems and solutions
When working with DirectX 12, two types of problems may arise:
- internal system error (during the installation process);
- constant failures in the operation of an already installed program.
What to do if an internal system error occurs
The most obvious reason for installation failure is a corrupted installer file. To avoid this, download updates only from the official Microsoft website.
Internal system error during DirectX 12 installation process
If you downloaded DirectX from Microsoft and an error occurs, you need to check your hard drive:
- Press Win + R to open Command Prompt.
The Win + R key combination is always used to work with commands - Write chkdsk in the text box and click OK.
The chkdsk command will launch a utility that checks the hard drive for file system errors - Wait until the hard drive scan finishes without closing the window. We are interested in the presence of damaged files.
Look at the line "Processing damaged files" to determine their presence - If there are no damaged files, then proceed to the next instructions. If there is, then you need to use the utility again. Open Command Prompt by pressing Win + R and type the command chkdsk /F. This utility will fix file system errors.
The chkdsk /F command will launch a utility that will fix damaged files - Wait for the Command Prompt window to automatically close. Correcting errors may take some time.
Next, you should check the system files and restore those that are damaged. Windows has built-in protection for system files, so if they are not executed correctly, it is easy to fix:
- Open Command Prompt using the Win + R key combination. Enter the command sfc /scannow and click OK.
The utility will scan and restore system files - Wait until the utility finishes.
The utility found and restored damaged files - Restart your computer.
It may also be that checking the hard drive did not help solve the problem. In this case, you need to check the compatibility of DirectX 12 with your system:
- Open the folder on your computer where you downloaded the DirectX 12 installer. Right-click on the file name and select “Fix compatibility issues.”
The “Fix compatibility problems” button opens the diagnostic mode we need - Select Use recommended settings in the Troubleshoot compatibility issues window.
Select the first option to match the DirectX settings to your computer's capabilities - Wait until the search for parameters is completed. Click "Check Program" to start the DirectX installation. After installation, click Next.
Using the "Check program" button you will install DirectX 12 on your computer - Select “Yes, save these settings for the program.” Save the selected settings so that DirectX works stably in the future
Video: Troubleshooting a system error during the DirectX 12 installation process
What to do if DirectX 12 is not working correctly
DirectX is installed on the computer, but there are constant glitches in its operation. If the DirectX error warning window appears quite often, you can:
- update DirectX 12 in Windows Update (the sequence of actions is described in the paragraph “How to update installed DirectX to version 12”). The update is configured in such a way that the missing files are simply loaded into the existing library package on your computer. The system produces errors because it lacks some files for stable operation, and updating DirectX will fix this;
- uninstall DirectX 12 and install from scratch (step-by-step instructions are described in “How to completely remove DirectX 12” and “How to install DirectX 12 on Windows 10”). This option should only be used if the DirectX update did not help, as you will have to work with system files.
Updating the program to the latest version
How to find out which Windows is installed on your computer
The only way to update your media package on Windows 10 is to check for a library update through the built-in Windows UpDate tool.
Note! All attempts to download the installer from the official developer website will result in the user being redirected to the software update page to Windows 10.
To check for an update, the user must perform the following steps:
- Open “Computer Settings” on your desktop computer or laptop.
- Go to the “Update and Security” tab, then right-click on the “Check for update” button.
- After a few seconds of searching, the result will be displayed. If an update is available, you must agree to install it.
Updating DirectX on Windows 10
How to completely remove DirectX 12
DirectX 12 is a built-in application in Windows 10, meaning it cannot be removed using normal methods. To work correctly, you need this program to be present on your computer, so Windows developers have removed the ability to remove it. However, there are times when it is necessary to reinstall DirectX due to constant failures in its operation. To do this you will have to use third-party programs. If it is possible to avoid uninstalling DirectX (for example, the problem can be solved by simply updating the system), then it is better to use it. Before uninstalling DirectX, be sure to create a system restore point so that in case of incorrect uninstallation you will be able to restore all data.
System Restore
The System Restore function is needed to return Windows 10 to a working state and fix errors that occurred when uninstalling or installing new programs.
How to create a restore point in Windows 10
- Click the search icon in the lower left corner of the screen.
Click the search field to enter text - Write "Control Panel". Open it.
“Control Panel” allows you to perform basic system setup steps - Select the "System and Security" section.
The “System and Security” section allows you to monitor the state of your computer and restore the system - Select the “System” subsection.
The “System” section allows you to administer your PC - Select "System Protection". The "System Protection" item will open the "System Properties" window
- Click "Configure" to enable protection for drive C.
Click "Configure" to open the disk protection settings window - Select “Enable system protection”, the amount of disk space and click “Apply”.
Click Apply to return to the System Properties window - Click "Create" to create a system restore point.
The “Create” button has become active because you have enabled protection for drive C - Enter the date. Click "Create".
A restore point will save all programs and the state of your computer as of that specific date - Wait for the message that the process is complete and click Close.
Now you can restore the system if DirectX uninstallation goes wrong or your computer becomes worse.
Video: how to create a system restore point
How to restore the system
- Follow steps 1–5 of the instructions “How to create a restore point in Windows 10” to open the “System Properties” window. Click "Restore". You can restore your computer to a previous state at any time
- Click Next on the System Restore window.
Please note that only system files and settings are restored - Select a system restore point with the desired date that you specified during creation. Click Next.
The restore point type will be “Manual”, since you created it, not Windows - Confirm your restore point selection.
Click "Finish" to start System Restore - Agree to the start of the recovery process. Please note that you will not be able to work on the computer until the system recovery is complete
- Wait until the system restore is complete.
Video: how to restore Windows 10
Uninstalling DirectX 12
Since DirectX removal is not provided in Windows 10, you will have to use third-party software. DirectX Happy Uninstall is a fairly common utility that will help you completely remove all DirectX libraries from your computer.
DirectX Happy Uninstall is not official software. Download it only from trusted sites.
To ensure that DirectX is uninstalled correctly, use the following tips:
- Create a restore point.
- Download the DirectX installer from the Microsoft website.
- Download and install the DirectX Happy Uninstall program.
- Disable the Internet so that the system cannot automatically download and install DirectX.
- Disable system file protection:
- follow steps 1–45 of the instructions “How to create a restore point in Windows 10” to open the “System Properties” window;
- click "Customize"
System protection must be disabled, otherwise you will not be able to remove DirectX completely - Select Turn off system protection and click OK.
Don't forget to enable protection when you reinstall DirectX
Now you can start uninstalling DirectX 12:
- Run DirectX Happy Uninstall. Create a system restore point in the “Backup” tab. If necessary, you can return deleted DirectX using it.
Click "Start Backup" to create a restore point - Select the "Uninstall" tab to remove the program.
Click "Uninstall" to start DirectX uninstallation - Wait until the uninstallation is complete and close the program.
Video: how to remove DirectX
Windows 10 itself downloads and installs the necessary updates, including for DirectX. Most problems that occur while running this program can be resolved by manually running a system update. Try not to resort to completely uninstalling DirectX if possible, since then you will have to use third-party software.
- Mikita G.
I have been doing copywriting and translation for 3 years. I have an incomplete higher education in the field of IT.
Supported GPUs
- Intel: Intel Processors Haswell (4th generation core), Broadwell (5th generation core), Skylake (6th generation core), Kaby Lake (7th generation core), Coffee Lake (8th generation core) , Cannon Lake (9th generation core)
- Qualcomm
Nvidia GeForce
AMD Radeon
- Radeon HD 7000 series (starting with HD 7730)
- Radeon HD 7000M series for laptops (starting from HD 7730M)
- Radeon HD 8000 series OEM (starting with HD 8570)
- Radeon™ HD 8000M Series for Notebooks
- Radeon R5 M240 series for laptops
- Radeon R7 M200 series for laptops
- Radeon R7 240
- Radeon R7 250 (X)
- Radeon R7 260 (X)
- Radeon R7 265 (X)
- Radeon R9 270 (X)
- Radeon R9 280 (X)
- Radeon R9 285
- Radeon R9 290 (X)
- Radeon R9 295X2
- Radeon R7 350
- Radeon R7 360
- Radeon R7 370
- Radeon R9 300 series
- Radeon R9 Fury
- Radeon R9 Fury X
- Radeon R9 NANO
- Radeon RX 460
- Radeon RX 470 (D)
- Radeon RX 480
- Radeon RX 550
- Radeon RX 560 (D)
- Radeon RX 570
- Radeon RX 580
- Radeon Vega Frontier Edition
- Radeon RX Vega 56
- Radeon RX Vega 64
- AMD Ryzen 2000G series APUs
- AMD Ryzen PRO 2000G Series APUs
- AMD Ryzen Mobile 2000 Series APUs
- AMD Ryzen Mobile PRO 2000 Series APUs
- AMD Ryzen Mobile 1000 Series APUs
- AMD Ryzen Mobile PRO 1000 Series APUs
- AMD A4/A6/A8/A10-7000 series hybrid processors (codenamed Kaveri and Godavari)
- AMD A6/A8/A10 PRO-7000 series hybrid processors (codenamed Kaveri and Godavari)
- AMD E1/A4/A10 Micro-6000 series APUs (codenamed Mullins)
- AMD E1/E2/A4/A6/A8-6000 series hybrid processors (codenamed Beema)
> GPU architectures supporting DirectX 12 API
Notes
- GeForce GTX 400 Review|NVIDIA (Russian) (unspecified) ?. www.nvidia.ru. Retrieved September 19, 2022.
- GeForce GTX 700 Series of Graphics Cards from NVIDIA (English). www.nvidia.com. Retrieved September 19, 2022.
- GeForce 800M Series Graphics Cards | Graphic cards for laptops|NVIDIA (Russian) (undefined) ?. www.nvidia.ru. Retrieved September 19, 2022.
- GEFORCE GTX 10 VIDEO CARDS (Russian) (undefined) ?. www.nvidia.com. Retrieved September 19, 2022.
- Meet the NVIDIA GeForce RTX 20 series video cards (Russian) (unspecified)?. NVIDIA. Retrieved September 19, 2022.
- AMD Radeon™ HD 7000 series video cards: 7990, 7900, 7800, 7700 (Russian) (undefined) ?. www.amd.com. Retrieved September 19, 2018.
- AMD Radeon™ HD 7000M Series Graphics: 7900m, 7800m, 7700m, 7500m, 7600m, 7400m, 7300m (English) (undefined) ?. www.amd.com. Retrieved September 19, 2022.
- AMD Radeon™ HD 8000 Series Graphics (OEM) (Russian) (undefined) ?. www.amd.com. Retrieved September 19, 2022.
- AMD Radeon™ R7 240 (English) (undefined) ?. products.amd.com. Retrieved September 19, 2022.
- AMD Radeon™ R7 250 (English) (undefined) ?. products.amd.com. Retrieved September 19, 2022.
- AMD Radeon™ R7 260 (English) (undefined) ?. products.amd.com. Retrieved September 19, 2022.
- AMD Radeon™ R7 265 (English) (undefined) ?. products.amd.com. Retrieved September 19, 2022.
- AMD Radeon™ R9 270 (English) (undefined) ?. products.amd.com. Retrieved September 19, 2022.
- AMD Radeon™ R9 280 (English) (undefined) ?. products.amd.com. Retrieved September 19, 2022.
- AMD Radeon™ R9 290X (English) (undefined) ?. products.amd.com. Retrieved September 19, 2022.
- AMD Radeon™ R9 295X2 (English) (undefined) ?. products.amd.com. Retrieved September 19, 2022.
- AMD Radeon™ R7 360 (English) (undefined) ?. products.amd.com. Retrieved September 19, 2022.
- AMD Radeon™ R7 370 (English) (undefined) ?. products.amd.com. Retrieved September 19, 2022.
- AMD Radeon R9 300 Series.
- AMD Radeon™ R9 Fury (English) (undefined) ?. products.amd.com. Retrieved September 19, 2022.
- AMD Radeon™ R9 Fury X (English) (undefined) ?. products.amd.com. Retrieved September 19, 2022.
- AMD Radeon™ R9 Nano (English) (undefined) ?. products.amd.com. Retrieved September 19, 2022.
- Radeon™ RX 460 (English) (undefined) ?. products.amd.com. Retrieved September 19, 2022.
- Radeon™ RX 470 (English) (undefined) ?. products.amd.com. Retrieved September 19, 2022.
- Radeon™ RX 480 (English) (undefined) ?. products.amd.com. Retrieved September 19, 2022.
- Radeon™ RX 550 (English) (undefined) ?. products.amd.com. Retrieved September 19, 2022.
- Radeon™ RX 560 (English) (undefined) ?. products.amd.com. Retrieved September 19, 2022.
- Radeon™ RX 570 (English) (undefined) ?. products.amd.com. Retrieved September 19, 2022.
- Radeon™ RX 580 (English) (undefined) ?. products.amd.com. Retrieved September 19, 2022.
- Radeon™ RX Vega 56 (English) (undefined) ?. products.amd.com. Retrieved September 19, 2022.
- Radeon™ RX Vega 64 (English) (undefined) ?. products.amd.com. Retrieved September 19, 2022.
- What is DirectX?
- What is DirectX for?
- How to find out the DirectX version in Windows 10?
- How to update DirectX 12 version for Windows 10?
- What's new in version 12?
- What if I don't trust Microsoft?
Any person who plays games on a computer or even uses the latter to solve everyday problems has most likely encountered such a thing as DirectX, but not everyone knows what it is, whether the presence of this component is necessary, why it needs to be updated and where download Microsoft DirectX 12 for Windows 10 for free?
What is DirectX?
Explanations in complex technical language are inappropriate in this case; such information is always easy to find on official websites or on Wikipedia. In simple words, it is a library or set of instructions that are responsible for the interaction of computer hardware and software. DirectX relies heavily on the video card, but it doesn't leave it alone and knows how to open up other parts of the PC to use their maximum power to play or create in real time the game elements that the developers have written in advance. It works automatically, so you don't have to worry about how to enable DirectX 12 on Windows 10. And, yes, it is not only a playback tool used by gamers or regular computer users, but also a tool for developers, from which they find the maximum level of interaction between hardware and software components. However, the question of how to reinstall DirectX on Windows 10 x64 or, in general, whether it needs to be installed, arises especially often among the first ones.
This set of libraries was developed by Microsoft and is used exclusively on Windows operating systems.
What is DirectX for?
It should be noted that if you have never encountered such a concept and can vouch for the fact that you have not installed anything like this on the system, the component is still present, and there is even a way to view the DirectX version on Windows 10. Despite due to the fact that it is aimed at gaming projects, it is also used in other OS processes, therefore it is necessary, and is installed along with it. Depending on the version of Windows, the version of the libraries also varies - from 9.0 in Windows XP to 12.0 in Windows 10. And so on, when a new OS is released, there will be a new update of the libraries. Again, this is a very important indicator. Each new version of the set not only adapts to a new operating system, but also provides expanded capabilities for developers, so, in theory, the same game launched with version 9 and 11 can look very different - especially when it comes to visual effects. This is why it is important to know how to install DirectX 12 on Windows 10.
Important! The set itself will not affect the quality in any way, but the number of technologies available in different versions can significantly affect how the developer uses them, and what ultimately comes out of the game. Based on this, you can understand which games will run on Windows 10.
Download and install a set of libraries
In this case, this is the official Microsoft website. Find the “Download” or “Download” button on the website.
Then click “Refuse and Continue.”
Download the file dxwebsetup.exe, then run it.
It is recommended, both during download and installation, to pay attention to all stages of the installation process and to the dialog boxes that appear, during which the company will try to supply you with several of its products - from Microsoft Office to the Bing panel. These are, of course, not malicious files, but if you don’t need them, they can be completely useless.
We agree to the terms of the license agreement.
Components begin loading.
Then install them.
After installation, click “Finish”.
The site emphasizes that this component cannot be removed, so it is advisable to create a system restore point so that in case of any problems you can easily restore it from the right place, thus avoiding the need to reinstall the entire system. There are no options offered during installation and you don't know where DirectX is located in Windows 10. Even the path is selected automatically, so there should be no difficulties in the process.
DirectX version for Windows 10
DirectX is a package of multimedia technologies that are required to run various applications, including computer games. Simply put, it is a collection of tools and functions that the OS needs to perform a variety of multimedia tasks.
Embedded DirectX media application logo
Most often, the application is used to write a game interface. This program is updated quite often, especially when installing new games using the latest versions of Directs, since the code must process audio streams and graphics. Without Direct X, the PC will not be able to process information coming from the keyboard, mouse or gaming joysticks. The toolkit is completely free and can be downloaded from the official Microsoft website.
Note! In the vast majority of cases, in order to achieve maximum integrity in operation, the required version of DirectX is also recorded on the game disc.
What's new in version 12?
Currently, 12 is the most current version of the library set, so it is important to know how to install the latest version of DirectX for Windows 10. It is used in the latest projects, and, as you would expect, offers developers such complex tools, effects obtained with the help of which, do not work on modern game consoles either. Based on this, there is no question about which DirectX is better for Windows 10.
However, many players who have quite expensive and, accordingly, powerful computers are faced with the fact that they have DirectX 11.2 installed, and, as noted above, there are no ways to adjust this manually. There are no Microsoft DirectX settings for Windows 10 either.
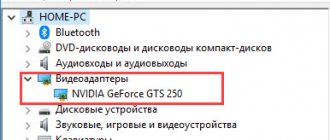
It’s worth saying right away that if you have updated the set of libraries and still have version 11.2, then the problem is with your video card, and everything depends only on its manufacturer. To find it out, you need to go to Device Manager.
And see what video card you have installed.
Only he can make sure that the latest component interacts perfectly with your hardware components and speeds up the operation of your OS.
This is the only answer to the question why DirectX 12 is not installed on Windows 10.
Step-by-step instructions for turning on
Hardware acceleration can be activated using the graphics chip settings. First, you should make sure that there is a need to interfere with the system configuration.
How to check if hardware acceleration is working:
- Right-click on any free area of the desktop. Go to “Screen Resolution”.
DirectX
DirectX is a set of various multimedia programs that are required for processing two and three-dimensional graphic objects. This software guarantees the normal launch and operation of games with complex graphics, playback of video files and the like. In addition, the components of such a program are responsible for a variety of graphic effects, affect sound, game optimization, and work with a variety of input devices - keyboard, mouse, gamepad, and the like.
Although you can download DirectX yourself, this program is usually installed along with the operating system, depending on the video card installed on the computer. Without DirectX, no game or graphics application will simply work.
DirectX itself, which can be downloaded for free directly on our website, performs many functions, and all of them are divided into groups according to the actions performed - outputting video and audio, processing audio data, ensuring the normal functioning of input devices.
By updating such a software product in a timely manner by downloading a new version of DirectX, the user protects his PC from failures and operational problems. In addition, the presence of the program significantly reduces the likelihood of games freezing and stuttering during video playback.
Relevance of inclusion and implications
Since it is the components, with the exception of the processor, that will devote their performance to executing programs, activating acceleration is most useful for users of PCs and laptops with good hardware (for example, a powerful video card).
In this case, enabling hardware acceleration can provide the most useful effect in the operation of highly demanding games, graphic and video editors, and other resource-intensive applications.
The increased load on all computer hardware leads to their rapid wear. Therefore, it is recommended to disable the function after completing tasks that require it.