The Android operating system has a function for creating screenshots. They are done by simultaneously pressing the “power off” + “volume down” keys for a few fractions of seconds. Almost always this manipulation works and the screenshot is saved. However, some users under certain circumstances may see the following message when attempting to take a screenshot: “The screenshot could not be saved. The drives may be busy” – we’ll try to figure out how to fix this problem below.
Causes of the “Could not save screenshot” error in Android
The first reason why Android may complain about the drives being busy when trying to take a screenshot may be that they are simply filled to capacity. That is, there is no space in the internal memory of the smartphone/tablet and on the memory card to save the picture.
The second reason is not so obvious. Android may also issue a message about storage occupancy when there is no folder in the file system provided by the system for saving the corresponding files. Yes, it usually creates the Screenshots directory automatically if it is missing, but something can go wrong. How to fix the message “The screenshot could not be saved. The drives may be busy" further.
Unable to take screenshots, "Couldn't save screenshot, storage may be in use" error
I am just trying to take a screenshot of my starbucks rewards card, so I can print it out. Apparently a lot of apps like netflix, hulu, and starbucks recently have been restricting screenshots for obvious reasons. All the screenshot tools I try give me an error (I have root access). The error is always » Couldn't save screenshot. Storage may be in use."
I'm just trying to take a screenshot of my starbucks rewards card so I can print it out. Apparently many apps like netflix, hulu and starbucks have recently restricted screenshots for obvious reasons. All the screenshot tools I try give me an error (I have root access). The error is always “Could not save screenshot. Storage can be used."
Created Jun 02 15 2015-06-02 00:56:47 1mike12
Related: (https://android.stackexchange.com/q/138778/1465) – Matthew Read May 24 16 2016-05-24 04:06:32
How to fix the error with taking a screenshot on Android
Fixing the problem with saving a screenshot on Android is quite simple. First of all, you will need to check whether there is enough space on the media on which the screenshots are saved. This can be done in any file manager (including standard ones). If the drive is full to capacity, you will need to delete some files to free up space. To do this, you can check the system for garbage using the CCleaner application or delete the application cache (Settings - Applications - Clear cache). You can also remove a couple of unnecessary files or programs.
If you have enough free space on your drive (not much is needed to take a screenshot), then the problem is likely a missing . In this case, to fix the problem in order to take a screenshot, you will need to perform the following series of actions:
- Go to the file manager;
- Find the Pictures folder and open it;
- Check if there is a Screenshots directory in it;
- If the Screenshots folder is missing, you will need to create it;
- Reboot your device.
After performing all these manipulations, creating screenshots using standard system tools should work. If Android still reports the error “Could not save screenshot. The drives may be busy,” then try, for example, taking any photo. If it persists, then the problem is not with memory and you can breathe a sigh of relief. The fact is that the phone’s flash memory (and, in particular, memory cards) sometimes breaks, which is why the system cannot write new files to it.
What to do if the screen is not saved?
Low memory
The smartphone could simply have run out of memory: that’s why it was not possible to take a photo. In this case, in the folder where the screenshot was supposed to be saved, there will be a black rectangle weighing 0 bytes. Check the memory on your device (Settings -> Memory), remove unnecessary memory and try again.
Button malfunction
Typically a combination of buttons is used: “Volume” and the power button. It is possible that one or both buttons are not working. Check their functionality. It is also possible that there was a glitch in the built-in application for creating screenshots. Try using a third-party program or take a screenshot via USB.
Serious driver problem
If not a single program works, then most likely there is a serious malfunction of the driver that is responsible for the video stream. It is worth contacting the service center and explaining the problem to them.
Universal method
If all of the above methods do not work, then there is one, quite complex, but guaranteed method. So, how to take a screenshot on your phone, regardless of the model and version of the operating system. To use it, we need a computer with a gadget connected to it via a USB cable:
- Enable USB debugging on your smartphone
- Download and install the necessary drivers
- Download and copy the archive to the root drive of your computer
- Copy the files "adb.exe", "AdbWinApi.dll" and "fastboot.exe" to Windows\System32. Launch a command prompt and navigate to the copied folder.
- In the "SDK" subdirectory, open the "platform-tools" directory and enter the "adb shell" command.
- In the “tools” folder you need to find and run the ddms.bat file. The launch should lead to the opening of the “Davlik Debug Monitor” program.
All Android devices connected to the computer will be displayed on the left side of the program screen. In this list you need to select the desired smartphone and open the Device-Screen Capture menu. You now have the option to take a screenshot, rotate it, save it, or place it on the clipboard.
This is undoubtedly a complex method that will require time and some experience to implement. However, this method can be used in any situation, regardless of the manufacturer, model and version of the operating system.
Many of those who bought themselves a brand new phone or tablet with the Android operating system installed sooner or later have the desire to take a screenshot of their device in order to show the photo to friends, post it on social networks, boast about the test result on the forum, etc. It would seem that nothing could be simpler. But, as practice shows, the answer to the question “How to take a screenshot on Android” is not at all obvious for many users. This article is intended to dot all the i's and teach visitors to our site simple techniques for taking screenshots on Android.
Unable to take screenshots, "Couldn't save screenshot, storage may be in use" error
I am just trying to take a screenshot of my starbucks rewards card, so I can print it out. Apparently a lot of apps like netflix, hulu, and starbucks recently have been restricting screenshots for obvious reasons. All the screenshot tools I try give me an error (I have root access). The error is always » Couldn't save screenshot. Storage may be in use."
I'm just trying to take a screenshot of my starbucks rewards card so I can print it out. Apparently many apps like netflix, hulu and starbucks have recently restricted screenshots for obvious reasons. All the screenshot tools I try give me an error (I have root access). The error is always “Could not save screenshot. Storage can be used."
Created Jun 02 15 2015-06-02 00:56:47 1mike12
Related: (https://android.stackexchange.com/q/138778/1465) – Matthew Read May 24 16 2016-05-24 04:06:32
Getting root rights
If your phone does not support the screenshot function, then getting root rights may be a way out. What it is? Root rights allow you to manage the settings of your smartphone. Obtaining rights is quite simple: you just need to install one program called Framaroot on your smartphone (we use the apk.file).
So, let's start activating the application:
- We launch the application: a window will open in front of you asking you to choose one of several ways to activate superuser status.
- We select among the possible applications for managing rights “install Super US”.
- If the above steps are performed correctly, a window will appear on the screen of your smartphone indicating that root rights have been successfully activated.
- Reboot the device to check the rights status.
This application supports a considerable number of mobile devices, and every day more and more new updates appear, allowing you to expand the list of devices with which it is compatible.
Advice. If your mobile device is not one of those models that allow you to get root rights, this does not mean that you cannot try to activate them: in practice, many phones are quite capable of activating root rights.
Device restrictions
Restrictions on taking screenshots could be set by the device manufacturer or organization.
If you have an Android device provided by a school or organization, it may have restrictions at the device or account level. These restrictions may prohibit taking screenshots for reasons of company security policy. If this is your personal device and screenshots are also prohibited on it, the function could be blocked in the system by default.
Possible problems and ways to solve them
Taking a screenshot is not always possible right away for many reasons. Users may encounter a number of difficulties.
- The screenshot is not saved. Solutions:
- Try a different button combination.
- Create a screenshot from another application.
- Check the amount of free memory.
- Large amounts of memory are occupied. What can be done:
- Remove outdated files and applications.
- Make the “Screenshots” storage active on the memory card.
- The screenshot application does not recognize root rights. Solution:
- Install Root using another program.
- Reset configurations to factory settings.
- Contact specialists.
The Android operating system provides users with many advantages, incl. in terms of taking screenshots. Knowledge of the OS capabilities and the ability to use third-party utilities will help you quickly take and edit a screenshot.
Screenshots are a feature that is found in all modern smartphones. Over time, what started as a curiosity that could only be done by third-party applications has become a built-in built-in utility and is used by many users even several times a day. But what happens when our mobile cannot take screenshots ?
On our website, we often see glitches and problems that our mobile phones face on a daily basis.
Fortunately, in many cases we will be able to avoid trouble because solutions are usually within our reach. In the event that our mobile cannot take screenshots, there may also be several reasons and therefore different solutions.
Branded methods
Asian brands offer more screen capture options to the user. Developers are introducing more convenient ways to take screenshots into the modified Android shells.
Xiaomi
The Chinese brand has developed 4 of its own options for taking a screenshot, not counting the 3 standard ones.
Let's look at the methods for Xiaomi in more detail:
- Through buttons. For MUI version 7: hold down the “menu” button and the “volume down” button.
- A special label. Go to widget management and drag the corresponding shortcut to your desktop.
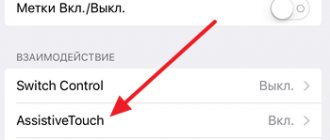
- Sensory assistant. Available in MUI version 8 and higher. Go to “settings”, then go to “advanced settings”. Here select the “Touch Assistant” item. In the new window, enable the “Touch Assistant” function, and add a screenshot in the “shortcut functions” field.
- Swipe control – taking a picture by swiping with three fingers from the top of the display to the bottom of the smartphone. Go to “Settings” → “Button Functions”. From the list, select “three-finger down gesture.” Here you can also choose alternative ways to enable the screenshot function. Only available on MUI 10 and above.
Huawei
The second-largest Chinese equipment manufacturer in terms of sales and popularity has proprietary options for creating print screens:
- Gesture control. This is the "three fingers down gesture" method. Swipe down the screen to take a screenshot. To enable the option, go to: “Settings” → “Controls” → “Motion” → “Three-finger screenshot”.
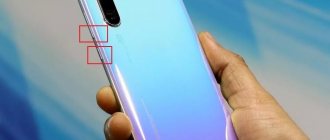
- Capturing the screen with your knuckles is Huawei's proprietary method. Available on flagship and top-end smartphone models. To enable this feature, go to: “Settings” → “Controls” → “Shortcuts and gestures” → “Take a screenshot”. In the new window, enable the “knuckle” option.
- Tapping your knuckle twice now takes a screenshot;
- double tapping with two knuckles – starts video recording;
- if you draw the letter “S” on the screen with a knuckle, you will get a long screenshot (a convenient way to take a photo of a voluminous web page);
- Finally, drawing an area or the letter "O" will take a photo in the highlighted area inside the circle.
Samsung
Samsung has several methods in its arsenal:
- Gesture control. Works on flagship and top-end smartphones of the brand. Go to Settings → Additional Features. After that, activate the “Screenshot” and “Palm Screenshot” option. Save your settings. To take a screenshot, move the edge of your palm from the right side of the display to the left.
- With keys. On many budget and older Samsung smartphones, the print screen is done by holding down two keys: the “power” button and the “home” button (under the display). On Galaxy S smartphones of the first modifications: pressing the “home” and “back” buttons. Top versions of gadgets and the Galaxy line work through a standard key press.
- Through the Edge widget panel. The feature is available on select Galaxy models. It's located in: Settings → Display → Curved Screen → Edge Panels. Here you need to enable the “Select and Save” panel. The corresponding function will appear in the configured widget.
For EMUI shell
This shell was developed by the Chinese company Huawei. It is installed on phones of this brand, as well as on Honor smartphones. It allows you to control screenshots using a three-finger swipe. This method is described in more detail above.
What alternatives do I have?
If all of the above does not work, we will not be able to take screenshots from the most classic one and used the method of all. But fortunately, our mobile phone is a Swiss army knife, full of options to get out of trouble.
Try it with Google Assistant
A number of Google Assistant drives, natively present in many terminals (can be installed differently), allow you to take screenshots simply by asking. This is a method that allows us to get rid of doubts and take action in cases where this is not possible in any other way. We just have to say "Okay Google" / take a screenshot.
Capture app
Google games is full of screenshot apps . The solution might be to download one of them and try your luck. In many cases this is the best way to make these grabs when all of the above fails. We leave you just below with a large number of applications so that you can try the one that best suits your needs. You are here: mobile phones that allow you to take screenshots there are different ways to do this. If we are trying to do this using the classic button method and there is no way, it might work if we click the screenshot button. This can be found in quick settings on the taskbar. If it is not initially visible, it may be in the options below. Pressing the button should occur smoothly. Sources used:
- https://ocomp.info/ne-udalos-sohranit-screenshot.html
- https://planshet-info.ru/kompjutery/pochemu-ne-rabotaet-skrinshot-na-androide
- https://lifehacki.ru/ne-udalos-soxranit-skrinshot-vozmozhno-nakopiteli-zanyaty-kak-ispravit/
- https://allscreenshots.ru/skrinshot-ekrana-na-os-android.html
- https://itigic.com/ru/mobile-does-not-take-screenshots-how-to-fix-it/
General methods
First, let's look at the general algorithms that work on almost all smartphones running the Android operating system; there will be a separate article for iOS. If the actions are performed correctly, the device screen will blink, and a photo of the display will be displayed in the upper corner and automatically saved in “Photos”.
Using buttons
The main method: hold down the “power” key (about 2-3 seconds) until a menu appears with the basic functions of turning on/off and rebooting the smartphone. The “Take a screenshot” button will also be located here. The method works on Nokia smartphones, Android 9 Pie OS and Android 10 OS, as well as custom firmware.
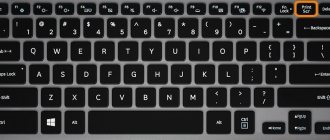
Pressing the hardware buttons on the case will take a “screenshot”, but the key combination may differ in different versions of Android:
- For older devices with OS version 3.2 and lower: long-press the “recent programs” key.
- For smartphones with version 4.0 and older: pressing the power button and volume down key. The most common option.
In some models, the second button may be “volume up”.
Through the notification curtain
Swipe the top curtain of the device down when the device is unlocked. In the list of functions, find “screenshot” and tap on it.
Gestures
You can make a print screen using a gesture on Samsung smartphones, as well as in some smartphone models from Chinese brands. Read more about all the methods below in the article.