Modern smartphones are capable of taking high-quality pictures and surpass even many cameras in this parameter. However, the slightest mistake when shooting can ruin your shot. External conditions are also not having the best effect. Lack of lighting and bad weather can easily damage your photo. And uploading it to the Internet and then resaving it again in a compressed form will have an even worse effect on the photo. You can also encounter poor quality in old photographs. In such situations, pictures can be corrected. An application for improving photo quality successfully copes with this. After it, the image changes radically.
The best mobile photo enhancement apps allow you to achieve noticeable results with minimal processing. Most of them are capable of working automatically, do not have watermarks and do not put forward any special requirements for the initial image. However, they can process photos without serious damage or deleted fragments. Therefore, it will still be possible to restore only images with moderate defects. And the most successful results are obtained when processing photographs with people’s faces.
AI Photo Enhance/Unblur
QR Code
Improve blurry photos with AI
Developer: KallosSoft
Price: Free
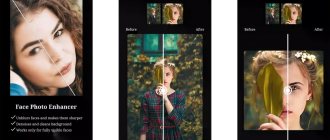
This handy app will help you improve the quality of your photos. It is designed to work with regular photos of people or selfies. Therefore, the emphasis is on improving a person's face. All you have to do is select a photo and confirm its adjustment. After this, the file will be sent to the server, where it will be processed. Then you can save it to your smartphone or forward it to friends.
The application removes any amount of noise in pictures and increases the sharpness of the picture. Therefore, even unsuccessful shots can become beautiful and suitable for further use. The service also performs exposure correction to correct the quality of colors, contrast and light in the image. Processing takes place in an accelerated manner and does not take much time. You will have to wait less than 30 seconds.
Advantages:
- advanced algorithms for analyzing people's faces with further automatic improvement;
- simultaneous removal of noise, sharpening and correction of photo parameters;
- Quickly correct images and then save or send them to friends.
The application requires good lighting and facial visibility. If it is only partially included in the frame, then the result of quality correction will not be so impressive. However, even then the picture will be better.
Modern smartphone camera
The camera of a modern gadget has a large number of settings and allows you to create high-quality photos and videos in various lighting conditions. The optics of such devices are manufactured by the world's best lens manufacturers, and a large selection of modes provides relatively good macro and micro photography capabilities.
With their help, you can pre-process the resulting image using built-in editors and upload it to social networks immediately after shooting. Processing is carried out using software that is rapidly improving. For example, the latest models are equipped with an HDR+ mode, the pictures in which are characterized by detailed tones.
A mobile phone camera can be used for remote video surveillance, reading QR codes, and creating photocopies of documents. Without it, many applications cannot be used, not to mention games.
However, users are often disappointed when they notice that the quality of the photo has deteriorated. Among the reasons are the following:
- manufacturing defects;
- incorrect settings;
- errors in the program.
The problem with defects can be solved in the workshop, but you need to figure out the settings yourself.
Final table
| Name | Platform | Manual processing | Functional |
| Remini | Android, iOS | No | Base |
| Enhance Photo Quality | Android, iOS | Yes | Basic, double exposure, coloring, advanced effects, video work |
| MintAI | Android, iOS | No | Basic, restoration, coloring, change of style |
| AI Photo Enhance | Android | No | Base |
| Bigjpg | Android, iOS | No | Base |
Setting up the camera correctly
Having bought a newfangled gadget, any of us pays attention to the functionality of the camera. This is one of the priority issues when choosing. There are a lot of options in the settings, but figuring them out is not that difficult.
It is important to understand the main points. In the following article, we will explain how to configure the camera on an Android phone to suit the user's needs.
First of all, we recommend performing the following operations:
- Check resolution.
- Enable image stabilization.
- Adjust white balance.
- Adjust exposure.
- Adjust color rendering.
The quality of the photos will be comparable to the best examples that we sometimes see on Instagram, provided that you can configure the Android camera correctly.
Checking permission
When we choose a camera (smartphone), we first look at the matrix size (number of pixels). This is not entirely correct, since the image quality, in addition to this parameter, is affected by the aperture, software capabilities and stabilization. The higher the resolution, the better the photo will look on the big screen.
To get the best resolution picture, you need to set the settings to the highest possible setting. The thing is that the default value is the average value. Therefore, it would not be superfluous to check this.
The size of the final photo in megabytes is always indicated next to the parameters. If you don’t need a high-quality photo or there is not enough space in the device’s memory, you can set the resolution lower.
Enabling image stabilization
It's not enough to set up a camera well on Android. The less mobile the smartphone is at the time of shooting, the better the resulting photo will be. The slightest fluctuation caused by breathing or banal trembling of the hands will certainly lead to blurring of the image. You have to hold your breath and put as little pressure on the smartphone as possible.
This is not easy, so developers equip cameras with two types of stabilization:
- digital (on mid-price gadgets);
- optical (on top models).
The first one should not be trusted one hundred percent. If your settings have options for self-timer, voice control, or gesture control, you should use them. Especially in poor lighting. For greater confidence, it is recommended to install the camera on a stationary surface.
The second increases shutter speed and allows you to take good photos even while moving, but the maximum effect is achieved in video mode. The user can simply enable/disable the option in the camera settings. No additional actions are expected. With rare exceptions, the type of stabilization is not reported.
White Balance Adjustment
This feature can adjust color by adding warm or cool tones. The smartphone camera is able to independently select the optimal balance depending on the lighting. However, with a sharp change in illumination, the automation does not have time to work out, and it has to be given some time to adapt.
The user can set the most suitable option from the modes offered in the settings:
- "Auto";
- "Daylight";
- "Sunny";
- "Cloudy";
- "Shadow";
- "Incandescent lamp";
- "Fluorescent"
The choice of options may vary on different smartphone models, but the meaning of the names is always clear. All you have to do is turn on the camera, go into the settings and select the mode that best suits the current light level. You can do it like this:
- Point the camera at a piece of paper and evaluate how white it looks on the screen.
- Find the optimal balance.
Before shooting, you need to pay attention to the location of the main light source. If it is behind the subject, the photo will turn out dark. The best option is when the light falls from behind the photographer.
Adjusting exposure
Exposure refers to the amount of light that hits the camera lens. The photo may become too light or dark if the option is not selected correctly.
An Android camera with shutter speed in automatic mode usually has a variable digital exposure parameter in the settings ranging from “-3” to “3” units. If you shoot a dark subject against a light background, the value is set to a negative value and vice versa.
Exposure in automatic shooting mode is also affected by the built-in exposure meter mode. As a rule, the function in the settings is called “Exposure Metering”. Typically there are three options to choose from:
- point;
- center-weighted;
- matrix
The first is good when photographing a bright object against a dark background or a dark object against a bright one. For example, if you are shooting against the sun. The second allows you to improve the quality of the front camera on Android when the brightness of the object and background differs slightly, or the object takes up most of the composition. The third is optimal in any situation.
Color settings
Unfortunately, there is no color adjustment on the phone camera. Color effects don't count. Essentially, these are filters that only smooth out errors and add stylization. There is also the possibility of very conditional adjustment of image quality.
The user has three options to choose from:
- the best;
- excellent;
- ordinary.
And that is all. That is, apart from adjusting white balance and exposure, there are no other tools for adjusting light and color. If the result is not satisfactory, the finished photograph will have to be adjusted in a graphics editor.
Snapseed will help make the image clearer and better quality
Free photo editor Snapseed quickly improves the quality of any photo. It has long been known and is actively used by both amateurs and professionals. The application developer is Google LLC, so the interface design is thoughtful and minimalist.
What useful features of Snapseed can be noted:
- In the application, you can carefully increase the sharpness and clarity of a photo.
- Exposure compensation is available. Brighten up your photo in a couple of touches.
- The Spot Adjustment Brush allows you to selectively apply the settings you want. As a result, the user has complete control over the editing process.
- You can create bright and clear images by adding the HDR effect.
The program also contains many customizable filters. How to use it:
- Open the application and upload the desired photo.
- Click on the edit button. It looks like a large white circle located in the lower right corner. Button to go to processing in Snapseed
- Choose the tool that best suits your purposes.
- If you scroll below, you will see a page with a list of available filters.
- Perform color correction if required. Adjust the exposure to brighten the image.
- Add some sharpness and structure to make your photo look more detailed.
- Add a vignette. This is called darkening or lightening the edges of the image. This will make the center of the composition appear sharper compared to the background. What does a vignette look like at 35 percent?
- Use spot processing tools to selectively adjust color grading.
- Save the result. With Snapseed you will be able to make your photo brighter, richer and more expressive.
You can additionally highlight an object in a photo by blurring the background and applying a filter with the HDR effect. Use this combination of functions when the background is in focus instead of the subject.
Snapseed's features will be familiar to professionals accustomed to Adobe Lightroom. You can download Snapseed for Android from Google Market. A similar application, Adobe Lightroom, is also available on the Google Play store website.
Is it possible to improve the quality of the photo?
What should people do who have purchased a low-quality smartphone? Can they improve the quality of their images on their own? The answer to the question will be positive, since any mobile device offers its owner a lot of opportunities to customize the frame and the photo itself. With the right level of dexterity, a person can set the parameter in such a way that even a weak camera will be able to take a colorful photo.
As a rule, all parameters must be set manually. This allows you to achieve the best results. The person himself selects the settings based on the surrounding conditions. During the day there will be some indicators, and in the evening - completely different.
Some smartphones independently select photo settings. They are usually positioned as models with artificial intelligence.
Thus, there are several ways to improve the quality of photos on your smartphone. We invite all readers to familiarize themselves with ten proven tips that work under almost any conditions.
Capture love in ultra-high-resolution selfies
White fluffy clouds roll across the blue sky, the wind blows through the trees and fresh green grass, and your dog can't help but help you in everything you do. Thanks for sharing your day and the selfie with that dog smile!
Every dog owner knows the happiness such moments can bring. You can now take ultra-high-resolution selfies with the Galaxy S10's 10MP dual UHD camera with autofocus. She creates emphatically realistic photos and helps convey the mood of the moment.
Bonus: TOP 5 best applications for photo processing
Of course, Google Play offers not only useful and proven programs, but also frankly crude utilities with a huge amount of advertising. How, then, to choose a good photo editing application? Just refer to our rating.
| Name | Description | Rating |
| Snapseed | It is no coincidence that this program is the most popular among users of Android devices. Snapseed is absolutely free and very easy to use, and the number of effects will satisfy the needs of any person. | ★★★★★ |
| Adobe Photoshop Fix | A convenient program from a well-known publisher that allows you to take advantage of all the benefits of Photoshop on Android. | ★★★★★ |
| PicsArt | A good app if you want to prepare photos for Instagram. All effects are aimed at eliminating appearance flaws. | ★★★★★ |
| VSCO | An advanced editor with which you can decorate not only a photo, but also a video. An ideal solution for those who create diverse content. | ★★★★★ |
| Photo editor InShot | An application aimed at active users of social networks. It is designed to make any selfie more beautiful, but during use a person will encounter watermarks. | ★★★★★ |
4.8/5 — (29 votes)
Author
Hermann
Expert in the field of digital technologies and the activities of mobile operators. I am engaged in constant monitoring of industry changes in Russia and abroad.
Capture stunning sunsets in the park
The purple-pink sky of late evening sunsets is awesome. But in low light it is quite difficult to get clear pictures.
The photo above, taken with the Galaxy S10's 12MP wide-angle camera, proves that the smartphone is capable of incredible low-light photography. With an F1.5 aperture and large 1.4µm pixels, the camera is able to capture more light. The result is that you and your furry friend will be captured in great detail while you catch the last rays of the sun.
The Galaxy S10 doesn't just shoot like a pro in low light at sunset. It also has a dedicated night mode for shooting at dusk. It is designed to create stunning photos in virtually no light.
Shoot videos while walking with Super Steady mode
Have you ever thought about how your dog sees the world? The next time you go for a walk in the park, you can capture it and capture the perspective that unfolds before your eyes with Galaxy S10's Super Steady video stabilization. It allows you to record video without jerking or camera shake.
Super Steady can be activated directly from the Video menu. Once enabled, this mode allows the Galaxy S10 to optimize your recording, whether you're riding a downhill bike ride or capturing a stunning corgi on a summer evening stroll. In any of the options, your actions will look smooth and at the same time perfectly detailed.
Apps that are an alternative to the camera
No matter how good it is, sometimes you want to upgrade the camera. There are a lot of reasons for this: a boring interface, buggy software, lack of functionality, or something else. Fortunately, the standard application can be expanded. On Google Play you can choose an option to suit any requirements.
Camera upgrade: HD Camera
The application does not support the Russian language, but is considered one of the best. Supported by devices running Android 4.0 and later. This camera has autofocus, but is amazing with the number of advanced settings. The main feature is a beautiful and user-friendly interface with three design themes: gold, pink, blue.
Shutter control and stabilization are implemented here, allowing you to take pictures without blocking the horizon and a built-in QR code scanner.
There is a paid version of HD Camera Pro.
DSLR Camera: great functionality with many settings
This is a manual focus camera for Android and one of the best apps of its kind. Compatible with gadgets running OS version 4.0 and higher. There is a paid version.
It differs from its analogues in its dual-mode shutter button, the ability to set the focus area anywhere, select ISO, a clear histogram, a convenient framing grid with three modes and focus tracking.
In addition, it is possible to use the volume keys instead of the shutter button. Thus, replacing a standard camera with this one will radically transform photography.
Tips for improving camera performance on Android
Now, more specifically about how to properly use the camera on an Android smartphone. There are many aspects, but we will highlight the main recommendations that will always allow you to get the best result.
- Use light correctly.
- Keep your lens clean.
- Focus your subjects.
- Avoid using zoom.
- Use flash on rare occasions.
It is recommended to use continuous shooting if possible. This way you can easily choose the most successful shot.
Using Light
As we have already noted, it is better for the light source to be located behind the photographer. If light enters the lens, it is very difficult to get a good photo.
Cameras are not very sensitive to light, so it needs a well-lit subject. The weaker the lighting, the more noise there is in the photo. Therefore, you need to make the most of the correct frame composition. In the dark, it is advisable to use a flash.
Clean lens
The objective lens should always be clean. Before shooting, you can wipe it with a dry soft cloth. This will help get rid of mechanical defects in the frame. Sand, dust, fingerprints and dirt stains will always be visible.
Correct focus
Most gadgets use only automatic focus, which does not work perfectly due to the small focal length. When there is not enough sharpness when capturing a subject, you should limit the movement of the smartphone as much as possible, accurately point the camera at the subject and give it time to capture.
But on some models you can find other modes:
- Infinity. Used for shooting distant objects and landscapes;
- Hyperfocal. Ideal for shooting through glass, in motion, as well as sports;
- Close-up. Suitable for photographing from a distance of up to half a meter.
These modes somewhat expand the user's capabilities, although they do not provide the freedom that is characteristic of a real camera.
Impact of zoom
Optical zoom on smartphone cameras is even more rare. This is a great success for a home-grown photographer, and you can use the option without restrictions. Digital zoom, which is found in every gadget, only spoils the image, sometimes distorting the proportions quite significantly.
If there is no optical one, it is better to get closer to the subject, otherwise you won’t get a good shot. As a last resort, the picture can be cropped in the editor - it will become visually closer. You can improve the camera on your Android phone at home by purchasing a head-mounted camera.
Should you use flash often?
Taking pictures at night without a flash is bad. If there is insufficient lighting, the photo will be difficult to distinguish. You shouldn’t get carried away with this matter, so it’s better to turn off the automatic mode. The fact is that there is enough illumination even at night, if we are not talking about absolute darkness.
A bright flash in this case can leave an unpleasant glare for half the frame. When in doubt about the need for use, it is recommended to take a couple of shots for comparison - with and without flash.